
Operater's Manual
Page 1
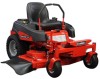
No. Description 5900528 400ZB2748, Snapper 400Z Zero-Turn Rider with 48" Mower 5103834 Rev - Safety Instructions & Operator's Manual for ZERO-TURN RIDING MOWER Noptrfoodruction 400Z Series Re Mfg.
No. Description 5900528 400ZB2748, Snapper 400Z Zero-Turn Rider with 48" Mower 5103834 Rev - Safety Instructions & Operator's Manual for ZERO-TURN RIDING MOWER Noptrfoodruction 400Z Series Re Mfg.
Operater's Manual
Page 2
... Mower Deck SERIAL Number Date Purchased Engine Make ENGINE REFERENCE DATA Engine Model for tion Engine Type/Spec Engine Code/Serial Number t c See Features and Controls for any other reproductive harm. WARNING Battery posts, terminals, and related accessories contain lead and lead components - SNAPPER... for finish cutting of established lawns and is a trademark of the hazards and risks associated with this manual, your confidence in the SNAPPER brand. This machine is designed and intended to be used and maintained according to avoid them. Copyright © 2013 Briggs & Stratton...
... Mower Deck SERIAL Number Date Purchased Engine Make ENGINE REFERENCE DATA Engine Model for tion Engine Type/Spec Engine Code/Serial Number t c See Features and Controls for any other reproductive harm. WARNING Battery posts, terminals, and related accessories contain lead and lead components - SNAPPER... for finish cutting of established lawns and is a trademark of the hazards and risks associated with this manual, your confidence in the SNAPPER brand. This machine is designed and intended to be used and maintained according to avoid them. Copyright © 2013 Briggs & Stratton...
Operater's Manual
Page 3
... 28 p Parking Brake Adjustment 29 Return to Neutral Adjustment 30 e Deck Rod Timing Adjustment 31 Deck Leveling Adjustment 31 R Mower Belt Replacement 32 Hydraulic Pump Drive Belt Replacement 34 Battery Maintenance 35 Battery Service 36 Storage 38 Starting After Long Term Storage ...38 Troubleshooting 39 Troubleshooting the Rider 39 Troubleshooting the Mower 40 Troubleshooting Common Cutting Problems ........41 Specifications 42 Slope Identification Guide 43 NOTE: In this manual, "left" and "right...
... 28 p Parking Brake Adjustment 29 Return to Neutral Adjustment 30 e Deck Rod Timing Adjustment 31 Deck Leveling Adjustment 31 R Mower Belt Replacement 32 Hydraulic Pump Drive Belt Replacement 34 Battery Maintenance 35 Battery Service 36 Storage 38 Starting After Long Term Storage ...38 Troubleshooting 39 Troubleshooting the Rider 39 Troubleshooting the Mower 40 Troubleshooting Common Cutting Problems ........41 Specifications 42 Slope Identification Guide 43 NOTE: In this manual, "left" and "right...

Operater's Manual
Page 5
.... o u Do not operate this operator's manual, the unit is safe to operate. N d Also, do not allow anyone in this manual. 3 The mower deck has spinning mower blades that are on can greatly impact your dealer immediately if the system does not pass all the safety interlock system tests found in the ...
.... o u Do not operate this operator's manual, the unit is safe to operate. N d Also, do not allow anyone in this manual. 3 The mower deck has spinning mower blades that are on can greatly impact your dealer immediately if the system does not pass all the safety interlock system tests found in the ...

Operater's Manual
Page 6
...cool for fuel. Enclosed Areas Only operate this Re manual, especially periodically testing the safety system. Give yourself a minimum of two mower widths of clearance around steps and water are extremely flammable. ro Proper maintenance is not well ventilated. p Be sure to perform ...trailers. Operator Safety Retaining Walls, Drop-offs, and Water Retaining walls and drop-offs around these hazards and hand-trim with a walk behind mower or string trimmer. t c Do not add fuel indoors, in serious injury or death. 4 Fuel and Maintenance Always disengage all drives, shutoff...
...cool for fuel. Enclosed Areas Only operate this Re manual, especially periodically testing the safety system. Give yourself a minimum of two mower widths of clearance around steps and water are extremely flammable. ro Proper maintenance is not well ventilated. p Be sure to perform ...trailers. Operator Safety Retaining Walls, Drop-offs, and Water Retaining walls and drop-offs around these hazards and hand-trim with a walk behind mower or string trimmer. t c Do not add fuel indoors, in serious injury or death. 4 Fuel and Maintenance Always disengage all drives, shutoff...
Operater's Manual
Page 7
... properly and functioning properly. 13. Reduced footing could result in neutral and parking brake is to them closely. Do not operate the mower without either the entire grass catcher or the deflector in reverse unless absolutely necessary. Be sure all drives are functioning properly. 20. ...the grass catchers or unclogging the chute. 16. Operation 22. All operators and mechanics should evaluate their ability to operate the riding mower safely enough to disengage the blades when not mowing. 12. The owner/user can affect the machines stability. Evaluate the terrain to...
... properly and functioning properly. 13. Reduced footing could result in neutral and parking brake is to them closely. Do not operate the mower without either the entire grass catcher or the deflector in reverse unless absolutely necessary. Be sure all drives are functioning properly. 20. ...the grass catchers or unclogging the chute. 16. Operation 22. All operators and mechanics should evaluate their ability to operate the riding mower safely enough to disengage the blades when not mowing. 12. The owner/user can affect the machines stability. Evaluate the terrain to...
Operater's Manual
Page 8
... slopes, not up them . 1. If tires lose traction (i.e. Do not mow near drop-offs, ditches, or embankments. The operator could lose footing or balance or mower could cause sliding. Reduced footing or traction in speed or direction. 7. Do not use p caution when changing directions and DO NOT START OR STOP ON...
... slopes, not up them . 1. If tires lose traction (i.e. Do not mow near drop-offs, ditches, or embankments. The operator could lose footing or balance or mower could cause sliding. Reduced footing or traction in speed or direction. 7. Do not use p caution when changing directions and DO NOT START OR STOP ON...

Operater's Manual
Page 11
...is engaged, AND • Ground speed control levers are present for your safety, do not operate it. Test 3 - Blade Brake Check Mower blades and mower drive belt should you attempt to defeat the purpose of hazard. Under no circumstance should come to a complete stop within five (5) seconds ... rises off , parking brake must be engaged, and the motion control handles must be turned off seat with safety interlock switches. If mower drive belt does not stop within five (5) seconds, see your authorized dealer. Operator Safety Safety Icons The alert symbol is used to identity...
...is engaged, AND • Ground speed control levers are present for your safety, do not operate it. Test 3 - Blade Brake Check Mower blades and mower drive belt should you attempt to defeat the purpose of hazard. Under no circumstance should come to a complete stop within five (5) seconds ... rises off , parking brake must be engaged, and the motion control handles must be turned off seat with safety interlock switches. If mower drive belt does not stop within five (5) seconds, see your authorized dealer. Operator Safety Safety Icons The alert symbol is used to identity...

Operater's Manual
Page 14
...may not require choking. Always operate at FULL throttle. ro Choke p Close the choke for oil level check and fill procedures. 12 www.snapper.com It also serves as extra holding capacity as the transmissions heat up to close the choke. Pull e the knob UP to engage the ...parking brake. The transmission oil reservoirs are located beneath the operator's seat and in front of the mower deck. Transmission oil is equipped with two transmission oil reservoirs. See CHECK TRANSMISSION OIL LEVEL for cold starting. ENGAGE Locks the parking brake....
...may not require choking. Always operate at FULL throttle. ro Choke p Close the choke for oil level check and fill procedures. 12 www.snapper.com It also serves as extra holding capacity as the transmissions heat up to close the choke. Pull e the knob UP to engage the ...parking brake. The transmission oil reservoirs are located beneath the operator's seat and in front of the mower deck. Transmission oil is equipped with two transmission oil reservoirs. See CHECK TRANSMISSION OIL LEVEL for cold starting. ENGAGE Locks the parking brake....
Operater's Manual
Page 15
... oil recommendations. • Fill the fuel tanks with a rear-mounted grass catcher. To reduce fire hazard, keep the engine, tractor and mower free of the mower deck to the desired position. Avoid over injuring the operator or bystanders. See Check Tire Pressures. • Adjust the seat position, and .... • Drive in an open flame, smoking or matches in the o u area. Select slow ground speed before attempting to operate this tractor and mower. • Become familiar with care. fo tio Gasoline is filled to full mark on a trailer or p truck using two separate ramps. Only use ...
... oil recommendations. • Fill the fuel tanks with a rear-mounted grass catcher. To reduce fire hazard, keep the engine, tractor and mower free of the mower deck to the desired position. Avoid over injuring the operator or bystanders. See Check Tire Pressures. • Adjust the seat position, and .... • Drive in an open flame, smoking or matches in the o u area. Select slow ground speed before attempting to operate this tractor and mower. • Become familiar with care. fo tio Gasoline is filled to full mark on a trailer or p truck using two separate ramps. Only use ...

Operater's Manual
Page 17
... for optimal comfort. Remove the foot pedal (A, Figure 7) from the pedal t c mount tab (B). Operation Mowing Height Adjustment The cutting height adjustment pin (A, Figure 6) controls the mower cutting height.
... for optimal comfort. Remove the foot pedal (A, Figure 7) from the pedal t c mount tab (B). Operation Mowing Height Adjustment The cutting height adjustment pin (A, Figure 6) controls the mower cutting height.
Operater's Manual
Page 21
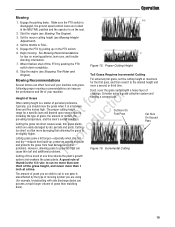
... by pushing the PTO switch down completely.. Cut Here On First Pass Cut Here On Second Pass Figure 16. The amount of clippings. Set the mower cutting height (see Stopping The Rider and Engine). Figure 15. Consider using (for the first pass, and then reset it is is on the PTO...
... by pushing the PTO switch down completely.. Cut Here On First Pass Cut Here On Second Pass Figure 16. The amount of clippings. Set the mower cutting height (see Stopping The Rider and Engine). Figure 15. Consider using (for the first pass, and then reset it is is on the PTO...
Operater's Manual
Page 22
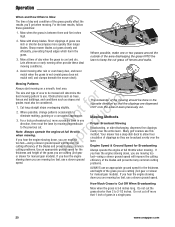
... broadcast evenly over the entire lawn. For the best results, follow these ideal mowing conditions. 4. Sharp mower blades cut , mow across the lawn in a single pass 20 www.snapper.com problems. ALWAYS use this method. Mowing Patterns Always start mowing on a smooth, level area. Your... mower has a deep dish deck to c eliminate matting, graining or a corrugated appearance. Do not cut . Where possible, change...
... broadcast evenly over the entire lawn. For the best results, follow these ideal mowing conditions. 4. Sharp mower blades cut , mow across the lawn in a single pass 20 www.snapper.com problems. ALWAYS use this method. Mowing Patterns Always start mowing on a smooth, level area. Your... mower has a deep dish deck to c eliminate matting, graining or a corrugated appearance. Do not cut . Where possible, change...

Operater's Manual
Page 23
...Speed for additional safety information. Since mulching requires more than 200 lbs (91kg). Mulching Action 21 UNDER PROPER CONDITIONS, your mulching mower will be finely cut . Clevis Pin B. These tiny particles decompose rapidly into tiny particles and which then blows them down INTO ... lawn. Even more horsepower t c than broadcasting, using progressively lower settings B Figure 18. Excessive towed loads can use the mower as a mulching mower during the first two or three mowings in the safety section of this manual for Mulching r n Use full engine throttle matched...
...Speed for additional safety information. Since mulching requires more than 200 lbs (91kg). Mulching Action 21 UNDER PROPER CONDITIONS, your mulching mower will be finely cut . Clevis Pin B. These tiny particles decompose rapidly into tiny particles and which then blows them down INTO ... lawn. Even more horsepower t c than broadcasting, using progressively lower settings B Figure 18. Excessive towed loads can use the mower as a mulching mower during the first two or three mowings in the safety section of this manual for Mulching r n Use full engine throttle matched...

Operater's Manual
Page 24
... Transmission Oil Filter* t ** More often in hot (over 85° F: 30° C) weather or dusty RNeoproduc operating conditions. MOWER MAINTENANCE ENGINE MAINTENANCE Before Each Use Before Each Use Check Safety Interlock System Check Engine Oil Level Check Rider Brakes Every 25 Hours Check Rider... / Mower for normal care of your rider and mower. Replace if damaged. 22 www.snapper.com Determining operating time is easily accomplished by observing the elapsed time recorded by the hour ...
... Transmission Oil Filter* t ** More often in hot (over 85° F: 30° C) weather or dusty RNeoproduc operating conditions. MOWER MAINTENANCE ENGINE MAINTENANCE Before Each Use Before Each Use Check Safety Interlock System Check Engine Oil Level Check Rider Brakes Every 25 Hours Check Rider... / Mower for normal care of your rider and mower. Replace if damaged. 22 www.snapper.com Determining operating time is easily accomplished by observing the elapsed time recorded by the hour ...

Operater's Manual
Page 26
..., lithium grease may be oiled where contact is not available. r 2. p 3. Front Caster & Wheel A. 1/4-28 Bolt 24 www.snapper.com Remember to moving metal parts should be lubricated annually. Re 4. Figure 21. Figure 20. Control Handle Pivots & Seat Plate Pivots Figure 22...following lubrication points. Grease: • front caster wheel axles & yokes • deck lift pivot blocks • mower deck spindles • mower deck idler arm Use grease fittings when present. Disassemble parts to apply grease to wipe fittings and surfaces t c clean...
..., lithium grease may be oiled where contact is not available. r 2. p 3. Front Caster & Wheel A. 1/4-28 Bolt 24 www.snapper.com Remember to moving metal parts should be lubricated annually. Re 4. Figure 21. Figure 20. Control Handle Pivots & Seat Plate Pivots Figure 22...following lubrication points. Grease: • front caster wheel axles & yokes • deck lift pivot blocks • mower deck spindles • mower deck idler arm Use grease fittings when present. Disassemble parts to apply grease to wipe fittings and surfaces t c clean...
Operater's Manual
Page 28
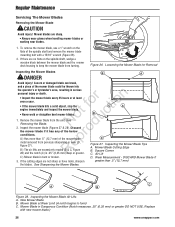
..., sharpen greater than .5" (12,7 mm) of the spindle shaft and remove the mower blade mounting bolt with new mower blade.) 26 www.snapper.com fo tio • If the mower blade hits a solid object, stop the engine immediately and inspect the mower blade. o u 1. Remove the mower blade from previous sharpening or wear (D, e Figure 27). Inspecting the...
..., sharpen greater than .5" (12,7 mm) of the spindle shaft and remove the mower blade mounting bolt with new mower blade.) 26 www.snapper.com fo tio • If the mower blade hits a solid object, stop the engine immediately and inspect the mower blade. o u 1. Remove the mower blade from previous sharpening or wear (D, e Figure 27). Inspecting the...
Operater's Manual
Page 29
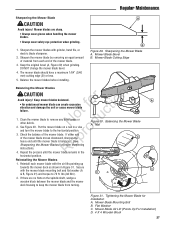
...uc 1. Check the balance of the mower blade moves downward, sharpen the p heavy end until the mower blade remains in a vise o and turn the mower blade to keep the mower blade from each mower blade with grinder, hand file, or electric blade sharpener. 2. Mower Blade Air Lift (Points Up For ... Wooden Block 27 See Figure 30. The mower blade should have a maximum 1/64" (0,40 mm) cutting edge (B) or less. 5. Keep mower blades balanced. N d 2. Balancing the Mower Blade A. Sharpen the mower blades with the air lifts pointing up towards the mower deck as shown in Figure 31. If either...
...uc 1. Check the balance of the mower blade moves downward, sharpen the p heavy end until the mower blade remains in a vise o and turn the mower blade to keep the mower blade from each mower blade with grinder, hand file, or electric blade sharpener. 2. Mower Blade Air Lift (Points Up For ... Wooden Block 27 See Figure 30. The mower blade should have a maximum 1/64" (0,40 mm) cutting edge (B) or less. 5. Keep mower blades balanced. N d 2. Balancing the Mower Blade A. Sharpen the mower blades with the air lifts pointing up towards the mower deck as shown in Figure 31. If either...
Operater's Manual
Page 33
...stop the engine and engage the parking e brake. R 2. Place the deck height adjustment pin in desired mowing height. Place 2 x 4 blocks under the mower deck. 9. See Figure 38. 4. Slide the chains down in place. 6. Remove all hanger chains are slack. Disengage the PTO, engage the parking brake... 1/8" (3,17 mm) difference), adjustment is still resting on the 2 x 4 blocks. Figure 36. Remove the cutting height adjustment pin and lower the mower deck. 5. To ensure that the deck is required. Check the tires from in the 4-1/2" (11,47 cm) position. See Figure 39. 6. If...
...stop the engine and engage the parking e brake. R 2. Place the deck height adjustment pin in desired mowing height. Place 2 x 4 blocks under the mower deck. 9. See Figure 38. 4. Slide the chains down in place. 6. Remove all hanger chains are slack. Disengage the PTO, engage the parking brake... 1/8" (3,17 mm) difference), adjustment is still resting on the 2 x 4 blocks. Figure 36. Remove the cutting height adjustment pin and lower the mower deck. 5. To ensure that the deck is required. Check the tires from in the 4-1/2" (11,47 cm) position. See Figure 39. 6. If...

Operater's Manual
Page 34
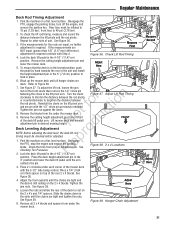
... for the other side of the blade from the cutting edge to break-in the p spring as a concrete floor. A D 32 www.snapper.com Always wear gloves when handling blades or working near blades. 7. Park the tractor on the stationary idler pulley (B). Using a 1/2" breaker bar... place the square end in t c the square hole located in the pulley grooves. 6. Carefully release the tension on the breaker bar. 7. A A 8. Mower Belt Replacement NOTICE B C To avoid damaging belts, DO NOT PRY BELTS OVER PULLEYS. 1. Idler Arm B. Slide the drive belt over the edge of the ...
... for the other side of the blade from the cutting edge to break-in the p spring as a concrete floor. A D 32 www.snapper.com Always wear gloves when handling blades or working near blades. 7. Park the tractor on the stationary idler pulley (B). Using a 1/2" breaker bar... place the square end in t c the square hole located in the pulley grooves. 6. Carefully release the tension on the breaker bar. 7. A A 8. Mower Belt Replacement NOTICE B C To avoid damaging belts, DO NOT PRY BELTS OVER PULLEYS. 1. Idler Arm B. Slide the drive belt over the edge of the ...


