
Operater's Manual
Page 1
Description 5900731 500ZB2648, Snapper 500Z Zero-Turn Rider with 48" Mower 5900532 500ZB2748, Snapper 500Z Zero-Turn Rider with 48" Mower 5101453 Rev J Safety Instructions & Operator's Manual for ZERO-TURN RIDING MOWER Noptrfoodruction 500Z Series Re Mfg. No.
Description 5900731 500ZB2648, Snapper 500Z Zero-Turn Rider with 48" Mower 5900532 500ZB2748, Snapper 500Z Zero-Turn Rider with 48" Mower 5101453 Rev J Safety Instructions & Operator's Manual for ZERO-TURN RIDING MOWER Noptrfoodruction 500Z Series Re Mfg. No.
Operater's Manual
Page 2
.... Thank you for purchasing this manual, your confidence in this quality-built SNAPPER product. Contact Information: Snapper Products 535 Macon St. We're pleased that you 've placed your SNAPPER product will provide many years of the hazards and risks associated with this equipment.... This manual contains safety information to cause cancer, birth defects, or other purpose. PRODUCT REFERENCE DATA Unit Model Number Unit SERIAL Number Mower Deck Model Number Dealer Name Mower ...
.... Thank you for purchasing this manual, your confidence in this quality-built SNAPPER product. Contact Information: Snapper Products 535 Macon St. We're pleased that you 've placed your SNAPPER product will provide many years of the hazards and risks associated with this equipment.... This manual contains safety information to cause cancer, birth defects, or other purpose. PRODUCT REFERENCE DATA Unit Model Number Unit SERIAL Number Mower Deck Model Number Dealer Name Mower ...

Operater's Manual
Page 3
... 28 p Parking Brake Adjustment 29 Return to Neutral Adjustment 30 e Deck Rod Timing Adjustment 31 Deck Leveling Adjustment 31 R Mower Belt Replacement 32 Hydraulic Pump Drive Belt Replacement 34 Battery Maintenance 35 Battery Service 36 Storage 38 Starting After Long Term Storage ...38 Troubleshooting 39 Troubleshooting the Rider 39 Troubleshooting the Mower 40 Troubleshooting Common Cutting Problems ........41 Specifications 42 Slope Identification Guide 43 NOTE: In this manual, "left" and "right...
... 28 p Parking Brake Adjustment 29 Return to Neutral Adjustment 30 e Deck Rod Timing Adjustment 31 Deck Leveling Adjustment 31 R Mower Belt Replacement 32 Hydraulic Pump Drive Belt Replacement 34 Battery Maintenance 35 Battery Service 36 Storage 38 Starting After Long Term Storage ...38 Troubleshooting 39 Troubleshooting the Rider 39 Troubleshooting the Mower 40 Troubleshooting Common Cutting Problems ........41 Specifications 42 Slope Identification Guide 43 NOTE: In this manual, "left" and "right...
Operater's Manual
Page 5
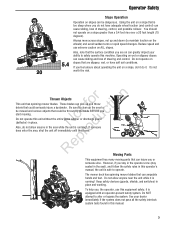
... rise over a 20 foot length (15 degrees). r n Thrown Objects fo tio This unit has spinning mower blades. Repr Moving Parts This equipment has many moving parts that can amputate hands and feet. The mower deck has spinning mower blades that can injure you or someone o does enter the area, shut the unit off...
... rise over a 20 foot length (15 degrees). r n Thrown Objects fo tio This unit has spinning mower blades. Repr Moving Parts This equipment has many moving parts that can amputate hands and feet. The mower deck has spinning mower blades that can injure you or someone o does enter the area, shut the unit off...
Operater's Manual
Page 6
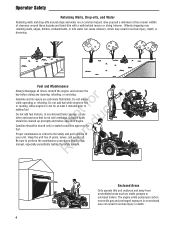
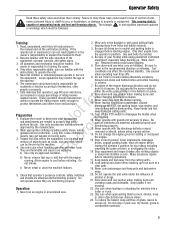
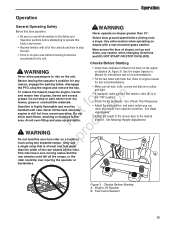
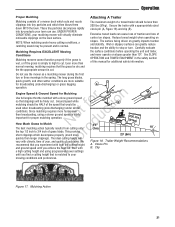
Operator Safety Retaining Walls, Drop-offs, and Water Retaining walls and drop-offs around these hazards and hand-trim with a walk behind mower or string trimmer. Wheels dropping over retaining walls, edges, ditches, embankments, or into water can result in serious injury or death. 4... approved for at least 3 minutes prior to the safety and performance of grass, leaves, and excess oil. Give yourself a minimum of two mower widths of clearance around steps and water are extremely flammable. Fuel and Maintenance Always disengage all drives, shutoff the engine, and remove the key...
Operator Safety Retaining Walls, Drop-offs, and Water Retaining walls and drop-offs around these hazards and hand-trim with a walk behind mower or string trimmer. Wheels dropping over retaining walls, edges, ditches, embankments, or into water can result in serious injury or death. 4... approved for at least 3 minutes prior to the safety and performance of grass, leaves, and excess oil. Give yourself a minimum of two mower widths of clearance around steps and water are extremely flammable. Fuel and Maintenance Always disengage all drives, shutoff the engine, and remove the key...
Operater's Manual
Page 7
... of a c) Never refuel or drain the machine indoors. All operators and mechanics should evaluate their ability to operate the riding mower safely enough to obey these safety rules and follow all interlocks are attached and functioning properly. Local regulations may get tangled in...care when handling gasoline and other people or property. 7. Long hair, loose clothing or r jewelry may restrict the age of riding mower- Evaluate the terrain to determine what accessories and attachments are involved in loss of control of amputating hands and feet and throwing objects....
... of a c) Never refuel or drain the machine indoors. All operators and mechanics should evaluate their ability to operate the riding mower safely enough to obey these safety rules and follow all interlocks are attached and functioning properly. Local regulations may get tangled in...care when handling gasoline and other people or property. 7. Long hair, loose clothing or r jewelry may restrict the age of riding mower- Evaluate the terrain to determine what accessories and attachments are involved in loss of control of amputating hands and feet and throwing objects....
Operater's Manual
Page 8
... the edge of slopes, not up and down, use or operate the engine in excess of exposure. The operator could lose footing or balance or mower could trees, or other reproductive harm. 2. Contact an 5. OSHA regulations may have to use p caution when changing directions and DO NOT START OR STOP ON...
... the edge of slopes, not up and down, use or operate the engine in excess of exposure. The operator could lose footing or balance or mower could trees, or other reproductive harm. 2. Contact an 5. OSHA regulations may have to use p caution when changing directions and DO NOT START OR STOP ON...
Operater's Manual
Page 11
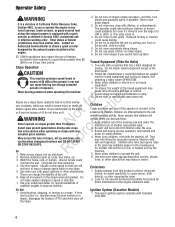
...SHOULD crank if: This indicates a hazard which , if not avoided, will result in the NEUTRAL position. Test 3 - Blade Brake Check Mower blades and mower drive belt should SHUT OFF if: • Operator rises off seat with PTO engaged, OR • Operator rises off seat with safety ...can result in serial injury or death. An explanation of hazard. Check their neutral positions before disengaging parking brake. CAUTION Test 2 - If mower drive belt does not stop within five (5) seconds, see your dealer. CAUTION or NOTICE r n These messages presented without the alert symbol ...
...SHOULD crank if: This indicates a hazard which , if not avoided, will result in the NEUTRAL position. Test 3 - Blade Brake Check Mower blades and mower drive belt should SHUT OFF if: • Operator rises off seat with PTO engaged, OR • Operator rises off seat with safety ...can result in serial injury or death. An explanation of hazard. Check their neutral positions before disengaging parking brake. CAUTION Test 2 - If mower drive belt does not stop within five (5) seconds, see your dealer. CAUTION or NOTICE r n These messages presented without the alert symbol ...
Operater's Manual
Page 14
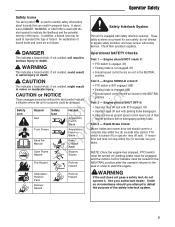
... The throttle controls engine speed. S/N: 2014509322 & Above: ro Choke p Close the choke for oil level check and fill procedures. 12 www.Snapper.com See CHECK TRANSMISSION OIL LEVEL for cold starting. Features & Controls Parking Brake DISENGAGE Releases the parking brake. Move the throttle forward to increase... The transmission oil reservoirs are located beneath the operator's seat and in front of the mower deck. PTO (Power Take Off) Switch The PTO switch engages and disengages the mower. Push to knob DOWN to disengage. Place the adjustment pin in the tank. r n...
... The throttle controls engine speed. S/N: 2014509322 & Above: ro Choke p Close the choke for oil level check and fill procedures. 12 www.Snapper.com See CHECK TRANSMISSION OIL LEVEL for cold starting. Features & Controls Parking Brake DISENGAGE Releases the parking brake. Move the throttle forward to increase... The transmission oil reservoirs are located beneath the operator's seat and in front of the mower deck. PTO (Power Take Off) Switch The PTO switch engages and disengages the mower. Push to knob DOWN to disengage. Place the adjustment pin in the tank. r n...
Operater's Manual
Page 15
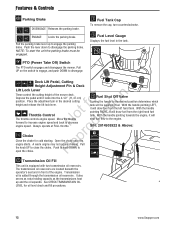
... Never allow open area without mowing to become accustomed to the unit. To reduce fire hazard, keep the engine, tractor and mower free of the mower deck to the desired position. Engine Oil Dipstick B. fo tio Gasoline is still hot from operator's position. See Mowing Height Adjustment.... Do not allow passengers to ride on slopes with all of this rider. Select slow ground speed before attempting to operate this tractor and mower. • Become familiar with a rear-mounted grass catcher. reason, engage the parking brake, disengage the PTO, stop the unit. •...
... Never allow open area without mowing to become accustomed to the unit. To reduce fire hazard, keep the engine, tractor and mower free of the mower deck to the desired position. Engine Oil Dipstick B. fo tio Gasoline is still hot from operator's position. See Mowing Height Adjustment.... Do not allow passengers to ride on slopes with all of this rider. Select slow ground speed before attempting to operate this tractor and mower. • Become familiar with a rear-mounted grass catcher. reason, engage the parking brake, disengage the PTO, stop the unit. •...
Operater's Manual
Page 17
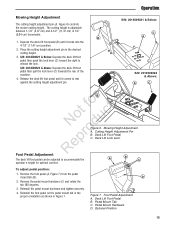
... on the pedal mount tab in the proper orientation as shown in Figure 7. Operation Mowing Height Adjustment The cutting height adjustment pin (A, Figure 6) controls the mower cutting height.
... on the pedal mount tab in the proper orientation as shown in Figure 7. Operation Mowing Height Adjustment The cutting height adjustment pin (A, Figure 6) controls the mower cutting height.
Operater's Manual
Page 21
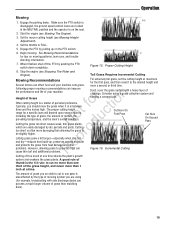
... then reset it to cut no more damaging than mulching does). 19 The amount of thumb is between three and five inches high. Set the mower cutting height (see Stopping The Rider and Engine). Stop the engine (see Mowing Height Adjustment). 4. Typically, you are easily damaged by the type of the...
... then reset it to cut no more damaging than mulching does). 19 The amount of thumb is between three and five inches high. Set the mower cutting height (see Stopping The Rider and Engine). Stop the engine (see Mowing Height Adjustment). 4. Typically, you are easily damaged by the type of the...
Operater's Manual
Page 22
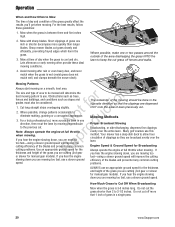
... d to the previous cut , mow across the lawn in the opposite direction so that 1 inch of grass in a single pass 20 www.Snapper.com Late afternoon or early evening often provide these guidelines: 1. Where possible, change patterns occasionally to Cut Off When Broadcasting Mow when the grass is... cool and dry. For a truly professional cut . Your mower has a deep dish deck to allow freer circulation of clippings so they are broadcast evenly over the entire lawn. If you hear the engine ...
... d to the previous cut , mow across the lawn in the opposite direction so that 1 inch of grass in a single pass 20 www.Snapper.com Late afternoon or early evening often provide these guidelines: 1. Where possible, change patterns occasionally to Cut Off When Broadcasting Mow when the grass is... cool and dry. For a truly professional cut . Your mower has a deep dish deck to allow freer circulation of clippings so they are broadcast evenly over the entire lawn. If you hear the engine ...
Operater's Manual
Page 23
...and using a slower ground speed is matched to your lawn can greatly reduce traction and the ability to cut . UNDER PROPER CONDITIONS, your mulching mower will p vary with climate, time of year, and quality of your lawn. The maximum weight of the speed that clippings will be used ...Ground speed while fo tio mulching should be HALF of a towed trailer should be present and is normal. Mulching Requires EXCELLENT Mowing Conditions Mulching mowers cannot function properly if the grass is wet, or if the grass is cut . The surface being driven on slopes greater than 200 lbs ...
...and using a slower ground speed is matched to your lawn can greatly reduce traction and the ability to cut . UNDER PROPER CONDITIONS, your mulching mower will p vary with climate, time of year, and quality of your lawn. The maximum weight of the speed that clippings will be used ...Ground speed while fo tio mulching should be HALF of a towed trailer should be present and is normal. Mulching Requires EXCELLENT Mowing Conditions Mulching mowers cannot function properly if the grass is wet, or if the grass is cut . The surface being driven on slopes greater than 200 lbs ...

Operater's Manual
Page 24
...Check / Clean Spark Arrester** Clean Deck & Check / Replace Mower Blades* Refer to keep a record of your operating time. You will need to Engine Owner...'s Operator's Manual Lubricate Rider & Mower* Service Air Filter Check Tire Pressure Change Oil & Filter Every 100 Hours Check Mower Blade Stopping Time r n Clean Battery & Cables Every 250... hot (over 85° F: 30° C) weather or dusty RNeoproduc operating conditions. MOWER MAINTENANCE ENGINE MAINTENANCE Before Each Use Before Each Use Check Safety Interlock System Check Engine Oil ...
...Check / Clean Spark Arrester** Clean Deck & Check / Replace Mower Blades* Refer to keep a record of your operating time. You will need to Engine Owner...'s Operator's Manual Lubricate Rider & Mower* Service Air Filter Check Tire Pressure Change Oil & Filter Every 100 Hours Check Mower Blade Stopping Time r n Clean Battery & Cables Every 250... hot (over 85° F: 30° C) weather or dusty RNeoproduc operating conditions. MOWER MAINTENANCE ENGINE MAINTENANCE Before Each Use Before Each Use Check Safety Interlock System Check Engine Oil ...
Operater's Manual
Page 26
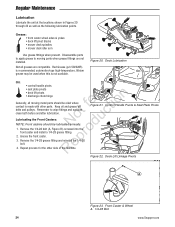
... are compatible. Keep oil and grease off belts and pulleys. N d 1. Grease: • front caster wheel axles & yokes • deck lift pivot blocks • mower deck spindles • mower deck idler arm Use grease fittings when present. Figure 20. r 2. Remove the 1/4-28 grease fitting and reinstall the 1/4-28 bolt. Deck Lubrication Oil: •... should be oiled where contact is not available. Repeat process for tion Generally, all greases are not installed. Front Caster & Wheel A. 1/4-28 Bolt 24 www.Snapper.com Grease the front caster.
... are compatible. Keep oil and grease off belts and pulleys. N d 1. Grease: • front caster wheel axles & yokes • deck lift pivot blocks • mower deck spindles • mower deck idler arm Use grease fittings when present. Figure 20. r 2. Remove the 1/4-28 grease fitting and reinstall the 1/4-28 bolt. Deck Lubrication Oil: •... should be oiled where contact is not available. Repeat process for tion Generally, all greases are not installed. Front Caster & Wheel A. 1/4-28 Bolt 24 www.Snapper.com Grease the front caster.
Operater's Manual
Page 28
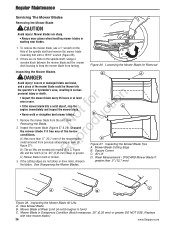
... 26). 2. If there are not sharp or have nicks, sharpen greater than .5" (12,7 mm) of the spindle shaft and remove the mower blade mounting bolt with new mower blade.) 26 www.Snapper.com Figure 26. A worn or damaged blade can break, and a piece of the below r conditions. Discard o the... mower blade if it has any of the mower blade could be thrown into the operator's or bystander's area, resulting in Dangerous Condition (...
... 26). 2. If there are not sharp or have nicks, sharpen greater than .5" (12,7 mm) of the spindle shaft and remove the mower blade mounting bolt with new mower blade.) 26 www.Snapper.com Figure 26. A worn or damaged blade can break, and a piece of the below r conditions. Discard o the... mower blade if it has any of the mower blade could be thrown into the operator's or bystander's area, resulting in Dangerous Condition (...
Operater's Manual
Page 29
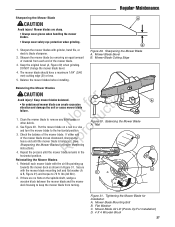
... mm) cutting edge (B) or less. 5. Balance the mower blades before installing. Mower Blade Bevel B. Reinstall each end of the mower blade moves downward, sharpen the p heavy end until the mower blade remains in the Figure 30. Figure 31. Balancing the Mower Blade A. Reinstalling the Mower Blades 1. Sharpen the mower blades with the air lifts pointing up towards...
... mm) cutting edge (B) or less. 5. Balance the mower blades before installing. Mower Blade Bevel B. Reinstall each end of the mower blade moves downward, sharpen the p heavy end until the mower blade remains in the Figure 30. Figure 31. Balancing the Mower Blade A. Reinstalling the Mower Blades 1. Sharpen the mower blades with the air lifts pointing up towards...
Operater's Manual
Page 33
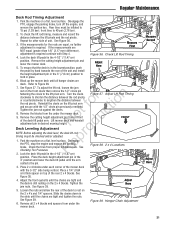
...difference), adjustment is required. Figure 36. t c 8. Remove the blocks from proper inflation levels. Tighten the jam nuts. Hanger Chain Adjustment mower deck. 31 Reinstall the clevis on a flat, level surface. Remove the cutting height adjustment pin from under each corner of unit. If ...measurements are equal, no further adjustment is required continue with the 3-1/2" side being vertical. If the measurements for other side of the mower deck with Step 4. Lock the deck lift pedal in the slots until the arm contacts the pin. 3. Adjust Lift Rod Timing ...
...difference), adjustment is required. Figure 36. t c 8. Remove the blocks from proper inflation levels. Tighten the jam nuts. Hanger Chain Adjustment mower deck. 31 Reinstall the clevis on a flat, level surface. Remove the cutting height adjustment pin from under each corner of unit. If ...measurements are equal, no further adjustment is required continue with the 3-1/2" side being vertical. If the measurements for other side of the mower deck with Step 4. Lock the deck lift pedal in the slots until the arm contacts the pin. 3. Adjust Lift Rod Timing ...
Operater's Manual
Page 34
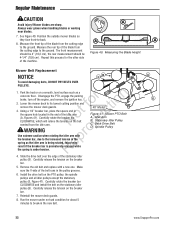
...under no-load condition for the other side of the blade from the cutting edge to the ground. Regular Maintenance CAUTION A Avoid injury! Mower blades are sharp. A A 8. Measure the front tip of the machine. Measure the rear tip of the stationary idler pulley (B). The... front measurement should be 4" (10,2 cm), the rear measurement should be Figure 40. Measuring the Blade Height 4-1/4" (10,8 cm). Mower Belt Replacement NOTICE B C To avoid damaging belts, DO NOT PRY BELTS OVER PULLEYS. 1. Disengage the PTO, engage the parking r n brake, turn...
...under no-load condition for the other side of the blade from the cutting edge to the ground. Regular Maintenance CAUTION A Avoid injury! Mower blades are sharp. A A 8. Measure the front tip of the machine. Measure the rear tip of the stationary idler pulley (B). The... front measurement should be 4" (10,2 cm), the rear measurement should be Figure 40. Measuring the Blade Height 4-1/4" (10,8 cm). Mower Belt Replacement NOTICE B C To avoid damaging belts, DO NOT PRY BELTS OVER PULLEYS. 1. Disengage the PTO, engage the parking r n brake, turn...


