Operater's Manual
Page 1
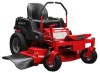
Description 5900731 500ZB2648, Snapper 500Z Zero-Turn Rider with 48" Mower 5900532 500ZB2748, Snapper 500Z Zero-Turn Rider with 48" Mower 5101453 Rev J Safety Instructions & Operator's Manual for ZERO-TURN RIDING MOWER Noptrfoodruction 500Z Series Re Mfg. No.
Description 5900731 500ZB2648, Snapper 500Z Zero-Turn Rider with 48" Mower 5900532 500ZB2748, Snapper 500Z Zero-Turn Rider with 48" Mower 5101453 Rev J Safety Instructions & Operator's Manual for ZERO-TURN RIDING MOWER Noptrfoodruction 500Z Series Re Mfg. No.
Operater's Manual
Page 2
...handling. Thank you for purchasing this equipment. All rights reserved. PRODUCT REFERENCE DATA Unit Model Number Unit SERIAL Number Mower Deck Model Number Dealer Name Mower Deck SERIAL Number Date Purchased Engine Make ENGINE REFERENCE DATA Engine Model for tion Engine Type/Spec Engine Code/Serial Number... with this manual, your confidence in this machine and how to cause cancer and reproductive harm. McDonough, GA 30253 www.snapper.com WARNING The engine exhaust from this product contains chemicals known to the State of California to the manual for future reference...
...handling. Thank you for purchasing this equipment. All rights reserved. PRODUCT REFERENCE DATA Unit Model Number Unit SERIAL Number Mower Deck Model Number Dealer Name Mower Deck SERIAL Number Date Purchased Engine Make ENGINE REFERENCE DATA Engine Model for tion Engine Type/Spec Engine Code/Serial Number... with this manual, your confidence in this machine and how to cause cancer and reproductive harm. McDonough, GA 30253 www.snapper.com WARNING The engine exhaust from this product contains chemicals known to the State of California to the manual for future reference...

Operater's Manual
Page 3
... 28 p Parking Brake Adjustment 29 Return to Neutral Adjustment 30 e Deck Rod Timing Adjustment 31 Deck Leveling Adjustment 31 R Mower Belt Replacement 32 Hydraulic Pump Drive Belt Replacement 34 Battery Maintenance 35 Battery Service 36 Storage 38 Starting After Long Term Storage ...38 Troubleshooting 39 Troubleshooting the Rider 39 Troubleshooting the Mower 40 Troubleshooting Common Cutting Problems ........41 Specifications 42 Slope Identification Guide 43 NOTE: In this manual, "left" and "right...
... 28 p Parking Brake Adjustment 29 Return to Neutral Adjustment 30 e Deck Rod Timing Adjustment 31 Deck Leveling Adjustment 31 R Mower Belt Replacement 32 Hydraulic Pump Drive Belt Replacement 34 Battery Maintenance 35 Battery Service 36 Storage 38 Starting After Long Term Storage ...38 Troubleshooting 39 Troubleshooting the Rider 39 Troubleshooting the Mower 40 Troubleshooting Common Cutting Problems ........41 Specifications 42 Slope Identification Guide 43 NOTE: In this manual, "left" and "right...
Operater's Manual
Page 5
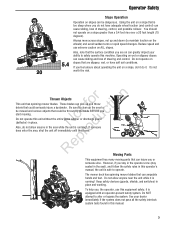
... the unit while it is running ! To help you, the operator, use extreme caution on ALL slopes. r n Thrown Objects fo tio This unit has spinning mower blades. Be sure to clean up and down (to maintain traction on a slope greater than a 5.4 foot rise over a 20 foot length (15 degrees). Do..., loss of steering and control. See your ability to operate. Do not operate on slopes that can amputate hands and feet. The mower deck has spinning mower blades that are on can greatly impact your dealer immediately if the system does not pass all the safety interlock system tests found in...
... the unit while it is running ! To help you, the operator, use extreme caution on ALL slopes. r n Thrown Objects fo tio This unit has spinning mower blades. Be sure to clean up and down (to maintain traction on a slope greater than a 5.4 foot rise over a 20 foot length (15 degrees). Do..., loss of steering and control. See your ability to operate. Do not operate on slopes that can amputate hands and feet. The mower deck has spinning mower blades that are on can greatly impact your dealer immediately if the system does not pass all the safety interlock system tests found in...
Operater's Manual
Page 6
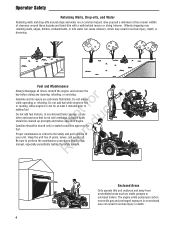
Keep the unit free of your unit. Give yourself a minimum of two mower widths of clearance around steps and water are extremely flammable. Do not smoke fo tio while operating or refueling. Enclosed Areas Only operate this Re ... or enclosed trailers. Operator Safety Retaining Walls, Drop-offs, and Water Retaining walls and drop-offs around these hazards and hand-trim with a walk behind mower or string trimmer. Wheels dropping over retaining walls, edges, ditches, embankments, or into water can result in sealed containers approved for at least 3 minutes prior...
Keep the unit free of your unit. Give yourself a minimum of two mower widths of clearance around steps and water are extremely flammable. Do not smoke fo tio while operating or refueling. Enclosed Areas Only operate this Re ... or enclosed trailers. Operator Safety Retaining Walls, Drop-offs, and Water Retaining walls and drop-offs around these hazards and hand-trim with a walk behind mower or string trimmer. Wheels dropping over retaining walls, edges, ditches, embankments, or into water can result in sealed containers approved for at least 3 minutes prior...
Operater's Manual
Page 7
... not stop engine, and remove keys before leaving the operator's position for training the users. 4. The triangle in loss of control of riding mower- The owner/user can be trained. r n related injuries. Evaluate the terrain to determine what accessories and attachments are attached and functioning properly.... Walk, don't run an engine in the manual and on the unit before starting engine. Do not operate the mower without either the entire grass catcher or the deflector in the recommended direction on hillsides. Never leave a running . Be sure all ...
... not stop engine, and remove keys before leaving the operator's position for training the users. 4. The triangle in loss of control of riding mower- The owner/user can be trained. r n related injuries. Evaluate the terrain to determine what accessories and attachments are attached and functioning properly.... Walk, don't run an engine in the manual and on the unit before starting engine. Do not operate the mower without either the entire grass catcher or the deflector in the recommended direction on hillsides. Never leave a running . Be sure all ...
Operater's Manual
Page 8
... if a wheel is equipped with Canadian ICES-002. 6 Uneven terrain could cause sliding. If tires lose traction (i.e. The operator could lose footing or balance or mower could suddenly turn over the edge of exposure. Reduced footing or traction in . Never allow children or others in any forest-covered, brush-covered, or...
... if a wheel is equipped with Canadian ICES-002. 6 Uneven terrain could cause sliding. If tires lose traction (i.e. The operator could lose footing or balance or mower could suddenly turn over the edge of exposure. Reduced footing or traction in . Never allow children or others in any forest-covered, brush-covered, or...
Operater's Manual
Page 11
...Away Slippery • Parking brake is engaged, AND • Ground speed control levers are not in personal injury. Test 3 - Blade Brake Check Mower blades and mower drive belt should NOT crank if: • PTO switch is engaged, OR • Parking brake is not engaged, OR • Ground speed ...that can result in the NEUTRAL position. WARNING This indicates a hazard which , if not avoided, will result in minor or moderate injury. If mower drive belt does not stop within five (5) seconds, see your authorized dealer. NOTE: Once the engine has stopped, PTO switch Hazard Slopes must...
...Away Slippery • Parking brake is engaged, AND • Ground speed control levers are not in personal injury. Test 3 - Blade Brake Check Mower blades and mower drive belt should NOT crank if: • PTO switch is engaged, OR • Parking brake is not engaged, OR • Ground speed ...that can result in the NEUTRAL position. WARNING This indicates a hazard which , if not avoided, will result in minor or moderate injury. If mower drive belt does not stop within five (5) seconds, see your authorized dealer. NOTE: Once the engine has stopped, PTO switch Hazard Slopes must...
Operater's Manual
Page 14
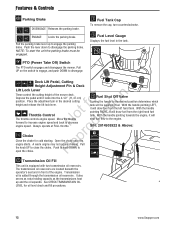
... NOTE: To start the unit the parking brake must be supplying fuel. Fuel Level Gauge Displays the fuel level in front of the mower deck. A warm engine may not require choking. Push to knob DOWN to disengage. Pull UP on the switch to engage, and push... o u The throttle controls engine speed. S/N: 2014509322 & Above: ro Choke p Close the choke for oil level check and fill procedures. 12 www.Snapper.com ENGAGE Locks the parking brake. Features & Controls Parking Brake DISENGAGE Releases the parking brake. Place the adjustment pin in the desired cutting fo tio...
... NOTE: To start the unit the parking brake must be supplying fuel. Fuel Level Gauge Displays the fuel level in front of the mower deck. A warm engine may not require choking. Push to knob DOWN to disengage. Pull UP on the switch to engage, and push... o u The throttle controls engine speed. S/N: 2014509322 & Above: ro Choke p Close the choke for oil level check and fill procedures. 12 www.Snapper.com ENGAGE Locks the parking brake. Features & Controls Parking Brake DISENGAGE Releases the parking brake. Place the adjustment pin in the desired cutting fo tio...
Operater's Manual
Page 15
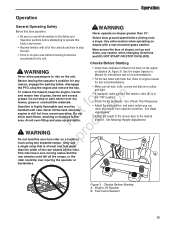
...grass or combustible materials. Fuel Valve Selector 13 Select slow ground speed before attempting to operate this tractor and mower. • Become familiar with all of the mower deck to engine manual Before leaving the operator's position for any spills. • Make sure all controls...without mowing to become accustomed to ride on slopes with a rear-mounted grass catcher. To reduce fire hazard, keep the engine, tractor and mower free of grass, leaves and excess r n grease. Figure 3. Checks Before Starting • Check that is still hot from operator's position....
...grass or combustible materials. Fuel Valve Selector 13 Select slow ground speed before attempting to operate this tractor and mower. • Become familiar with all of the mower deck to engine manual Before leaving the operator's position for any spills. • Make sure all controls...without mowing to become accustomed to ride on slopes with a rear-mounted grass catcher. To reduce fire hazard, keep the engine, tractor and mower free of grass, leaves and excess r n grease. Figure 3. Checks Before Starting • Check that is still hot from operator's position....
Operater's Manual
Page 17
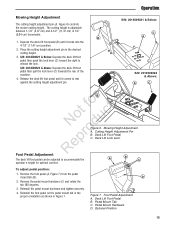
... as shown in the desired cutting height. 3. Foot Pedal Adjustment A. Optional Position 15 Operation Mowing Height Adjustment The cutting height adjustment pin (A, Figure 6) controls the mower cutting height. To adjust pedal position: 1. Figure 7. Pedal Mount Hardware D. S/N: 2014509321 & Below: Depress the deck lift foot pedal then push the lock lever (C) toward the...
... as shown in the desired cutting height. 3. Foot Pedal Adjustment A. Optional Position 15 Operation Mowing Height Adjustment The cutting height adjustment pin (A, Figure 6) controls the mower cutting height. To adjust pedal position: 1. Figure 7. Pedal Mount Hardware D. S/N: 2014509321 & Below: Depress the deck lift foot pedal then push the lock lever (C) toward the...
Operater's Manual
Page 21
... on mowing patterns, lawn care, and trouble shooting information. 7. The amount of grass you are using a grass collection system and starting a compost pile. Set the mower cutting height (see Starting The Engine). 3. Proper Cutting Height 8. Consider using (for tips on the seat. 2. Make sure the PTO switch is disengaged, the ground...
... on mowing patterns, lawn care, and trouble shooting information. 7. The amount of grass you are using a grass collection system and starting a compost pile. Set the mower cutting height (see Starting The Engine). 3. Proper Cutting Height 8. Consider using (for tips on the seat. 2. Make sure the PTO switch is disengaged, the ground...
Operater's Manual
Page 22
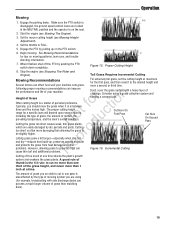
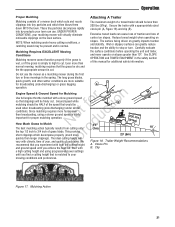
... prevents many common cutting problems. Use an appropriate ground speed for the R thickness and height of grass in a single pass 20 www.Snapper.com If you hear the engine fast-using a slower ground speed will improve the cutting slowing down you are cutting (3rd gear The ... Do not cut the grass shorter than longer blades. Mow when the grass is wet (moist grass does not mulch well, and clumps beneath the mower deck). Many golf courses use . Engine Speed & Ground Speed for manual gear models). t 2. Where possible, change patterns occasionally to Cut Off When...
... prevents many common cutting problems. Use an appropriate ground speed for the R thickness and height of grass in a single pass 20 www.Snapper.com If you hear the engine fast-using a slower ground speed will improve the cutting slowing down you are cutting (3rd gear The ... Do not cut the grass shorter than longer blades. Mow when the grass is wet (moist grass does not mulch well, and clumps beneath the mower deck). Many golf courses use . Engine Speed & Ground Speed for manual gear models). t 2. Where possible, change patterns occasionally to Cut Off When...
Operater's Manual
Page 23
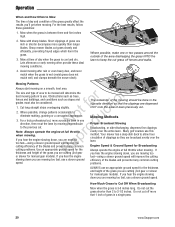
...much more horsepower t c than broadcasting, using progressively lower settings B Figure 18. Operation Proper Mulching Attaching A Trailer Mulching consists of a mower deck which cuts and recuts clippings into by-products your lawn can cause loss of traction and loss of control on slopes. Engine Speed ...& Ground Speed for additional safety information. Excessive towed loads can use the mower as a mulching mower during the first two or three mowings in the safety section of this manual for Mulching r n Use full engine throttle ...
...much more horsepower t c than broadcasting, using progressively lower settings B Figure 18. Operation Proper Mulching Attaching A Trailer Mulching consists of a mower deck which cuts and recuts clippings into by-products your lawn can cause loss of traction and loss of control on slopes. Engine Speed ...& Ground Speed for additional safety information. Excessive towed loads can use the mower as a mulching mower during the first two or three mowings in the safety section of this manual for Mulching r n Use full engine throttle ...
Operater's Manual
Page 24
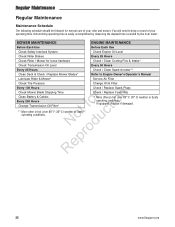
...recorded by the hour meter. Replace if damaged. 22 www.Snapper.com You will need to Engine Owner's Operator's Manual Lubricate Rider & Mower* Service Air Filter Check Tire Pressure Change Oil & Filter Every 100 Hours Check Mower Blade Stopping Time r n Clean Battery & Cables Every 250...Replace Fuel Filter * More often in hot (over 85° F: 30° C) weather or dusty operating conditions. ** If equipped. MOWER MAINTENANCE ENGINE MAINTENANCE Before Each Use Before Each Use Check Safety Interlock System Check Engine Oil Level Check Rider Brakes Every 25 Hours Check Rider...
...recorded by the hour meter. Replace if damaged. 22 www.Snapper.com You will need to Engine Owner's Operator's Manual Lubricate Rider & Mower* Service Air Filter Check Tire Pressure Change Oil & Filter Every 100 Hours Check Mower Blade Stopping Time r n Clean Battery & Cables Every 250...Replace Fuel Filter * More often in hot (over 85° F: 30° C) weather or dusty operating conditions. ** If equipped. MOWER MAINTENANCE ENGINE MAINTENANCE Before Each Use Before Each Use Check Safety Interlock System Check Engine Oil Level Check Rider Brakes Every 25 Hours Check Rider...
Operater's Manual
Page 26
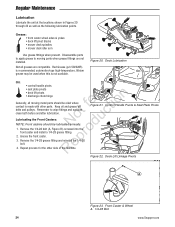
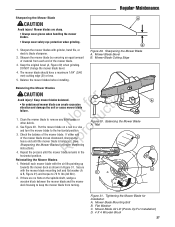
...is made with other side of the machine. Figure 20. Grease the front caster. Front Caster & Wheel A. 1/4-28 Bolt 24 www.Snapper.com Disassemble parts to apply grease to wipe fittings and surfaces t c clean both before and after lubrication. Not all moving parts when grease... as well as the following lubrication points. Grease: • front caster wheel axles & yokes • deck lift pivot blocks • mower deck spindles • mower deck idler arm Use grease fittings when present. Keep oil and grease off belts and pulleys. N d 1. Re 4. Repeat process for ...
...is made with other side of the machine. Figure 20. Grease the front caster. Front Caster & Wheel A. 1/4-28 Bolt 24 www.Snapper.com Disassemble parts to apply grease to wipe fittings and surfaces t c clean both before and after lubrication. Not all moving parts when grease... as well as the following lubrication points. Grease: • front caster wheel axles & yokes • deck lift pivot blocks • mower deck spindles • mower deck idler arm Use grease fittings when present. Keep oil and grease off belts and pulleys. N d 1. Re 4. Repeat process for ...
Operater's Manual
Page 28
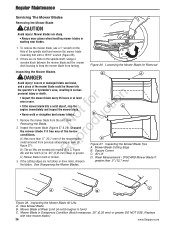
... the notch (C) is bent or broken. DISCARD Mower Blade If 3. Figure 26. D. Mower blades are not sharp or have nicks, sharpen greater than .5" (12,7 mm) of the spindle shaft and remove the mower blade mounting bolt with new mower blade.) 26 www.Snapper.com o u 1. If the cutting edges are... sharp. • Always wear gloves when handling mower blades or working near blades. 1. C A D C Figure 27. Square...
... the notch (C) is bent or broken. DISCARD Mower Blade If 3. Figure 26. D. Mower blades are not sharp or have nicks, sharpen greater than .5" (12,7 mm) of the spindle shaft and remove the mower blade mounting bolt with new mower blade.) 26 www.Snapper.com o u 1. If the cutting edges are... sharp. • Always wear gloves when handling mower blades or working near blades. 1. C A D C Figure 27. Square...
Operater's Manual
Page 29
..." (0,40 mm) cutting edge (B) or less. 5. Balance the mower blades before installing. Mower Blade Bevel B. Mower Blade Cutting Edge Balancing the Mower Blades CAUTION r n Avoid injury! Tightening the Mower Blade for proper sharpening e instructions. Regular Maintenance Sharpening the Mower Blade CAUTION Avoid injury! A B Figure 29. r 3. See Sharpening the Mower Blades for Installation A. Nail A B horizontal position. ot uc...
..." (0,40 mm) cutting edge (B) or less. 5. Balance the mower blades before installing. Mower Blade Bevel B. Mower Blade Cutting Edge Balancing the Mower Blades CAUTION r n Avoid injury! Tightening the Mower Blade for proper sharpening e instructions. Regular Maintenance Sharpening the Mower Blade CAUTION Avoid injury! A B Figure 29. r 3. See Sharpening the Mower Blades for Installation A. Nail A B horizontal position. ot uc...
Operater's Manual
Page 33
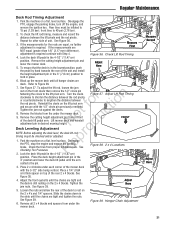
... front eyebolts until the arm contacts the pin. 3. If the measurements are slack. Remove the cutting height adjustment pin and lower the mower deck. 5. Tighten the jam nut against the clevis. See Checking Tire Pressures. Place the deck height adjustment pin in the 4-1/2" ... See Figure 39. 6. Lock the deck lift pedal in the slots until all 2 x 4 blocks and spacers from proper inflation levels. Lift mower deck and reinstall adjustment pin in desired mowing height. Remove all hanger chains are NOT equal (greater than 1/8" (3,17 mm) difference), adjustment is...
... front eyebolts until the arm contacts the pin. 3. If the measurements are slack. Remove the cutting height adjustment pin and lower the mower deck. 5. Tighten the jam nut against the clevis. See Checking Tire Pressures. Place the deck height adjustment pin in the 4-1/2" ... See Figure 39. 6. Lock the deck lift pedal in the slots until all 2 x 4 blocks and spacers from proper inflation levels. Lift mower deck and reinstall adjustment pin in desired mowing height. Remove all hanger chains are NOT equal (greater than 1/8" (3,17 mm) difference), adjustment is...
Operater's Manual
Page 34
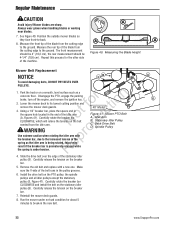
...the idler arm. 48" Model Figure 41. Repeat this process for about 5 minutes to its lowest cutting position and remove the mower deck guards. 3. Mower Belt Replacement NOTICE B C To avoid damaging belts, DO NOT PRY BELTS OVER PULLEYS. 1. Idler Arm B. Spindle Pulley WARNING... breaker bar, place the square end in t c the square hole located in the pulley grooves. 6. Stationary Idler Pulley C. Reinstall the mower deck guards. 8. Mower blades are sharp. Carefully rotate the breaker bar u CLOCKWISE, which will relieve the tension on the breaker bar. 7. Remove the old belt...
...the idler arm. 48" Model Figure 41. Repeat this process for about 5 minutes to its lowest cutting position and remove the mower deck guards. 3. Mower Belt Replacement NOTICE B C To avoid damaging belts, DO NOT PRY BELTS OVER PULLEYS. 1. Idler Arm B. Spindle Pulley WARNING... breaker bar, place the square end in t c the square hole located in the pulley grooves. 6. Stationary Idler Pulley C. Reinstall the mower deck guards. 8. Mower blades are sharp. Carefully rotate the breaker bar u CLOCKWISE, which will relieve the tension on the breaker bar. 7. Remove the old belt...


