

Operater's Manual
Page 3
.../Adding Fuel 23 Fuel Filter 23 t Oil & Filter Change 23 c Lubrication 24 o u Check Transmission Oil Level 25 Transmission Oil Filter Change 25 N d Servicing the Mower Blades 26 Ground Speed Control Lever Adjustment 28 o Speed Balancing Adjustment 28 r Neutral Adjustment 28 p Parking Brake Adjustment 29 Return to Neutral Adjustment 30 e Deck Rod...
.../Adding Fuel 23 Fuel Filter 23 t Oil & Filter Change 23 c Lubrication 24 o u Check Transmission Oil Level 25 Transmission Oil Filter Change 25 N d Servicing the Mower Blades 26 Ground Speed Control Lever Adjustment 28 o Speed Balancing Adjustment 28 r Neutral Adjustment 28 p Parking Brake Adjustment 29 Return to Neutral Adjustment 30 e Deck Rod...
Operater's Manual
Page 5
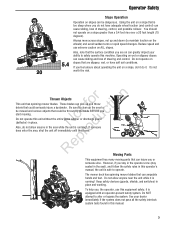
...to clean up and throw debris that could seriously injure a bystander. However, if you t c start mowing. The mower deck has spinning mower blades that can amputate hands and feet. To help you or someone o does enter the area, shut the unit off immediately until they leave. Repr...not allow anyone in this equipment safely, it is running ! Do not operate on slopes that is equipped with an operator-present safety system. These blades can cause sliding, loss of steering and control. N d Also, do it. Keep safety devices (guards, shields, and switches) in place. Do...
...to clean up and throw debris that could seriously injure a bystander. However, if you t c start mowing. The mower deck has spinning mower blades that can amputate hands and feet. To help you or someone o does enter the area, shut the unit off immediately until they leave. Repr...not allow anyone in this equipment safely, it is running ! Do not operate on slopes that is equipped with an operator-present safety system. These blades can cause sliding, loss of steering and control. N d Also, do it. Keep safety devices (guards, shields, and switches) in place. Do...
Operater's Manual
Page 7
...light, 1. Allow engine to operate the unit. 5. Do not operate unless they are attached, adjusted properly and functioning properly. 13. Stop blades if not mowing. Operator Safety Read these rules could cause slipping. 5. Read, understand, and follow them . 2. Only start engine from ... injury. The owner/user can affect the machines stability. Make necessary repairs b) Never remove fuel cap or add fuel with the blades running unit unattended. Be sure all interlocks are functioning properly. 20. Always look down and use extra care on slopes. 9. ...
...light, 1. Allow engine to operate the unit. 5. Do not operate unless they are attached, adjusted properly and functioning properly. 13. Stop blades if not mowing. Operator Safety Read these rules could cause slipping. 5. Read, understand, and follow them . 2. Only start engine from ... injury. The owner/user can affect the machines stability. Make necessary repairs b) Never remove fuel cap or add fuel with the blades running unit unattended. Be sure all interlocks are functioning properly. 20. Always look down and use extra care on slopes. 9. ...
Operater's Manual
Page 8
...the CAUTION hitch point. 2. Be alert and turn unit off the slope. Use slow speed. These can change speed while on a slope), disengage the blade(s) (PTO) and drive slow off if children enter the area. 3. Never mow It is not alert to the presence of California Public Resource Code, ... greater than 15 degrees. Never allow children to the unit and the mowing activity. periods of a unless the exhaust system is equipped with the blade(s) off and be run over or backed over by putting your authorized dealer for an 8 hour time period. Use extra care when approaching blind...
...the CAUTION hitch point. 2. Be alert and turn unit off the slope. Use slow speed. These can change speed while on a slope), disengage the blade(s) (PTO) and drive slow off if children enter the area. 3. Never mow It is not alert to the presence of California Public Resource Code, ... greater than 15 degrees. Never allow children to the unit and the mowing activity. periods of a unless the exhaust system is equipped with the blade(s) off and be run over or backed over by putting your authorized dealer for an 8 hour time period. Use extra care when approaching blind...
Operater's Manual
Page 9
...hot coolant or steam blow-out, never attempt to service. Disconnect battery or remove spark plug wire before filling. 7. Only replace blades. Wear protective clothes and use extreme care when removing the cap. Frequently check components and replace with stored energy. 15. Use only... o 1. Always follow the engine manual instructions for leaks. Replace all fuel tank caps and fuel container caps securely. Use care when checking blades. Keep hands and feet away from cutting units, drives, mufflers, and engine to make adjustments with the engine running . Adjust and service ...
...hot coolant or steam blow-out, never attempt to service. Disconnect battery or remove spark plug wire before filling. 7. Only replace blades. Wear protective clothes and use extreme care when removing the cap. Frequently check components and replace with stored energy. 15. Use only... o 1. Always follow the engine manual instructions for leaks. Replace all fuel tank caps and fuel container caps securely. Use care when checking blades. Keep hands and feet away from cutting units, drives, mufflers, and engine to make adjustments with the engine running . Adjust and service ...
Operater's Manual
Page 11
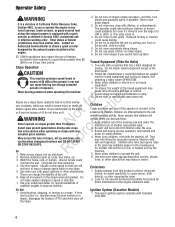
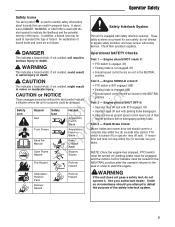
...CAUTION Test 2 - Safety RNeopt roduc Icon Hazard Alert Safety Icon Toxic Fumes Read the Manual Open Flame Hazard Amputation: Foot in Blade Amputation: Hand in Blade Keep Children Away Slippery • Parking brake is engaged, AND • Ground speed control levers are not in minor or ...moderate injury. WARNING This indicates a hazard which, if not avoided, could be damaged. Operational SAFETY Checks Test 1 - Blade Brake Check Mower blades and mower drive belt should NOT crank if: • PTO switch is engaged, OR • Parking brake is not engaged, OR ...
...CAUTION Test 2 - Safety RNeopt roduc Icon Hazard Alert Safety Icon Toxic Fumes Read the Manual Open Flame Hazard Amputation: Foot in Blade Amputation: Hand in Blade Keep Children Away Slippery • Parking brake is engaged, AND • Ground speed control levers are not in minor or ...moderate injury. WARNING This indicates a hazard which, if not avoided, could be damaged. Operational SAFETY Checks Test 1 - Blade Brake Check Mower blades and mower drive belt should NOT crank if: • PTO switch is engaged, OR • Parking brake is not engaged, OR ...
Operater's Manual
Page 22
... the cut . Mow at full throttle when mowing. Late afternoon or early evening often provide these guidelines: 1. o u 3. Mow with sharp blades. Mowing Patterns Always start mowing on a smooth, level area. Cut long straight strips overlapping slightly. If you hear the engine fast-using a ...the grass you are mowing too fast, use a slower ground speed. Sharp mower blades cut . Where possible, make one inch or shorter decompose more that 1 inch of grass in a single pass 20 www.Snapper.com Obstructions such as trees, r n fences and buildings, and conditions such ...
... the cut . Mow at full throttle when mowing. Late afternoon or early evening often provide these guidelines: 1. o u 3. Mow with sharp blades. Mowing Patterns Always start mowing on a smooth, level area. Cut long straight strips overlapping slightly. If you hear the engine fast-using a ...the grass you are mowing too fast, use a slower ground speed. Sharp mower blades cut . Where possible, make one inch or shorter decompose more that 1 inch of grass in a single pass 20 www.Snapper.com Obstructions such as trees, r n fences and buildings, and conditions such ...
Operater's Manual
Page 23
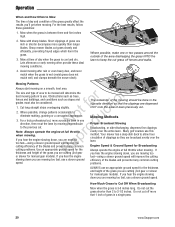
... on slopes greater than 10°. Engine Speed & Ground Speed for proper mulching operation. We recommend that clippings will be finely cut . The long grass blades, quick growth, and often wetter conditions are more suitable for additional safety information. Clevis Pin B. Clip until you find a cutting height that would be present... . UNDER PROPER CONDITIONS, your lawn can use the mower as a mulching mower during the first two or three mowings in the safety section of grass blade. This provides r short clippings which then blows them down INTO the lawn.
... on slopes greater than 10°. Engine Speed & Ground Speed for proper mulching operation. We recommend that clippings will be finely cut . The long grass blades, quick growth, and often wetter conditions are more suitable for additional safety information. Clevis Pin B. Clip until you find a cutting height that would be present... . UNDER PROPER CONDITIONS, your lawn can use the mower as a mulching mower during the first two or three mowings in the safety section of grass blade. This provides r short clippings which then blows them down INTO the lawn.
Operater's Manual
Page 24
... Every 25 Hours Check / Clean Spark Arrester** Clean Deck & Check / Replace Mower Blades* Refer to keep a record of your operating time. Replace if damaged. 22 www.Snapper.com MOWER MAINTENANCE ENGINE MAINTENANCE Before Each Use Before Each Use Check Safety Interlock System Check...will need to Engine Owner's Operator's Manual Lubricate Rider & Mower* Service Air Filter Check Tire Pressure Change Oil & Filter Every 100 Hours Check Mower Blade Stopping Time r n Clean Battery & Cables Every 250 Hours fo tio Change Transmission Oil Filter* t ** More often in hot (over 85°...
... Every 25 Hours Check / Clean Spark Arrester** Clean Deck & Check / Replace Mower Blades* Refer to keep a record of your operating time. Replace if damaged. 22 www.Snapper.com MOWER MAINTENANCE ENGINE MAINTENANCE Before Each Use Before Each Use Check Safety Interlock System Check...will need to Engine Owner's Operator's Manual Lubricate Rider & Mower* Service Air Filter Check Tire Pressure Change Oil & Filter Every 100 Hours Check Mower Blade Stopping Time r n Clean Battery & Cables Every 250 Hours fo tio Change Transmission Oil Filter* t ** More often in hot (over 85°...
Operater's Manual
Page 28
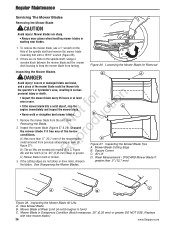
... sharp. • Always wear gloves when handling mower blades or working near blades. 1. A worn or damaged blade can break, and a piece of the spindle shaft and remove the mower blade mounting bolt with new mower blade.) 26 www.Snapper.com See Removing the Blade. N d 2. DISCARD Mower Blade If 3. C A B Figure 28. New Mower Blade B. fo tio • If the mower...
... sharp. • Always wear gloves when handling mower blades or working near blades. 1. A worn or damaged blade can break, and a piece of the spindle shaft and remove the mower blade mounting bolt with new mower blade.) 26 www.Snapper.com See Removing the Blade. N d 2. DISCARD Mower Blade If 3. C A B Figure 28. New Mower Blade B. fo tio • If the mower...
Operater's Manual
Page 29
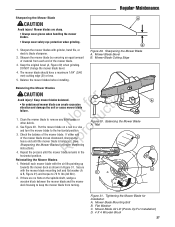
.... See Figure 30. If either end of material from turning. Balancing the Mower Blade A. Nail A B horizontal position. Figure 31. Mower blades are no flats on a nail in a vise o and turn the mower blade to keep the mower blade from each mower blade with the air lifts pointing up towards the mower deck as shown in...
.... See Figure 30. If either end of material from turning. Balancing the Mower Blade A. Nail A B horizontal position. Figure 31. Mower blades are no flats on a nail in a vise o and turn the mower blade to keep the mower blade from each mower blade with the air lifts pointing up towards the mower deck as shown in...
Operater's Manual
Page 34
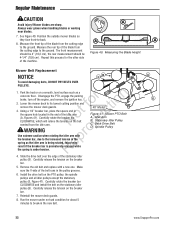
... tension on the breaker bar. 5. Stationary Idler Pulley C. Install the drive belt on the stationary idler pulley (B). Position the outside mower blades so they face front-to its lowest cutting position and remove the mower deck guards. 3. The front measurement should be 4" (10,2 ... 41. Make sure the V-side of the stationary idler pulley (B). Regular Maintenance CAUTION A Avoid injury! Always wear gloves when handling blades or working near blades. 7. Idler Arm B. Spindle Pulley WARNING ro Use extreme caution when rotating the idler arm with a new one. Slide the drive...
... tension on the breaker bar. 5. Stationary Idler Pulley C. Install the drive belt on the stationary idler pulley (B). Position the outside mower blades so they face front-to its lowest cutting position and remove the mower deck guards. 3. The front measurement should be 4" (10,2 ... 41. Make sure the V-side of the stationary idler pulley (B). Regular Maintenance CAUTION A Avoid injury! Always wear gloves when handling blades or working near blades. 7. Idler Arm B. Spindle Pulley WARNING ro Use extreme caution when rotating the idler arm with a new one. Slide the drive...
Operater's Manual
Page 42
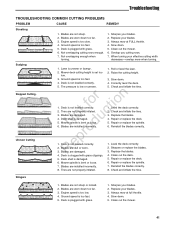
...is broken. 3. See Brake Adjustment. 2. Mower drive belt slips or fails to full throttle. 2. fo tio Cutting height set too low. c Blade mounting bolts are bent. Reinstall Correctly. 1. Cause 1. Transmission release lever(s) in "open" position. 2. Belt is loose. 2. Belt stretched or.... 2. Check and tighten any loose connections. 2. N d Mower blades are out of balance. Rider steers or handles poorly. 3. Discharge chute jamming t with mower engaged. See Battery Maintenance section. 40 www.Snapper.com Tension too loose. Engine stalls easily with cut area. 1. ...
...is broken. 3. See Brake Adjustment. 2. Mower drive belt slips or fails to full throttle. 2. fo tio Cutting height set too low. c Blade mounting bolts are bent. Reinstall Correctly. 1. Cause 1. Transmission release lever(s) in "open" position. 2. Belt is loose. 2. Belt stretched or.... 2. Check and tighten any loose connections. 2. N d Mower blades are out of balance. Rider steers or handles poorly. 3. Discharge chute jamming t with mower engaged. See Battery Maintenance section. 40 www.Snapper.com Tension too loose. Engine stalls easily with cut area. 1. ...
Operater's Manual
Page 43
...Slow down . 5. Deck is too fast. 5. for tion 1. Blades are installed incorrectly. 1. N d 6. Blades are damaged. Reinstall the blades correctly. e 2. Deck shell is too low. 4. Repair or replace the spindle. 7. Reinstall the blades correctly. 8. Tires are damaged. 1. Engine speed is damaged. 5....3. Deck shell is low or uneven. 5. Repair or replace the deck. 5. Blades are not properly inflated. Blades are dull or worn. Deck is clogged with grass. 6. Sharpen your blades. 3. Clean out the mower. 6. Not overlapping cutting rows enough. 7. Slow ...
...Slow down . 5. Deck is too fast. 5. for tion 1. Blades are installed incorrectly. 1. N d 6. Blades are damaged. Reinstall the blades correctly. e 2. Deck shell is too low. 4. Repair or replace the spindle. 7. Reinstall the blades correctly. 8. Tires are damaged. 1. Engine speed is damaged. 5....3. Deck shell is low or uneven. 5. Repair or replace the deck. 5. Blades are not properly inflated. Blades are dull or worn. Deck is clogged with grass. 6. Sharpen your blades. 3. Clean out the mower. 6. Not overlapping cutting rows enough. 7. Slow ...
Operater's Manual
Page 46
... warranty lasts, and some states or countries do not allow the exclusion or limitation of non-original parts is available only through Snapper Authorized Service Dealers. Most warranty repairs are also entitled to country.** WARRANTY PERIOD Item Equipment Engine* Battery (if equipped) Consumer ..., it will repair or replace, free of acceptable quality and the failure does not amount to be considered as filters, belts, cutting blades, and brake pads (except engine brake pads) are covered by emailing or writing to accident, abuse, modifications, alterations, improper servicing, ...
... warranty lasts, and some states or countries do not allow the exclusion or limitation of non-original parts is available only through Snapper Authorized Service Dealers. Most warranty repairs are also entitled to country.** WARRANTY PERIOD Item Equipment Engine* Battery (if equipped) Consumer ..., it will repair or replace, free of acceptable quality and the failure does not amount to be considered as filters, belts, cutting blades, and brake pads (except engine brake pads) are covered by emailing or writing to accident, abuse, modifications, alterations, improper servicing, ...

Parts Manual
Page 3
Housing, Covers, Spindles & Blades 8 48" Mower Deck Group - Table Of Contents Model Components Page 48" (122 cm) Mower Deck Group - All Rights reserved 3 29-Jul-2018 Hanger Chains 4 48" (... Lift Group (S/N: 2015070191 & Below 16 Deck Lift Group (S/N: 2015070192 & Above 18 Engine & PTO Group 20 Evap Canister Group - S/N: 2016499706 & Below Wheel & Tire Group Wiring Schematic - 500Z Series NRo te pFroo d u c Torque Specification Chart 36 38 40 42 44 46 48 Copyright © Briggs and Stratton. Pulleys, Belts & Idler Arm 10 Decals...
Housing, Covers, Spindles & Blades 8 48" Mower Deck Group - Table Of Contents Model Components Page 48" (122 cm) Mower Deck Group - All Rights reserved 3 29-Jul-2018 Hanger Chains 4 48" (... Lift Group (S/N: 2015070191 & Below 16 Deck Lift Group (S/N: 2015070192 & Above 18 Engine & PTO Group 20 Evap Canister Group - S/N: 2016499706 & Below Wheel & Tire Group Wiring Schematic - 500Z Series NRo te pFroo d u c Torque Specification Chart 36 38 40 42 44 46 48 Copyright © Briggs and Stratton. Pulleys, Belts & Idler Arm 10 Decals...
Parts Manual
Page 8
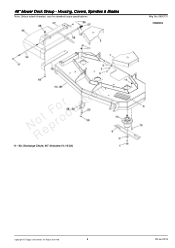
No: 5900731 NRo te pFroord u c t i o n Copyright © Briggs and Stratton. All Rights reserved 8 29-Jul-2018 Housing, Covers, Spindles & Blades Note: Unless noted otherwise, use the standard torque specifications Mfg. 48" Mower Deck Group -
No: 5900731 NRo te pFroord u c t i o n Copyright © Briggs and Stratton. All Rights reserved 8 29-Jul-2018 Housing, Covers, Spindles & Blades Note: Unless noted otherwise, use the standard torque specifications Mfg. 48" Mower Deck Group -

Parts Manual
Page 9
All Rights reserved 9 29-Jul-2018 Housing, Covers, Spindles & Blades REF NO 1 2 3 4 5 6 7 8 9 10 11 12 13 14 15 16 17 18 19 20 21 22 23 24 25 26 27 28 29 30 PART NO ..., 5/16-18 X 1/2" DEEP 5025155 6 WASHER, 5/16" SAE 5025011X6 6 BOLT, 5/16-18 X 3/4 GD5 5025159 3 WASHER, 5/8 USS 5025320X14 3 BOLT, 5/8-11 X 1-3/4 GR8 5101004 1 SAFETY WALK, 4.00 X 7.50 5101986S 3 BLADES, SET OF THREE (3); 16.25 X.25 X 2.5, 1 X 3.5 5023156 12 BOLT, 5/16-18 X 1-1/4" FLANGE 5025392 14 NUT, 5/16-18 HEX NYLOCK FLANGE 5061095 3 ASSEMBLY, SPINDLE, LOW PROFILE...
All Rights reserved 9 29-Jul-2018 Housing, Covers, Spindles & Blades REF NO 1 2 3 4 5 6 7 8 9 10 11 12 13 14 15 16 17 18 19 20 21 22 23 24 25 26 27 28 29 30 PART NO ..., 5/16-18 X 1/2" DEEP 5025155 6 WASHER, 5/16" SAE 5025011X6 6 BOLT, 5/16-18 X 3/4 GD5 5025159 3 WASHER, 5/8 USS 5025320X14 3 BOLT, 5/8-11 X 1-3/4 GR8 5101004 1 SAFETY WALK, 4.00 X 7.50 5101986S 3 BLADES, SET OF THREE (3); 16.25 X.25 X 2.5, 1 X 3.5 5023156 12 BOLT, 5/16-18 X 1-1/4" FLANGE 5025392 14 NUT, 5/16-18 HEX NYLOCK FLANGE 5061095 3 ASSEMBLY, SPINDLE, LOW PROFILE...

Parts Manual
Page 15
..., SAE 20W50 -(LOCATED UNDER SEAT PLATE) 5048970 1 DECAL, IGNITION CONTROL 5100342 1 DECAL, FUEL VALVE -(LOCATED ON BRACKET BEHIND RH SIDE OF SEAT) 5103196YP 1 DECAL, BELT & BLADE, S50X iCD -(LOCATED UNDER SEAT PLATE) 5101315 1 DECAL, CUT HEIGHT, S50X 5101991 2 DECAL, TRANSAXLE RELEASE -(LOCATED ON LH & RH DECK GUARDS) ----- 1 LABEL, EMISSION CONTROL CALIF...
..., SAE 20W50 -(LOCATED UNDER SEAT PLATE) 5048970 1 DECAL, IGNITION CONTROL 5100342 1 DECAL, FUEL VALVE -(LOCATED ON BRACKET BEHIND RH SIDE OF SEAT) 5103196YP 1 DECAL, BELT & BLADE, S50X iCD -(LOCATED UNDER SEAT PLATE) 5101315 1 DECAL, CUT HEIGHT, S50X 5101991 2 DECAL, TRANSAXLE RELEASE -(LOCATED ON LH & RH DECK GUARDS) ----- 1 LABEL, EMISSION CONTROL CALIF...

Parts Manual
Page 29
... 12 13 14 15 16 17 18 PART NO QTY DESCRIPTION 1709188 1 PLUG, .820X1.44 HOLE, BLACK PLASTIC 5020811 1 CABLE, THROTTLE CONTROL, 38 5022180 1 SWITCH, BLADE ENGAGEMENT 5022222 1 RING, SWITCH RETAINER ----- 1 HOUR METER, ASSEMBLE -(S/N: 2015551938 & Above)(*See footnote) 5100996 1 HOUR METER, W/ SUPRESSOR -(S/N: 2015551937 & Below) 5402918A 1 CONTROL PANEL, LEFT - All Rights reserved...
... 12 13 14 15 16 17 18 PART NO QTY DESCRIPTION 1709188 1 PLUG, .820X1.44 HOLE, BLACK PLASTIC 5020811 1 CABLE, THROTTLE CONTROL, 38 5022180 1 SWITCH, BLADE ENGAGEMENT 5022222 1 RING, SWITCH RETAINER ----- 1 HOUR METER, ASSEMBLE -(S/N: 2015551938 & Above)(*See footnote) 5100996 1 HOUR METER, W/ SUPRESSOR -(S/N: 2015551937 & Below) 5402918A 1 CONTROL PANEL, LEFT - All Rights reserved...


