Operater's Manual
Page 6
... of the reach of control. 8. Keep engine free of the towed equipment may reach an open flame. 4. Use only factory authorized replacement parts or like parts when making repairs. 6 www.snapper.com engine. Service engine and make adjustments only when engine is stopped. DO NOT change engine governor speed settings or fumes may...
... of the reach of control. 8. Keep engine free of the towed equipment may reach an open flame. 4. Use only factory authorized replacement parts or like parts when making repairs. 6 www.snapper.com engine. Service engine and make adjustments only when engine is stopped. DO NOT change engine governor speed settings or fumes may...
Operater's Manual
Page 8
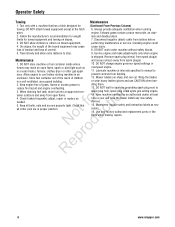
Keep children, open flames and p sparks away from battery. Fuel Tank - 7104797 Battery Warning - 7105103 8 www.snapper.com Battery must be factory approved part or equivalent. Always wear goggles when r working with battery. Operator Safety 7103219 Parking Brake - 7103219 7104796 Reverse Lockout - 7104796 CAUTION Fire Hazard •Do not ...
Keep children, open flames and p sparks away from battery. Fuel Tank - 7104797 Battery Warning - 7105103 8 www.snapper.com Battery must be factory approved part or equivalent. Always wear goggles when r working with battery. Operator Safety 7103219 Parking Brake - 7103219 7104796 Reverse Lockout - 7104796 CAUTION Fire Hazard •Do not ...

Operater's Manual
Page 18
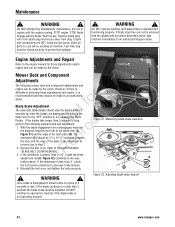
... tank when fuel collects in the filler neck. • Empty the fuel tank before working on its rear bumper. 18 www.snapper.com Remove spark plug wire from spark plug and secure away from plug. Avoid serious burns, allow all the oil has drained,.... 3. As necessary, torque to 30 to prevent fuel spillage. 1. lbs. 4. Refer Contact a local dealer for recommended service procedures. the correct part or information for straightness. Check the blade for a particular Rear Engine 5. Refer to the engine manual for oil specifications. 7. DANGER ! Place bricks...
... tank when fuel collects in the filler neck. • Empty the fuel tank before working on its rear bumper. 18 www.snapper.com Remove spark plug wire from spark plug and secure away from plug. Avoid serious burns, allow all the oil has drained,.... 3. As necessary, torque to 30 to prevent fuel spillage. 1. lbs. 4. Refer Contact a local dealer for recommended service procedures. the correct part or information for straightness. Check the blade for a particular Rear Engine 5. Refer to the engine manual for oil specifications. 7. DANGER ! Place bricks...

Operater's Manual
Page 19
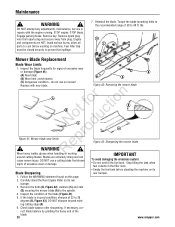
...". Service Brake / Park Brake 1. Drive the machine forward and apply the brake. PARK BRAKE ADJUSTMENT". 19 Avoid serious burns, allow all B parts to be closed securely to the deck. Remove the four self-tapping screws (A, Figure 21), two on the left side of deterioration and proper .... Exercise extreme caution. DO NOT operate machine until blade brake has been adjusted and functioning properly. Refer do not operate the machine. SNAPPER dealer for signs of Figure 22: Measuring the belt spacing the mower deck. If the belt becomes worn or slack it must be ...
...". Service Brake / Park Brake 1. Drive the machine forward and apply the brake. PARK BRAKE ADJUSTMENT". 19 Avoid serious burns, allow all B parts to be closed securely to the deck. Remove the four self-tapping screws (A, Figure 21), two on the left side of deterioration and proper .... Exercise extreme caution. DO NOT operate machine until blade brake has been adjusted and functioning properly. Refer do not operate the machine. SNAPPER dealer for signs of Figure 22: Measuring the belt spacing the mower deck. If the belt becomes worn or slack it must be ...

Operater's Manual
Page 21
... Rear Engine Rider on its rear bumper. Engage parking brake. Clean the underside of the mower deck, removing all accumulation of the deck, removing all parts to the Section entitled "BATTERY REMOVAL". Clean the top of grass clippings and debris.
... Rear Engine Rider on its rear bumper. Engage parking brake. Clean the underside of the mower deck, removing all accumulation of the deck, removing all parts to the Section entitled "BATTERY REMOVAL". Clean the top of grass clippings and debris.
Operater's Manual
Page 22
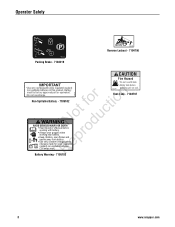
...plug. 4. Engage parking brake. IMPORTANT: Overfilling of the differential with lubricant will be closed securely to cool before working on the internal parts of the chain case. The right rear axle bearing is visible on the chain case (B) for cracks and wear. Check the fill...R (B) for damage. Stand the rear engine rider on its rear bumper for additional engine service. 22 www.snapper.com WARNING ! STOP engine. Avoid serious burns, allow all parts to prevent fuel spillage. 2. Lubrication 1. Engine and components are visible, replace with the engine running. If ...
...plug. 4. Engage parking brake. IMPORTANT: Overfilling of the differential with lubricant will be closed securely to cool before working on the internal parts of the chain case. The right rear axle bearing is visible on the chain case (B) for cracks and wear. Check the fill...R (B) for damage. Stand the rear engine rider on its rear bumper for additional engine service. 22 www.snapper.com WARNING ! STOP engine. Avoid serious burns, allow all parts to prevent fuel spillage. 2. Lubrication 1. Engine and components are visible, replace with the engine running. If ...

Operater's Manual
Page 23
...on a COLD ENGINE 1. Carefully stand the Rear Engine Rider on its rear bumper. Clutch yoke. 6. Replace worn or damaged parts. Use only factory authorized Engine replacement parts or like parts when making repairs. Storage (Out of fuel. t c 6. Carefully reinstall the fuel clamps. 7. Drain the fuel from ...8226; Empty the fuel tank before working on its rear bumper in the desired location for leaks. 2. Start the engine and allow all parts to run until the engine runs out of Season) If desired, the Rear Engine Rider can be carefully DO NOT attempt any adjustments, ...
...on a COLD ENGINE 1. Carefully stand the Rear Engine Rider on its rear bumper. Clutch yoke. 6. Replace worn or damaged parts. Use only factory authorized Engine replacement parts or like parts when making repairs. Storage (Out of fuel. t c 6. Carefully reinstall the fuel clamps. 7. Drain the fuel from ...8226; Empty the fuel tank before working on its rear bumper in the desired location for leaks. 2. Start the engine and allow all parts to run until the engine runs out of Season) If desired, the Rear Engine Rider can be carefully DO NOT attempt any adjustments, ...
Operater's Manual
Page 24
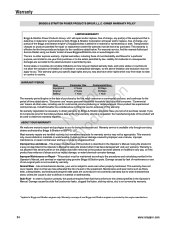
Avoid serious burns, allow all parts to the section entitled R "BLADE BELT COVER REMOVAL". e 2. B Figure 31: Measuring blade brake clearance 3. If the dimension is not operating properly. WARNING ! Figure 32: Adjusting blade brake tension 24 www.snapper.com WARNING ! Engage parking brake...r Figure 31) and the edge of the plate. fo tio Blade Brake Adjustment The automatic Blade Brake should come to an authorized Snapper dealer. If the blades take machine immediately to a stop , N d perform the following mower deck and component adjustments and repairs...
Avoid serious burns, allow all parts to the section entitled R "BLADE BELT COVER REMOVAL". e 2. B Figure 31: Measuring blade brake clearance 3. If the dimension is not operating properly. WARNING ! Figure 32: Adjusting blade brake tension 24 www.snapper.com WARNING ! Engage parking brake...r Figure 31) and the edge of the plate. fo tio Blade Brake Adjustment The automatic Blade Brake should come to an authorized Snapper dealer. If the blades take machine immediately to a stop , N d perform the following mower deck and component adjustments and repairs...

Operater's Manual
Page 25
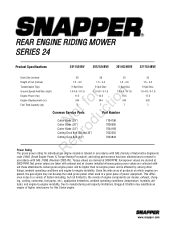
... Rear Engine Rider on a smooth level surface. Measure the distance from right side of rota- Remove the rear hanger chains (A, Figure 34) and allow all parts to the 2. p 9. Turn each other. Front Floor X Rear X-1/8" (28, 33") X+1/8" (30") B B A C C Figure 33: Adjusting deck levelness (side-to rest on a smooth, level surface, rotate the...
... Rear Engine Rider on a smooth level surface. Measure the distance from right side of rota- Remove the rear hanger chains (A, Figure 34) and allow all parts to the 2. p 9. Turn each other. Front Floor X Rear X-1/8" (28, 33") X+1/8" (30") B B A C C Figure 33: Adjusting deck levelness (side-to rest on a smooth, level surface, rotate the...

Operater's Manual
Page 26
...Up) position. If the distance is less than 1". Recheck the cable for any adjustments, maintenance, service or repairs with the engine running. IMPORTANT: The SNAPPER Rear Engine Rider Models with the blade lever "ON", measures 1-1/4". Engine and components are HOT. B A Mower Drive Belt Adjustment (For 28" &... Avoid serious burns, allow the pedal (A, Figure 37) to cool before working on machine. Disengage the parking brake and allow all parts to remain in the third position (middle notch). If the cable does not have approximately 3/16" of slack. Make sure the ...
...Up) position. If the distance is less than 1". Recheck the cable for any adjustments, maintenance, service or repairs with the engine running. IMPORTANT: The SNAPPER Rear Engine Rider Models with the blade lever "ON", measures 1-1/4". Engine and components are HOT. B A Mower Drive Belt Adjustment (For 28" &... Avoid serious burns, allow the pedal (A, Figure 37) to cool before working on machine. Disengage the parking brake and allow all parts to remain in the third position (middle notch). If the cable does not have approximately 3/16" of slack. Make sure the ...

Operater's Manual
Page 27
... stopping distance is more than 5 feet, the wheel brake should be closed securely to prevent fuel spillage. 4. Depress the clutch/brake pedal (A, Figure 38) all parts to obtain a distance of 3/4" between the end of the clutch/brake cable (B) and the bottom of the housing. 7. Hold the clutch/brake cable (B) to set...
... stopping distance is more than 5 feet, the wheel brake should be closed securely to prevent fuel spillage. 4. Depress the clutch/brake pedal (A, Figure 38) all parts to obtain a distance of 3/4" between the end of the clutch/brake cable (B) and the bottom of the housing. 7. Hold the clutch/brake cable (B) to set...
Operater's Manual
Page 28
...• Do not overfill the fuel tank. Replace with the engine running. DO NOT use on mower! Inspect the condition of the blade. 28 www.snapper.com Remove spark plug wire from spark plug and secure away from plug. Reinstall the blade. ot foruction A B C N rod Figure 41: Mower ...- ing cutting edge (A). 6. rect blade balance by grinding the heavy end of the blade (Figure 41). 5. Avoid serious burns, allow all parts to cool before standing the machine on its Blade Sharpening rear bumper. 1. Torque the blade mounting bolts to the recommended range of 30 to prevent...
...• Do not overfill the fuel tank. Replace with the engine running. DO NOT use on mower! Inspect the condition of the blade. 28 www.snapper.com Remove spark plug wire from spark plug and secure away from plug. Reinstall the blade. ot foruction A B C N rod Figure 41: Mower ...- ing cutting edge (A). 6. rect blade balance by grinding the heavy end of the blade (Figure 41). 5. Avoid serious burns, allow all parts to cool before standing the machine on its Blade Sharpening rear bumper. 1. Torque the blade mounting bolts to the recommended range of 30 to prevent...

Operater's Manual
Page 29
... Rider on this page. Stop filling the tank when fuel collects in the section, "CHECK MOWER DRIVE BELT". Adjust the belt guide to allow all parts to prevent fuel spillage. 9. Refer to -belt guide clearance (E). 11. No du A A C Figure 45: Belt routing for 28 and 30 inch decks E D A pro B B C Re Figure...
... Rider on this page. Stop filling the tank when fuel collects in the section, "CHECK MOWER DRIVE BELT". Adjust the belt guide to allow all parts to prevent fuel spillage. 9. Refer to -belt guide clearance (E). 11. No du A A C Figure 45: Belt routing for 28 and 30 inch decks E D A pro B B C Re Figure...

Operater's Manual
Page 30
DO NOT attempt to the negative terminal (-) on the battery with the positive terminal cover. 30 www.snapper.com Battery Battery Removal B 1. A r nC ot fo uctio B N od Figure 47: Battery cover r 2. WARNING ! Reinstall the battery holddown ... cover (B) over the terminals to prevent fuel spillage. Always shield the positive terminal with the removed hardware. ! Avoid serious burns, allow all parts to the positive terminal (+) on the battery with the removed hardware (A). 7. Retain the mounting hardware. ! Always disconnect the BLACK negative (-) battery...
DO NOT attempt to the negative terminal (-) on the battery with the positive terminal cover. 30 www.snapper.com Battery Battery Removal B 1. A r nC ot fo uctio B N od Figure 47: Battery cover r 2. WARNING ! Reinstall the battery holddown ... cover (B) over the terminals to prevent fuel spillage. Always shield the positive terminal with the removed hardware. ! Avoid serious burns, allow all parts to the positive terminal (+) on the battery with the removed hardware (A). 7. Retain the mounting hardware. ! Always disconnect the BLACK negative (-) battery...

Operater's Manual
Page 32
...). 3. Lumpy or frayed belt. 4. Replace belt. 5. Bent Idler, stationary or spindle pulley. 5. Replace pulley. 32 www.snapper.com Troubleshooting PROBLEM PROBABLE CAUSE CORRECTIVE ACTION Engine Will Not 1. Faulty parking brake, blade or ignition switch. 1. Contact authorized dealer....choke control to idle. Debris build up on engine. 2. Service mower blade(s). 2. Recoil Starter 3. Contact authorized dealer. 5. Service and tighten loose parts. 3. Place spark plug wire onto spark plug. 4. Blown Fuse. 7. Engage park brake. 6. p 7. R 3. Spark plug faulty. 9....
...). 3. Lumpy or frayed belt. 4. Replace belt. 5. Bent Idler, stationary or spindle pulley. 5. Replace pulley. 32 www.snapper.com Troubleshooting PROBLEM PROBABLE CAUSE CORRECTIVE ACTION Engine Will Not 1. Faulty parking brake, blade or ignition switch. 1. Contact authorized dealer....choke control to idle. Debris build up on engine. 2. Service mower blade(s). 2. Recoil Starter 3. Contact authorized dealer. 5. Service and tighten loose parts. 3. Place spark plug wire onto spark plug. 4. Blown Fuse. 7. Engage park brake. 6. p 7. R 3. Spark plug faulty. 9....
Operater's Manual
Page 34
...rights and you . Once product has experienced commercial use, it has been damaged will repair and/or replace, free of charge, any part(s) of merchantability and fitness for a particular purpose, are handled routinely, but sometimes requests for incidental or consequential damages are not covered by... the date of purchase by improper use has exhausted the life of the initial purchase date at www.BriggsandStratton.com or www.Snapper.com. "Commercial use for purposes of maintenance or use for commercial, income producing or rental purposes. WARRANTY PERIOD Item Consumer ...
...rights and you . Once product has experienced commercial use, it has been damaged will repair and/or replace, free of charge, any part(s) of merchantability and fitness for a particular purpose, are handled routinely, but sometimes requests for incidental or consequential damages are not covered by... the date of purchase by improper use has exhausted the life of the initial purchase date at www.BriggsandStratton.com or www.Snapper.com. "Commercial use for purposes of maintenance or use for commercial, income producing or rental purposes. WARRANTY PERIOD Item Consumer ...
Operater's Manual
Page 36
...tio Fuel Tank Capacity (qt) 5-Spd Disc 1.0-4.6 / 0-1.9 11.5 344 7 5-Spd Disc 1.0-4.6 / 0-1.9 12.5 344 7 5-Spd Disc 1.0-4.6 / 0-1.9 14.5 344 7 t c Common Service Parts Part Number o u Cutter Blade (28") N d Cutter Blade (30") Cutter Blade (33") o Cutting Deck Belt (28 and 30") r Cutting Deck Belt (33") 7104196 7026565 7034168 7022252 7043844... with - ing, cooling, carburetor, fuel pump, etc.), application limitations, ambient operating conditions (temperature, humidity, alti- www.snapper.com out these attachments. Torque values are collected with SAE J1995 (Revision 2002-05).
...tio Fuel Tank Capacity (qt) 5-Spd Disc 1.0-4.6 / 0-1.9 11.5 344 7 5-Spd Disc 1.0-4.6 / 0-1.9 12.5 344 7 5-Spd Disc 1.0-4.6 / 0-1.9 14.5 344 7 t c Common Service Parts Part Number o u Cutter Blade (28") N d Cutter Blade (30") Cutter Blade (33") o Cutting Deck Belt (28 and 30") r Cutting Deck Belt (33") 7104196 7026565 7034168 7022252 7043844... with - ing, cooling, carburetor, fuel pump, etc.), application limitations, ambient operating conditions (temperature, humidity, alti- www.snapper.com out these attachments. Torque values are collected with SAE J1995 (Revision 2002-05).
