Operater's Manual
Page 1
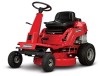
Manual No. 7104742 (Rev. '-') Description 7800784 2811524BV 7800785 2812524BVE 7800786 3014524BVE 7800787 3317524BVE RNeoptrfoodruction ! Operator's Manual REAR ENGINE RIDING MOWER SERIES 24 Model No.
Manual No. 7104742 (Rev. '-') Description 7800784 2811524BV 7800785 2812524BVE 7800786 3014524BVE 7800787 3317524BVE RNeoptrfoodruction ! Operator's Manual REAR ENGINE RIDING MOWER SERIES 24 Model No.
Operater's Manual
Page 3
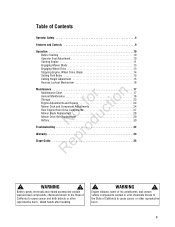
...of Contents Operator Safety 4 Features and Controls 9 Operation 10 Before Starting 10 Operator Seat Adjustment 10 Starting Engine 11 Engaging Mower Blade 13 Engaging Wheel Drive 13 Stopping Engine, Wheel Drive, Blade 14 Setting Park Brake 15 Cutting Height Adjustment 15 ...Maintenance Chart 17 r n General Maintenance 18 Storage 23 fo tio Engine Adjustments and Repairs 24 Mower Deck and Component Adjustments 24 Rear Engine Rider Drive Components 27 t c Mower Blade Replacement 28 o Mower Drive Belt Replacement 29 u Battery 30 N d Troubleshooting 32 ro Warranty 34 Rep Slope ...
...of Contents Operator Safety 4 Features and Controls 9 Operation 10 Before Starting 10 Operator Seat Adjustment 10 Starting Engine 11 Engaging Mower Blade 13 Engaging Wheel Drive 13 Stopping Engine, Wheel Drive, Blade 14 Setting Park Brake 15 Cutting Height Adjustment 15 ...Maintenance Chart 17 r n General Maintenance 18 Storage 23 fo tio Engine Adjustments and Repairs 24 Mower Deck and Component Adjustments 24 Rear Engine Rider Drive Components 27 t c Mower Blade Replacement 28 o Mower Drive Belt Replacement 29 u Battery 30 N d Troubleshooting 32 ro Warranty 34 Rep Slope ...
Operater's Manual
Page 4
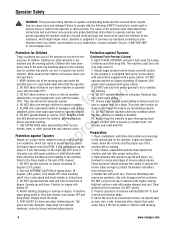
... that operators age 60 and above 10 from machine. DO NOT put your satisfaction, contact Customer Service (1-800-935-2967 or www.snapper.com). DO NOT operate machine on machine, r n attachments or towed equipment (even with engine running. WARNING: This powerful cutting ...Continued From Previous Column) presence of the machine. 3. degrees (18% grade). Fuels are often attracted to operate machine. Practice operation of mower-related injuries. 1. Tall as toys, wire, rocks, limbs and other attachments; 9. The owner of DO NOT remove fuel cap or ...
... that operators age 60 and above 10 from machine. DO NOT put your satisfaction, contact Customer Service (1-800-935-2967 or www.snapper.com). DO NOT operate machine on machine, r n attachments or towed equipment (even with engine running. WARNING: This powerful cutting ...Continued From Previous Column) presence of the machine. 3. degrees (18% grade). Fuels are often attracted to operate machine. Practice operation of mower-related injuries. 1. Tall as toys, wire, rocks, limbs and other attachments; 9. The owner of DO NOT remove fuel cap or ...
Operater's Manual
Page 5
... machine with damaged. DO NOT operate machine unless properly seated with engine running. Know how to hitch plate as needed to cool before turning. 10. mower to stop. 15. Blades must be OFF except when cutting grass. Check grass catcher components frequently for emergencies. 6. Allow the engine to prevent neath deck...
... machine with damaged. DO NOT operate machine unless properly seated with engine running. Know how to hitch plate as needed to cool before turning. 10. mower to stop. 15. Blades must be OFF except when cutting grass. Check grass catcher components frequently for emergencies. 6. Allow the engine to prevent neath deck...
Operater's Manual
Page 6
... 5. Travel slowly and allow children or others on slopes. 7. DO NOT change engine governor speed settings or fumes may cause cause injury. Mower blades are in a water heater, furnace, clothes dryer or other gas appli- 11. or wear heavy leather gloves and use CAUTION when han...needed. 5. adjust, repair or replace as overspeed engine. Use only factory authorized replacement parts or like parts when making repairs. 6 www.snapper.com limits for spark by an authorized dealer at the hitch 6. Disconnect negative (black) cable from battery before storing machine in an ...
... 5. Travel slowly and allow children or others on slopes. 7. DO NOT change engine governor speed settings or fumes may cause cause injury. Mower blades are in a water heater, furnace, clothes dryer or other gas appli- 11. or wear heavy leather gloves and use CAUTION when han...needed. 5. adjust, repair or replace as overspeed engine. Use only factory authorized replacement parts or like parts when making repairs. 6 www.snapper.com limits for spark by an authorized dealer at the hitch 6. Disconnect negative (black) cable from battery before storing machine in an ...
Operater's Manual
Page 7
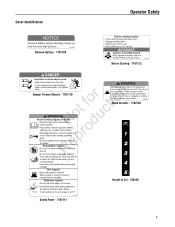
A spark arrestor may create sparks that can start fires around dry vegetation. Operation of Cut - 703440 7 WARNING • Do not operate mower unless discharge chute or entire grass catcher is in its proper place. 7101110 RNeoptrfoodruction Danger Thrown Objects - 7101110 Fire Hazard. The operator should contact local ...
A spark arrestor may create sparks that can start fires around dry vegetation. Operation of Cut - 703440 7 WARNING • Do not operate mower unless discharge chute or entire grass catcher is in its proper place. 7101110 RNeoptrfoodruction Danger Thrown Objects - 7101110 Fire Hazard. The operator should contact local ...
Operater's Manual
Page 13
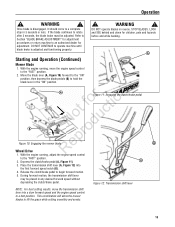
...blade lever in 3 seconds or less. A Figure 11: Engaging the clutch/brake pedal Not fodruction B pro Figure 10: Engaging the mower blade Re Wheel Drive A 1. If the blade continues to an authorized dealer for children, pets and hazards before and while backing. ...(B). 4. During forward motion, the transmission shift lever may be adjusted. This combination will allow the mower blades to begin forward motion. 5. WARNING ! A Starting and Operation (Continued) Mower Blade 1. Release the clutch/brake pedal to lift the grass while cutting smoothly and evenly. 13 ...
...blade lever in 3 seconds or less. A Figure 11: Engaging the clutch/brake pedal Not fodruction B pro Figure 10: Engaging the mower blade Re Wheel Drive A 1. If the blade continues to an authorized dealer for children, pets and hazards before and while backing. ...(B). 4. During forward motion, the transmission shift lever may be adjusted. This combination will allow the mower blades to begin forward motion. 5. WARNING ! A Starting and Operation (Continued) Mower Blade 1. Release the clutch/brake pedal to lift the grass while cutting smoothly and evenly. 13 ...
Operater's Manual
Page 14
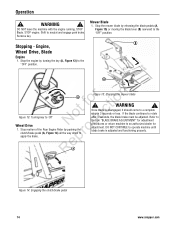
... return machine to rotate after 3 seconds, the blade brake must be adjusted. RepA Figure 14: Engaging the clutch/brake pedal 14 www.snapper.com Stopping - Figure 15: Stopping the mower blade ! DO NOT CONTINUE to operate machine until blade brake is disengaged, it should come to neutral and engage park brake. Refer...
... return machine to rotate after 3 seconds, the blade brake must be adjusted. RepA Figure 14: Engaging the clutch/brake pedal 14 www.snapper.com Stopping - Figure 15: Stopping the mower blade ! DO NOT CONTINUE to operate machine until blade brake is disengaged, it should come to neutral and engage park brake. Refer...
Operater's Manual
Page 16
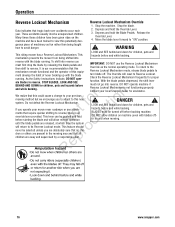
...the Blade Pedals. Release the Override Lever. 4. Check the Reverse Lockout Mechanism frequently for proper ate blades in yard when mowing. 16 www.snapper.com If you must first stop the blade by a responsible adult. t c ments that tragic back-over accidents occur each year. BLADES...taught how to view this Override as fun rather than being shifted into reverse you operate your mower near roadways or use the Reverse Lockout Mechanism then shift to your local Snapper dealer for children, pets and hazards before and while backing. To return to Reverse Lockout....
...the Blade Pedals. Release the Override Lever. 4. Check the Reverse Lockout Mechanism frequently for proper ate blades in yard when mowing. 16 www.snapper.com If you must first stop the blade by a responsible adult. t c ments that tragic back-over accidents occur each year. BLADES...taught how to view this Override as fun rather than being shifted into reverse you operate your mower near roadways or use the Reverse Lockout Mechanism then shift to your local Snapper dealer for children, pets and hazards before and while backing. To return to Reverse Lockout....
Operater's Manual
Page 17
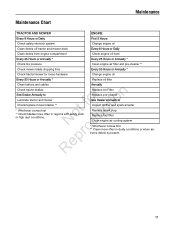
...Annually * Every 25 Hours or Annually * Check tire pressure Clean engine air filter and pre-cleaner ** Check mower blade stopping time Every 50 Hours or Annually * Check tractor/mower for loose hardware Change engine oil Every 50 Hours or Annually * Replace oil filter Clean battery and cables ... or when airborne debris is present. 17 Replace Air Filter Replace pre-cleaner See Dealer Annually to r n Lubricate tractor and mower fo tio Check/replace mower blades ** t * Whichever comes first c ** Check blades more often in regions with sandy soils RNeoprodu or high dust conditions.
...Annually * Every 25 Hours or Annually * Check tire pressure Clean engine air filter and pre-cleaner ** Check mower blade stopping time Every 50 Hours or Annually * Check tractor/mower for loose hardware Change engine oil Every 50 Hours or Annually * Replace oil filter Clean battery and cables ... or when airborne debris is present. 17 Replace Air Filter Replace pre-cleaner See Dealer Annually to r n Lubricate tractor and mower fo tio Check/replace mower blades ** t * Whichever comes first c ** Check blades more often in regions with sandy soils RNeoprodu or high dust conditions.

Operater's Manual
Page 18
...blade bolt torque B Figure 19: Oil drain plugs 5. Refer to cool before standing the machine on its rear bumper. 18 www.snapper.com Engage parking brake. Remove key. Follow the WARNING statement found on the rear bumper. (See statement below.) 3. Check the... blade for a particular Rear Engine 5. Loosen or remove the oil fill cap on the Rear Engine Rider. Maintenance ! lbs. 4. entitled "ADJUSTING MOWER BLADE". IMPORTANT To avoid damaging the emissions system: • Do not overfill the fuel tank. After all parts to repairs with . DANGER ! ...
...blade bolt torque B Figure 19: Oil drain plugs 5. Refer to cool before standing the machine on its rear bumper. 18 www.snapper.com Engage parking brake. Remove key. Follow the WARNING statement found on the rear bumper. (See statement below.) 3. Check the... blade for a particular Rear Engine 5. Loosen or remove the oil fill cap on the Rear Engine Rider. Maintenance ! lbs. 4. entitled "ADJUSTING MOWER BLADE". IMPORTANT To avoid damaging the emissions system: • Do not overfill the fuel tank. After all parts to repairs with . DANGER ! ...

Operater's Manual
Page 19
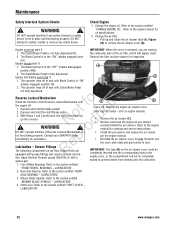
...functioning properly, brake adjustment must stop rotating in the operator's seat. A Check the Blade Drive Belt The blade drive consists of mower drive belt cover (B). 3. The belt spacing (B) should skid. The following procedure requires the engine and blades to the deck.... adjustments, maintenance, service or repairs with the engine running. Clear area of Figure 22: Measuring the belt spacing the mower deck. Blade Brake 1. SNAPPER dealer for proper function. WARNING ! Avoid serious burns, allow all B parts to the 3rd height of deterioration and proper...
...functioning properly, brake adjustment must stop rotating in the operator's seat. A Check the Blade Drive Belt The blade drive consists of mower drive belt cover (B). 3. The belt spacing (B) should skid. The following procedure requires the engine and blades to the deck.... adjustments, maintenance, service or repairs with the engine running. Clear area of Figure 22: Measuring the belt spacing the mower deck. Blade Brake 1. SNAPPER dealer for proper function. WARNING ! Avoid serious burns, allow all B parts to the 3rd height of deterioration and proper...
Operater's Manual
Page 20
... not start if: 1. N d ! D B Figure 23: Opening the engine air cleaner cover (May vary by model - LUBRICATION". 20 www.snapper.com DO NOT operate machine if any safety device. tion. The operator rises off of the air filter, which will not be completely inserted into... components on the air cleaner cover must stop if: C 1. Check Engine 1. Depress and hold the clutch/brake pedal. 3. Mower Blade Spindle. Contact your SNAPPER dealer immediately for inspection. Change the air filter: • Pull up and rotate the air cleaner latch (A, Figure 23) to...
... not start if: 1. N d ! D B Figure 23: Opening the engine air cleaner cover (May vary by model - LUBRICATION". 20 www.snapper.com DO NOT operate machine if any safety device. tion. The operator rises off of the air filter, which will not be completely inserted into... components on the air cleaner cover must stop if: C 1. Check Engine 1. Depress and hold the clutch/brake pedal. 3. Mower Blade Spindle. Contact your SNAPPER dealer immediately for inspection. Change the air filter: • Pull up and rotate the air cleaner latch (A, Figure 23) to...

Operater's Manual
Page 21
..., service or repairs with two shots of the deck, removing all parts to prevent fuel spillage. Engage parking brake. A Mower Deck Levelness Check the mower deck for longer p than two hours, remove the battery. LEVELNESS". STOP blade. Remove key. Engine and components are HOT...from a grease gun. Maintenance ! Carefully stand the Rear Engine Rider on its rear bumper for proper level. Refer to the section entitled "MOWER DECK ADJUSTMENT - ro IMPORTANT: If the unit will be closed securely to cool before standing the machine on the rear Front Wheel Bearing ...
..., service or repairs with two shots of the deck, removing all parts to prevent fuel spillage. Engage parking brake. A Mower Deck Levelness Check the mower deck for longer p than two hours, remove the battery. LEVELNESS". STOP blade. Remove key. Engine and components are HOT...from a grease gun. Maintenance ! Carefully stand the Rear Engine Rider on its rear bumper for proper level. Refer to the section entitled "MOWER DECK ADJUSTMENT - ro IMPORTANT: If the unit will be closed securely to cool before standing the machine on the rear Front Wheel Bearing ...

Operater's Manual
Page 23
... running. Drain the fuel from the fuel tank. 4. components of the Rear Engine Rider should be closed securely to remain clean during storage. 5. STOP engine. Mower deck linkage and pivot areas. Carefully reinstall the fuel clamps. 7. Check both front wheel king pins. 3. Refer to cool before standing the machine on a COLD...
... running. Drain the fuel from the fuel tank. 4. components of the Rear Engine Rider should be closed securely to remain clean during storage. 5. STOP engine. Mower deck linkage and pivot areas. Carefully reinstall the fuel clamps. 7. Check both front wheel king pins. 3. Refer to cool before standing the machine on a COLD...
Operater's Manual
Page 24
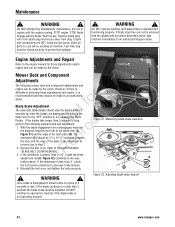
...3 seconds to a stop time can be made by the owner. Engage parking brake. The dimension (C) should stop , N d perform the following mower deck and component adjustments and repairs can be adjusted. Remove the belt cover. B - ! WARNING ! Remove key. Fuel Filler Cap must be ... with the engine running. If the blades take machine immediately to step 2. e 2. Figure 32: Adjusting blade brake tension 24 www.snapper.com Avoid serious burns, allow all parts to the section entitled R "BLADE BELT COVER REMOVAL". WARNING ! Engine Adjustments and Repair Refer...
...3 seconds to a stop time can be made by the owner. Engage parking brake. The dimension (C) should stop , N d perform the following mower deck and component adjustments and repairs can be adjusted. Remove the belt cover. B - ! WARNING ! Remove key. Fuel Filler Cap must be ... with the engine running. If the blades take machine immediately to step 2. e 2. Figure 32: Adjusting blade brake tension 24 www.snapper.com Avoid serious burns, allow all parts to the section entitled R "BLADE BELT COVER REMOVAL". WARNING ! Engine Adjustments and Repair Refer...

Operater's Manual
Page 25
... hanger chains (A, Figure 34) and allow all parts to - If t c the measurement is within 1/8" of machine) D A Figure 34: Adjusting the mower deck (front-to rest on a smooth, level surface, rotate the blade until proper levelness is more than 1/4" higher than the front. tions on machine. DO... NOT attempt any adjustments, maintenance, service or repairs with adjustment. 6. STOP blade. Mower Deck Adjustment (Front-to -side, the deck attitude is still uneven, adjust side-to cool before working on the eye-bolt to raise ...
... hanger chains (A, Figure 34) and allow all parts to - If t c the measurement is within 1/8" of machine) D A Figure 34: Adjusting the mower deck (front-to rest on a smooth, level surface, rotate the blade until proper levelness is more than 1/4" higher than the front. tions on machine. DO... NOT attempt any adjustments, maintenance, service or repairs with adjustment. 6. STOP blade. Mower Deck Adjustment (Front-to -side, the deck attitude is still uneven, adjust side-to cool before working on the eye-bolt to raise ...

Operater's Manual
Page 26
...B Retighten the hardware that anchors the front frame assembly 5. Figure 37: Clutch/brake cable adjustment 26 www.snapper.com Engine and components are HOT. Remove the mower drive belt cover. Disengage the parking brake and allow all parts to remain in the cable. IMPORTANT: Too... much slack may cause improper clutch function. IMPORTANT: The SNAPPER Rear Engine Rider Models with the blade lever "ON",...
...B Retighten the hardware that anchors the front frame assembly 5. Figure 37: Clutch/brake cable adjustment 26 www.snapper.com Engine and components are HOT. Remove the mower drive belt cover. Disengage the parking brake and allow all parts to remain in the cable. IMPORTANT: Too... much slack may cause improper clutch function. IMPORTANT: The SNAPPER Rear Engine Rider Models with the blade lever "ON",...
Operater's Manual
Page 28
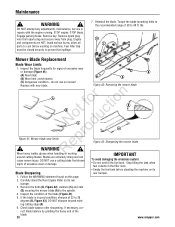
...Carefully stand the Rear Engine Rider on its Blade Sharpening rear bumper. 1. Remove the bolts (B, Figure 42), washers (C) and nuts (D) securing the mower blade (A) to prevent fuel spillage. 7. Check blade balance after sharpening. rect blade balance by grinding the heavy end of excessive wear or damage (...blade. Engine and components are extremely sharp and can cause severe injury. Inspect the blade frequently for signs of the blade. 28 www.snapper.com do not use a cutting blade that shows To avoid damaging the emissions system: signs of excessive wear or damage. • ...
...Carefully stand the Rear Engine Rider on its Blade Sharpening rear bumper. 1. Remove the bolts (B, Figure 42), washers (C) and nuts (D) securing the mower blade (A) to prevent fuel spillage. 7. Check blade balance after sharpening. rect blade balance by grinding the heavy end of excessive wear or damage (...blade. Engine and components are extremely sharp and can cause severe injury. Inspect the blade frequently for signs of the blade. 28 www.snapper.com do not use a cutting blade that shows To avoid damaging the emissions system: signs of excessive wear or damage. • ...

Operater's Manual
Page 29
... the belt around the drive disc and into the drive pulley belt groove. 7. Engage parking brake. Engine and components are present. Check the mower drive belt tension and adjust if necessary (28" & 30" decks only). Refer to cool before standing the machine on its rear bumper. ...the new belt through the engine belt guide (B, t c Figure 44) up to the #5 position. Move the transmission shift lever to the Section entitled "MOWER DRIVE BELT ADJUSTMENT". 12. Make sure the belt is inside the spindle belt guide (D) and the idler belt guide (B). Maintenance ! Remove key. Refer ...
... the belt around the drive disc and into the drive pulley belt groove. 7. Engage parking brake. Engine and components are present. Check the mower drive belt tension and adjust if necessary (28" & 30" decks only). Refer to cool before standing the machine on its rear bumper. ...the new belt through the engine belt guide (B, t c Figure 44) up to the #5 position. Move the transmission shift lever to the Section entitled "MOWER DRIVE BELT ADJUSTMENT". 12. Make sure the belt is inside the spindle belt guide (D) and the idler belt guide (B). Maintenance ! Remove key. Refer ...


