Operater's Manual
Page 6
... outdoors and away from spark plug(s). 1. Maintain or replace safety and instruction labels as fo tio needed. 5. Use only factory authorized replacement parts or like parts when making repairs. 6 www.snapper.com in a well ventilated, unoccupied building. Store fuel container out of the reach of control. 8. DO NOT test for (Continued From Previous...
... outdoors and away from spark plug(s). 1. Maintain or replace safety and instruction labels as fo tio needed. 5. Use only factory authorized replacement parts or like parts when making repairs. 6 www.snapper.com in a well ventilated, unoccupied building. Store fuel container out of the reach of control. 8. DO NOT test for (Continued From Previous...
Operater's Manual
Page 8
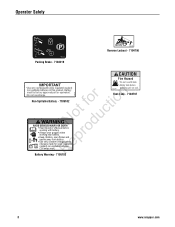
... tank before o working near battery. CV (sealed) non-spillable batteries. R (3.6 amps max.) 7105103 7104797 standing unit on end. Fuel Tank - 7104797 Battery Warning - 7105103 8 www.snapper.com Do not overcharge. Battery must be factory approved part or equivalent. Always wear goggles when r working with battery.
... tank before o working near battery. CV (sealed) non-spillable batteries. R (3.6 amps max.) 7105103 7104797 standing unit on end. Fuel Tank - 7104797 Battery Warning - 7105103 8 www.snapper.com Do not overcharge. Battery must be factory approved part or equivalent. Always wear goggles when r working with battery.

Operater's Manual
Page 18
...A wear or damage on the engine. 3. IMPORTANT To avoid damaging the emissions system: • Do not overfill the fuel tank. the correct part or information for proper blade inspection and service procedures. Engine Rider. fo tio 2. Refer to the section entitled "MOWER BLADE REPLACEMENT" for a ...engine crankcase with oil filters at every oil change. Refer to cool before standing the machine on its rear bumper. 18 www.snapper.com the Engine Manual for service instructions. Remove spark plug wire from spark plug and secure away from plug. Engine Check ...
...A wear or damage on the engine. 3. IMPORTANT To avoid damaging the emissions system: • Do not overfill the fuel tank. the correct part or information for proper blade inspection and service procedures. Engine Rider. fo tio 2. Refer to the section entitled "MOWER BLADE REPLACEMENT" for a ...engine crankcase with oil filters at every oil change. Refer to cool before standing the machine on its rear bumper. 18 www.snapper.com the Engine Manual for service instructions. Remove spark plug wire from spark plug and secure away from plug. Engine Check ...

Operater's Manual
Page 19
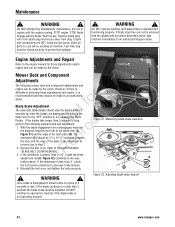
...be operated. Refer do not operate the machine. Check the machine brake for proper function. STOP engine. Avoid serious burns, allow all B parts to the lowest setting. 2. Lower the deck to cool before operating the machine. If the blade continues to rotate longer than 3 seconds less ...than 1". SNAPPER dealer for assistance. * IMPORTANT: The blade drive belt on each side of Figure 22: Measuring the belt spacing the mower deck. The machine...
...be operated. Refer do not operate the machine. Check the machine brake for proper function. STOP engine. Avoid serious burns, allow all B parts to the lowest setting. 2. Lower the deck to cool before operating the machine. If the blade continues to rotate longer than 3 seconds less ...than 1". SNAPPER dealer for assistance. * IMPORTANT: The blade drive belt on each side of Figure 22: Measuring the belt spacing the mower deck. The machine...

Operater's Manual
Page 21
...: Shift lever grease fitting 21 Remove key. Re IMPORTANT Lubricate the front wheel grease fittings (A, Figure 25) with two shots of the deck, removing all parts to prevent fuel spillage. Avoid serious burns, allow all grass clippings fo tio and debris. A Mower Deck Levelness Check the mower deck for longer p than...
...: Shift lever grease fitting 21 Remove key. Re IMPORTANT Lubricate the front wheel grease fittings (A, Figure 25) with two shots of the deck, removing all parts to prevent fuel spillage. Avoid serious burns, allow all grass clippings fo tio and debris. A Mower Deck Levelness Check the mower deck for longer p than...
Operater's Manual
Page 22
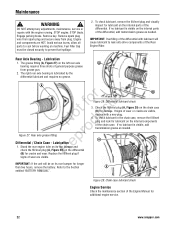
..., maintenance, service or repairs with lubricant will be closed securely to the Section B entitled "BATTERY REMOVAL". Avoid serious burns, allow all parts to leak onto drive components of wear or cracks are visible, replace with a new plug. 4. Lubrication 1. Figure 29: Chain case lubricant ...brake. Engine and components are visible. The grease fitting (A, Figure 27) on the chain case (B) for additional engine service. 22 www.snapper.com Stand the rear engine rider on its rear bumper for cracks and wear. To check lubricant in the chain case, remove the fill...
..., maintenance, service or repairs with lubricant will be closed securely to the Section B entitled "BATTERY REMOVAL". Avoid serious burns, allow all parts to leak onto drive components of wear or cracks are visible, replace with a new plug. 4. Lubrication 1. Figure 29: Chain case lubricant ...brake. Engine and components are visible. The grease fitting (A, Figure 27) on the chain case (B) for additional engine service. 22 www.snapper.com Stand the rear engine rider on its rear bumper for cracks and wear. To check lubricant in the chain case, remove the fill...

Operater's Manual
Page 23
...lines from the fuel tank. 4. t c 6. Engine and components are HOT. Check both front wheel king pins. 3. Replace worn or damaged parts. Fuel Filler Cap must be carefully DO NOT attempt any adjustments, maintenance, service or repairs with the engine running. grass clippings and debris. 1.... STOP blade. inspected regularly for wear or damage. 1. Use only factory authorized Engine replacement parts or like parts when making repairs. No du C IMPORTANT oTo avoid damaging the emissions system: r • Do not overfill the fuel tank. ...
...lines from the fuel tank. 4. t c 6. Engine and components are HOT. Check both front wheel king pins. 3. Replace worn or damaged parts. Fuel Filler Cap must be carefully DO NOT attempt any adjustments, maintenance, service or repairs with the engine running. grass clippings and debris. 1.... STOP blade. inspected regularly for wear or damage. 1. Use only factory authorized Engine replacement parts or like parts when making repairs. No du C IMPORTANT oTo avoid damaging the emissions system: r • Do not overfill the fuel tank. ...
Operater's Manual
Page 24
...not be achieved with the engine running. Reinstall the belt cover and tighten the bolts securely. Avoid serious burns, allow all parts to the section entitled R "BLADE BELT COVER REMOVAL". The dimension (C) should stop time can be made by the owner...3 seconds or less. WARNING ! Maintenance ! STOP engine. Engine and components are disengaged by moving the o blade lever to an authorized Snapper dealer. If blade stop the blades within 3 t c seconds any adjustments, maintenance, service or repairs with the adjustment procedure described above,...
...not be achieved with the engine running. Reinstall the belt cover and tighten the bolts securely. Avoid serious burns, allow all parts to the section entitled R "BLADE BELT COVER REMOVAL". The dimension (C) should stop time can be made by the owner...3 seconds or less. WARNING ! Maintenance ! STOP engine. Engine and components are disengaged by moving the o blade lever to an authorized Snapper dealer. If blade stop the blades within 3 t c seconds any adjustments, maintenance, service or repairs with the adjustment procedure described above,...

Operater's Manual
Page 25
...") B B A C C Figure 33: Adjusting deck levelness (side-to-side) (View of left N d side of the deck. Remove the rear hanger chains (A, Figure 34) and allow all parts to -Rear Engage parking brake. If difference from plug. p 9. Engine and components are at the front and rear of the deck.
...") B B A C C Figure 33: Adjusting deck levelness (side-to-side) (View of left N d side of the deck. Remove the rear hanger chains (A, Figure 34) and allow all parts to -Rear Engage parking brake. If difference from plug. p 9. Engine and components are at the front and rear of the deck.

Operater's Manual
Page 26
... 3/16" of slack. With the blade lever in the engaged wheel drive (Up) position. Figure 37: Clutch/brake cable adjustment 26 www.snapper.com WARNING ! Engine and components are HOT. If the distance is complete, it will be affected. Loosen the hardware (A, Figure 36) that...: Measuring the belt spacing p 4. Disengage the parking brake and allow all parts to the section entitled "CHECK MOWER DRIVE BELT". Recheck the service brake/park brake and readjust if necessary. IMPORTANT: The SNAPPER Rear Engine Rider Models with the engine running. Remove the mower drive belt ...
... 3/16" of slack. With the blade lever in the engaged wheel drive (Up) position. Figure 37: Clutch/brake cable adjustment 26 www.snapper.com WARNING ! Engine and components are HOT. If the distance is complete, it will be affected. Loosen the hardware (A, Figure 36) that...: Measuring the belt spacing p 4. Disengage the parking brake and allow all parts to the section entitled "CHECK MOWER DRIVE BELT". Recheck the service brake/park brake and readjust if necessary. IMPORTANT: The SNAPPER Rear Engine Rider Models with the engine running. Remove the mower drive belt ...

Operater's Manual
Page 27
... Rider Drive Components Service Brake / Park Brake Adjustment Test the wheel brake on this page. 2. When prop- Depress the clutch/brake pedal (A, Figure 38) all parts to prevent fuel spillage. 4. Move and hold the park brake lever (B) in inset of Figure 40) and the bottom of the housing. 7. Stop filling the...
... Rider Drive Components Service Brake / Park Brake Adjustment Test the wheel brake on this page. 2. When prop- Depress the clutch/brake pedal (A, Figure 38) all parts to prevent fuel spillage. 4. Move and hold the park brake lever (B) in inset of Figure 40) and the bottom of the housing. 7. Stop filling the...
Operater's Manual
Page 28
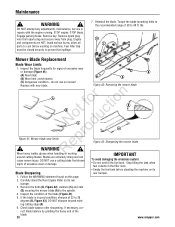
... on its Blade Sharpening rear bumper. 1. DO NOT sharpen beyond exist- If necessary, cor- Avoid serious burns, allow all parts to the spindle. 4. Inspect the condition of the blade. 28 www.snapper.com Check blade balance after sharpening. WARNING ! Inspect the blade frequently for signs of excessive wear or damage. • Do...
... on its Blade Sharpening rear bumper. 1. DO NOT sharpen beyond exist- If necessary, cor- Avoid serious burns, allow all parts to the spindle. 4. Inspect the condition of the blade. 28 www.snapper.com Check blade balance after sharpening. WARNING ! Inspect the blade frequently for signs of excessive wear or damage. • Do...

Operater's Manual
Page 29
... 4. Route the belt as described in the hole located on machine. Tighten the idler pulley bolt securely. 10. Adjust the belt guide to allow all parts to the section entitled "DRIVE BELT COVER REMOVAL". 2. Remove the old belt. To clear the primary chain case, move the transmission shift lever to -belt...
... 4. Route the belt as described in the hole located on machine. Tighten the idler pulley bolt securely. 10. Adjust the belt guide to allow all parts to the section entitled "DRIVE BELT COVER REMOVAL". 2. Remove the old belt. To clear the primary chain case, move the transmission shift lever to -belt...

Operater's Manual
Page 30
Avoid serious burns, allow all parts to prevent fuel spillage. Fuel Filler Cap must be closed securely to cool before working on the battery with the removed hardware. 4. WARNING ! A r nC ot .... 5. Connect the RED positive (+) cable (A, Figure 49) to charge the battery while it is installed on the battery with the positive terminal cover. 30 www.snapper.com Always connect the RED positive (+) battery cable first. Slide the battery into the battery compartment. 2. A B Figure 48: Battery holddown bracket 3. Always shield the positive...
Avoid serious burns, allow all parts to prevent fuel spillage. Fuel Filler Cap must be closed securely to cool before working on the battery with the removed hardware. 4. WARNING ! A r nC ot .... 5. Connect the RED positive (+) cable (A, Figure 49) to charge the battery while it is installed on the battery with the positive terminal cover. 30 www.snapper.com Always connect the RED positive (+) battery cable first. Slide the battery into the battery compartment. 2. A B Figure 48: Battery holddown bracket 3. Always shield the positive...

Operater's Manual
Page 32
... level. 2. r n 11. fo tio 12. o u 2. Fuel tank empty. 4. r 6. Spark plug faulty. 9. Clean and connect battery cables. Connect starter cable. Service and tighten loose parts. 3. Replace pulley. 32 www.snapper.com Place spark plug wire onto spark plug. 4. Engage park brake. 6. Contact authorized dealer. 8. Spark plug defective or gap set too "FAST". Fuel...
... level. 2. r n 11. fo tio 12. o u 2. Fuel tank empty. 4. r 6. Spark plug faulty. 9. Clean and connect battery cables. Connect starter cable. Service and tighten loose parts. 3. Replace pulley. 32 www.snapper.com Place spark plug wire onto spark plug. 4. Engage park brake. 6. Contact authorized dealer. 8. Spark plug defective or gap set too "FAST". Fuel...
Operater's Manual
Page 34
... in the Operator's Manual or using our dealer locator at the time warranty service is not covered by the engine manufacturer. 34 www.snapper.com Save your warranty. u ABOUT YOUR WARRANTY N d We welcome warranty repair and apologize to you may also have other rights which...repair or replacement under this product requires fresh fuel that is permitted by purchaser. Briggs & Stratton Corporation will void your proof of a part or the equipment. In order to Briggs and Stratton engines only. Transportation charges on how long an implied warranty lasts, and some ...
... in the Operator's Manual or using our dealer locator at the time warranty service is not covered by the engine manufacturer. 34 www.snapper.com Save your warranty. u ABOUT YOUR WARRANTY N d We welcome warranty repair and apologize to you may also have other rights which...repair or replacement under this product requires fresh fuel that is permitted by purchaser. Briggs & Stratton Corporation will void your proof of a part or the equipment. In order to Briggs and Stratton engines only. Transportation charges on how long an implied warranty lasts, and some ...
Operater's Manual
Page 36
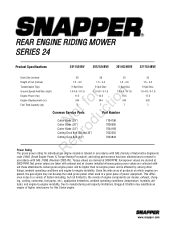
...RPM. ence is due to a variety of factors including, but not limited to -engine variability. This differ- www.snapper.com Due to -engine variability. REAR ENGINE RIDING MOWER SERIES 24 Product Specifications 2811524BV 2812524BVE 3014524BVE 3317524BVE Deck Size (inches...Capacity (qt) 5-Spd Disc 1.0-4.6 / 0-1.9 11.5 344 7 5-Spd Disc 1.0-4.6 / 0-1.9 12.5 344 7 5-Spd Disc 1.0-4.6 / 0-1.9 14.5 344 7 t c Common Service Parts Part Number o u Cutter Blade (28") N d Cutter Blade (30") Cutter Blade (33") o Cutting Deck Belt (28 and 30") r Cutting Deck Belt (33") 7104196 7026565 7034168...
...RPM. ence is due to a variety of factors including, but not limited to -engine variability. This differ- www.snapper.com Due to -engine variability. REAR ENGINE RIDING MOWER SERIES 24 Product Specifications 2811524BV 2812524BVE 3014524BVE 3317524BVE Deck Size (inches...Capacity (qt) 5-Spd Disc 1.0-4.6 / 0-1.9 11.5 344 7 5-Spd Disc 1.0-4.6 / 0-1.9 12.5 344 7 5-Spd Disc 1.0-4.6 / 0-1.9 14.5 344 7 t c Common Service Parts Part Number o u Cutter Blade (28") N d Cutter Blade (30") Cutter Blade (33") o Cutting Deck Belt (28 and 30") r Cutting Deck Belt (33") 7104196 7026565 7034168...
