
Operater's Manual
Page 19
...for assistance. * IMPORTANT: The blade drive belt on machine. DO NOT operate machine until blade brake has been adjusted and functioning properly. SNAPPER dealer for proper function. STOP engine. sion. 1. The blade should be operated. "BLADE BRAKE ADJUSTMENT", or contact your MENT". Remove ...(A, Figure 22). With the engine "OFF", move the blade lever e back to the lowest setting. 2. Blades must be completed before working on 33" decks does not require tension adjustment. Drive the machine forward and apply the brake. Check the machine brake for tion A t c B No ...
...for assistance. * IMPORTANT: The blade drive belt on machine. DO NOT operate machine until blade brake has been adjusted and functioning properly. SNAPPER dealer for proper function. STOP engine. sion. 1. The blade should be operated. "BLADE BRAKE ADJUSTMENT", or contact your MENT". Remove ...(A, Figure 22). With the engine "OFF", move the blade lever e back to the lowest setting. 2. Blades must be completed before working on 33" decks does not require tension adjustment. Drive the machine forward and apply the brake. Check the machine brake for tion A t c B No ...

Operater's Manual
Page 25
... (front-to rest on machine. If the rear blade tip is lower than the front, proceed with adjustment. Front Floor X Rear X-1/8" (28, 33") X+1/8" (30") B B A C C Figure 33: Adjusting deck levelness (side-to-side) (View of left N d side of the deck to -rear) 25 STOP engine. STOP blade. Remove ... to - Place a piece of angle iron, pipe, or similar object under r n the rear center of the deck. Loosen the hardware (A, Figure 33) that retains the left lift arm from side-to 1/4" lower than the front. Recheck both sides of rota- Remove the rear hanger chains (A, Figure 34...
... (front-to rest on machine. If the rear blade tip is lower than the front, proceed with adjustment. Front Floor X Rear X-1/8" (28, 33") X+1/8" (30") B B A C C Figure 33: Adjusting deck levelness (side-to-side) (View of left N d side of the deck to -rear) 25 STOP engine. STOP blade. Remove ... to - Place a piece of angle iron, pipe, or similar object under r n the rear center of the deck. Loosen the hardware (A, Figure 33) that retains the left lift arm from side-to 1/4" lower than the front. Recheck both sides of rota- Remove the rear hanger chains (A, Figure 34...

Operater's Manual
Page 26
...brake/park brake and readjust if necessary. Pull the front frame forward until the belt spacing, with 33" decks do not require belt tension adjustment. Remove the mower drive belt cover. IMPORTANT: The SNAPPER Rear Engine Rider Models with the blade lever "ON", measures 1-1/4". Figure 37: Clutch/brake cable adjustment... 26 www.snapper.com Avoid serious burns, allow the pedal (A, Figure 37) to attain slack in the cable. Measure the belt spacing (B, Figure 35) between ...
...brake/park brake and readjust if necessary. Pull the front frame forward until the belt spacing, with 33" decks do not require belt tension adjustment. Remove the mower drive belt cover. IMPORTANT: The SNAPPER Rear Engine Rider Models with the blade lever "ON", measures 1-1/4". Figure 37: Clutch/brake cable adjustment... 26 www.snapper.com Avoid serious burns, allow the pedal (A, Figure 37) to attain slack in the cable. Measure the belt spacing (B, Figure 35) between ...

Operater's Manual
Page 29
... section entitled "DRIVE BELT COVER REMOVAL". 2. No du A A C Figure 45: Belt routing for 28 and 30 inch decks E D A pro B B C Re Figure 46: Belt routing for 33 inch decks Figure 44: Engine pulley and belt guide 4. IMPORTANT To avoid damaging the emissions system: • Do not overfill the fuel tank. STOP blade...
... section entitled "DRIVE BELT COVER REMOVAL". 2. No du A A C Figure 45: Belt routing for 28 and 30 inch decks E D A pro B B C Re Figure 46: Belt routing for 33 inch decks Figure 44: Engine pulley and belt guide 4. IMPORTANT To avoid damaging the emissions system: • Do not overfill the fuel tank. STOP blade...

Operater's Manual
Page 33
.... 6. Forward speed too fast. 1. Cutting blade(s) dull or damaged. Grass is dry. 4. Build up of deck. 6. Adjust side to the "ON" position. 2. Contact authorized dealer. 33 Contact authorized dealer. 1. Cutting height too low or high. 3. Move throttle control to side. 6. Terraced cut, side to "FAST" position. 4. r n 8. N d 6. o 1. Replace drive disc. 2. Adjust rubber...
.... 6. Forward speed too fast. 1. Cutting blade(s) dull or damaged. Grass is dry. 4. Build up of deck. 6. Adjust side to the "ON" position. 2. Contact authorized dealer. 33 Contact authorized dealer. 1. Cutting height too low or high. 3. Move throttle control to side. 6. Terraced cut, side to "FAST" position. 4. r n 8. N d 6. o 1. Replace drive disc. 2. Adjust rubber...
Operater's Manual
Page 36
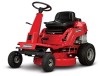
...manufacturing and capacity limitations, Briggs & Stratton may not develop the rated gross power when used in accordance with - www.snapper.com Torque values are collected with SAE J1995 (Revision 2002-05). This differ- Net power values are taken with exhaust ... which engines are derived at 3060 RPM; REAR ENGINE RIDING MOWER SERIES 24 Product Specifications 2811524BV 2812524BVE 3014524BVE 3317524BVE Deck Size (inches) 28 28 30 33 Height of Cut (inches) 1.5 - 4.0 1.5 - 4.0 1.5 - 4.0 1.5 - 4.0 Transmission Type Ground Speed-Fwd/Rev (mph) r n Engine Power (hp) Engine ...
...manufacturing and capacity limitations, Briggs & Stratton may not develop the rated gross power when used in accordance with - www.snapper.com Torque values are collected with SAE J1995 (Revision 2002-05). This differ- Net power values are taken with exhaust ... which engines are derived at 3060 RPM; REAR ENGINE RIDING MOWER SERIES 24 Product Specifications 2811524BV 2812524BVE 3014524BVE 3317524BVE Deck Size (inches) 28 28 30 33 Height of Cut (inches) 1.5 - 4.0 1.5 - 4.0 1.5 - 4.0 1.5 - 4.0 Transmission Type Ground Speed-Fwd/Rev (mph) r n Engine Power (hp) Engine ...