Operater's Manual
Page 10
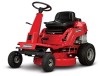
...from "ON" to "OFF" to the FULL mark (A, Figure 1). Check the Reverse Lockout Mechanism. Clean the exterior surfaces of the cutting deck and p engine of any accumulation of the seat. Refer Figure 3: Operator seat adjustment to the fuel tank after refueling. With the engine stopped... system: • Do not overfill the fuel tank. Operation Before Starting Make the following checks and perform the service required before standing the machine on its rear bumper. 10 www.snapper.com Adjust the seat (A, Figure 3) as needed to A bring level up : 1. Check the tire pressure;...
...from "ON" to "OFF" to the FULL mark (A, Figure 1). Check the Reverse Lockout Mechanism. Clean the exterior surfaces of the cutting deck and p engine of any accumulation of the seat. Refer Figure 3: Operator seat adjustment to the fuel tank after refueling. With the engine stopped... system: • Do not overfill the fuel tank. Operation Before Starting Make the following checks and perform the service required before standing the machine on its rear bumper. 10 www.snapper.com Adjust the seat (A, Figure 3) as needed to A bring level up : 1. Check the tire pressure;...

Operater's Manual
Page 19
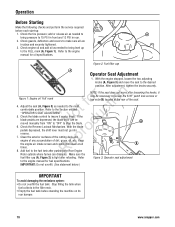
... stop in 3 seconds or less after releasing the blade pedals. ! SNAPPER dealer for assistance. * IMPORTANT: The blade drive belt on each side of Figure 22: Measuring the belt spacing the mower deck. If the belt becomes worn or slack it must be completed before...blade drive consists of cut position (middle p notch). Check the blade brake for signs of loose parts & tools first. be replaced. Service Brake / Park Brake 1. Exercise extreme caution. Engage parking brake. Maintenance ! Engine and components are not functioning properly, brake adjustment must ...
... stop in 3 seconds or less after releasing the blade pedals. ! SNAPPER dealer for assistance. * IMPORTANT: The blade drive belt on each side of Figure 22: Measuring the belt spacing the mower deck. If the belt becomes worn or slack it must be completed before...blade drive consists of cut position (middle p notch). Check the blade brake for signs of loose parts & tools first. be replaced. Service Brake / Park Brake 1. Exercise extreme caution. Engage parking brake. Maintenance ! Engine and components are not functioning properly, brake adjustment must ...

Operater's Manual
Page 21
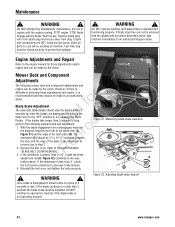
...Figure 26: Shift lever grease fitting 21 DO NOT attempt any adjustments, maintenance, service or repairs with N d three shots of the deck, removing all parts to the section entitled "MOWER DECK ADJUSTMENT - STOP blade. LEVELNESS". Follow the WARNING statement found on this page. ...grease fitting Shift Lever - Maintenance ! WARNING ! STOP engine. Engine and components are HOT. Clean the underside of the mower deck, removing all mower deck linkage pivot points with five shots of general purpose grease from a grease gun. Mower Blade Spindle - Lubrication t c 1. ...
...Figure 26: Shift lever grease fitting 21 DO NOT attempt any adjustments, maintenance, service or repairs with N d three shots of the deck, removing all parts to the section entitled "MOWER DECK ADJUSTMENT - STOP blade. LEVELNESS". Follow the WARNING statement found on this page. ...grease fitting Shift Lever - Maintenance ! WARNING ! STOP engine. Engine and components are HOT. Clean the underside of the mower deck, removing all mower deck linkage pivot points with five shots of general purpose grease from a grease gun. Mower Blade Spindle - Lubrication t c 1. ...

Operater's Manual
Page 23
...and store the battery. Stop filling the tank when B fuel collects in this manual. Maintenance ! Engine and components are HOT. Clutch disc. 5. Mower deck linkage and pivot areas. Perform all ONLY! Remove the fuel lines from the fuel tank. 4. Check the fuel system for wear or damage. 1. Avoid ...Rear Engine Rider will operate properly when taken out of the Rear Engine Rider should be carefully DO NOT attempt any adjustments, maintenance, service or repairs with the engine running. components of storage. Storage (Out of Season) If desired, the Rear Engine Rider can be...
...and store the battery. Stop filling the tank when B fuel collects in this manual. Maintenance ! Engine and components are HOT. Clutch disc. 5. Mower deck linkage and pivot areas. Perform all ONLY! Remove the fuel lines from the fuel tank. 4. Check the fuel system for wear or damage. 1. Avoid ...Rear Engine Rider will operate properly when taken out of the Rear Engine Rider should be carefully DO NOT attempt any adjustments, maintenance, service or repairs with the engine running. components of storage. Storage (Out of Season) If desired, the Rear Engine Rider can be...
Operater's Manual
Page 24
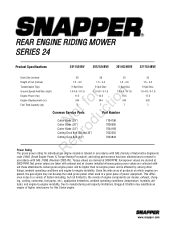
...fo tio Blade Brake Adjustment The automatic Blade Brake should stop , N d perform the following mower deck and component adjustments and repairs can be 3" to step 2. If the dimension is adjusted and ...n recommended that can be adjusted. Figure 32: Adjusting blade brake tension 24 www.snapper.com Maintenance ! With the blade engagement lever disengaged, measure o the distance between ...seconds to stop the blades within 3 t c seconds any adjustments, maintenance, service or repairs with the adjustment procedure described above, take machine immediately to the ...
...fo tio Blade Brake Adjustment The automatic Blade Brake should stop , N d perform the following mower deck and component adjustments and repairs can be 3" to step 2. If the dimension is adjusted and ...n recommended that can be adjusted. Figure 32: Adjusting blade brake tension 24 www.snapper.com Maintenance ! With the blade engagement lever disengaged, measure o the distance between ...seconds to stop the blades within 3 t c seconds any adjustments, maintenance, service or repairs with the adjustment procedure described above, take machine immediately to the ...

Operater's Manual
Page 25
... in the support brackets (D). Turn each other. DO NOT attempt any adjustments, maintenance, service or repairs with adjustment. 6. Mower Deck Adjustment (Front-to rear levelness. Move the lift arm (C) up or down as required until the blade tips are 30" Decks properly inflated and mowing is satisfactory. p 9. If the rear blade tip is...
... in the support brackets (D). Turn each other. DO NOT attempt any adjustments, maintenance, service or repairs with adjustment. 6. Mower Deck Adjustment (Front-to rear levelness. Move the lift arm (C) up or down as required until the blade tips are 30" Decks properly inflated and mowing is satisfactory. p 9. If the rear blade tip is...

Operater's Manual
Page 26
...if the A front frame assembly clamp is loosened for the approximate 3/16" of slack. Figure 37: Clutch/brake cable adjustment 26 www.snapper.com STOP blade. Engage parking brake. Fuel Filler Cap must be necessary to attain slack in the "ON" position, the distance should ... closed securely to cool before working on machine. B A Mower Drive Belt Adjustment (For 28" & 30" Decks Only) 1. Recheck the cable for any adjustments, maintenance, service or repairs with the engine running. Remove the mower drive belt cover. The clutch/brake cable should have slack ...
...if the A front frame assembly clamp is loosened for the approximate 3/16" of slack. Figure 37: Clutch/brake cable adjustment 26 www.snapper.com STOP blade. Engage parking brake. Fuel Filler Cap must be necessary to attain slack in the "ON" position, the distance should ... closed securely to cool before working on machine. B A Mower Drive Belt Adjustment (For 28" & 30" Decks Only) 1. Recheck the cable for any adjustments, maintenance, service or repairs with the engine running. Remove the mower drive belt cover. The clutch/brake cable should have slack ...

Operater's Manual
Page 29
...DRIVE BELT COVER REMOVAL". 2. r n Belt Replacement 1. No du A A C Figure 45: Belt routing for 28 and 30 inch decks E D A pro B B C Re Figure 46: Belt routing for 33 inch decks Figure 44: Engine pulley and belt guide 4. Maintenance ! STOP blade. Remove key. E D B Belt Removal 1. fo tio 2. ...Check the mower drive belt tension and adjust if necessary (28" & 30" decks only). Route the belt onto the spindle pulley (C). Engage parking brake. DO NOT attempt any adjustments, maintenance, service or repairs with your hand and work the belt between the drive disc and...
...DRIVE BELT COVER REMOVAL". 2. r n Belt Replacement 1. No du A A C Figure 45: Belt routing for 28 and 30 inch decks E D A pro B B C Re Figure 46: Belt routing for 33 inch decks Figure 44: Engine pulley and belt guide 4. Maintenance ! STOP blade. Remove key. E D B Belt Removal 1. fo tio 2. ...Check the mower drive belt tension and adjust if necessary (28" & 30" decks only). Route the belt onto the spindle pulley (C). Engage parking brake. DO NOT attempt any adjustments, maintenance, service or repairs with your hand and work the belt between the drive disc and...

Operater's Manual
Page 33
...blade(s). 8. Move transmission shift lever to side. 6. Clean the underside of grass clippings and debris under deck. Verify plugs are not cracked & are in the "OFF" position. 2. Check gaskets. 2. Replace ...deck. 6. Insufficient lubrication in chain case or transmission/differential. 1. o 1. Troubleshooting PROBLEM Rider Will Not Move Or Loss of Traction Blade(s) Not Cutting Cutting Grass Improperly Poor Grass Discharge Oil Leaking PROBABLE CAUSE CORRECTIVE ACTION 1. Rubber drive disc is dry. 4. Move lever to rear. 7. Cutting blade(s) dull or damaged. Mower belt slipping. Service...
...blade(s). 8. Move transmission shift lever to side. 6. Clean the underside of grass clippings and debris under deck. Verify plugs are not cracked & are in the "OFF" position. 2. Check gaskets. 2. Replace ...deck. 6. Insufficient lubrication in chain case or transmission/differential. 1. o 1. Troubleshooting PROBLEM Rider Will Not Move Or Loss of Traction Blade(s) Not Cutting Cutting Grass Improperly Poor Grass Discharge Oil Leaking PROBABLE CAUSE CORRECTIVE ACTION 1. Rubber drive disc is dry. 4. Move lever to rear. 7. Cutting blade(s) dull or damaged. Mower belt slipping. Service...
Operater's Manual
Page 36
...products on which engines are collected with- Due to -engine variability. REAR ENGINE RIDING MOWER SERIES 24 Product Specifications 2811524BV 2812524BVE 3014524BVE 3317524BVE Deck Size (inches) 28 28 30 33 Height of Cut (inches) 1.5 - 4.0 1.5 - 4.0 1.5 - 4.0 1.5 - 4.0 ... / 0-1.9 12.5 344 7 5-Spd Disc 1.0-4.6 / 0-1.9 14.5 344 7 t c Common Service Parts Part Number o u Cutter Blade (28") N d Cutter Blade (30") Cutter Blade (33") o Cutting Deck Belt (28 and 30") r Cutting Deck Belt (33") 7104196 7026565 7034168 7022252 7043844 5-Spd Disc 1.0-4.6 / 0-1.9 17.5 502 7 ep...
...products on which engines are collected with- Due to -engine variability. REAR ENGINE RIDING MOWER SERIES 24 Product Specifications 2811524BV 2812524BVE 3014524BVE 3317524BVE Deck Size (inches) 28 28 30 33 Height of Cut (inches) 1.5 - 4.0 1.5 - 4.0 1.5 - 4.0 1.5 - 4.0 ... / 0-1.9 12.5 344 7 5-Spd Disc 1.0-4.6 / 0-1.9 14.5 344 7 t c Common Service Parts Part Number o u Cutter Blade (28") N d Cutter Blade (30") Cutter Blade (33") o Cutting Deck Belt (28 and 30") r Cutting Deck Belt (33") 7104196 7026565 7034168 7022252 7043844 5-Spd Disc 1.0-4.6 / 0-1.9 17.5 502 7 ep...
