Operating Instructions
Page 6
... Parts and Controls 10 Guide to the Control Menu Display 13 Hookups 16 Hooking Up the Player 16 Step 1: Unpacking 16 Step 2: Inserting Batteries Into the Remote 16 Step 3: Connecting the Video Cords/HDMI Cords 17 Step 4: Connecting the Audio Cords 21 Step 5: Connecting the Power Cord 23 ... Discs 25 Resuming Playback From the Point Where You Stopped the Disc (Multi-disc Resume 27 Using the DVD's Menu 28 Selecting "ORIGINAL" or "PLAY LIST" on a DVD-RW/DVD-R 28 Playing VIDEO CDs With PBC Functions (PBC Playback 29 Various Play Mode Functions (Program Play, Shuffle Play, Repeat Play, ...
... Parts and Controls 10 Guide to the Control Menu Display 13 Hookups 16 Hooking Up the Player 16 Step 1: Unpacking 16 Step 2: Inserting Batteries Into the Remote 16 Step 3: Connecting the Video Cords/HDMI Cords 17 Step 4: Connecting the Audio Cords 21 Step 5: Connecting the Power Cord 23 ... Discs 25 Resuming Playback From the Point Where You Stopped the Disc (Multi-disc Resume 27 Using the DVD's Menu 28 Selecting "ORIGINAL" or "PLAY LIST" on a DVD-RW/DVD-R 28 Playing VIDEO CDs With PBC Functions (PBC Playback 29 Various Play Mode Functions (Program Play, Shuffle Play, Repeat Play, ...

Operating Instructions
Page 10
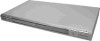
... based on /standby) button (25) B Disc tray (25) C Front panel display (11) D HDMI* (High-Definition Multimedia Interface) indicator (18, 63, 66, 73) Lights up when the player outputs progressive signals. This DVD player incorporates High-Definition Multimedia Interface (HDMI™) technology. E A (open/close) button (25) F H (play) button (25) G x (stop) button (26) H ./> (previous/next) buttons (34...
... based on /standby) button (25) B Disc tray (25) C Front panel display (11) D HDMI* (High-Definition Multimedia Interface) indicator (18, 63, 66, 73) Lights up when the player outputs progressive signals. This DVD player incorporates High-Definition Multimedia Interface (HDMI™) technology. E A (open/close) button (25) F H (play) button (25) G x (stop) button (26) H ./> (previous/next) buttons (34...
Operating Instructions
Page 16
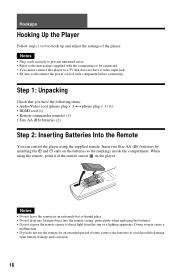
... TV that you do not use the remote for an extended period of the player. Step 1: Unpacking Check that does not have the following items: • Audio/Video cord (phono plug × 3 y phono plug × 3) (1) • HDMI cord (1) • Remote commander (remote) (1) • Size AA (R6...) batteries (2) Step 2: Inserting Batteries Into the Remote You can control the player using the remote, point it at the remote sensor on the batteries to avoid possible...
... TV that you do not use the remote for an extended period of the player. Step 1: Unpacking Check that does not have the following items: • Audio/Video cord (phono plug × 3 y phono plug × 3) (1) • HDMI cord (1) • Remote commander (remote) (1) • Size AA (R6...) batteries (2) Step 2: Inserting Batteries Into the Remote You can control the player using the remote, point it at the remote sensor on the batteries to avoid possible...

Operating Instructions
Page 17
...amplifier (receiver) to LINE OUT (VIDEO) to S VIDEO OUT to HDMI OUT COAXIAL R AUDIO L LINE OUT VIDEO OPTICAL HDMI OUT DIGITAL OUT Y PB PR COMPONENT VIDEO OUT S VIDEO OUT to COMPONENT VIDEO OUT HDMI cord (supplied) (green) (blue) (red) CD/DVD player D IN TV, projector or AV amplifier (receiver) l : Signal ... TV monitor, projector or AV amplifier (receiver) using a video cord. In order to view progressive signal (480p) pictures with HDMI input. Hookups Step 3: Connecting the Video Cords/HDMI Cords Connect this player to your TV monitor, projector or AV amplifier (receiver).
...amplifier (receiver) to LINE OUT (VIDEO) to S VIDEO OUT to HDMI OUT COAXIAL R AUDIO L LINE OUT VIDEO OPTICAL HDMI OUT DIGITAL OUT Y PB PR COMPONENT VIDEO OUT S VIDEO OUT to COMPONENT VIDEO OUT HDMI cord (supplied) (green) (blue) (red) CD/DVD player D IN TV, projector or AV amplifier (receiver) l : Signal ... TV monitor, projector or AV amplifier (receiver) using a video cord. In order to view progressive signal (480p) pictures with HDMI input. Hookups Step 3: Connecting the Video Cords/HDMI Cords Connect this player to your TV monitor, projector or AV amplifier (receiver).

Operating Instructions
Page 18
... on the front panel. Green Blue Red Green Blue Red D If you are connecting to an HDMI/DVI input jack Use a certified Sony HDMI cord (supplied) to enjoy high quality digital picture and sound through the HDMI OUT jack. You will enjoy high quality images. When connecting to the... HDMI OUT jack, carefully align the HDMI connector with DVI input Use an HDMI-DVI converter cord (not supplied). ...
... on the front panel. Green Blue Red Green Blue Red D If you are connecting to an HDMI/DVI input jack Use a certified Sony HDMI cord (supplied) to enjoy high quality digital picture and sound through the HDMI OUT jack. You will enjoy high quality images. When connecting to the... HDMI OUT jack, carefully align the HDMI connector with DVI input Use an HDMI-DVI converter cord (not supplied). ...

Operating Instructions
Page 20
...based software in progressive signal format, sections of some types of the above condition. About DVD software types and the conversion method DVD software can select the signal format in which the player outputs video signals (Progressive or Interlace), and the conversion method for video-based software. In...progressive signals. You cannot select this if the image is lit. Each time you select PROGRESSIVE AUTO. Select this setting while the HDMI indicator is not clear when you press PROGRESSIVE, the display changes as dramas and sit-coms, and displays images at 24 frames per...
...based software in progressive signal format, sections of some types of the above condition. About DVD software types and the conversion method DVD software can select the signal format in which the player outputs video signals (Progressive or Interlace), and the conversion method for video-based software. In...progressive signals. You cannot select this if the image is lit. Each time you select PROGRESSIVE AUTO. Select this setting while the HDMI indicator is not clear when you press PROGRESSIVE, the display changes as dramas and sit-coms, and displays images at 24 frames per...

Operating Instructions
Page 21
... to LINE OUT L/R (AUDIO) COAXIAL R AUDIO L LINE OUT VIDEO OPTICAL HDMI OUT DIGITAL OUT Y PB PR COMPONENT VIDEO OUT S VIDEO OUT to DIGITAL OUT (COAXIAL or OPTICAL)/HDMI OUT CD/DVD player COAXIAL OPTICAL HDMI OUT DIGITAL OUT or or Optical digital cord (not supplied) Remove jack cap ...before connecting Coaxial digital cord (not supplied) HDMI cord (supplied) [Speakers] Rear (L) to the input jack on...
... to LINE OUT L/R (AUDIO) COAXIAL R AUDIO L LINE OUT VIDEO OPTICAL HDMI OUT DIGITAL OUT Y PB PR COMPONENT VIDEO OUT S VIDEO OUT to DIGITAL OUT (COAXIAL or OPTICAL)/HDMI OUT CD/DVD player COAXIAL OPTICAL HDMI OUT DIGITAL OUT or or Optical digital cord (not supplied) Remove jack cap ...before connecting Coaxial digital cord (not supplied) HDMI cord (supplied) [Speakers] Rear (L) to the input jack on...

Operating Instructions
Page 22
...VIDEO cord, or audio/video cord). • When connecting to the HDMI OUT jack, carefully align the HDMI connector with this connection. • When you connect the player to an AV amplifier (receiver) using an HDMI cord, you connect an amplifier (receiver) that conforms to the 96 kHz... and a digital input jack, use this player cannot be used with the jack. Connect the AV amplifier (receiver) to the HDMI cord. 22 Connect using a coaxial or optical digital cord (not supplied)/HDMI cord (supplied). Coaxial cord Optical cord HDMI cord • Surround effect Dolby Digital (5.1ch...
...VIDEO cord, or audio/video cord). • When connecting to the HDMI OUT jack, carefully align the HDMI connector with this connection. • When you connect the player to an AV amplifier (receiver) using an HDMI cord, you connect an amplifier (receiver) that conforms to the 96 kHz... and a digital input jack, use this player cannot be used with the jack. Connect the AV amplifier (receiver) to the HDMI cord. 22 Connect using a coaxial or optical digital cord (not supplied)/HDMI cord (supplied). Coaxial cord Optical cord HDMI cord • Surround effect Dolby Digital (5.1ch...

Operating Instructions
Page 23
...AUDIO: SUBTITLE: ENGLISH ENGLISH FRENCH SPANISH PORTUGUESE 5 Press X/x to the previous adjustment, press .. Step 5: Connecting the Power Cord Plug the player and TV power cords into an AC outlet. Step 6: Quick Setup Follow the steps below to run Quick Setup (page 62). 4 Press ...not appear, select "QUICK" (quick) under "SETUP" (setup) in the selected language. 6 Press ENTER. SCREEN SETUP TV TYPE: 16:9 HDMI RESOLUTION: 16:9 YCBCR/RGB (HDMI): 4:3 LETTER BOX SCREEN SAVER: 4:3 PAN SCAN BACKGROUND: JACKET PICTURE BLACK LEVEL: ON BLACK LEVEL (COMPONENT OUT): OFF 4:3 OUTPUT: FULL ...
...AUDIO: SUBTITLE: ENGLISH ENGLISH FRENCH SPANISH PORTUGUESE 5 Press X/x to the previous adjustment, press .. Step 5: Connecting the Power Cord Plug the player and TV power cords into an AC outlet. Step 6: Quick Setup Follow the steps below to run Quick Setup (page 62). 4 Press ...not appear, select "QUICK" (quick) under "SETUP" (setup) in the selected language. 6 Press ENTER. SCREEN SETUP TV TYPE: 16:9 HDMI RESOLUTION: 16:9 YCBCR/RGB (HDMI): 4:3 LETTER BOX SCREEN SAVER: 4:3 PAN SCAN BACKGROUND: JACKET PICTURE BLACK LEVEL: ON BLACK LEVEL (COMPONENT OUT): OFF 4:3 OUTPUT: FULL ...

Operating Instructions
Page 24
YES LINE OUTPUT L/R(AUDIO) DIGITAL OUTPUT NO 9 Press X/x to select the type of jack (if any) you are using a digital coaxial or optical/HDMI cord, select "YES: DIGITAL OUTPUT." 10Press X/x to select the type of Dolby Digital signal you wish to send to your TV type. ◆ ...Otherwise, select "D-PCM." "DTS" is finished. If you did not connect an AV amplifier (receiver), select "NO," then go to step 13. Is this player connected to step 13. If you connected an AV amplifier (receiver) using . AUDIO SETUP AUDIO ATT: OFF AUDIO DRC: STANDARD AUDIO FILTER: SHARP DOWNMIX: DOLBY...
YES LINE OUTPUT L/R(AUDIO) DIGITAL OUTPUT NO 9 Press X/x to select the type of jack (if any) you are using a digital coaxial or optical/HDMI cord, select "YES: DIGITAL OUTPUT." 10Press X/x to select the type of Dolby Digital signal you wish to send to your TV type. ◆ ...Otherwise, select "D-PCM." "DTS" is finished. If you did not connect an AV amplifier (receiver), select "NO," then go to step 13. Is this player connected to step 13. If you connected an AV amplifier (receiver) using . AUDIO SETUP AUDIO ATT: OFF AUDIO DRC: STANDARD AUDIO FILTER: SHARP DOWNMIX: DOLBY...

Operating Instructions
Page 25
...A loud noise may be damaged. The disc tray closes. Notes on playing DTS sound tracks on a DVD VIDEO • DTS audio signals are output only through the DIGITAL OUT (COAXIAL or OPTICAL)/HDMI OUT jack. • When you leave it in "CUSTOM SETUP" to the operating instructions supplied with...on the TV or the amplifier (receiver). Adjust the volume on the disc tray. To turn this function on the DVD or VIDEO CD, some operations may come out from the player. Playing Discs Depending on or off, set "AUTO POWER OFF" in stop mode for more information about finalizing, ...
...A loud noise may be damaged. The disc tray closes. Notes on playing DTS sound tracks on a DVD VIDEO • DTS audio signals are output only through the DIGITAL OUT (COAXIAL or OPTICAL)/HDMI OUT jack. • When you leave it in "CUSTOM SETUP" to the operating instructions supplied with...on the TV or the amplifier (receiver). Adjust the volume on the disc tray. To turn this function on the DVD or VIDEO CD, some operations may come out from the player. Playing Discs Depending on or off, set "AUTO POWER OFF" in stop mode for more information about finalizing, ...

Operating Instructions
Page 41
...when playing a disc containing a song with multilingual tracks, you connect to an AV amplifier (receiver) using the DIGITAL OUT (COAXIAL or OPTICAL)/ HDMI OUT jack and want to switch between the sound tracks, set "DOLBY DIGITAL" to see which the audio track 2 is not recorded, no...• 1: MAIN (main sound) • 1: SUB (sub sound) • 1: MAIN+SUB (main and sub sound) ◆ When playing a VIDEO CD, CD or DATA CD (MP3 audio)/DATA DVD (MP3 audio) The default setting is underlined. • STEREO: the standard stereo sound • 1/L: the sound of the left channel (monaural) • ...
...when playing a disc containing a song with multilingual tracks, you connect to an AV amplifier (receiver) using the DIGITAL OUT (COAXIAL or OPTICAL)/ HDMI OUT jack and want to switch between the sound tracks, set "DOLBY DIGITAL" to see which the audio track 2 is not recorded, no...• 1: MAIN (main sound) • 1: SUB (sub sound) • 1: MAIN+SUB (main and sub sound) ◆ When playing a VIDEO CD, CD or DATA CD (MP3 audio)/DATA DVD (MP3 audio) The default setting is underlined. • STEREO: the standard stereo sound • 1/L: the sound of the left channel (monaural) • ...
Operating Instructions
Page 42
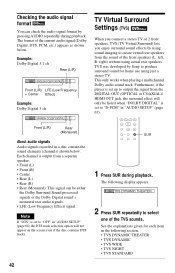
... Rear (Monaural) About audio signals Audio signals recorded in the following display appears. Furthermore, if the player is set up to select one of the current audio signal (Dolby Digital, DTS, PCM, etc...Press SUR repeatedly to output the signal from the DIGITAL OUT (OPTICAL or COAXIAL)/ HDMI OUT jack, the surround effect will not appear on the screen even if the ... connect a stereo TV or 2 front speakers, TVS (TV Virtual Surround) lets you enjoy surround sound effects by Sony to create virtual rear speakers from a separate speaker. • Front (L) • Front (R) • Center...
... Rear (Monaural) About audio signals Audio signals recorded in the following display appears. Furthermore, if the player is set up to select one of the current audio signal (Dolby Digital, DTS, PCM, etc...Press SUR repeatedly to output the signal from the DIGITAL OUT (OPTICAL or COAXIAL)/ HDMI OUT jack, the surround effect will not appear on the screen even if the ... connect a stereo TV or 2 front speakers, TVS (TV Virtual Surround) lets you enjoy surround sound effects by Sony to create virtual rear speakers from a separate speaker. • Front (L) • Front (R) • Center...

Operating Instructions
Page 43
... all discs will respond to the "TVS NIGHT" function in the same way. • If you want to use the DIGITAL OUT (OPTICAL or COAXIAL)/HDMI OUT jack and set "DOLBY DIGITAL" to "DOLBY DIGITAL," and "DTS" to "ON" in "AUDIO SETUP," sound will not have the SURROUND effect. • The...
... all discs will respond to the "TVS NIGHT" function in the same way. • If you want to use the DIGITAL OUT (OPTICAL or COAXIAL)/HDMI OUT jack and set "DOLBY DIGITAL" to "DOLBY DIGITAL," and "DTS" to "ON" in "AUDIO SETUP," sound will not have the SURROUND effect. • The...

Operating Instructions
Page 49
... not match the pictures on the screen, you press C/c, the delay is not effective if you connect a Dolby Digital or DTS-compliant device via the HDMI OUT jack, and set "DOLBY DIGITAL" or "DTS" in AUDIO SETUP to "DOLBY DIGITAL" or "ON" respectively (page 67). 3 Press x to select "SET c",...Press CLEAR in AUDIO SETUP to "DOLBY DIGITAL" or "ON" respectively (page 67). • This function is adjusted by 10 milliseconds. 5 Press ENTER. STOP DVD VIDEO 0 ms SET AV SYNC 0ms 4 Press c repeatedly to select (AV SYNC), then press ENTER. Notes • This function is not effective if you ...
... not match the pictures on the screen, you press C/c, the delay is not effective if you connect a Dolby Digital or DTS-compliant device via the HDMI OUT jack, and set "DOLBY DIGITAL" or "DTS" in AUDIO SETUP to "DOLBY DIGITAL" or "ON" respectively (page 67). 3 Press x to select "SET c",...Press CLEAR in AUDIO SETUP to "DOLBY DIGITAL" or "ON" respectively (page 67). • This function is adjusted by 10 milliseconds. 5 Press ENTER. STOP DVD VIDEO 0 ms SET AV SYNC 0ms 4 Press c repeatedly to select (AV SYNC), then press ENTER. Notes • This function is not effective if you ...

Operating Instructions
Page 61
...make various adjustments to select an item, then press ENTER. Example: "SCREEN SETUP" Selected item ENTER DISPLAY 1 Press DISPLAY when the player is selected. The options for the subtitles and the Setup Display, among other things. The Control Menu appears. 2 Press X/x to...ENGLISH ORIGINAL ENGLISH 4 Press X/x to 68. The options for "SETUP" appear. ( 47 ) STOP DVD VIDEO QUICK CUSTOM RESET QUICK SCREEN SETUP TV TYPE: 16:9 HDMI RESOLUTION: AUTO YCBCR/RGB (HDMI): YCBCR SCREEN SAVER: ON BACKGROUND: JACKET PICTURE BLACK LEVEL: ON BLACK LEVEL (COMPONENT OUT): OFF 4:3...
...make various adjustments to select an item, then press ENTER. Example: "SCREEN SETUP" Selected item ENTER DISPLAY 1 Press DISPLAY when the player is selected. The options for the subtitles and the Setup Display, among other things. The Control Menu appears. 2 Press X/x to...ENGLISH ORIGINAL ENGLISH 4 Press X/x to 68. The options for "SETUP" appear. ( 47 ) STOP DVD VIDEO QUICK CUSTOM RESET QUICK SCREEN SETUP TV TYPE: 16:9 HDMI RESOLUTION: AUTO YCBCR/RGB (HDMI): YCBCR SCREEN SAVER: ON BACKGROUND: JACKET PICTURE BLACK LEVEL: ON BLACK LEVEL (COMPONENT OUT): OFF 4:3...

Operating Instructions
Page 62
...Do not press [/1 while resetting the player, which takes a few seconds to select a setting, then press ENTER. To use the display, see "Using the Setup Display" (page 61). The setting is selected and setup is selected. ◆ SUBTITLE (DVD VIDEO only) Switches the language of ... the recorded languages will be automatically selected. 62 Example: "4:3 PAN SCAN" Selected setting SCREEN SETUP TV TYPE: 4:3 PAN SCAN HDMI RESOLUTION: AUTO YCBCR/RGB (HDMI): YCBCR SCREEN SAVER: ON BACKGROUND: JACKET PICTURE BLACK LEVEL: ON BLACK LEVEL (COMPONENT OUT): OFF 4:3 OUTPUT: FULL To enter...
...Do not press [/1 while resetting the player, which takes a few seconds to select a setting, then press ENTER. To use the display, see "Using the Setup Display" (page 61). The setting is selected and setup is selected. ◆ SUBTITLE (DVD VIDEO only) Switches the language of ... the recorded languages will be automatically selected. 62 Example: "4:3 PAN SCAN" Selected setting SCREEN SETUP TV TYPE: 4:3 PAN SCAN HDMI RESOLUTION: AUTO YCBCR/RGB (HDMI): YCBCR SCREEN SAVER: ON BACKGROUND: JACKET PICTURE BLACK LEVEL: ON BLACK LEVEL (COMPONENT OUT): OFF 4:3 OUTPUT: FULL To enter...
Operating Instructions
Page 63
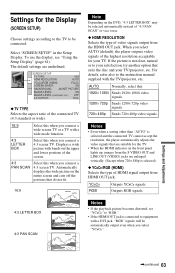
...Automatically displays the wide picture on the entire screen and cuts off the portions that are suitable for the TV. • When the HDMI indicator on the DVD, "4:3 LETTER BOX" may be automatically output even when you connect a wide-screen TV or a TV with bands on the upper and...; 480p video signals. When you connect a 4:3 screen TV. AUTO Normally, select this when you select AUTO (default), the player outputs video signals of video signals output from the HDMI OUT jack. Notes • Even when a setting other than "AUTO" is not clear, natural or to the instruction manual...
...Automatically displays the wide picture on the entire screen and cuts off the portions that are suitable for the TV. • When the HDMI indicator on the DVD, "4:3 LETTER BOX" may be automatically output even when you connect a wide-screen TV or a TV with bands on the upper and...; 480p video signals. When you connect a 4:3 screen TV. AUTO Normally, select this when you select AUTO (default), the player outputs video signals of video signals output from the HDMI OUT jack. Notes • Even when a setting other than "AUTO" is not clear, natural or to the instruction manual...

Operating Instructions
Page 64
...select this position. Use this when the picture becomes too white. ◆ BLACK LEVEL (COMPONENT OUT) Selects the black level (setup level) for HDMI connection or progressive signals output from becoming damaged (ghosting). Shows a 16:9 aspect ratio signal with black bands on left and right sides of the ...on the TV screen when the player is effective only when you set "TV TYPE" in pause or stop mode or while playing a CD or DATA CD (MP3 audio)/DATA DVD (MP3 audio). OFF Turns off the screen saver. If you play a CD or DATA CD (MP3 audio)/DATA DVD (MP3 audio) for the video...
...select this position. Use this when the picture becomes too white. ◆ BLACK LEVEL (COMPONENT OUT) Selects the black level (setup level) for HDMI connection or progressive signals output from becoming damaged (ghosting). Shows a 16:9 aspect ratio signal with black bands on left and right sides of the ...on the TV screen when the player is effective only when you set "TV TYPE" in pause or stop mode or while playing a CD or DATA CD (MP3 audio)/DATA DVD (MP3 audio). OFF Turns off the screen saver. If you play a CD or DATA CD (MP3 audio)/DATA DVD (MP3 audio) for the video...

Operating Instructions
Page 65
...lighting of the front panel display. CUSTOM SETUP AUTO POWER OFF: AUTO PLAY: DIMMER: PAUSE MODE: TRACK SELECTION: MULTI-DISC RESUME: AUDIO (HDMI): OFF OFF BRIGHT AUTO OFF ON AUTO ◆ AUTO POWER OFF Switches the Auto Power Off setting on or off . OFF AUTO No ...ON OFF Stores the resume setting in memory for up to 6 different DVD VIDEOs/ VIDEO CDs (page 27). Settings and Adjustments ,continued 65 Automatically starts playback when the player is output in high resolution. ◆ TRACK SELECTION (DVD VIDEO only) Gives the sound track which contains the highest number of...
...lighting of the front panel display. CUSTOM SETUP AUTO POWER OFF: AUTO PLAY: DIMMER: PAUSE MODE: TRACK SELECTION: MULTI-DISC RESUME: AUDIO (HDMI): OFF OFF BRIGHT AUTO OFF ON AUTO ◆ AUTO POWER OFF Switches the Auto Power Off setting on or off . OFF AUTO No ...ON OFF Stores the resume setting in memory for up to 6 different DVD VIDEOs/ VIDEO CDs (page 27). Settings and Adjustments ,continued 65 Automatically starts playback when the player is output in high resolution. ◆ TRACK SELECTION (DVD VIDEO only) Gives the sound track which contains the highest number of...


