
The Sony Guide to Home Theater
Page 18
..." diagonal 13' 53" diagonal 15' 61" diagonal For "high definition monitor" televisions with 4:3 aspect ratio and 1080i or 480p scanning Viewing Recommended Sony Distance TV Screen Size 7' 32" diagonal 7' 6" 36" diagonal 8' 40" ... The guidelines for three classes of television. Much will depend on the amount of space you have for a television, the size of what you watch...cinematic experience, you may be better off with widescreen 16:9 aspect ratio and 1080i or 480p scanning Viewing Recommended Sony TV Screen Size Distance 5' 32" diagonal widescreen 5' 6" 34...
..." diagonal 13' 53" diagonal 15' 61" diagonal For "high definition monitor" televisions with 4:3 aspect ratio and 1080i or 480p scanning Viewing Recommended Sony Distance TV Screen Size 7' 32" diagonal 7' 6" 36" diagonal 8' 40" ... The guidelines for three classes of television. Much will depend on the amount of space you have for a television, the size of what you watch...cinematic experience, you may be better off with widescreen 16:9 aspect ratio and 1080i or 480p scanning Viewing Recommended Sony TV Screen Size Distance 5' 32" diagonal widescreen 5' 6" 34...

Marketing Specifications
Page 2
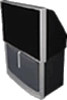
...x D): KP-65WS50060 3/4 x 57 1/8 x 28 7/8 (1542.1x1452.2x735mm) KP-57WS50052 1/4 x 54 1/8 x 27 1/8 (1326x1375x690mm) KP-51WS50047 x 51 1/2 x 24 3/4 (1194x1308x630mm) KP-65WS500 275lbs 9oz (125kg) KP-57WS500 210lbs 2oz (95.3)kg KP-51WS500 168lbs (76.2kg) 1 Rear • DVI-HDTV Interface ©2002 Sony Electronics Inc....screen. Product Information KP-65WS500 KP-57WS500 KP-51WS500 Hi-Scan 1080i™ 16:9 Projection Television KEY TECHNOLOGY Hi-Scan 1080i™ Display Sony's Hi-Scan1080i™ TV's accept the full 1080 interlaced scanning lines (1080i) or 720 progressive scan (720p) from ...
...x D): KP-65WS50060 3/4 x 57 1/8 x 28 7/8 (1542.1x1452.2x735mm) KP-57WS50052 1/4 x 54 1/8 x 27 1/8 (1326x1375x690mm) KP-51WS50047 x 51 1/2 x 24 3/4 (1194x1308x630mm) KP-65WS500 275lbs 9oz (125kg) KP-57WS500 210lbs 2oz (95.3)kg KP-51WS500 168lbs (76.2kg) 1 Rear • DVI-HDTV Interface ©2002 Sony Electronics Inc....screen. Product Information KP-65WS500 KP-57WS500 KP-51WS500 Hi-Scan 1080i™ 16:9 Projection Television KEY TECHNOLOGY Hi-Scan 1080i™ Display Sony's Hi-Scan1080i™ TV's accept the full 1080 interlaced scanning lines (1080i) or 720 progressive scan (720p) from ...
Dimensions Diagram
Page 1
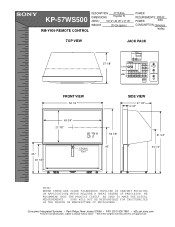
KP-57WS500 DESCRIPTION: 51" Hi-Scan DIMENSIONS Projection TV (WHD): 52 1/4" x 54 1/8" x 27 1/8" WEIGHT: 210 Lbs (approx.) RM-Y909 ...CONVERTER CONTROL S IN OUT AUX IN FRONT VIEW 52 1/4 " SIDE VIEW 27 1/8" 4 1/8" 25 " 23 1/2 " 49 3/4" 27 7/8" 57" 54 1/8" R Ir Receiver under Power button 40" 51 3/4" 34 1/4" NOTE: WHERE THERE ARE CLOSE TOLERANCES INVOLVED IN CABINET BUILDING OR APPLICATIONS ... New Jersey 07656 • FAX (201) 930 7891 • b2b.sel.sony.com Features and specifications subject to change without notice. • Non-metric weights and measurements are approximate...
KP-57WS500 DESCRIPTION: 51" Hi-Scan DIMENSIONS Projection TV (WHD): 52 1/4" x 54 1/8" x 27 1/8" WEIGHT: 210 Lbs (approx.) RM-Y909 ...CONVERTER CONTROL S IN OUT AUX IN FRONT VIEW 52 1/4 " SIDE VIEW 27 1/8" 4 1/8" 25 " 23 1/2 " 49 3/4" 27 7/8" 57" 54 1/8" R Ir Receiver under Power button 40" 51 3/4" 34 1/4" NOTE: WHERE THERE ARE CLOSE TOLERANCES INVOLVED IN CABINET BUILDING OR APPLICATIONS ... New Jersey 07656 • FAX (201) 930 7891 • b2b.sel.sony.com Features and specifications subject to change without notice. • Non-metric weights and measurements are approximate...

Operating Instructions
Page 7
...Sony Projection TV Presenting the Sony Projection TV 8 Using this manual 9 Installing and Connecting the Projection TV Contents 10 Inserting Batteries into the Remote Control ..........10 Carrying Your Projection TV 10 Installing the Projection TV 11 Connector Types 12 Projection TV Controls and Connectors 13 Basic Connections (Connecting Cable TV or Antenna 16...Using the Audio Menu 51 Using the Channel Menu 53 Using the Wide Menu 55 Using the Timer Menu 57 Using the Setup Menu 58 Other Information Programming the Remote Control 68 Operating Other Components with A/V Connectors .....
...Sony Projection TV Presenting the Sony Projection TV 8 Using this manual 9 Installing and Connecting the Projection TV Contents 10 Inserting Batteries into the Remote Control ..........10 Carrying Your Projection TV 10 Installing the Projection TV 11 Connector Types 12 Projection TV Controls and Connectors 13 Basic Connections (Connecting Cable TV or Antenna 16...Using the Audio Menu 51 Using the Channel Menu 53 Using the Wide Menu 55 Using the Timer Menu 57 Using the Setup Menu 58 Other Information Programming the Remote Control 68 Operating Other Components with A/V Connectors .....

Operating Instructions
Page 11
... has been equipped with casters for easy movement on each side) (KP-65WS500 only) Do not carry the TV by placing hands under the front screen Installing the Projection TV 65"min. 57" min. 51" min. 2.4 2.1 1.8 m m m (approx. (approx. (approx. 8 7 6 ft.) ft.) ft.) 20˚ 20˚ 51"min. 60˚ 15.87mm"(ianp...
... has been equipped with casters for easy movement on each side) (KP-65WS500 only) Do not carry the TV by placing hands under the front screen Installing the Projection TV 65"min. 57" min. 51" min. 2.4 2.1 1.8 m m m (approx. (approx. (approx. 8 7 6 ft.) ft.) ft.) 20˚ 20˚ 51"min. 60˚ 15.87mm"(ianp...

Operating Instructions
Page 34
... details, see "Selecting Video Options" on page 49. Press when in the Video menu. Press to restore the picture. See page 57 for movement of the joystick selects the item. You can view and select from all receivable channels scrolling on page 40. Press again or.../UHF input and the AUX input. Button Descriptions Outside Panel Button 1 MUTING 2 SLEEP 3 ANT 4 DISPLAY 5 JUMP 6 FREEZE 7 INDEX 8 9 VOL +/- The projection TV alternates between the current channel and the last channel that are for more advanced functions. Pressing down on the center of the on-screen...
... details, see "Selecting Video Options" on page 49. Press when in the Video menu. Press to restore the picture. See page 57 for movement of the joystick selects the item. You can view and select from all receivable channels scrolling on page 40. Press again or.../UHF input and the AUX input. Button Descriptions Outside Panel Button 1 MUTING 2 SLEEP 3 ANT 4 DISPLAY 5 JUMP 6 FREEZE 7 INDEX 8 9 VOL +/- The projection TV alternates between the current channel and the last channel that are for more advanced functions. Pressing down on the center of the on-screen...

Operating Instructions
Page 48
...Provides several options for setting up a Favorite Channel list, run the Auto 53 Program function, and more. Lets you set the clock on your projection TV and allows 57 you to set the 4:3 Default mode. Using the Menus Overview To end a menu session: Press MENU again. Allows you to set the wide... vertical center in wide mode, and set up your channels, 58 labeling your Video inputs, and selecting the language of program you to program your projection TV. Move the joystick B or b to choose the next menu icon and press to scroll through the features. 4 See the specific menu page ...
...Provides several options for setting up a Favorite Channel list, run the Auto 53 Program function, and more. Lets you set the clock on your projection TV and allows 57 you to set the 4:3 Default mode. Using the Menus Overview To end a menu session: Press MENU again. Allows you to set the wide... vertical center in wide mode, and set up your channels, 58 labeling your Video inputs, and selecting the language of program you to program your projection TV. Move the joystick B or b to choose the next menu icon and press to scroll through the features. 4 See the specific menu page ...
Operating Instructions
Page 57
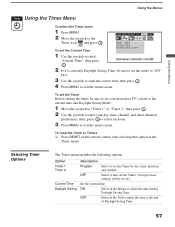
... press . 4 Press MENU to adjust the time at the end of Daylight Saving Time. 57 To set your day, time, channel, and timer duration preferences; then, press to select each one. 3 Press MENU to enter your projection TV's clock to the current time and Daylight Saving Mode. 1 Move the joystick to "Timer...
... press . 4 Press MENU to adjust the time at the end of Daylight Saving Time. 57 To set your day, time, channel, and timer duration preferences; then, press to select each one. 3 Press MENU to enter your projection TV's clock to the current time and Daylight Saving Mode. 1 Move the joystick to "Timer...
Operating Instructions
Page 76
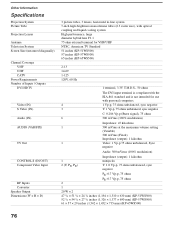
Other Information Specifications Projection System Picture Tube Projection Lenses Antenna Television System Screen Size (measured diagonally) Channel Coverage VHF UHF CATV Power Requirements Number of Inputs / Outputs DVI-HDTV Video (IN) S Video (IN) Audio (IN) AUDIO ... liquid cooling system High performance, large diameter hybrid lens F1.1 75 ohm external terminal for VHF/UHF NTSC, American TV Standard 51 inches (KP-51WS500) 57 inches (KP-57WS500) 65 inches (KP-65WS500) 2-13 14-69 1-125 120V, 60 Hz 1 terminal, 3.3V T.M.D.S., 50 ohms The DVI input terminal is compliant with the EIA-861 ...
Other Information Specifications Projection System Picture Tube Projection Lenses Antenna Television System Screen Size (measured diagonally) Channel Coverage VHF UHF CATV Power Requirements Number of Inputs / Outputs DVI-HDTV Video (IN) S Video (IN) Audio (IN) AUDIO ... liquid cooling system High performance, large diameter hybrid lens F1.1 75 ohm external terminal for VHF/UHF NTSC, American TV Standard 51 inches (KP-51WS500) 57 inches (KP-57WS500) 65 inches (KP-65WS500) 2-13 14-69 1-125 120V, 60 Hz 1 terminal, 3.3V T.M.D.S., 50 ohms The DVI input terminal is compliant with the EIA-861 ...

Operating Instructions
Page 79
... Cable or antenna 16 Camcorder 29 Digital TV Receiver 28 DVD player 26, 27 Satellite receiver 23, 24 VCR 20-22, 24 Connector Types 12 Contents of box 10 CONTROL S 31 Convergence, adjusting automatically 33 D Daylight saving 57 Digital Reality Creation 50 Digital TV connecting 28 watching 39 Digital ..., connecting 26 E Effect Dolby Virtual51 OFF 51 Simulated 51 Enlarging pictures, in remote 10 Bilingual audio 51 Brightness, adjusting 49 C Cable connecting 16-18 setting ON/OFF 53 with VCR, connecting 19-20 Cable box connecting with VCR 20 using with TV remote control 72 Camcorder, connecting 29...
... Cable or antenna 16 Camcorder 29 Digital TV Receiver 28 DVD player 26, 27 Satellite receiver 23, 24 VCR 20-22, 24 Connector Types 12 Contents of box 10 CONTROL S 31 Convergence, adjusting automatically 33 D Daylight saving 57 Digital Reality Creation 50 Digital TV connecting 28 watching 39 Digital ..., connecting 26 E Effect Dolby Virtual51 OFF 51 Simulated 51 Enlarging pictures, in remote 10 Bilingual audio 51 Brightness, adjusting 49 C Cable connecting 16-18 setting ON/OFF 53 with VCR, connecting 19-20 Cable box connecting with VCR 20 using with TV remote control 72 Camcorder, connecting 29...
Operating Instructions
Page 80
...using 37, 44 Front Panel Controls 13 FUNCTION buttons (WHITE) 35 H Hookups 16-31 Hue, adjusting 49 I Inputs, labeling 59 Installation of the projection TV 16-31 J JUMP button 34 Jump, using 37 L Label channels 54 video ...inputs 59 M MENU button 35 Menus Audio 48, 51 Channel 48, 53 Setup 48, 58 Timer 48, 57 Video 48, ... Removing channels from the channel list 54 RESET button 34 Resetting Audio options 51 Timer options 57 Video options 49 S S Video cable 12 SAT/CABLE function button 35 SAT/CABLE power ...
...using 37, 44 Front Panel Controls 13 FUNCTION buttons (WHITE) 35 H Hookups 16-31 Hue, adjusting 49 I Inputs, labeling 59 Installation of the projection TV 16-31 J JUMP button 34 Jump, using 37 L Label channels 54 video ...inputs 59 M MENU button 35 Menus Audio 48, 51 Channel 48, 53 Setup 48, 58 Timer 48, 57 Video 48, ... Removing channels from the channel list 54 RESET button 34 Resetting Audio options 51 Timer options 57 Video options 49 S S Video cable 12 SAT/CABLE function button 35 SAT/CABLE power ...

Operating Instructions
Page 81
... 48, 49 Video Modes, selecting 49 Viewing area, recommended 11 VOL +/- Surround sound 51 SYSTEM OFF button 36 T Time set current 57 set daylight saving 57 Timer menu 48, 57 Timer setting 57 Treble, adjusting 51 Troubleshooting 73-75 TV function button 35 TV power button 35 TV/VIDEO button 35 Twin View™...
... 48, 49 Video Modes, selecting 49 Viewing area, recommended 11 VOL +/- Surround sound 51 SYSTEM OFF button 36 T Time set current 57 set daylight saving 57 Timer menu 48, 57 Timer setting 57 Treble, adjusting 51 Troubleshooting 73-75 TV function button 35 TV power button 35 TV/VIDEO button 35 Twin View™...


