
Marketing Specifications
Page 2
..., this CRT produces a 30% tighter beam spot compared to 480 progressive image quality. Product Information KP-65WS500 KP-57WS500 KP-51WS500 Hi-Scan 1080i™ 16:9 Projection Television KEY TECHNOLOGY Hi-Scan 1080i™ Display Sony's Hi-Scan1080i™ TV's accept the full 1080 interlaced scanning lines (1080i) or 720 progressive scan (720p) from an external HDTV receiver or a compatible high definition digital satellite receiver.
..., this CRT produces a 30% tighter beam spot compared to 480 progressive image quality. Product Information KP-65WS500 KP-57WS500 KP-51WS500 Hi-Scan 1080i™ 16:9 Projection Television KEY TECHNOLOGY Hi-Scan 1080i™ Display Sony's Hi-Scan1080i™ TV's accept the full 1080 interlaced scanning lines (1080i) or 720 progressive scan (720p) from an external HDTV receiver or a compatible high definition digital satellite receiver.

Operating Instructions
Page 2
... the presence of important operating and maintenance (servicing) instructions in this manual could void your warranty and your authority to operate this television receiver for other outlet unless the blades can be determined by cable companies or satellite for the use your projection TV, or viewing a TV station whose logo always stays on...
... the presence of important operating and maintenance (servicing) instructions in this manual could void your warranty and your authority to operate this television receiver for other outlet unless the blades can be determined by cable companies or satellite for the use your projection TV, or viewing a TV station whose logo always stays on...
Operating Instructions
Page 3
...When viewing programs with the instruction manual. Please refer to your TV, resulting in retention of the image in a place subject to excessive dust or mechanical vibration. ❑ Avoid operating the projection TV at the rear of the projection TV, below the Sony logo, on the sticker, ...5°C (41°F). ❑ If the projection TV is desirable to reduce the "Picture" and "Brightness" levels. Serial No. 3 Refer to reduce the risk of causing image retention: View a variety of causing image retention. MODELS: KP-51WS500, KP-57WS500, and KP65WS500. Please keep this product. ...
...When viewing programs with the instruction manual. Please refer to your TV, resulting in retention of the image in a place subject to excessive dust or mechanical vibration. ❑ Avoid operating the projection TV at the rear of the projection TV, below the Sony logo, on the sticker, ...5°C (41°F). ❑ If the projection TV is desirable to reduce the "Picture" and "Brightness" levels. Serial No. 3 Refer to reduce the risk of causing image retention: View a variety of causing image retention. MODELS: KP-51WS500, KP-57WS500, and KP65WS500. Please keep this product. ...

Operating Instructions
Page 4
... the outlet, try reversing the plug. Overloading Do not overload wall outlets, extension cords or convenience receptacles beyond their capacity, since this manual for some TV sets to make occasional snapping or popping sounds, particularly when being turned on or off when it is not being used... the manufacturer, as they may be observed in the installation, use strong solvents such as thinner or benzine for a long period of the projection TV. Consult qualified service personnel. 4 Object and Liquid Entry Never push objects of any kind on the set through the cabinet slots as ...
... the outlet, try reversing the plug. Overloading Do not overload wall outlets, extension cords or convenience receptacles beyond their capacity, since this manual for some TV sets to make occasional snapping or popping sounds, particularly when being turned on or off when it is not being used... the manufacturer, as they may be observed in the installation, use strong solvents such as thinner or benzine for a long period of the projection TV. Consult qualified service personnel. 4 Object and Liquid Entry Never push objects of any kind on the set through the cabinet slots as ...

Operating Instructions
Page 7
Contents Introducing the Sony Projection TV Presenting the Sony Projection TV 8 Using this manual 9 Installing and Connecting the Projection TV Contents 10 Inserting Batteries into the Remote Control ..........10 Carrying Your Projection TV 10 Installing the Projection TV 11 Connector Types 12 Projection TV Controls and Connectors 13 Basic Connections (Connecting Cable TV or Antenna 16 Connecting a VCR and Cable 19...
Contents Introducing the Sony Projection TV Presenting the Sony Projection TV 8 Using this manual 9 Installing and Connecting the Projection TV Contents 10 Inserting Batteries into the Remote Control ..........10 Carrying Your Projection TV 10 Installing the Projection TV 11 Connector Types 12 Projection TV Controls and Connectors 13 Basic Connections (Connecting Cable TV or Antenna 16 Connecting a VCR and Cable 19...
Operating Instructions
Page 8
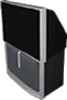
... a DTV (digital television) receiver to view DTV programs. ❑ DRC™ Multi-Function: Unlike conventional line doublers, the DRC feature doubles vertical and horizontal lines, resulting in the selected window. This manual is used for models KP-51WS500, KP-57WS500, and KP-65WS500. Introducing the Sony Projection TV Presenting the Sony Projection TV Thank you to receive the 1080i, 720p, 480p...
... a DTV (digital television) receiver to view DTV programs. ❑ DRC™ Multi-Function: Unlike conventional line doublers, the DRC feature doubles vertical and horizontal lines, resulting in the selected window. This manual is used for models KP-51WS500, KP-57WS500, and KP-65WS500. Introducing the Sony Projection TV Presenting the Sony Projection TV Thank you to receive the 1080i, 720p, 480p...
Operating Instructions
Page 9
...you how to ensure that you carefully review the contents of your new projection TV. 1 Installing and Connecting the Projection TV This section guides you through your initial setup. Instructions in this manual We recommend that you fully understand the operation of the following three ...the EIA-861 standard and is not intended for the remote control. Introducing the Sony Projection TV Introducing the Sony Projection TV ❑ Wide Screen Mode: Allows you to watch 4:3 normal broadcasts in wide screen mode (16:9 aspect ratio). ❑ Auto Wide: Allows you to select the wide screen ...
...you how to ensure that you carefully review the contents of your new projection TV. 1 Installing and Connecting the Projection TV This section guides you through your initial setup. Instructions in this manual We recommend that you fully understand the operation of the following three ...the EIA-861 standard and is not intended for the remote control. Introducing the Sony Projection TV Introducing the Sony Projection TV ❑ Wide Screen Mode: Allows you to watch 4:3 normal broadcasts in wide screen mode (16:9 aspect ratio). ❑ Auto Wide: Allows you to select the wide screen ...

Operating Instructions
Page 15
...or other S VIDEO-equipped video component. Connects to the S VIDEO OUT jack of the projection TV. To control the projection TV with a remote control for details about connection, refer to the operating manual supplied with the CONTROL S cable. Provides better picture quality than the VHF/UHF jacks ...or the Video IN jack. Connects to the left and right audio inputs of your audio or video component. 0 CONTROL S IN/OUT To control other Sony equipment with the projection TV's ...
...or other S VIDEO-equipped video component. Connects to the S VIDEO OUT jack of the projection TV. To control the projection TV with a remote control for details about connection, refer to the operating manual supplied with the CONTROL S cable. Provides better picture quality than the VHF/UHF jacks ...or the Video IN jack. Connects to the left and right audio inputs of your audio or video component. 0 CONTROL S IN/OUT To control other Sony equipment with the projection TV's ...

Operating Instructions
Page 22
... audio, so audio cables must be connected to provide sound. ✍ You cannot record signals from one VCR to the other while using your projection TV to the recording VCR's S VIDEO IN jack. Rear of the yellow video cable on your VCR. Using an S VIDEO cable, connect ... playback VCR's S VIDEO OUT jack to monitor what is being recorded. Consult your VCR's operating manual for instructions. ✍ If your VCRs have an S VIDEO jack: For best picture quality, use an S VIDEO connection instead of projection TV VCR (playback) VCR (recording) AUDIO-R (red) AUDIO-L (white) VIDEO (yellow) VMC-...
... audio, so audio cables must be connected to provide sound. ✍ You cannot record signals from one VCR to the other while using your projection TV to the recording VCR's S VIDEO IN jack. Rear of the yellow video cable on your VCR. Using an S VIDEO cable, connect ... playback VCR's S VIDEO OUT jack to monitor what is being recorded. Consult your VCR's operating manual for instructions. ✍ If your VCRs have an S VIDEO jack: For best picture quality, use an S VIDEO connection instead of projection TV VCR (playback) VCR (recording) AUDIO-R (red) AUDIO-L (white) VIDEO (yellow) VMC-...

Operating Instructions
Page 24
... IN jack. 2 Connect the CATV cable to the VCR's VHF/UHF IN jack. 3 Using a coaxial cable, connect the VCR's OUT jack to the projection TV's VHF/UHF jack. 4 Using AUDIO and S VIDEO cables, connect the satellite receiver's AUDIO and S VIDEO OUT jacks to the VCR's AUDIO and ...instead of projection TV Satellite receiver Satellite antenna cable AUDIO-R (red) AUDIO-L (white) VIDEO (yellow) VMC-810S/820S (not supplied) 24 S VIDEO Coaxial cable YC-15V/30V (not supplied) VCR YC-15V/30V (not supplied) Cable VMC-810S/ 820S (not supplied) ✍ Be sure your VCR's operating manual for ...
... IN jack. 2 Connect the CATV cable to the VCR's VHF/UHF IN jack. 3 Using a coaxial cable, connect the VCR's OUT jack to the projection TV's VHF/UHF jack. 4 Using AUDIO and S VIDEO cables, connect the satellite receiver's AUDIO and S VIDEO OUT jacks to the VCR's AUDIO and ...instead of projection TV Satellite receiver Satellite antenna cable AUDIO-R (red) AUDIO-L (white) VIDEO (yellow) VMC-810S/820S (not supplied) 24 S VIDEO Coaxial cable YC-15V/30V (not supplied) VCR YC-15V/30V (not supplied) Cable VMC-810S/ 820S (not supplied) ✍ Be sure your VCR's operating manual for ...

Operating Instructions
Page 28
You may also use with personal computers. 28 Refer to your Digital TV Receiver manual for all power sources before making any equipment connected into the Y, PB and PR connectors. ✍ This projection TV is not compatible with digital TV receivers configured with RGB or VGA output connectors...types. 2 Using an audio cable, connect the Digital TV Set-top box's Audio OUT jacks to view 480p, 720p, and 1080i formats. Installing and Connecting the Projection TV Connecting a Digital TV Receiver z Be sure to provide sound. ✍ Component video connection is not intended for use the ...
You may also use with personal computers. 28 Refer to your Digital TV Receiver manual for all power sources before making any equipment connected into the Y, PB and PR connectors. ✍ This projection TV is not compatible with digital TV receivers configured with RGB or VGA output connectors...types. 2 Using an audio cable, connect the Digital TV Set-top box's Audio OUT jacks to view 480p, 720p, and 1080i formats. Installing and Connecting the Projection TV Connecting a Digital TV Receiver z Be sure to provide sound. ✍ Component video connection is not intended for use the ...

Operating Instructions
Page 39
...the Digital TV When you have connected the DTV receiver, you can enjoy digital TV programs. This projection TV is capable of receiving the 1080i, 720p, 480p and 480i digital TV formats. ✍ This projection TV is converted into a 480p format signal. For details, see page 28) 2 Press TV/...VIDEO to VIDEO 5, 6 or 7 IN on the projection TV. (for details, see the Operating Manual of the DTV receiver. 4 Adjust ...
...the Digital TV When you have connected the DTV receiver, you can enjoy digital TV programs. This projection TV is capable of receiving the 1080i, 720p, 480p and 480i digital TV formats. ✍ This projection TV is converted into a 480p format signal. For details, see page 28) 2 Press TV/...VIDEO to VIDEO 5, 6 or 7 IN on the projection TV. (for details, see the Operating Manual of the DTV receiver. 4 Adjust ...

Operating Instructions
Page 40
The factory setting for Favorite Channel is set to input your favorite channels: ✍ Your Favorite Channel options can be set automatically or manually. The program of that you preset. When Favorite Channel is Auto. Press to watch. If you want to Auto, the last eight channels selected with 0-9 ...
The factory setting for Favorite Channel is set to input your favorite channels: ✍ Your Favorite Channel options can be set automatically or manually. The program of that you preset. When Favorite Channel is Auto. Press to watch. If you want to Auto, the last eight channels selected with 0-9 ...

Operating Instructions
Page 53
Manual Select if you want to input your own selections as Favorite Channel options. 1 Press to select a favorite channel number. 2 Use the joystick to scroll through ...
Manual Select if you want to input your own selections as Favorite Channel options. 1 Press to select a favorite channel number. 2 Use the joystick to scroll through ...
Operating Instructions
Page 62
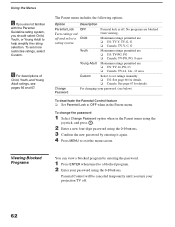
... option when in the Parent menu. Using the Menus z If you are not familiar with the Parental Guideline rating system, you turn your projection TV off . To set ratings manually. ❏ US: See page 66 for details. ❏ Canada: See page 67 for details. Parental Control will be canceled temporarily until you...
... option when in the Parent menu. Using the Menus z If you are not familiar with the Parental Guideline rating system, you turn your projection TV off . To set ratings manually. ❏ US: See page 66 for details. ❏ Canada: See page 67 for details. Parental Control will be canceled temporarily until you...

Operating Instructions
Page 75
... program in the ❏ window picture as in the main picture ❏ Both may be set to Manual in the Channel menu (see "Video Label" on page 59). If possible, run a direct cable to your projection TV's VHF/UHF input (this will only unscramble one signal at a time, so you press TV...
... program in the ❏ window picture as in the main picture ❏ Both may be set to Manual in the Channel menu (see "Video Label" on page 59). If possible, run a direct cable to your projection TV's VHF/UHF input (this will only unscramble one signal at a time, so you press TV...

Operating Instructions
Page 79
...15, 30 B Balance, adjusting 51 Bass, adjusting 51 Batteries, inserting in Twin View 43 Extended Data Service 58 F Favorite Channel auto 53 described 8 manual 53 See cable. Channel list, adding channels 54 Channel menu 48, 53 Channel Skip/Add 54 Channels Auto Program 54 creating labels 54 setting up..., connecting 26 E Effect Dolby Virtual51 OFF 51 Simulated 51 Enlarging pictures, in remote 10 Bilingual audio 51 Brightness, adjusting 49 C Cable connecting 16-18 setting ON/OFF 53 with VCR, connecting 19-20 Cable box connecting with VCR 20 using with TV remote control 72 Camcorder, connecting 29...
...15, 30 B Balance, adjusting 51 Bass, adjusting 51 Batteries, inserting in Twin View 43 Extended Data Service 58 F Favorite Channel auto 53 described 8 manual 53 See cable. Channel list, adding channels 54 Channel menu 48, 53 Channel Skip/Add 54 Channels Auto Program 54 creating labels 54 setting up..., connecting 26 E Effect Dolby Virtual51 OFF 51 Simulated 51 Enlarging pictures, in remote 10 Bilingual audio 51 Brightness, adjusting 49 C Cable connecting 16-18 setting ON/OFF 53 with VCR, connecting 19-20 Cable box connecting with VCR 20 using with TV remote control 72 Camcorder, connecting 29...


