
Operating Instructions
Page 4
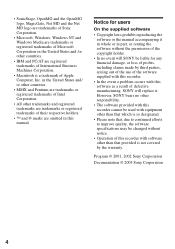
...of their respective holders. • ™ and ® marks are omitted in this software as a result of defective manufacturing, SONY will SONY be liable for users On the supplied software • Copyright laws prohibit reproducing the software or the manual accompanying it in whole ...loss of profits, including claims made by the warranty. • SonicStage, OpenMG and the OpenMG logo, MagicGate, Net MD and the Net MD logo are trademarks of Sony Corporation. • Microsoft, Windows, Windows NT and Windows Media are trademarks or registered trademarks of Microsoft Corporation in part...
...of their respective holders. • ™ and ® marks are omitted in this software as a result of defective manufacturing, SONY will SONY be liable for users On the supplied software • Copyright laws prohibit reproducing the software or the manual accompanying it in whole ...loss of profits, including claims made by the warranty. • SonicStage, OpenMG and the OpenMG logo, MagicGate, Net MD and the Net MD logo are trademarks of Sony Corporation. • Microsoft, Windows, Windows NT and Windows Media are trademarks or registered trademarks of Microsoft Corporation in part...

Operating Instructions
Page 6
Table of contents Recorder Operations Looking at controls 14 Getting started 18 Recording an MD right away 21 Playing an MD right away 24 Listening to the radio 26 Various ways of recording 28 Viewing various information 28 To start/stop recording in sync with the ...
Table of contents Recorder Operations Looking at controls 14 Getting started 18 Recording an MD right away 21 Playing an MD right away 24 Listening to the radio 26 Various ways of recording 28 Viewing various information 28 To start/stop recording in sync with the ...

Operating Instructions
Page 7
Playing an MD within your car stereo system 39 Before installation 39 Installation 39 Connection 41 Playing an MD within your car stereo system 41 The rotary commander 42 Fuse Replacement 43 Editing recorded tracks 44 Before editing 44 Labeling recordings (Name 44 Labeling 44 Moving recorded tracks (Move 46 Dividing a track (Divide 47 Dividing a track directly 47 Adjusting a dividing point before dividing a track (Divide Rehearsal 47 Combining tracks (Combine 48 Erasing tracks and a whole disc contents (Erase 49 To erase a track 49 To erase the whole disc 50 7
Playing an MD within your car stereo system 39 Before installation 39 Installation 39 Connection 41 Playing an MD within your car stereo system 41 The rotary commander 42 Fuse Replacement 43 Editing recorded tracks 44 Before editing 44 Labeling recordings (Name 44 Labeling 44 Moving recorded tracks (Move 46 Dividing a track (Divide 47 Dividing a track directly 47 Adjusting a dividing point before dividing a track (Divide Rehearsal 47 Combining tracks (Combine 48 Erasing tracks and a whole disc contents (Erase 49 To erase a track 49 To erase the whole disc 50 7

Operating Instructions
Page 10
... 93 System requirements 93 Installing the software onto your computer 94 Before installing the software 94 Installing SonicStage Ver.1.5 95 Connecting the Net MD to your computer 97 Storing audio data to your computer 98 Starting SonicStage 98 Recording audio CDs to the hard disk drive 99 Labeling...audio data from your computer to the Net MD (Check-out 102 Checking out audio files to the Net MD 102 Listening to an MD 105 Listening to an MD with the Net MD connected to the computer 105 Listening to an MD with the Net MD disconnected from the computer 105 Advanced operations ...
... 93 System requirements 93 Installing the software onto your computer 94 Before installing the software 94 Installing SonicStage Ver.1.5 95 Connecting the Net MD to your computer 97 Storing audio data to your computer 98 Starting SonicStage 98 Recording audio CDs to the hard disk drive 99 Labeling...audio data from your computer to the Net MD (Check-out 102 Checking out audio files to the Net MD 102 Listening to an MD 105 Listening to an MD with the Net MD connected to the computer 105 Listening to an MD with the Net MD disconnected from the computer 105 Advanced operations ...

Operating Instructions
Page 11
... For Windows Millennium Edition/Windows 98 Second Edition users 112 For Windows 2000 users 113 Troubleshooting 114 If your computer does not recognize the Net MD 116 If the installation was not successful 116 Information and explanations 118 Net...
... For Windows Millennium Edition/Windows 98 Second Edition users 112 For Windows 2000 users 113 Troubleshooting 114 If your computer does not recognize the Net MD 116 If the installation was not successful 116 Information and explanations 118 Net...
Operating Instructions
Page 12
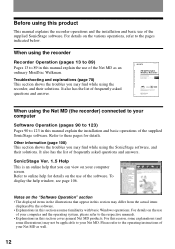
... the operating system, please refer to 123 in this section cover general Net MD products. MZ-NF810CK ©2003 Sony Corporation When using the Net MD (the recorder) connected to represent Headphone Stereo products. is a registered trademark of Sony Corporation to your Net MD. Before using this product This manual explains the recorder operations and the...
... the operating system, please refer to 123 in this section cover general Net MD products. MZ-NF810CK ©2003 Sony Corporation When using the Net MD (the recorder) connected to represent Headphone Stereo products. is a registered trademark of Sony Corporation to your Net MD. Before using this product This manual explains the recorder operations and the...
Operating Instructions
Page 15
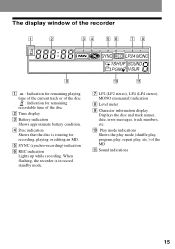
... for remaining playing time of the current track or of the disc : Indication for recording, playing or editing an MD. When flashing, the recorder is rotating for remaining recordable time of the MD. K Sound indications 15 qa G LP2 (LP2 stereo), LP4 (LP4 stereo), MONO (monaural) indication H Level meter I Character information display Displays...
... for remaining playing time of the current track or of the disc : Indication for recording, playing or editing an MD. When flashing, the recorder is rotating for remaining recordable time of the MD. K Sound indications 15 qa G LP2 (LP2 stereo), LP4 (LP4 stereo), MONO (monaural) indication H Level meter I Character information display Displays...

Operating Instructions
Page 21
Recording an MD right away! Note that you cannot record a radio broadcast that is being received on the remote control. 1 Insert an MD. 1 Slide OPEN to open the lid. 2 Insert an MD with the label side facing front, and press the lid down to check the record-protect tab is closed. continued 21 Make sure to close. This section explains the basic procedure for making digital recordings using an optical cable connected to a CD player, Digital TV or other recording operations, see "Various ways of recording" (page 28). For other digital equipment.
Recording an MD right away! Note that you cannot record a radio broadcast that is being received on the remote control. 1 Insert an MD. 1 Slide OPEN to open the lid. 2 Insert an MD with the label side facing front, and press the lid down to check the record-protect tab is closed. continued 21 Make sure to close. This section explains the basic procedure for making digital recordings using an optical cable connected to a CD player, Digital TV or other recording operations, see "Various ways of recording" (page 28). For other digital equipment.

Operating Instructions
Page 22
...If you want to start after the existing contents, do the procedure "Recording without overwriting existing material" (page 61) before doing step 3, "Record an MD." (page 22). 22 To stop recording, press x. If you record on a previously recorded disc, the recorder is stopped, press and slide REC. ...DC IN 3V to LINE IN (OPTICAL) ∗ When using an optical cable other than the supplied one, see "Optional accessories" (page 77). 3 Record an MD. 5-way control key (N, ., >) REC x • CANCEL/ CHG X END SEARCH MENU 1 Set the sound source you want the recording to record. 2...
...If you want to start after the existing contents, do the procedure "Recording without overwriting existing material" (page 61) before doing step 3, "Record an MD." (page 22). 22 To stop recording, press x. If you record on a previously recorded disc, the recorder is stopped, press and slide REC. ...DC IN 3V to LINE IN (OPTICAL) ∗ When using an optical cable other than the supplied one, see "Optional accessories" (page 77). 3 Record an MD. 5-way control key (N, ., >) REC x • CANCEL/ CHG X END SEARCH MENU 1 Set the sound source you want the recording to record. 2...
Operating Instructions
Page 23
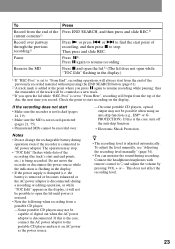
... flashing in the display. • If the power supply is not record-protected (pages 21, 75). • Premastered MDs cannot be recorded over partway through the previous recording1) Pause Remove the MD Press Press END SEARCH, and then press and slide REC.1) Press N or press . If this is the case, turn...affect the recording level. 23 or > to find the start • Make sure the recorder is not locked (pages 14, 19). • Make sure the MD is disrupted (i.e. Press x and open the lid.3) (The lid does not open the lid until power is restored. • Note the following when recording from...
... flashing in the display. • If the power supply is not record-protected (pages 21, 75). • Premastered MDs cannot be recorded over partway through the previous recording1) Pause Remove the MD Press Press END SEARCH, and then press and slide REC.1) Press N or press . If this is the case, turn...affect the recording level. 23 or > to find the start • Make sure the recorder is not locked (pages 14, 19). • Make sure the MD is disrupted (i.e. Press x and open the lid.3) (The lid does not open the lid until power is restored. • Note the following when recording from...

Operating Instructions
Page 24
.... A long beep sounds in the display. To start with the label side facing front, and press the lid down to close. 2 Play an MD. 5-way control key (N, ., >, VOL+, -) x • CANCEL/ CHG X VOL+, - Jog lever (NX, ., >) x 1 Press N on the remote control. Playing an... MD right away! 1 Insert an MD. 1 Slide OPEN to open the lid. 2 Insert an MD with the first track of the disc, press N on the recorder or the jog lever (NX) on the remote control for...
.... A long beep sounds in the display. To start with the label side facing front, and press the lid down to close. 2 Play an MD. 5-way control key (N, ., >, VOL+, -) x • CANCEL/ CHG X VOL+, - Jog lever (NX, ., >) x 1 Press N on the remote control. Playing an... MD right away! 1 Insert an MD. 1 Slide OPEN to open the lid. 2 Insert an MD with the first track of the disc, press N on the recorder or the jog lever (NX) on the remote control for...

Operating Instructions
Page 25
...of the first track. Note The playback sound may skip if: • the recorder receives stronger continuous shock. • a dirty or scratched MD is towards .. repeatedly. repeatedly. or >. Search for a specific track Press and hold the jog lever while viewing track while the recorder is played...backwards or forward Press and hold the jog lever while pausing. resume play . or > while the names and numbers stopped. or >. button Remove the MD Press x and open the lid.2) Press x and open the lid. 1) For more details, see "Using the group function" (page 51). 2) ...
...of the first track. Note The playback sound may skip if: • the recorder receives stronger continuous shock. • a dirty or scratched MD is towards .. repeatedly. repeatedly. or >. Search for a specific track Press and hold the jog lever while viewing track while the recorder is played...backwards or forward Press and hold the jog lever while pausing. resume play . or > while the names and numbers stopped. or >. button Remove the MD Press x and open the lid.2) Press x and open the lid. 1) For more details, see "Using the group function" (page 51). 2) ...

Operating Instructions
Page 27
...; Playback or recording stops when you use a fully charged rechargeable battery or a new dry battery since more power is consumed by the radio than by MD playback. • The radio will be adjusted individually using the supplied remote control. 27 To improve the broadcast reception • For FM/TV/Wb(weather... as this may be heard. • When you use the radio, it is recommended that you use the radio. • The volume of radio and MD can be reduced.
...; Playback or recording stops when you use a fully charged rechargeable battery or a new dry battery since more power is consumed by the radio than by MD playback. • The radio will be adjusted individually using the supplied remote control. 27 To improve the broadcast reception • For FM/TV/Wb(weather... as this may be heard. • When you use the radio, it is recommended that you use the radio. • The volume of radio and MD can be reduced.

Operating Instructions
Page 30
...8226; Even when there is no sound from the player for approximately 2 seconds during synchrorecording from a sound source other than a CD or an MD, a new track mark is automatically added at 2 times normal recording time is also possible. Stereo recording is kept in the display, and then... due to stop recording Press x. If the recorder is possible at 2 times (LP2) or 4 times (LP4) the normal (stereo) recording time. MDs recorded in the display. 6 Press and slide REC. Long-time recording (MDLP) Select each recording mode according to record. The recorder stands by for ...
...8226; Even when there is no sound from the player for approximately 2 seconds during synchrorecording from a sound source other than a CD or an MD, a new track mark is automatically added at 2 times normal recording time is also possible. Stereo recording is kept in the display, and then... due to stop recording Press x. If the recorder is possible at 2 times (LP2) or 4 times (LP4) the normal (stereo) recording time. MDs recorded in the display. 6 Press and slide REC. Long-time recording (MDLP) Select each recording mode according to record. The recorder stands by for ...

Operating Instructions
Page 31
... Press x. This is because of the recording mode when you record in LP4 mode, momentary noise may be mixed. 3) When using an 80-minute recordable MD 5 Press and slide REC. 6 Play the source you record a stereo source in normal stereo or LP2 mode to obtain better sound quality. to select the...
... Press x. This is because of the recording mode when you record in LP4 mode, momentary noise may be mixed. 3) When using an 80-minute recordable MD 5 Press and slide REC. 6 Play the source you record a stereo source in normal stereo or LP2 mode to obtain better sound quality. to select the...

Operating Instructions
Page 35
... play or normal play is selected, the operating conditions, and the disc settings, you press DISPLAY, the display changes as follows: Display window on the MD, the group name, and the total number of tracks in a group. Each time you may not be able to check the remaining time or the...
... play or normal play is selected, the operating conditions, and the disc settings, you press DISPLAY, the display changes as follows: Display window on the MD, the group name, and the total number of tracks in a group. Each time you may not be able to check the remaining time or the...
Operating Instructions
Page 39
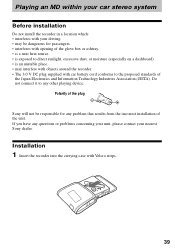
Playing an MD within your car stereo system Before installation Do not install the recorder in a location which: • interferes with your nearest Sony dealer. Polarity of the plug Sony will not be responsible for any questions or problems concerning your unit, please contact your driving. • may be dangerous for passengers. • interferes...
Playing an MD within your car stereo system Before installation Do not install the recorder in a location which: • interferes with your nearest Sony dealer. Polarity of the plug Sony will not be responsible for any questions or problems concerning your unit, please contact your driving. • may be dangerous for passengers. • interferes...

Operating Instructions
Page 41
... the tape selector to the normal (TYPE I) position and the DOLBY NR, REPEAT or BLANK SKIP switch to OFF if they are equipped. Playing an MD within your car cassette deck, connect it as follows: To a cassette insertion door Car cassette deck Recorder To DC IN 3V To a cigarette lighter socket...
... the tape selector to the normal (TYPE I) position and the DOLBY NR, REPEAT or BLANK SKIP switch to OFF if they are equipped. Playing an MD within your car cassette deck, connect it as follows: To a cassette insertion door Car cassette deck Recorder To DC IN 3V To a cigarette lighter socket...

Operating Instructions
Page 42
... car connecting pack, press the Z (eject) button of the car connecting pack into the car cassette deck. 4 Start playback on the car cassette deck. 5 Start MD playback. 6 Adjust the volume. Never pull the plug out by grasping the plug. The rotary commander 3 1 4 2 A x (stop) button B Jack for connecting a...recorder, pull it towards + or -. If no sound is heard or the car connecting pack is not a sign of malfunction. • Sony guarantees only playback operations on the car cassette deck. However, this is ejected, change playback direction on the recorder during use with some car ...
... car connecting pack, press the Z (eject) button of the car connecting pack into the car cassette deck. 4 Start playback on the car cassette deck. 5 Start MD playback. 6 Adjust the volume. Never pull the plug out by grasping the plug. The rotary commander 3 1 4 2 A x (stop) button B Jack for connecting a...recorder, pull it towards + or -. If no sound is heard or the car connecting pack is not a sign of malfunction. • Sony guarantees only playback operations on the car cassette deck. However, this is ejected, change playback direction on the recorder during use with some car ...

Operating Instructions
Page 44
...and discs using the recorder's character palette. For details on operations done on the number of characters that are done on the side of the MD before editing. • The recorder is recording editing results while "TOC Edit" is flashing in the display. - Note When you label ...way control key (., >, ENTER, VOL+, -) x X END SEARCH MENU Labeling You can edit your recordings by adding/ erasing track marks or labeling tracks and MDs. or > repeatedly until "Name" appears in the display, and then press ENTER. 44 For labeling a group, see the pages indicated for track names, ...
...and discs using the recorder's character palette. For details on operations done on the number of characters that are done on the side of the MD before editing. • The recorder is recording editing results while "TOC Edit" is flashing in the display. - Note When you label ...way control key (., >, ENTER, VOL+, -) x X END SEARCH MENU Labeling You can edit your recordings by adding/ erasing track marks or labeling tracks and MDs. or > repeatedly until "Name" appears in the display, and then press ENTER. 44 For labeling a group, see the pages indicated for track names, ...


