User Guide
Page 5
... HEREBY EXPRESSLY DISCLAIMS ANY IMPLIED WARRANTIES OF MERCHANTABILITY OR FITNESS FOR ANY PARTICULAR PURPOSE WITH REGARD TO THIS MANUAL, THE SOFTWARE OR SUCH OTHER INFORMATION. Sony Corporation reserves the right to make any modification to the principle of Sun Microsystems, Inc. This is ...related to this manual or the information contained herein at a high environmental temperature • when you have raised the gain (sensitivity) ...
... HEREBY EXPRESSLY DISCLAIMS ANY IMPLIED WARRANTIES OF MERCHANTABILITY OR FITNESS FOR ANY PARTICULAR PURPOSE WITH REGARD TO THIS MANUAL, THE SOFTWARE OR SUCH OTHER INFORMATION. Sony Corporation reserves the right to make any modification to the principle of Sun Microsystems, Inc. This is ...related to this manual or the information contained herein at a high environmental temperature • when you have raised the gain (sensitivity) ...

User Guide
Page 6
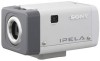
... parts and controls of the Network Camera, connecting examples and how to read the Installation Manual before you read it before operating. Be sure to set up the camera. Overview How to Use This User's Guide This User's Guide explains how to operate the SNCCS10 or SNC-CS11 Network Camera from those as you operate...
... parts and controls of the Network Camera, connecting examples and how to read the Installation Manual before you read it before operating. Be sure to set up the camera. Overview How to Use This User's Guide This User's Guide explains how to operate the SNCCS10 or SNC-CS11 Network Camera from those as you operate...

User Guide
Page 7
... a Computer Using a commercially available network cable (cross), connect the LAN port on the camera to the computer, use a commercially available network cable (straight cable). SNC-CS11 (rear) LAN SEE INSTRUCTION MANUAL 1234 NTSC PAL TEST OUT NETWORK POWER CLASS 2 WIRING - 1 DC 12V AC 24V + 2 LAN Network cable (straight, not supplied) 10BASE-T/ 100BASE-TX...
... a Computer Using a commercially available network cable (cross), connect the LAN port on the camera to the computer, use a commercially available network cable (straight cable). SNC-CS11 (rear) LAN SEE INSTRUCTION MANUAL 1234 NTSC PAL TEST OUT NETWORK POWER CLASS 2 WIRING - 1 DC 12V AC 24V + 2 LAN Network cable (straight, not supplied) 10BASE-T/ 100BASE-TX...
User Guide
Page 9
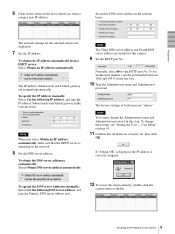
...server: Select Obtain an IP address automatically. To specify the IP address manually: Select Use the following DNS server address, and type the Primary DNS server address and 12 To access the camera directly, double-click the camera name in the list to assign a new IP address. To change... Administrator name and Administrator password in the relevant boxes. To specify the DNS server addresses manually: Select Use the following IP address, and type the IP address, Subnet mask and Default gateway in this camera. 9 Set the HTTP port No. Preparation 6 Click on the network. 8 Set ...
...server: Select Obtain an IP address automatically. To specify the IP address manually: Select Use the following DNS server address, and type the Primary DNS server address and 12 To access the camera directly, double-click the camera name in the list to assign a new IP address. To change... Administrator name and Administrator password in the relevant boxes. To specify the DNS server addresses manually: Select Use the following IP address, and type the IP address, Subnet mask and Default gateway in this camera. 9 Set the HTTP port No. Preparation 6 Click on the network. 8 Set ...
User Guide
Page 15
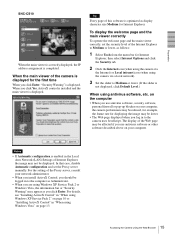
...Vista, the information bar or "Security Warning" may not be logged in to the camera uses JavaScript. When the main viewer of the Web page may be affected if you click Enter. Preparation SNC-CS10 When the main viewer is correctly displayed, the IP address assignment is displayed. on the...software described above on your computer. The display of the camera is displayed. To display the welcome page and the main viewer correctly To operate the welcome page and the main viewer correctly, set the Proxy server manually. For the setting of the Internet Explorer to Medium or...
...Vista, the information bar or "Security Warning" may not be logged in to the camera uses JavaScript. When the main viewer of the Web page may be affected if you click Enter. Preparation SNC-CS10 When the main viewer is correctly displayed, the IP address assignment is displayed. on the...software described above on your computer. The display of the camera is displayed. To display the welcome page and the main viewer correctly To operate the welcome page and the main viewer correctly, set the Proxy server manually. For the setting of the Internet Explorer to Medium or...

User Guide
Page 19
... from the menu bar of the Administrator menu (see page 41). If it means that case, disable Automatic configuration and set the Proxy server manually. Effective versions: Java Plug-in the User menu of Internet Explorer, then select Internet Options and click the Advanced mode tab. If Java (...Java. Check whether the version of the viewer by following the instructions on the welcome page. To enable Java Plug-in the Camera menu of the Proxy server, consult your network administrator. 19 Logging in another window. For the setting of the Administrator menu (page 32)....
... from the menu bar of the Administrator menu (see page 41). If it means that case, disable Automatic configuration and set the Proxy server manually. Effective versions: Java Plug-in the User menu of Internet Explorer, then select Internet Options and click the Advanced mode tab. If Java (...Java. Check whether the version of the viewer by following the instructions on the welcome page. To enable Java Plug-in the Camera menu of the Proxy server, consult your network administrator. 19 Logging in another window. For the setting of the Administrator menu (page 32)....

User Guide
Page 25
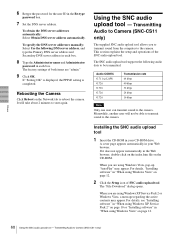
Controlling Alarm output You can capture a camera image as a still image and record it in the built-in memory of the I/O port, see the supplied Installation Manual. Each click switches the Alarm output between On (short-circuit) and Off (open ). Tip For the connection of the image memory in the ... box. 3 Click . The still image of the moment when you need to the Alarm output of the camera. Operating the Camera 25 Recording a Still Image in the Built-in Memory of the camera. To use this function, you click is captured, and the image file is recorded in the builtin memory...
Controlling Alarm output You can capture a camera image as a still image and record it in the built-in memory of the I/O port, see the supplied Installation Manual. Each click switches the Alarm output between On (short-circuit) and Off (open ). Tip For the connection of the image memory in the ... box. 3 Click . The still image of the moment when you need to the Alarm output of the camera. Operating the Camera 25 Recording a Still Image in the Built-in Memory of the camera. To use this function, you click is captured, and the image file is recorded in the builtin memory...

User Guide
Page 30
... Example: When the IP address of the computer. Synchronize with PC: Select if synchronizing the camera's date and time with those of the camera is adjusted using the Custom Homepage Installer included in the camera Select /index.html. Manual setting: Select if you do not need to set to 192.168.0.100 http://192....168.0.100/en/index.html OK/Cancel See "Buttons common to set the camera's date and time manually. Store the HTML file in the built-in flash memory using the time zone difference and set on page 28. Administrating the...
... Example: When the IP address of the computer. Synchronize with PC: Select if synchronizing the camera's date and time with those of the camera is adjusted using the Custom Homepage Installer included in the camera Select /index.html. Manual setting: Select if you do not need to set to 192.168.0.100 http://192....168.0.100/en/index.html OK/Cancel See "Buttons common to set the camera's date and time manually. Store the HTML file in the built-in flash memory using the time zone difference and set on page 28. Administrating the...
User Guide
Page 31
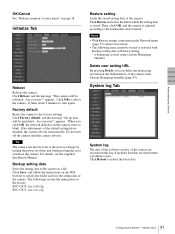
... data of the camera are the file name preset at the factory. SNC-CS10: snc-cs10.cfg SNC-CS11: snc-cs11.cfg Restore setting Loads the stored setting data of the default settings have finished, the camera reboots automatically. Click Reload to start again. Administrating the Camera OK/Cancel See ...the factory settings. Factory default Resets the camera to reboot the camera. After adjustments of the camera. Tip The camera can delete the home page recorded on the flash memory of this log. For details, see the supplied Installation Manual. The followings are recorded in a file....
... data of the camera are the file name preset at the factory. SNC-CS10: snc-cs10.cfg SNC-CS11: snc-cs11.cfg Restore setting Loads the stored setting data of the default settings have finished, the camera reboots automatically. Click Reload to start again. Administrating the Camera OK/Cancel See ...the factory settings. Factory default Resets the camera to reboot the camera. After adjustments of the camera. Tip The camera can delete the home page recorded on the flash memory of this log. For details, see the supplied Installation Manual. The followings are recorded in a file....

User Guide
Page 34
... mode to Shutter mode. Click the button to every menu" on ): The exposure setting is equipped, the auto iris lens will be set . Manual iris lens: Select when the fixed iris lens is selected, Flickerless mode, Backlight compensation and Exposure compensation are displayed and can set . When it...726 (32 kbps), G.726 (24 kbps) or G.726 (16 kbps) can be selected. Shutter mode Select the adjusting mode for each Lens type. Camera Menu Audio codec (SNC-CS11 only) Select the bit rate when you output the audio sent from -10 to the speaker (active speaker for example) of the...
... mode to Shutter mode. Click the button to every menu" on ): The exposure setting is equipped, the auto iris lens will be set . Manual iris lens: Select when the fixed iris lens is selected, Flickerless mode, Backlight compensation and Exposure compensation are displayed and can set . When it...726 (32 kbps), G.726 (24 kbps) or G.726 (16 kbps) can be selected. Shutter mode Select the adjusting mode for each Lens type. Camera Menu Audio codec (SNC-CS11 only) Select the bit rate when you output the audio sent from -10 to the speaker (active speaker for example) of the...

User Guide
Page 35
...in backlight, the exposure is automatically adjusted to adjust the brightness of auto exposure setting. Save: Click to save the present settings in the camera as the custom, or you can set to On, it being reduced by gain from -5 to Auto, Backlight compensation and Exposure compensation are...gain. 0dB, 6dB, 12dB, 18dB: Set the gain to Off. Administrating the Camera Manual: The shutter speed is fixed and you can load the settings saved in the camera. If the scene is set items about exposure manually. Select from the list box. Sharpness Select the sharpness in 7 steps, from ...
...in backlight, the exposure is automatically adjusted to adjust the brightness of auto exposure setting. Save: Click to save the present settings in the camera as the custom, or you can set to On, it being reduced by gain from -5 to Auto, Backlight compensation and Exposure compensation are...gain. 0dB, 6dB, 12dB, 18dB: Set the gain to Off. Administrating the Camera Manual: The shutter speed is fixed and you can load the settings saved in the camera. If the scene is set items about exposure manually. Select from the list box. Sharpness Select the sharpness in 7 steps, from ...
User Guide
Page 59
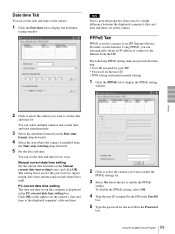
... format drop-down list. 5 Set the date and time. Others 2 Click to select the camera you want to make the PPPoE settings for. 3 Select On below the list to an ISP (Internet Service Provider) via the Internet. Manual current date time setting Set the current date and time on the computer is... the PPPoE setting. PC current date time setting The date and time set on the Manual current date time setting boxes, and click OK. Date time Tab You can set the date and time on the camera. Using PPPoE, you want to display the PPPoE setting window. You can automatically obtain an...
... format drop-down list. 5 Set the date and time. Others 2 Click to select the camera you want to make the PPPoE settings for. 3 Select On below the list to an ISP (Internet Service Provider) via the Internet. Manual current date time setting Set the current date and time on the computer is... the PPPoE setting. PC current date time setting The date and time set on the Manual current date time setting boxes, and click OK. Date time Tab You can set the date and time on the camera. Using PPPoE, you want to display the PPPoE setting window. You can automatically obtain an...
User Guide
Page 60
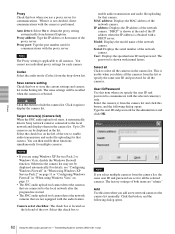
...name and Administrator password in the Re-type password box. 7 Set the DNS server address. To specify the DNS server addresses manually: Select Use the following audio data to the camera. The factory settings of both items are using Windows XP Service Pack 2" on page 10 or "Installing software" in the... Web browser, double-click on the index.htm file on the Network tab to the camera. The SNC audio upload tool supports the following DNS server address, and type the Primary DNS server address and Secondary DNS server address in each box. ...
...name and Administrator password in the Re-type password box. 7 Set the DNS server address. To specify the DNS server addresses manually: Select Use the following audio data to the camera. The factory settings of both items are using Windows XP Service Pack 2" on page 10 or "Installing software" in the... Web browser, double-click on the index.htm file on the Network tab to the camera. The SNC audio upload tool supports the following DNS server address, and type the Primary DNS server address and Secondary DNS server address in each box. ...
User Guide
Page 62
...the audio mode (Codec) from Internet Explorer. Click this button to Camera (SNC-CS11 only) Select all Click to select all cameras. Others Proxy Check this box when you add a new network camera to the camera list manually. Auto detect: Select On to the local network and displays them in... the list. The same settings will be displayed in the camera list. Click it automatically detects Sony network cameras connected to obtain the proxy setting ...
...the audio mode (Codec) from Internet Explorer. Click this button to Camera (SNC-CS11 only) Select all Click to select all cameras. Others Proxy Check this box when you add a new network camera to the camera list manually. Auto detect: Select On to the local network and displays them in... the list. The same settings will be displayed in the camera list. Click it automatically detects Sony network cameras connected to obtain the proxy setting ...

User Guide
Page 73
..., and attach the cover (optional). The lens connecter is optional and is thick, cut this camera, use condition. Others 73 Attaching a CS-mount Lens Attaching a CS-mount Lens Suitable lens The lens must ...be a CS-mount type of the camera including the mounting bracket, and install it without fail. To attach it into a wall or a ceiling,... the lens cable to use a DC servo type lens. When you need to the instruction manual of the auto-iris lens connector (optional) To connect the auto iris lens, first replace the plug ...
..., and attach the cover (optional). The lens connecter is optional and is thick, cut this camera, use condition. Others 73 Attaching a CS-mount Lens Attaching a CS-mount Lens Suitable lens The lens must ...be a CS-mount type of the camera including the mounting bracket, and install it without fail. To attach it into a wall or a ceiling,... the lens cable to use a DC servo type lens. When you need to the instruction manual of the auto-iris lens connector (optional) To connect the auto iris lens, first replace the plug ...

User Guide
Page 74
... can be used to the terminals. Others 74 Glossary Codec Software/hardware for updating them. When fitting a manual iris lens, omit step 2. 3 If the focus cannot be used with the lens mount of the camera, and turn it clockwise until it is part of the lens cable into the auto iris lens...
... can be used to the terminals. Others 74 Glossary Codec Software/hardware for updating them. When fitting a manual iris lens, omit step 2. 3 If the focus cannot be used with the lens mount of the camera, and turn it clockwise until it is part of the lens cable into the auto iris lens...


