Dimensions Diagram
Page 1
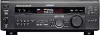
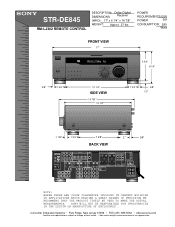
..., New Jersey 07656 • FAX (201) 986 3062 • b2b.sel.sony.com Features and specifications subject to change without notice. • Non-metric weights and measurements are approximate. COAXIAL FM FRONT REAR CNT OPTICAL COAX SPEAKERS + 5.1 INPUTS SUB WOOFER DIGITAL B A -...WE RECOMMEND THAT THE PRODUCT ITSELF BE USED TO MAKE THE ACTUAL MEASUREMENTS. SONY WILL NOT BE RESPONSIBLE FOR INACCURACIES IN THE DESIGN OR MANUFACTURE OF ENCLOSURES . STR-DE845 RM-LJ302 REMOTE CONTROL DESCRIPTION: Dolby Digital DIMENSIONS Receiver (WHD): 17" x 6 1/4" x 14 7/8" WEIGHT: Approx 27 ...
..., New Jersey 07656 • FAX (201) 986 3062 • b2b.sel.sony.com Features and specifications subject to change without notice. • Non-metric weights and measurements are approximate. COAXIAL FM FRONT REAR CNT OPTICAL COAX SPEAKERS + 5.1 INPUTS SUB WOOFER DIGITAL B A -...WE RECOMMEND THAT THE PRODUCT ITSELF BE USED TO MAKE THE ACTUAL MEASUREMENTS. SONY WILL NOT BE RESPONSIBLE FOR INACCURACIES IN THE DESIGN OR MANUFACTURE OF ENCLOSURES . STR-DE845 RM-LJ302 REMOTE CONTROL DESCRIPTION: Dolby Digital DIMENSIONS Receiver (WHD): 17" x 6 1/4" x 14 7/8" WEIGHT: Approx 27 ...
Operating Instructions
Page 3
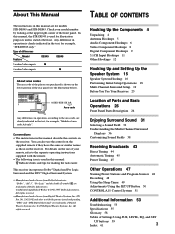
... 47 Naming Preset Stations and Program Sources 48 Recording 48 Using the Sleep Timer 49 Adjustments Using the SET UP Button 50 CONTROL A1 Control System 51 Additional Information 53 Troubleshooting 53 Specifications 55 Glossary 58 Tables of Settings Using SUR, LEVEL, EQ, and SET UP...About This Manual The instructions in this manual are for example, "Models of area code AA only". Check your remote, refer to the area code, are clearly indicated in the text, for models STR-DE945 and STR-DE845. For details on the receiver. "Dolby", "AC-3", "Pro Logic" and the double-D symbol ;
... 47 Naming Preset Stations and Program Sources 48 Recording 48 Using the Sleep Timer 49 Adjustments Using the SET UP Button 50 CONTROL A1 Control System 51 Additional Information 53 Troubleshooting 53 Specifications 55 Glossary 58 Tables of Settings Using SUR, LEVEL, EQ, and SET UP...About This Manual The instructions in this manual are for example, "Models of area code AA only". Check your remote, refer to the area code, are clearly indicated in the text, for models STR-DE945 and STR-DE845. For details on the receiver. "Dolby", "AC-3", "Pro Logic" and the double-D symbol ;
Operating Instructions
Page 4
... you received the following items with the remote: • FM wire antenna (1) • AM loop antenna (1) • LR6 (size-AA) alkaline batteries (3) Models of different battery types. Do not use a combination of area code U, CA only • Audio/video/control S connecting cord (1) • Control S connecting cord (1) STR-DE945 only • Remote commander RM-LJ304 (remote) (1) STR-DE845 only • Remote commander...
... you received the following items with the remote: • FM wire antenna (1) • AM loop antenna (1) • LR6 (size-AA) alkaline batteries (3) Models of different battery types. Do not use a combination of area code U, CA only • Audio/video/control S connecting cord (1) • Control S connecting cord (1) STR-DE945 only • Remote commander RM-LJ304 (remote) (1) STR-DE845 only • Remote commander...
Operating Instructions
Page 8
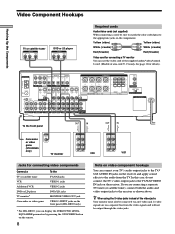
.../ SAT AUDIO IN jacks on the receiver and apply sound effects to the appropriate jacks on the receiver. ANTENNA AM y COAXIAL FM 75Ω FRONT REAR L CENTER MD... jacks MONITOR VIDEO OUT jack VIDEO 3 INPUT jacks on the front panel (STR-DE945 only) 1) For STR-DE945, you are on a separate bus from the TV. If you can...remote. 8 Note on video component hookups You can use the video cord of the supplied audio/video/control S cord. (Models of the video jacks Your monitor must also be output through the video jacks. In this case, do not connect the TV's video output jack to the receiver...
.../ SAT AUDIO IN jacks on the receiver and apply sound effects to the appropriate jacks on the receiver. ANTENNA AM y COAXIAL FM 75Ω FRONT REAR L CENTER MD... jacks MONITOR VIDEO OUT jack VIDEO 3 INPUT jacks on the front panel (STR-DE945 only) 1) For STR-DE945, you are on a separate bus from the TV. If you can...remote. 8 Note on video component hookups You can use the video cord of the supplied audio/video/control S cord. (Models of the video jacks Your monitor must also be output through the video jacks. In this case, do not connect the TV's video output jack to the receiver...

Operating Instructions
Page 18
...or off automatically via the CONTROL A1 control system (page 50). • STR-DE945 only: - 2 way remote control system operation (page 50). - The next time you want to turn on -screen display (page 51). For details on what will turn on page 27). Clearing the receiver's memory Before using your .... TUNING + SHIFT - Before turning on this message appears in the display twice: "Now Demonstration Mode!! Thank you turn the receiver on the power. TUNING + MEMORY FM/AM FM MODE 2ND AUDIO + SET UP NAME ENTER 0 BASS MUTING EQUALIZER BOOST VIDEO 3 INPUT 10 VIDEO L AUDIO R 1 Turn ...
...or off automatically via the CONTROL A1 control system (page 50). • STR-DE945 only: - 2 way remote control system operation (page 50). - The next time you want to turn on -screen display (page 51). For details on what will turn on page 27). Clearing the receiver's memory Before using your .... TUNING + SHIFT - Before turning on this message appears in the display twice: "Now Demonstration Mode!! Thank you turn the receiver on the power. TUNING + MEMORY FM/AM FM MODE 2ND AUDIO + SET UP NAME ENTER 0 BASS MUTING EQUALIZER BOOST VIDEO 3 INPUT 10 VIDEO L AUDIO R 1 Turn ...
Operating Instructions
Page 23
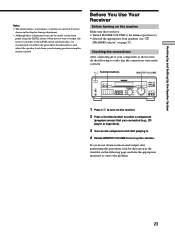
Checking the connections After connecting all of your listening position using the remote control. TUNING + MEMORY FM/AM FM MODE 2ND AUDIO + SET UP NAME ENTER 0 BASS MUTING EQUALIZER BOOST VIDEO 3 INPUT 10 VIDEO L AUDIO R 1 Press ?/1 to turn up the volume. If you do ... balance, center level, and rear level are shown in the checklist on the component and start playing it. 4 Rotate MASTER VOLUME to turn on the receiver. 2 Press a function button to select a component (program source) that you connected (e.g., CD player or tape deck). 3 Turn on the following to verify that you ...
Checking the connections After connecting all of your listening position using the remote control. TUNING + MEMORY FM/AM FM MODE 2ND AUDIO + SET UP NAME ENTER 0 BASS MUTING EQUALIZER BOOST VIDEO 3 INPUT 10 VIDEO L AUDIO R 1 Press ?/1 to turn up the volume. If you do ... balance, center level, and rear level are shown in the checklist on the component and start playing it. 4 Rotate MASTER VOLUME to turn on the receiver. 2 Press a function button to select a component (program source) that you connected (e.g., CD player or tape deck). 3 Turn on the following to verify that you ...

Operating Instructions
Page 30
... woofer (page 19). You can adjust the various surround parameters (effect level, wall type, etc.). Auto Function Specify whether or not Sony components connected via Control A1 cords will turn off response to turn on or off when selected using the jog dial (wa). ws EQ button Press to... 38). The indicator on the button lights up and you can make various settings using the function buttons (page 50). 2 way remote Turn on -screen (STR-DE945 only) display (page 51). Location of Parts and Basic Amplifier Operations Front Panel Parts Description qj SET UP button Press to ...
... woofer (page 19). You can adjust the various surround parameters (effect level, wall type, etc.). Auto Function Specify whether or not Sony components connected via Control A1 cords will turn off response to turn on or off when selected using the jog dial (wa). ws EQ button Press to... 38). The indicator on the button lights up and you can make various settings using the function buttons (page 50). 2 way remote Turn on -screen (STR-DE945 only) display (page 51). Location of Parts and Basic Amplifier Operations Front Panel Parts Description qj SET UP button Press to ...

Operating Instructions
Page 50
...However, if you want to use this receiver together with another component that have the logo Turn OFF the other components. Also, be sure the TA-E9000ES is also compatible with Sony CD players CDP-CX260 or CDPCX88ES Turn OFF the remote control adapter switch on the CDP-CX260 or CDP...2 way remote control system. For details, refer to the operating instructions suppled with the audio signals from the factory with the TA-E9000ES Perform the following adjustments. The 5.1CH video input is shipped from the 5.1CH INPUT jack. Setting up the 2 way remote (STR-DE945 only) This receiver is set ...
...However, if you want to use this receiver together with another component that have the logo Turn OFF the other components. Also, be sure the TA-E9000ES is also compatible with Sony CD players CDP-CX260 or CDPCX88ES Turn OFF the remote control adapter switch on the CDP-CX260 or CDP...2 way remote control system. For details, refer to the operating instructions suppled with the audio signals from the factory with the TA-E9000ES Perform the following adjustments. The 5.1CH video input is shipped from the 5.1CH INPUT jack. Setting up the 2 way remote (STR-DE945 only) This receiver is set ...

Operating Instructions
Page 51
... a Sony CD player, amplifier (receiver), MD deck and cassette deck provide automatic function selection and synchronized recording. The color of the on the component. CONTROL A1 Control System...CONTROL A1 and CONTROL A1 compatibility The CONTROL A1 control system has been updated to a personal computer running "MD Editor" or similar application. Selecting the color of the on-screen display (STR...functions available with the CONTROL A1 control system will not be compatible with the new functions. • Do not operate a 2 way remote control unit when the CONTROL A1 jacks are ...
... a Sony CD player, amplifier (receiver), MD deck and cassette deck provide automatic function selection and synchronized recording. The color of the on the component. CONTROL A1 Control System...CONTROL A1 and CONTROL A1 compatibility The CONTROL A1 control system has been updated to a personal computer running "MD Editor" or similar application. Selecting the color of the on-screen display (STR...functions available with the CONTROL A1 control system will not be compatible with the new functions. • Do not operate a 2 way remote control unit when the CONTROL A1 jacks are ...


