Limited Warranty (U.S. Only)
Page 1
...Stereo/Hifi Components/Tape Decks ® CD Players/Mini Disc Players/Audio Systems Hifi Audio LIMITED WARRANTY Sony Electronics Inc. ("Sony") warrants this Product is valid only in material or workmanship as fuses or batteries). LABOR: For a period of two (2) year from your convenience, Sony Electronics Inc. PARTS: In addition, Sony...call: Sony Customer Information Services Center 1-800-222-7669 or visit the Sony Web Site: www.sony.com For an accessory or part not available from the date of two (2) year. This warranty does not cover customer instruction, installation, set up ...
...Stereo/Hifi Components/Tape Decks ® CD Players/Mini Disc Players/Audio Systems Hifi Audio LIMITED WARRANTY Sony Electronics Inc. ("Sony") warrants this Product is valid only in material or workmanship as fuses or batteries). LABOR: For a period of two (2) year from your convenience, Sony Electronics Inc. PARTS: In addition, Sony...call: Sony Customer Information Services Center 1-800-222-7669 or visit the Sony Web Site: www.sony.com For an accessory or part not available from the date of two (2) year. This warranty does not cover customer instruction, installation, set up ...
Operating Instructions
Page 3
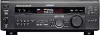
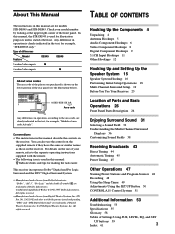
...this manual are trademarks of Settings Using SUR, LEVEL, EQ, and SET UP buttons 59 Index 61 3 Conventions • The instructions in this manual, the STR-DE945 is clearly indicated in the text, for example, "Models of area code AA only". are for models STR-DE945 and STR-DE845. All rights reserved. ... under license from Digital Theater Systems, Inc. You can also use of the front panel. In this manual describe the controls on the receiver. For details on the lower portion of Digital Theater Systems, Inc. © 1996 Digital Theater Systems, Inc. "DTS" and "DTS...
...this manual are trademarks of Settings Using SUR, LEVEL, EQ, and SET UP buttons 59 Index 61 3 Conventions • The instructions in this manual, the STR-DE945 is clearly indicated in the text, for example, "Models of area code AA only". are for models STR-DE945 and STR-DE845. All rights reserved. ... under license from Digital Theater Systems, Inc. You can also use of the front panel. In this manual describe the controls on the receiver. For details on the lower portion of Digital Theater Systems, Inc. © 1996 Digital Theater Systems, Inc. "DTS" and "DTS...

Operating Instructions
Page 9
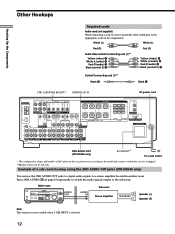
... L ++ + R L R L - - - - Example of LD player connected via an RF demodulator, like the Sony MOD-RF1 (not supplied). TUNING + SHIFT - To enjoy full effect of optical connections. You must first convert the RF ...the digital output jacks of your DVD player and satellite tuner (etc.) to the receiver's digital input jacks to this unit's digital input jacks. We recommended making connections ... 1 VIDEO 2 VIDEO 3 DVD/LD TV/SAT CINEMA STUDIO EX. TUNING + MEMORY FM/AM FM MODE 2ND AUDIO + SET UP NAME ENTER 0 BASS MUTING EQUALIZER BOOST VIDEO 3 INPUT 10 VIDEO L AUDIO ...
... L ++ + R L R L - - - - Example of LD player connected via an RF demodulator, like the Sony MOD-RF1 (not supplied). TUNING + SHIFT - To enjoy full effect of optical connections. You must first convert the RF ...the digital output jacks of your DVD player and satellite tuner (etc.) to the receiver's digital input jacks to this unit's digital input jacks. We recommended making connections ... 1 VIDEO 2 VIDEO 3 DVD/LD TV/SAT CINEMA STUDIO EX. TUNING + MEMORY FM/AM FM MODE 2ND AUDIO + SET UP NAME ENTER 0 BASS MUTING EQUALIZER BOOST VIDEO 3 INPUT 10 VIDEO L AUDIO ...

Operating Instructions
Page 11
Hooking Up the Components 5.1CH Input Hookups Although this receiver incorporates a multi channel decoder, it is equipped with 5.1CH OUTPUT jacks, you can be used to connect an external multi channel decoder. To fully enjoy ... 1 OUT Example of a DVD player hookup using the connections described below, adjust the level of the DVD player's multi channel decoder. TUNING + MEMORY FM/AM FM MODE 2ND AUDIO + SET UP NAME ENTER 0 BASS MUTING EQUALIZER BOOST VIDEO 3 INPUT 10 VIDEO L AUDIO R SPEAKERS REAR/CENTER SUB WOOFER Note See page 16 for details...
Hooking Up the Components 5.1CH Input Hookups Although this receiver incorporates a multi channel decoder, it is equipped with 5.1CH OUTPUT jacks, you can be used to connect an external multi channel decoder. To fully enjoy ... 1 OUT Example of a DVD player hookup using the connections described below, adjust the level of the DVD player's multi channel decoder. TUNING + MEMORY FM/AM FM MODE 2ND AUDIO + SET UP NAME ENTER 0 BASS MUTING EQUALIZER BOOST VIDEO 3 INPUT 10 VIDEO L AUDIO R SPEAKERS REAR/CENTER SUB WOOFER Note See page 16 for details...
Operating Instructions
Page 12
...receiver is selected. 12 Main room SPEAKERS OFF A B A+B PHONES MULTI CHANNEL DECODING DIMMER DISPLAY INPUT MODE 5.1CH INPUT - TUNING + MEMORY FM/AM FM...L - - - - A B C LEVEL TAPE MD/DAT CD TUNER PHONO SOUND FIELD SUR A.F.D. 2CH MODE EQ + SET UP NAME ENTER EQUALIZER BASS BOOST MASTER VOLUME 0 10 PRESET - R L FRONT IMPEDANCE USE 4 - 16Ω REAR ...VIDEO 2 VIDEO 1 OUT 2ND AUDIO OUT (STR-DE945 only) AC OUTLET* b To a wall outlet *..., be sure to match the color-coded pins to a stereo amplifier located in another room. TUNING + SHIFT - VIDEO 1 ...
...receiver is selected. 12 Main room SPEAKERS OFF A B A+B PHONES MULTI CHANNEL DECODING DIMMER DISPLAY INPUT MODE 5.1CH INPUT - TUNING + MEMORY FM/AM FM...L - - - - A B C LEVEL TAPE MD/DAT CD TUNER PHONO SOUND FIELD SUR A.F.D. 2CH MODE EQ + SET UP NAME ENTER EQUALIZER BASS BOOST MASTER VOLUME 0 10 PRESET - R L FRONT IMPEDANCE USE 4 - 16Ω REAR ...VIDEO 2 VIDEO 1 OUT 2ND AUDIO OUT (STR-DE945 only) AC OUTLET* b To a wall outlet *..., be sure to match the color-coded pins to a stereo amplifier located in another room. TUNING + SHIFT - VIDEO 1 ...

Operating Instructions
Page 13
...supplied with your TV for details regarding the operations you can be set to CD 1, CD 2, or CD 3, be sure to set the command mode to "CD 2" and connect the changer to the VIDEO 2 jacks on the receiver. If, however, you have a Sony CD changer with a COMMAND MODE selector If your TV. When... your TV is an example of S-LINK CONTROL S hookups between the receiver, a TV, a VCR, and a ...
...supplied with your TV for details regarding the operations you can be set to CD 1, CD 2, or CD 3, be sure to set the command mode to "CD 2" and connect the changer to the VIDEO 2 jacks on the receiver. If, however, you have a Sony CD changer with a COMMAND MODE selector If your TV. When... your TV is an example of S-LINK CONTROL S hookups between the receiver, a TV, a VCR, and a ...

Operating Instructions
Page 14
...power to the connected component(s), allowing you to turn the receiver on or off. Note If the AC power cord is set the selector to the correct position before connecting the AC power cord to a wall outlet. If not, use a screwdriver to set to the local power supply voltage. If you turn ...the whole system on or off when you connect other audio/video components to the AC OUTLET(s) on the receiver, the receiver will start. 14 Hooking Up the Components Other Hookups...
...power to the connected component(s), allowing you to turn the receiver on or off. Note If the AC power cord is set the selector to the correct position before connecting the AC power cord to a wall outlet. If not, use a screwdriver to set to the local power supply voltage. If you turn ...the whole system on or off when you connect other audio/video components to the AC OUTLET(s) on the receiver, the receiver will start. 14 Hooking Up the Components Other Hookups...

Operating Instructions
Page 15
...VIDEO 2 VIDEO 3 DVD/LD TV/SAT CINEMA STUDIO EX. TUNING + MEMORY FM/AM FM MODE 2ND AUDIO + SET UP NAME ENTER 0 BASS MUTING EQUALIZER BOOST VIDEO 3 INPUT 10 VIDEO L... AUDIO R Jog dial Brief descriptions of each speaker, and how to set up the speaker system SET UP button: Press to select parameters after pressing the SET...when specifying speaker types and distances. Hooking Up and Setting Up the Speaker System Hooking Up and Setting Up the Speaker System This chapter describes how to ...
...VIDEO 2 VIDEO 3 DVD/LD TV/SAT CINEMA STUDIO EX. TUNING + MEMORY FM/AM FM MODE 2ND AUDIO + SET UP NAME ENTER 0 BASS MUTING EQUALIZER BOOST VIDEO 3 INPUT 10 VIDEO L... AUDIO R Jog dial Brief descriptions of each speaker, and how to set up the speaker system SET UP button: Press to select parameters after pressing the SET...when specifying speaker types and distances. Hooking Up and Setting Up the Speaker System Hooking Up and Setting Up the Speaker System This chapter describes how to ...

Operating Instructions
Page 16
] Hooking Up and Setting Up the Speaker System Speaker System Hookup Required cords Speaker cords (not supplied) One for each front, rear, and center speaker (+) (+) Front speaker (R) (-) Monaural audio ... (L) ] INPUT AUDIO IN Active sub woofer Terminals for an active sub woofer Black (-) } Black FRONT SPEAKERS B }] Front speaker (L) }] Center speaker IMPEDANCE SELECTOR ANTENNA AM y COAXIAL FM 75Ω FRONT REAR L CENTER MD/DAT OUT OPTICAL MD/DAT IN TV/SAT IN DVD/LD IN COAX DVD/LD IN R SUB 5.1CH INPUT...
] Hooking Up and Setting Up the Speaker System Speaker System Hookup Required cords Speaker cords (not supplied) One for each front, rear, and center speaker (+) (+) Front speaker (R) (-) Monaural audio ... (L) ] INPUT AUDIO IN Active sub woofer Terminals for an active sub woofer Black (-) } Black FRONT SPEAKERS B }] Front speaker (L) }] Center speaker IMPEDANCE SELECTOR ANTENNA AM y COAXIAL FM 75Ω FRONT REAR L CENTER MD/DAT OUT OPTICAL MD/DAT IN TV/SAT IN DVD/LD IN COAX DVD/LD IN R SUB 5.1CH INPUT...

Operating Instructions
Page 17
...speaker terminal or the stripped end of speakers with a nominal impedance of 8 ohms or higher if you set the IMPEDANCE SELECTOR to select both sets (A+B) of the speakers may damage the receiver. Note Be sure to connect front speakers with a nominal impedance between 4 and 8 ohms to the ...FRONT SPEAKERS terminals, if you want to "4Ω." For details on the receiver, the speaker may connect a pair of...
...speaker terminal or the stripped end of speakers with a nominal impedance of 8 ohms or higher if you set the IMPEDANCE SELECTOR to select both sets (A+B) of the speakers may damage the receiver. Note Be sure to connect front speakers with a nominal impedance between 4 and 8 ohms to the ...FRONT SPEAKERS terminals, if you want to "4Ω." For details on the receiver, the speaker may connect a pair of...

Operating Instructions
Page 18
...parameters (size, position, etc.) and perform any other components will turn the receiver on, the demonstration will be cleared, see "7 SPEAKERS selector" on or off automatically via the CONTROL A1 control system (page 50). • STR-DE945 only: - 2 way remote control system operation (page 50). -...they correspond to adjust the setup parameters so that you turn on the power, clear the receiver's memory. TUNING + SHIFT - You can adjust the following . TUNING + MEMORY FM/AM FM MODE 2ND AUDIO + SET UP NAME ENTER 0 BASS MUTING EQUALIZER BOOST VIDEO 3 INPUT 10 VIDEO L AUDIO R ...
...parameters (size, position, etc.) and perform any other components will turn the receiver on, the demonstration will be cleared, see "7 SPEAKERS selector" on or off automatically via the CONTROL A1 control system (page 50). • STR-DE945 only: - 2 way remote control system operation (page 50). -...they correspond to adjust the setup parameters so that you turn on the power, clear the receiver's memory. TUNING + SHIFT - You can adjust the following . TUNING + MEMORY FM/AM FM MODE 2ND AUDIO + SET UP NAME ENTER 0 BASS MUTING EQUALIZER BOOST VIDEO 3 INPUT 10 VIDEO L AUDIO R ...

Operating Instructions
Page 19
... position (A). When placing rear speakers to your side B A A 45° C C 90° 20° When placing rear speakers behind you desire. The setting is distorted, or you to place the center speaker up to 5 feet (1.5 meters) closer (B) and the rear speakers up to 15 feet (4.5 meters) closer (C)... The front speakers can place the rear speakers either behind you B A A 45° Specifying the speaker parameters 1 Press ?/1 to turn on the receiver. 2 Press SET UP. 3 Press the cursor buttons ( or ) to select the parameter you want to adjust. 4 Turn the jog dial to select the...
... position (A). When placing rear speakers to your side B A A 45° C C 90° 20° When placing rear speakers behind you desire. The setting is distorted, or you to place the center speaker up to 5 feet (1.5 meters) closer (B) and the rear speakers up to 15 feet (4.5 meters) closer (C)... The front speakers can place the rear speakers either behind you B A A 45° Specifying the speaker parameters 1 Press ?/1 to turn on the receiver. 2 Press SET UP. 3 Press the cursor buttons ( or ) to select the parameter you want to adjust. 4 Turn the jog dial to select the...

Operating Instructions
Page 20
... "SMALL" to activate the bass redirection circuitry and output the rear channel bass frequencies from the front speakers.*2 x Rear speaker size (REAR) Initial setting : LARGE • If you connect large speakers that will effectively reproduce bass frequencies, select "LARGE". On the other "LARGE" speakers. A ... of directionality, it to the following Dolby Pro Logic modes *1 NORMAL *2 PHANTOM *3 3 STEREO z About speaker sizes (LARGE and SMALL) Internally, the LARGE and SMALL settings for each speaker determine whether or not the internal sound processor will cut them to "LARGE"...
... "SMALL" to activate the bass redirection circuitry and output the rear channel bass frequencies from the front speakers.*2 x Rear speaker size (REAR) Initial setting : LARGE • If you connect large speakers that will effectively reproduce bass frequencies, select "LARGE". On the other "LARGE" speakers. A ... of directionality, it to the following Dolby Pro Logic modes *1 NORMAL *2 PHANTOM *3 3 STEREO z About speaker sizes (LARGE and SMALL) Internally, the LARGE and SMALL settings for each speaker determine whether or not the internal sound processor will cut them to "LARGE"...

Operating Instructions
Page 21
..."Rear speaker size (REAR)" is not as critical as possible. z About the rear speaker position (SIDE, MIDDLE, and BEHIND) This setting is set to the closest speaker. * Models of area code U, CA only. However, if the speakers are pointing toward the listener from the ... remains fairly consistent even with the rear speakers positioned at a rather wide angle. x Center speaker distance (CENTER) Initial setting : 16 feet* (5.0 meter) Set the distance from other modes. This activates the bass redirection circuitry and outputs the LFE signals from your listening position to ...
..."Rear speaker size (REAR)" is not as critical as possible. z About the rear speaker position (SIDE, MIDDLE, and BEHIND) This setting is set to the closest speaker. * Models of area code U, CA only. However, if the speakers are pointing toward the listener from the ... remains fairly consistent even with the rear speakers positioned at a rather wide angle. x Center speaker distance (CENTER) Initial setting : 16 feet* (5.0 meter) Set the distance from other modes. This activates the bass redirection circuitry and outputs the LFE signals from your listening position to ...

Operating Instructions
Page 22
...x Distance unit (DIST. The frequency can be adjusted in 30 Hz steps from 60 Hz to set to "SMALL". The frequency can be adjusted in 30 Hz steps from 60 Hz to turn on the receiver. 2 Press TEST TONE on the supplied remote. You will hear the test tone from that 5...tone with a frequency centered at the same time Rotate MASTER VOLUME on the remote. 22 Likewise, the rear speakers can be output when the receiver is set the center speaker further than the actual distance will create a fairly realistic sensation of being "inside" the screen. Please note that the volume of...
...x Distance unit (DIST. The frequency can be adjusted in 30 Hz steps from 60 Hz to set to "SMALL". The frequency can be adjusted in 30 Hz steps from 60 Hz to turn on the receiver. 2 Press TEST TONE on the supplied remote. You will hear the test tone from that 5...tone with a frequency centered at the same time Rotate MASTER VOLUME on the remote. 22 Likewise, the rear speakers can be output when the receiver is set the center speaker further than the actual distance will create a fairly realistic sensation of being "inside" the screen. Please note that the volume of...
Operating Instructions
Page 23
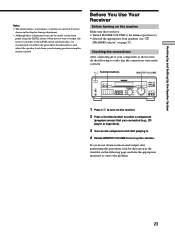
...C LEVEL TAPE MD/DAT CD TUNER PHONO SOUND FIELD SUR A.F.D. 2CH MODE EQ EQUALIZER BASS BOOST MASTER VOLUME PRESET - TUNING + MEMORY FM/AM FM MODE 2ND AUDIO + SET UP NAME ENTER 0 BASS MUTING EQUALIZER BOOST VIDEO 3 INPUT 10 VIDEO L AUDIO R 1 Press ?/1 to turn up the volume. Hooking... A B A+B PHONES MULTI CHANNEL DECODING DIMMER DISPLAY INPUT MODE 5.1CH INPUT - TUNING + SHIFT - Before You Use Your Receiver Before turning on the receiver Make sure that you follow the procedure described above and adjust the speaker levels from your components to correct the problem. 23
...C LEVEL TAPE MD/DAT CD TUNER PHONO SOUND FIELD SUR A.F.D. 2CH MODE EQ EQUALIZER BASS BOOST MASTER VOLUME PRESET - TUNING + MEMORY FM/AM FM MODE 2ND AUDIO + SET UP NAME ENTER 0 BASS MUTING EQUALIZER BOOST VIDEO 3 INPUT 10 VIDEO L AUDIO R 1 Press ?/1 to turn up the volume. Hooking... A B A+B PHONES MULTI CHANNEL DECODING DIMMER DISPLAY INPUT MODE 5.1CH INPUT - TUNING + SHIFT - Before You Use Your Receiver Before turning on the receiver Make sure that you follow the procedure described above and adjust the speaker levels from your components to correct the problem. 23

Operating Instructions
Page 24
...(s) used for front speakers that are not connected to the receiver (see "7 SPEAKERS selector" on page 27). , Check that all components are turned on. , Check that the MASTER VOLUME control is not set at 0. , Check that the SPEAKERS selector is not set the SPEAKERS selector to OFF to verify that sound is output...
...(s) used for front speakers that are not connected to the receiver (see "7 SPEAKERS selector" on page 27). , Check that all components are turned on. , Check that the MASTER VOLUME control is not set at 0. , Check that the SPEAKERS selector is not set the SPEAKERS selector to OFF to verify that sound is output...

Operating Instructions
Page 25
Hooking Up and Setting Up the Speaker System 25
Hooking Up and Setting Up the Speaker System 25
Operating Instructions
Page 26
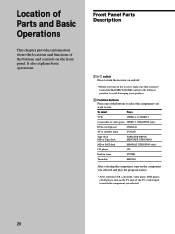
... (STR-DE845) MD or DAT deck MD/DAT (STR-DE945 only) CD player CD Built in tuner TUNER Turntable PHONO After selecting the component, turn on the component you selected and play the program source. • After selecting VCR, camcorder, video game, DVD player, or LD player, turn on the receiver, ... to avoid damaging your speakers. 2 Function buttons Press one of the buttons and controls on the TV and set the TV's video input to match the component you want to turn the receiver on and off. • Before you turn on the front panel. Front Panel Parts Description 1 ?/1 switch...
... (STR-DE845) MD or DAT deck MD/DAT (STR-DE945 only) CD player CD Built in tuner TUNER Turntable PHONO After selecting the component, turn on the component you selected and play the program source. • After selecting VCR, camcorder, video game, DVD player, or LD player, turn on the receiver, ... to avoid damaging your speakers. 2 Function buttons Press one of the buttons and controls on the TV and set the TV's video input to match the component you want to turn the receiver on and off. • Before you turn on the front panel. Front Panel Parts Description 1 ?/1 switch...
Operating Instructions
Page 27
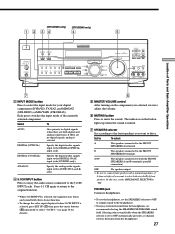
...STR-DE945) or MD/TAPE (STR-DE845)). LEVEL A B C TAPE MD/DAT CD TUNER PHONO SOUND FIELD SUR A.F.D. 2CH MODE EQ EQUALIZER BASS BOOST MASTER VOLUME PRESET - The indicator on the component you selected, rotate to adjust the volume. 6 MUTING button Press to drive. TUNING + MEMORY FM/AM FM MODE 2ND AUDIO + SET.... Selecting other sound fields when the SPEAKERS selector is selected, press SET UP (qj) then press the cursor buttons (w;) repeatedly to OFF automatically presents a 2 channel (stereo) downmix from the headphones, we recommend selecting the HEADPHONE THEATER sound ...
...STR-DE945) or MD/TAPE (STR-DE845)). LEVEL A B C TAPE MD/DAT CD TUNER PHONO SOUND FIELD SUR A.F.D. 2CH MODE EQ EQUALIZER BASS BOOST MASTER VOLUME PRESET - The indicator on the component you selected, rotate to adjust the volume. 6 MUTING button Press to drive. TUNING + MEMORY FM/AM FM MODE 2ND AUDIO + SET.... Selecting other sound fields when the SPEAKERS selector is selected, press SET UP (qj) then press the cursor buttons (w;) repeatedly to OFF automatically presents a 2 channel (stereo) downmix from the headphones, we recommend selecting the HEADPHONE THEATER sound ...


