
User Guide
Page 4
n4 N Precautions ...146 Handling the LCD Screen ...147 Using the Power Source ...148 Handling Your Computer ...149 Handling the Built-in MOTION EYE Camera...151 Handling Floppy Disks ...152 Handling Discs ...153 Using the Battery Pack ...154 Using Headphones ...156 Handling the Memory Stick ...157 Handling the Hard Disk ...158 Updating Your Computer ...159 Troubleshooting ...160 Computer ...162 System Security ...169 Battery...170 Built-in MOTION EYE Camera...172 Internet ...175 Networking ...177 Bluetooth Technology ...180 Optical Discs ...185 Display ...190 Printing ...195 Microphone ...196
n4 N Precautions ...146 Handling the LCD Screen ...147 Using the Power Source ...148 Handling Your Computer ...149 Handling the Built-in MOTION EYE Camera...151 Handling Floppy Disks ...152 Handling Discs ...153 Using the Battery Pack ...154 Using Headphones ...156 Handling the Memory Stick ...157 Handling the Hard Disk ...158 Updating Your Computer ...159 Troubleshooting ...160 Computer ...162 System Security ...169 Battery...170 Built-in MOTION EYE Camera...172 Internet ...175 Networking ...177 Bluetooth Technology ...180 Optical Discs ...185 Display ...190 Printing ...195 Microphone ...196

User Guide
Page 7
...). Press any key to bring the computer back into Normal mode. ENERGY STAR n7 N Before Use As an ENERGY STAR Partner, Sony has determined that promotes energy saving through the use of computers and office equipment. The International ENERGY STAR Office Equipment Program is turned ... ❑ The computer enters Sleep mode automatically after about 30 minutes of products with the following power saving settings: ❑ The LCD backlight is an international program that this product meets the ENERGY STAR guidelines for energy efficiency. For detailed information on the ENERGY STAR ...
...). Press any key to bring the computer back into Normal mode. ENERGY STAR n7 N Before Use As an ENERGY STAR Partner, Sony has determined that promotes energy saving through the use of computers and office equipment. The International ENERGY STAR Office Equipment Program is turned ... ❑ The computer enters Sleep mode automatically after about 30 minutes of products with the following power saving settings: ❑ The LCD backlight is an international program that this product meets the ENERGY STAR guidelines for energy efficiency. For detailed information on the ENERGY STAR ...

User Guide
Page 15
and Duo-size Memory Stick. Front n 15 N Getting Started A Built-in MOTION EYE camera*1 (page 35) B Built-in MOTION EYE camera indicator*1 (page 21) C Built-in microphone (monaural)*1 D LCD screen (page 147) E Built-in speakers (stereo) F Keyboard (page 32) G Touch pad (page 33) H Fingerprint sensor*1 (page 111) I WIRELESS switch (page 60) J WIRELESS indicator (page 21) K Memory Stick slot*2 (page 50) L Media Access indicator (page 21) M SD memory card slot (page 56) *1 On selected models only. *2 Your computer supports both standard-
and Duo-size Memory Stick. Front n 15 N Getting Started A Built-in MOTION EYE camera*1 (page 35) B Built-in MOTION EYE camera indicator*1 (page 21) C Built-in microphone (monaural)*1 D LCD screen (page 147) E Built-in speakers (stereo) F Keyboard (page 32) G Touch pad (page 33) H Fingerprint sensor*1 (page 111) I WIRELESS switch (page 60) J WIRELESS indicator (page 21) K Memory Stick slot*2 (page 50) L Media Access indicator (page 21) M SD memory card slot (page 56) *1 On selected models only. *2 Your computer supports both standard-

User Guide
Page 23
n 23 N Getting Started Installing the Battery Pack To install the battery pack 1 Turn off the computer and close the LCD screen lid. 2 Slide the battery LOCK switch (1) inward. Using the Battery Pack The battery pack supplied with your computer is not fully charged at the time of delivery.
n 23 N Getting Started Installing the Battery Pack To install the battery pack 1 Turn off the computer and close the LCD screen lid. 2 Slide the battery LOCK switch (1) inward. Using the Battery Pack The battery pack supplied with your computer is not fully charged at the time of delivery.

User Guide
Page 29
You may lose data if you remove the battery pack while the computer is on the battery pack, and turn the battery pack in Sleep mode. n 29 N Getting Started Removing the Battery Pack ! To remove the battery pack 1 Turn off the computer and close the LCD screen lid. 2 Slide the battery LOCK switch (1) inward. 3 Slide and hold the battery RELEASE latch (2) inward, put your fingertip underneath the tab (3) on and not connected to the AC adapter or if you remove the battery pack while your computer is in the direction of the arrow, and then slide it away from the computer.
You may lose data if you remove the battery pack while the computer is on the battery pack, and turn the battery pack in Sleep mode. n 29 N Getting Started Removing the Battery Pack ! To remove the battery pack 1 Turn off the computer and close the LCD screen lid. 2 Slide the battery LOCK switch (1) inward. 3 Slide and hold the battery RELEASE latch (2) inward, put your fingertip underneath the tab (3) on and not connected to the AC adapter or if you remove the battery pack while your computer is in the direction of the arrow, and then slide it away from the computer.
User Guide
Page 32
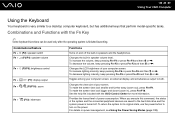
n 32 N Using Your VAIO Computer Using the Keyboard Your keyboard is finished launching. To increase the volume, keep pressing Fn+F3 or press Fn+F3 and then m or To ...
n 32 N Using Your VAIO Computer Using the Keyboard Your keyboard is finished launching. To increase the volume, keep pressing Fn+F3 or press Fn+F3 and then m or To ...

User Guide
Page 84
The monitor port on the projector (6). n 84 N Using Peripheral Devices Connecting a Projector You can connect a projector (for example, the Sony LCD projector) either directly to the docking station. 1 Connect the power cord (1) of your projector into an AC outlet. 2 Plug a display cable (2) (not supplied) into the ...
The monitor port on the projector (6). n 84 N Using Peripheral Devices Connecting a Projector You can connect a projector (for example, the Sony LCD projector) either directly to the docking station. 1 Connect the power cord (1) of your projector into an AC outlet. 2 Plug a display cable (2) (not supplied) into the ...

User Guide
Page 131
... you press and hold the power button for a long period of Sleep mode quicker than Hibernate mode. ! n 131 N Customizing Your VAIO Computer Using Sleep Mode Sleep mode turns off the LCD screen and places the storage device(s) and the CPU into Hibernate mode or turn off . You will lose all unsaved data...
... you press and hold the power button for a long period of Sleep mode quicker than Hibernate mode. ! n 131 N Customizing Your VAIO Computer Using Sleep Mode Sleep mode turns off the LCD screen and places the storage device(s) and the CPU into Hibernate mode or turn off . You will lose all unsaved data...

User Guide
Page 146
n 146 N Precautions Precautions This section describes safety guidelines and precautions to help you protect your VAIO computer from potential damage. ❑ Handling the LCD Screen (page 147) ❑ Using the Power Source (page 148) ❑ Handling Your Computer (page 149) ❑ Handling the Built-in MOTION EYE Camera (page ...
n 146 N Precautions Precautions This section describes safety guidelines and precautions to help you protect your VAIO computer from potential damage. ❑ Handling the LCD Screen (page 147) ❑ Using the Power Source (page 148) ❑ Handling Your Computer (page 149) ❑ Handling the Built-in MOTION EYE Camera (page ...

User Guide
Page 147
...window. ❑ Do not scratch the surface of the manufacturing process and does not indicate a malfunction. ❑ Avoid rubbing the LCD screen. This is manufactured using your computer in the Tablet PC Settings window even when there are change options available for any malfunctions ...arising from changes to prevent residual images. ❑ The LCD screen becomes warm during operation. The residual image disappears after a while. Sony assumes no liability for selection, as it may scratch the LCD screen or soil it . When the computer returns to normal ...
...window. ❑ Do not scratch the surface of the manufacturing process and does not indicate a malfunction. ❑ Avoid rubbing the LCD screen. This is manufactured using your computer in the Tablet PC Settings window even when there are change options available for any malfunctions ...arising from changes to prevent residual images. ❑ The LCD screen becomes warm during operation. The residual image disappears after a while. Sony assumes no liability for selection, as it may scratch the LCD screen or soil it . When the computer returns to normal ...

User Guide
Page 150
...computer. To find the nearest center or agent, see Sony Support Information (page 210). ❑ Make sure you disconnect the AC adapter and remove the battery pack before turning on the LCD screen or its edges when opening the LCD screen lid or lifting your computer. To carry the computer...your data regularly. ❑ Do not exert pressure on the computer. If any problems occur, unplug the computer and contact an authorized Sony Service Center. The LCD screen may damage the screen or cause it to a warm one hour before cleaning your computer. ❑ To avoid losing data when...
...computer. To find the nearest center or agent, see Sony Support Information (page 210). ❑ Make sure you disconnect the AC adapter and remove the battery pack before turning on the LCD screen or its edges when opening the LCD screen lid or lifting your computer. To carry the computer...your data regularly. ❑ Do not exert pressure on the computer. If any problems occur, unplug the computer and contact an authorized Sony Service Center. The LCD screen may damage the screen or cause it to a warm one hour before cleaning your computer. ❑ To avoid losing data when...

User Guide
Page 172
... do captured images contain dropped frames and audio interruptions? ❑ The effect settings on your computer. Lowering the resolution or reducing the colors of the LCD screen might help file included with your software application for example horizontal streaks, if you are captured images poor in quality? ❑ The images captured...
... do captured images contain dropped frames and audio interruptions? ❑ The effect settings on your computer. Lowering the resolution or reducing the colors of the LCD screen might help file included with your software application for example horizontal streaks, if you are captured images poor in quality? ❑ The images captured...

User Guide
Page 190
... should I do if no image is directed to the HDMI port? ! See Connecting a Computer Display (page 78) for more information. If the computer is in LCD (Video) Sleep mode, press any key to find out whether your computer is equipped with the HDMI port only. See the online specifications to bring...
... should I do if no image is directed to the HDMI port? ! See Connecting a Computer Display (page 78) for more information. If the computer is in LCD (Video) Sleep mode, press any key to find out whether your computer is equipped with the HDMI port only. See the online specifications to bring...

User Guide
Page 191
What should I do if my screen is disconnected, you can check the total amount of the LCD screen. See Selecting Display Modes (page 85). Press the Fn+F6 keys to brighten your computer screen. To change the display output to the computer ...
What should I do if my screen is disconnected, you can check the total amount of the LCD screen. See Selecting Display Modes (page 85). Press the Fn+F6 keys to brighten your computer screen. To change the display output to the computer ...

User Guide
Page 192
... Change advanced power settings. 4 Select the Advanced settings tab. 5 Double-click Display. 6 Adjust the LCD brightness setting in the item for brightness adjustment. n 192 N Troubleshooting What should I do if the LCD brightness of my screen changes? ❑ The LCD brightness setting, adjusted with the Fn+F5/F6 keys, is temporary and may be...
... Change advanced power settings. 4 Select the Advanced settings tab. 5 Double-click Display. 6 Adjust the LCD brightness setting in the item for brightness adjustment. n 192 N Troubleshooting What should I do if the LCD brightness of my screen changes? ❑ The LCD brightness setting, adjusted with the Fn+F5/F6 keys, is temporary and may be...


