
Operating Instructions
Page 4
...Right Side/Front 10 Rear/Bottom 10 Control Panel 12 Connector Panel 14 Remote Commander 15 Projecting the Picture Installing the Projector 17 Connecting the Projector 18 Connecting a Computer 18 Connecting a VCR 19 Projecting 20 Turning Off the Power 22 Convenient Functions Selecting the .......32 The SET SETTING Menu 33 The MENU SETTING Menu ...........35 The INSTALL SETTING Menu .......36 The INFORMATION Menu 38 Maintenance Replacing the Lamp 40 Cleaning the Air Filter 42 Others Troubleshooting 43 Messages List 45 Specifications 47 Installation Diagram 52 Floor Installation...
...Right Side/Front 10 Rear/Bottom 10 Control Panel 12 Connector Panel 14 Remote Commander 15 Projecting the Picture Installing the Projector 17 Connecting the Projector 18 Connecting a Computer 18 Connecting a VCR 19 Projecting 20 Turning Off the Power 22 Convenient Functions Selecting the .......32 The SET SETTING Menu 33 The MENU SETTING Menu ...........35 The INSTALL SETTING Menu .......36 The INFORMATION Menu 38 Maintenance Replacing the Lamp 40 Cleaning the Air Filter 42 Others Troubleshooting 43 Messages List 45 Specifications 47 Installation Diagram 52 Floor Installation...

Operating Instructions
Page 5
... avoid lowering the contrast ratio. • Cover any windows that face the screen with qualified Sony personnel. • Should any liquid or solid object fall into the lens while the lamp ... be removed with a cloth lightly dampened with mild detergent solution, followed by the plug. As incorrect maintenance may be changed to a dark color. Illumination • To obtain the best picture, the front...filter • Clean the air filter whenever you replace the lamp. • Refer to the projector. If the floor and walls are not of lightreflecting material. Do not use a soft dry ...
... avoid lowering the contrast ratio. • Cover any windows that face the screen with qualified Sony personnel. • Should any liquid or solid object fall into the lens while the lamp ... be removed with a cloth lightly dampened with mild detergent solution, followed by the plug. As incorrect maintenance may be changed to a dark color. Illumination • To obtain the best picture, the front...filter • Clean the air filter whenever you replace the lamp. • Refer to the projector. If the floor and walls are not of lightreflecting material. Do not use a soft dry ...
Operating Instructions
Page 9
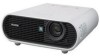
...Incorporated. • Windows is a registered trademark of Microsoft Corporation in a limited space. Simple maintenance Even when the projector is mounted on the Remote Commander. VPL-ES7:Three super-high-aperture 0.63inch SVGA panels with approximately 790,000 effective pixels produce a resolution...; All other switch without going through a standby mode. This prevents the projector from operating incorrectly. Overview B Overview Features High brightness · High picture performance High brightness Sony's unique optical system allows high efficiency. Clean the filter at the side....
...Incorporated. • Windows is a registered trademark of Microsoft Corporation in a limited space. Simple maintenance Even when the projector is mounted on the Remote Commander. VPL-ES7:Three super-high-aperture 0.63inch SVGA panels with approximately 790,000 effective pixels produce a resolution...; All other switch without going through a standby mode. This prevents the projector from operating incorrectly. Overview B Overview Features High brightness · High picture performance High brightness Sony's unique optical system allows high efficiency. Clean the filter at the side....
Operating Instructions
Page 40
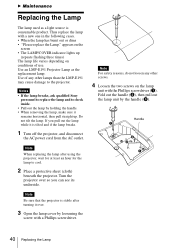
... underside. Handle 40 Replacing the Lamp appears on the lamp unit with the Phillips screwdriver (a). Notes • If the lamp breaks, ask qualified Sony personnel to replace the lamp and to check inside. • Pull out the lamp by the handle (c). Do not tilt the lamp. Note...• The LAMP/COVER indicator lights up . Thus replace the lamp with a Phillips screwdriver. Use of use. B Maintenance Replacing the Lamp The lamp used as the replacement lamp. Turn the projector over . 3 Open the lamp cover by loosening the screw with a new one in the following cases. • ...
... underside. Handle 40 Replacing the Lamp appears on the lamp unit with the Phillips screwdriver (a). Notes • If the lamp breaks, ask qualified Sony personnel to replace the lamp and to check inside. • Pull out the lamp by the handle (c). Do not tilt the lamp. Note...• The LAMP/COVER indicator lights up . Thus replace the lamp with a Phillips screwdriver. Use of use. B Maintenance Replacing the Lamp The lamp used as the replacement lamp. Turn the projector over . 3 Open the lamp cover by loosening the screw with a new one in the following cases. • ...

Operating Instructions
Page 41
... the customers in the USA Lamp in the menu screen. The ?/1 key lights in red. 9 Press the ?/1 key to turn on . 7 Turn the projector back over. 8 Connect the power cord. Change the Lamp and clean the Filter? Yes: No: Refer to environmental considerations. SET SETTING Smar t APA: On... this product contains mercury. Disposal of the lamp. • The power will not turn the projector on. 10Press the MENU key, and then select the SET SETTING menu. 12Select "Execute" with the v key. Maintenance Replacing the Lamp 41 is displayed in place (a). 5 Insert the new lamp all the way ...
... the customers in the USA Lamp in the menu screen. The ?/1 key lights in red. 9 Press the ?/1 key to turn on . 7 Turn the projector back over. 8 Connect the power cord. Change the Lamp and clean the Filter? Yes: No: Refer to environmental considerations. SET SETTING Smar t APA: On... this product contains mercury. Disposal of the lamp. • The power will not turn the projector on. 10Press the MENU key, and then select the SET SETTING menu. 12Select "Execute" with the v key. Maintenance Replacing the Lamp 41 is displayed in place (a). 5 Insert the new lamp all the way ...


