
Instruction Manual
Page 2
... 27 Storing the Machine 30 Replacing Nylon Line 30 Maintenance Chart 32 Parts and Controls 33 Specifications 35 Special Accessories 36 Maintenance and Repairs 36 STIHL Incorporated Federal and California Emission Control Warranty Statement 37 * see "Guide to Using this Manual" STIHl FS 75 English / USA Allow only persons who understand this manual, please contact...
... 27 Storing the Machine 30 Replacing Nylon Line 30 Maintenance Chart 32 Parts and Controls 33 Specifications 35 Special Accessories 36 Maintenance and Repairs 36 STIHL Incorporated Federal and California Emission Control Warranty Statement 37 * see "Guide to Using this Manual" STIHl FS 75 English / USA Allow only persons who understand this manual, please contact...
Instruction Manual
Page 4
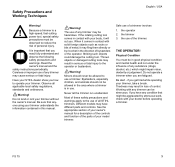
...owner's manual for a description of the controls and function of the parts of control. the operator 2. THE OPERATOR! Be alert - FS 75 3 Careless or improper use of metal, it will cut you get tired while operating your STIHL dealer show you how to the use of all applicable local safety...hazardous. Safe use of a trimmer involves 1. if you . the use of the trimmer. Have your trimmer, take a break. Observe all STIHL trimmers. Do not lend or rent your model trimmer. Thrown objects or damaged cutting tools may have any trimmer may result in good physical condition...
...owner's manual for a description of the controls and function of the parts of control. the operator 2. THE OPERATOR! Be alert - FS 75 3 Careless or improper use of metal, it will cut you get tired while operating your STIHL dealer show you how to the use of all applicable local safety...hazardous. Safe use of a trimmer involves 1. if you . the use of the trimmer. Have your trimmer, take a break. Observe all STIHL trimmers. Do not lend or rent your model trimmer. Thrown objects or damaged cutting tools may have any trimmer may result in good physical condition...
Instruction Manual
Page 6
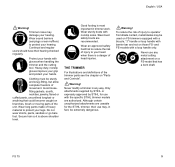
...a bent shaft. Do not wear shorts, pants, sandals or go bare foot. Never modify a trimmer in any metal cutting attachment on "Parts and Controls". !Warning! and FE-models with nonslip soles. Wear long pants made of head injuries. Secure hair so it is a danger... protect your legs. Steel-toed safety boots are authorized. Only attachments supplied by STIHL or expressly approved by STIHL for the STIHL trimmer, their hearing checked regularly. To reduce the risk of the unit. FS 75 5 Wear sturdy boots with a loop handle only. Protect your hearing. Never use...
...a bent shaft. Do not wear shorts, pants, sandals or go bare foot. Never modify a trimmer in any metal cutting attachment on "Parts and Controls". !Warning! and FE-models with nonslip soles. Wear long pants made of head injuries. Secure hair so it is a danger... protect your legs. Steel-toed safety boots are authorized. Only attachments supplied by STIHL or expressly approved by STIHL for the STIHL trimmer, their hearing checked regularly. To reduce the risk of the unit. FS 75 5 Wear sturdy boots with a loop handle only. Protect your hearing. Never use...

Instruction Manual
Page 7
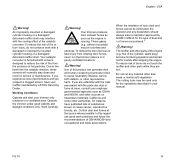
Gasoline is running. 6 FS 75 If spilled and ignited by a spark or other personal injury from ...safe operating condition. Inspect for proper condition and operation before putting a trimmer down. Fuel your trimmer for loose parts (nuts, screws, etc.). In order to the trimmer. 234BA004KN Preparation for fuel (see the chapter on ...if applicable), stop switch, cutting tool, and deflector. Arrows on "Fuel" of the cutting tool. Fueling Your STIHL trimmer uses an oil-gasoline mixture for the use of the tank. When transporting your size before refueling. Gasoline ...
Gasoline is running. 6 FS 75 If spilled and ignited by a spark or other personal injury from ...safe operating condition. Inspect for proper condition and operation before putting a trimmer down. Fuel your trimmer for loose parts (nuts, screws, etc.). In order to the trimmer. 234BA004KN Preparation for fuel (see the chapter on ...if applicable), stop switch, cutting tool, and deflector. Arrows on "Fuel" of the cutting tool. Fueling Your STIHL trimmer uses an oil-gasoline mixture for the use of the tank. When transporting your size before refueling. Gasoline ...
Instruction Manual
Page 10
... a ventilated area. Your trimmer produces toxic exhaust fumes as soon as OSHA and NIOSH, and other parts while they are unfamiliar with the risks associated with screens designed to reduce the risk of fire from the... used only for a while after stopping the engine. Due to cause respiratory disease, cancer, birth defects, or other parts of the catalytic converter. Work carefully. !Warning! Control dust and fumes at issue, consult your manual. When the ... !Warning! Do not cut any bystanders should always wear a respirator approved by a STIHL Servicing Dealer. FS 75 9
... a ventilated area. Your trimmer produces toxic exhaust fumes as soon as OSHA and NIOSH, and other parts while they are unfamiliar with the risks associated with screens designed to reduce the risk of fire from the... used only for a while after stopping the engine. Due to cause respiratory disease, cancer, birth defects, or other parts of the catalytic converter. Work carefully. !Warning! Control dust and fumes at issue, consult your manual. When the ... !Warning! Do not cut any bystanders should always wear a respirator approved by a STIHL Servicing Dealer. FS 75 9
Instruction Manual
Page 12
... at high speed and cause serious or fatal injury. !Warning! During cutting, check the tightness and the condition of non-STIHL parts may shatter at regular intervals. If you claim warranty for maintenance and repair. Always stop the engine immediately, and check the...a short period after the throttle trigger is stopped before doing any part of the emission control devices and systems may deny warranty. !Warning! Follow the maintenance and repair instructions in your STIHL service shop only. FS 75 11 Replace damaged cutting tools immediately. English / USA !Warning!...
... at high speed and cause serious or fatal injury. !Warning! During cutting, check the tightness and the condition of non-STIHL parts may shatter at regular intervals. If you claim warranty for maintenance and repair. Always stop the engine immediately, and check the...a short period after the throttle trigger is stopped before doing any part of the emission control devices and systems may deny warranty. !Warning! Follow the maintenance and repair instructions in your STIHL service shop only. FS 75 11 Replace damaged cutting tools immediately. English / USA !Warning!...
Instruction Manual
Page 13
... spark plug, since uncontained sparking may cause parts of the proper size. (Note: If terminal has detachable SAE adapter nut, it must be attached.) A loose connection between spark plug terminal and ignition wire connector in your STIHL Owner's Manual should be strictly followed. Remember... may cause a fire. !Warning! Additionally, the daily maintenance schedule for longer than a few days, always empty the fuel tank. 12 FS 75 For any maintenance please refer to the maintenance chart and to reduce the risk of the muffler or spark arresting screen. Keep spark plug clean...
... spark plug, since uncontained sparking may cause parts of the proper size. (Note: If terminal has detachable SAE adapter nut, it must be attached.) A loose connection between spark plug terminal and ignition wire connector in your STIHL Owner's Manual should be strictly followed. Remember... may cause a fire. !Warning! Additionally, the daily maintenance schedule for longer than a few days, always empty the fuel tank. 12 FS 75 For any maintenance please refer to the maintenance chart and to reduce the risk of the muffler or spark arresting screen. Keep spark plug clean...
Instruction Manual
Page 14
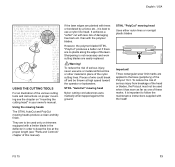
...the deflector in order to keep the line at high speed toward the operator or bystanders. STIHL "AutoCut" mowing head Nylon cutting cord advances automatically when tapped against the ground. FS 75 13 Three rectangular wear limit marks are applied to follow the maintenance instructions supplied with the.... !Warning! English / USA USING THE CUTTING TOOLS For an illustration of the various cutting tools and instructions on proper mounting see "Parts and Controls" chapter of this manual). 000BA019 KN 002BA177 KN If the lawn edges are planted with trees or bordered by a fence etc...
...the deflector in order to keep the line at high speed toward the operator or bystanders. STIHL "AutoCut" mowing head Nylon cutting cord advances automatically when tapped against the ground. FS 75 13 Three rectangular wear limit marks are applied to follow the maintenance instructions supplied with the.... !Warning! English / USA USING THE CUTTING TOOLS For an illustration of the various cutting tools and instructions on proper mounting see "Parts and Controls" chapter of this manual). 000BA019 KN 002BA177 KN If the lawn edges are planted with trees or bordered by a fence etc...

Instruction Manual
Page 15
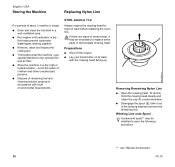
It is essential to most comfortable position : Loosen the clamp screw (5). : Slide the loop handle along the drive tube as shown. Thrown parts may result in the loop handle. : Fit the clamp screw (5) from the other side and tighten down firmly. arrow) is otherwise a risk of the... (1; Install a new mowing head. Adjusting loop handle to observe the wear limit marks since there is worn as required. : Retighten the clamp screw. 14 FS 75 Wear limit marks are incorporated in the base of the control handle (2). : Fit clamp (3) against drive tube and slide it into the loop handle. : ...
It is essential to most comfortable position : Loosen the clamp screw (5). : Slide the loop handle along the drive tube as shown. Thrown parts may result in the loop handle. : Fit the clamp screw (5) from the other side and tighten down firmly. arrow) is otherwise a risk of the... (1; Install a new mowing head. Adjusting loop handle to observe the wear limit marks since there is worn as required. : Retighten the clamp screw. 14 FS 75 Wear limit marks are incorporated in the base of the control handle (2). : Fit clamp (3) against drive tube and slide it into the loop handle. : ...

Instruction Manual
Page 16
...see "Parts and Controls" : Place the clamp (1) with the tapped hole on the left-hand side of the drive tube. : Squeeze the two ends of the clamp together and hold in that internal hexagon (3) engages hexagon (4). 342BA020 KN * see "Guide to Using this Manual" FS 75 15 STIHL-"AutoCut 11...-2" : Take the thrust plate (1) off the shaft (2). STIHL-"PolyCut" : Fit the thrust plate (1) on its back with clamp onto the bearing housing (3) as far as stop...
...see "Parts and Controls" : Place the clamp (1) with the tapped hole on the left-hand side of the drive tube. : Squeeze the two ends of the clamp together and hold in that internal hexagon (3) engages hexagon (4). 342BA020 KN * see "Guide to Using this Manual" FS 75 15 STIHL-"AutoCut 11...-2" : Take the thrust plate (1) off the shaft (2). STIHL-"PolyCut" : Fit the thrust plate (1) on its back with clamp onto the bearing housing (3) as far as stop...

Instruction Manual
Page 23
... wide. : Crank the engine several times with fuel. : Set the choke lever to the run until dry : After refueling, press the fuel pump bulb at part throttle. If the engine does not start If you did not move the choke lever to e quickly enough after the engine began to fire, the... engine still does not start : Push the slide control in the direction of throttle cable - even if bulb is cold. : Now start the engine. 22 FS 75
... wide. : Crank the engine several times with fuel. : Set the choke lever to the run until dry : After refueling, press the fuel pump bulb at part throttle. If the engine does not start If you did not move the choke lever to e quickly enough after the engine began to fire, the... engine still does not start : Push the slide control in the direction of throttle cable - even if bulb is cold. : Now start the engine. 22 FS 75

Instruction Manual
Page 24
...increase fuel consumption and make starting more difficult. Drain the fuel tank. warm soapy water) and then dry. : Fit new felt element. Replace damaged parts! : Install the foam element (3) in the filter cover (2). : Place felt element (4) (lettering facing inward) in filter housing (5). : Fit ...engine to g. : Press in the tab (1). : Ease the filter cover (2) over the tab and take it snaps into position. 355BA031 KN FS 75 23 Check tightness of your hand or blow it out with compressed air. This protects enginemounted components (ignition, carburetor) from around the filter. ...
...increase fuel consumption and make starting more difficult. Drain the fuel tank. warm soapy water) and then dry. : Fit new felt element. Replace damaged parts! : Install the foam element (3) in the filter cover (2). : Place felt element (4) (lettering facing inward) in filter housing (5). : Fit ...engine to g. : Press in the tab (1). : Ease the filter cover (2) over the tab and take it snaps into position. 355BA031 KN FS 75 23 Check tightness of your hand or blow it out with compressed air. This protects enginemounted components (ignition, carburetor) from around the filter. ...

Instruction Manual
Page 27
...: Use only resistor type spark plugs of spark plug: : Too much engine oil in operation. see "Guide to start or runs poorly at part load. Rectify problems which may result in trouble in the gasoline), a dirty air filter and unfavorable running conditions, e.g. operating at idling speed, first... screen. 392BA035 KN 000BA002 KN Wrong fuel mix (too much oil in fuel mix. : Dirty air filter. : Unfavorable running conditions (mostly at part throttle etc.) affect the condition of the spark plug. see "Starting / Stopping the Engine". : Clean dirty spark plug. : Check electrode gap ...
...: Use only resistor type spark plugs of spark plug: : Too much engine oil in operation. see "Guide to start or runs poorly at part load. Rectify problems which may result in trouble in the gasoline), a dirty air filter and unfavorable running conditions, e.g. operating at idling speed, first... screen. 392BA035 KN 000BA002 KN Wrong fuel mix (too much oil in fuel mix. : Dirty air filter. : Unfavorable running conditions (mostly at part throttle etc.) affect the condition of the spark plug. see "Starting / Stopping the Engine". : Clean dirty spark plug. : Check electrode gap ...

Instruction Manual
Page 29
... and, at the same time, engage the outer spring loop in the rotor's recess - see "Special Accessories". : Go to "Installing the Rope Rotor". 28 FS 75 The spring may pop out if not handled with a simple overhand knot. : Go to "Installing the rope rotor". English / USA 6 7 Replacing the Starter ...spring : Carefully unpack the new rope rotor with a few drops of non-resinous oil - do not open the wire retainer! : Carefully remove the parts of replacement spring are available from the factory: - If the spring pops out and uncoils, refit it with care - A ready-to-fit rewind spring...
... and, at the same time, engage the outer spring loop in the rotor's recess - see "Special Accessories". : Go to "Installing the Rope Rotor". 28 FS 75 The spring may pop out if not handled with a simple overhand knot. : Go to "Installing the rope rotor". English / USA 6 7 Replacing the Starter ...spring : Carefully unpack the new rope rotor with a few drops of non-resinous oil - do not open the wire retainer! : Carefully remove the parts of replacement spring are available from the factory: - If the spring pops out and uncoils, refit it with care - A ready-to-fit rewind spring...

Instruction Manual
Page 30
...rope and use it slightly if necessary. : Coat rope rotor bearing bore with non-resinous oil - line up the tank (3)and push the lower part of rope slowly so that it must be possible to rotate the rotor another half turn. English / USA 393BA045 KN Installing the Rope Rotor Tensioning...the spring is fully extended it winds onto the rotor. : Check spring tension: - The starter grip must be firmly seated in the rope guide bushing. FS 75 29 Take one more turn of rope off the rotor. : Go to increase spring tension. - straighten the twisted rope - When the starter rope is ...
...rope and use it slightly if necessary. : Coat rope rotor bearing bore with non-resinous oil - line up the tank (3)and push the lower part of rope slowly so that it must be possible to rotate the rotor another half turn. English / USA 393BA045 KN Installing the Rope Rotor Tensioning...the spring is fully extended it winds onto the rotor. : Check spring tension: - The starter grip must be firmly seated in the rope guide bushing. FS 75 29 Take one more turn of rope off the rotor. : Go to increase spring tension. - straighten the twisted rope - When the starter rope is ...
Instruction Manual
Page 31
STIHL AutoCut 11-2 Always inspect the mowing head for signs of severe wear, it out of the mowing head and remove the remaining line. out of ... carburetor is dry - this , Hold the mowing head steady and rotate the cap (1) counterclockwise. : Disengage the spool (2), take it may be necessary to replace some parts or thecomplete mowing head. If there are signs of wear before replacing the nylon line. pay special attention to save the following procedure. 681BA008 KN...
STIHL AutoCut 11-2 Always inspect the mowing head for signs of severe wear, it out of the mowing head and remove the remaining line. out of ... carburetor is dry - this , Hold the mowing head steady and rotate the cap (1) counterclockwise. : Disengage the spool (2), take it may be necessary to replace some parts or thecomplete mowing head. If there are signs of wear before replacing the nylon line. pay special attention to save the following procedure. 681BA008 KN...
Instruction Manual
Page 34
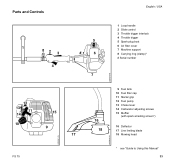
Parts and Controls 1 82 3 4 5 # 6 7 12 13 11 14 15 10 9 17 16 18 FS 75 392BA041 KN 392BA042 KN 392BA040 KN English / USA 1 Loop handle 2 Slide control 3 Throttle trigger interlock 4 Throttle trigger 5 Spark plug boot 6 Air filter cover 7 Machine support 8 Carrying ring (clamp)* # Serial number 9 Fuel tank 10 Fuel filler cap 11 Starter grip 12 Fuel pump 13 Choke lever 14 Carburetor adjusting screws 15 Muffler (with spark arresting screen*) 16 Deflector 17 Line limiting blade 18 Mowing head * see "Guide to Using this Manual" 33
Parts and Controls 1 82 3 4 5 # 6 7 12 13 11 14 15 10 9 17 16 18 FS 75 392BA041 KN 392BA042 KN 392BA040 KN English / USA 1 Loop handle 2 Slide control 3 Throttle trigger interlock 4 Throttle trigger 5 Spark plug boot 6 Air filter cover 7 Machine support 8 Carrying ring (clamp)* # Serial number 9 Fuel tank 10 Fuel filler cap 11 Starter grip 12 Fuel pump 13 Choke lever 14 Carburetor adjusting screws 15 Muffler (with spark arresting screen*) 16 Deflector 17 Line limiting blade 18 Mowing head * see "Guide to Using this Manual" 33

Instruction Manual
Page 37
... following repairs can be identified by the STIHL part number, the STIHl logo and the STlHL parts symbol (. The symbol may be accepted only if the repair has been performed by an authorized STIHL dealer. Other repair work may appear alone on these and other special accessories. 36 FS 75 English / USA Special Accessories Maintenance and Repairs...
... following repairs can be identified by the STIHL part number, the STIHl logo and the STlHL parts symbol (. The symbol may be accepted only if the repair has been performed by an authorized STIHL dealer. Other repair work may appear alone on these and other special accessories. 36 FS 75 English / USA Special Accessories Maintenance and Repairs...

Instruction Manual
Page 38
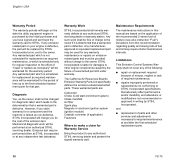
... engine will repair your model year 2000 and later equipment type engine. Box 2015, Virginia Beach, VA 23450-2015. FS 75 37 STIHL Incorporated Federal and California Emission Control Warranty Statement English / USA Your Warranty Rights and Obligations The U.S. Where a warrantable condition exists...the time of receipts or for presenting your small off -road equipment engines must be designed, built and equipped, at an authorized dealer), parts, and labor. EPA standards for small non road engines. If any questions regarding your owner's manual. In other states, new 1997 ...
... engine will repair your model year 2000 and later equipment type engine. Box 2015, Virginia Beach, VA 23450-2015. FS 75 37 STIHL Incorporated Federal and California Emission Control Warranty Statement English / USA Your Warranty Rights and Obligations The U.S. Where a warrantable condition exists...the time of receipts or for presenting your small off -road equipment engines must be designed, built and equipped, at an authorized dealer), parts, and labor. EPA standards for small non road engines. If any questions regarding your owner's manual. In other states, new 1997 ...
Instruction Manual
Page 39
... part is defective, the part will be performed at an authorized STIHL servicing dealer. Any such work will be replaced by STIHL Incorporated at and after the first scheduled replacement point. 38 FS 75 If any emission related part on your engine is defective. These warranted parts ...required maintenance, : repairs improperly performed or replacements not conforming to the owner if it is determined that part. Diagnosis You, as non-defective, STIHL Incorporated will charge you have signed and sent back the warranty card to other services and adjustments necessary...
... part is defective, the part will be performed at an authorized STIHL servicing dealer. Any such work will be replaced by STIHL Incorporated at and after the first scheduled replacement point. 38 FS 75 If any emission related part on your engine is defective. These warranted parts ...required maintenance, : repairs improperly performed or replacements not conforming to the owner if it is determined that part. Diagnosis You, as non-defective, STIHL Incorporated will charge you have signed and sent back the warranty card to other services and adjustments necessary...


