

Owner's Manual
Page 1
OWNER'S MANUAL DVD PLAYER with VIDEO CASSETTE RECORDER WF802 INSTRUCCIONES EN ESPAÑOL INCLUIDAS. If you need additional assistance for set-up or operating after reading owner's manual, please call TOLL FREE : 1-800-242-7158 Please read before using this equipment.
OWNER'S MANUAL DVD PLAYER with VIDEO CASSETTE RECORDER WF802 INSTRUCCIONES EN ESPAÑOL INCLUIDAS. If you need additional assistance for set-up or operating after reading owner's manual, please call TOLL FREE : 1-800-242-7158 Please read before using this equipment.

Owner's Manual
Page 4
...home and other limited viewing uses only unless otherwise authorized by Macrovision Corporation and other intellectual property rights owned by Macrovision Corporation. DVD : refers to aid identification in accordance with your machine. Batteries should record the number and other vital information here and ...retain this copyright protection technology must be authorized by Macrovision Corporation, and is protected by claims of DVD video discs. Serial numbers are not kept on the back of video cassette tapes. This serial number is prohibited. SUPPLIED ...
...home and other limited viewing uses only unless otherwise authorized by Macrovision Corporation and other intellectual property rights owned by Macrovision Corporation. DVD : refers to aid identification in accordance with your machine. Batteries should record the number and other vital information here and ...retain this copyright protection technology must be authorized by Macrovision Corporation, and is protected by claims of DVD video discs. Serial numbers are not kept on the back of video cassette tapes. This serial number is prohibited. SUPPLIED ...

Owner's Manual
Page 5
... 8 PLAYABLE DISCS 8 DISC TYPES 8 I OPERATING CONTROLS AND FUNCTIONS 9 DISPLAY 12 DISPLAYS DURING OPERATION 12 LOADING THE BATTERIES 12 I VIDEO/DVD SWITCHING 13 I HOOKUPS 14 DVD/VCR TO TV CONNECTION 14 SETTING THE CH3/CH4 SWITCH 14 CONNECTING TO A TV 14 CONNECTING TO A TV THAT HAS AN S-VIDEO INPUT...39 I HANDLING PRECAUTIONS 40 DISC HANDLING 40 I SPECIFICATIONS 41 INDICE I CONTROLES DEL FUNCIONAMIENETO Y SUS FUNCIONES 42 I CAMBIO DE VCR/DVD 45 I CONEXIONES 46 DVD/VCR A CONEXIÓN DE TV 46 AJUSTANDO EL CONMUTADOR CH3/CH4 46 CONECTANDO A UN TV 46 CONECTADO A UN TV QUE TIENE...
... 8 PLAYABLE DISCS 8 DISC TYPES 8 I OPERATING CONTROLS AND FUNCTIONS 9 DISPLAY 12 DISPLAYS DURING OPERATION 12 LOADING THE BATTERIES 12 I VIDEO/DVD SWITCHING 13 I HOOKUPS 14 DVD/VCR TO TV CONNECTION 14 SETTING THE CH3/CH4 SWITCH 14 CONNECTING TO A TV 14 CONNECTING TO A TV THAT HAS AN S-VIDEO INPUT...39 I HANDLING PRECAUTIONS 40 DISC HANDLING 40 I SPECIFICATIONS 41 INDICE I CONTROLES DEL FUNCIONAMIENETO Y SUS FUNCIONES 42 I CAMBIO DE VCR/DVD 45 I CONEXIONES 46 DVD/VCR A CONEXIÓN DE TV 46 AJUSTANDO EL CONMUTADOR CH3/CH4 46 CONECTANDO A UN TV 46 CONECTADO A UN TV QUE TIENE...

Owner's Manual
Page 6
... playback of the entire disc being (MP3) played is possible. A-B: Playback of the section between A and B (designated by user is possible. FEATURES DVD Mode ¡Dolby Digital sound This player can handle Dolby Digital surround sound with the Number buttons during playback or in stop mode. ¡On...the current operation can be displayed on the TV screen, allowing you to confirm the currently active functions (such as program playback), on the DVD. ¡Screen saver/Auto power-off . ¡Subtitles in a desired language You can select the desired language for the subtitle display, if...
... playback of the entire disc being (MP3) played is possible. A-B: Playback of the section between A and B (designated by user is possible. FEATURES DVD Mode ¡Dolby Digital sound This player can handle Dolby Digital surround sound with the Number buttons during playback or in stop mode. ¡On...the current operation can be displayed on the TV screen, allowing you to confirm the currently active functions (such as program playback), on the DVD. ¡Screen saver/Auto power-off . ¡Subtitles in a desired language You can select the desired language for the subtitle display, if...

Owner's Manual
Page 7
... CONDENSATION WARNING Moisture condensation may be necessary to view scrambled cable channels.) Automatic functions ¡Auto power on system Automatically turns the DVD/VCR on when you insert the cassette. ¡Digital Auto Tracking (DTR) Playback ¡S-VHS Quasi Playback (SQPB) (Allows you... events (including Daily and Weekly Timer Recording) ¡OTR (One Touch Recording) PRECAUTIONS INSTALLATION LOCATION For safety and optimum performance of your DVD/VCR, unplug the power cord immediately and take the unit to a warm place, or after heating a cold room or under conditions of ...
... CONDENSATION WARNING Moisture condensation may be necessary to view scrambled cable channels.) Automatic functions ¡Auto power on system Automatically turns the DVD/VCR on when you insert the cassette. ¡Digital Auto Tracking (DTR) Playback ¡S-VHS Quasi Playback (SQPB) (Allows you... events (including Daily and Weekly Timer Recording) ¡OTR (One Touch Recording) PRECAUTIONS INSTALLATION LOCATION For safety and optimum performance of your DVD/VCR, unplug the power cord immediately and take the unit to a warm place, or after heating a cold room or under conditions of ...
Owner's Manual
Page 8
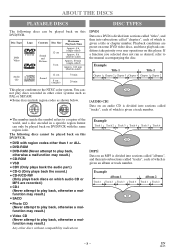
...-sided) 8 cm Approx. 80 min (single-sided) Approx. 160 min (double-sided) Audio CD Sound 12 cm 8 cm (singles) 74 min 20 min [DVD] Data on a DVD is divided into sections called "titles", and then into subsections called "chapters", each of which is given a title or chapter number. EN 1L25 You... cannot play discs recorded in other than 1 or ALL. ¡DVD-ROM ¡DVD-RAM (Never attempt to play back, otherwise a malfunction may result.) ¡CD-ROM ¡VSD ¡CDV (Only plays back the audio part...
...-sided) 8 cm Approx. 80 min (single-sided) Approx. 160 min (double-sided) Audio CD Sound 12 cm 8 cm (singles) 74 min 20 min [DVD] Data on a DVD is divided into sections called "titles", and then into subsections called "chapters", each of which is given a title or chapter number. EN 1L25 You... cannot play discs recorded in other than 1 or ALL. ¡DVD-ROM ¡DVD-RAM (Never attempt to play back, otherwise a malfunction may result.) ¡CD-ROM ¡VSD ¡CDV (Only plays back the audio part...

Owner's Manual
Page 9
...forward during a OneTouch Recording. REW Button (VCR) [page 18] Press to rewind the tape, or to begin playback. To make the green DVD OUTPUT light come on, the VCR button on the remote control or the OUTPUT button on the front panel. 3. press to correct digits when setting... to determine the setting modes from the on . 9. Press to start a recording. OPERATING CONTROLS AND FUNCTIONS FRONT PANEL 1 2 3 4 5 6 78 9 POWER OPEN/CLOSE DVD OPERATION OUTPUT VCR OPERATION CHANNEL STOP SKIP/REV PLAY FWD/SKIP STOP/EJECT REW PLAY F.FWD REC/OTR TIMER SET VCR/TV CST.IN VIDEO...
...forward during a OneTouch Recording. REW Button (VCR) [page 18] Press to rewind the tape, or to begin playback. To make the green DVD OUTPUT light come on, the VCR button on the remote control or the OUTPUT button on the front panel. 3. press to correct digits when setting... to determine the setting modes from the on . 9. Press to start a recording. OPERATING CONTROLS AND FUNCTIONS FRONT PANEL 1 2 3 4 5 6 78 9 POWER OPEN/CLOSE DVD OPERATION OUTPUT VCR OPERATION CHANNEL STOP SKIP/REV PLAY FWD/SKIP STOP/EJECT REW PLAY F.FWD REC/OTR TIMER SET VCR/TV CST.IN VIDEO...

Owner's Manual
Page 10
... to fast forward playback. 22. Hold down to directly select a Track (Audio CD) for the remote control. SPEED Button [page 20] Press to select DVD mode for playback. G VCR mode [page 17] Press to reverse playback of a selected section. 44. To select channels, enter channel numbers as a two...page 24] 37. Sets Black level. 40. Press to enter digits when setting program (For example: setting clock or timer program). DISPLAY Button G DVD mode [page 29] Press to view the picture rapidly in fast reverse motion or to select TV channels on -screen status display. 31. However, if...
... to fast forward playback. 22. Hold down to directly select a Track (Audio CD) for the remote control. SPEED Button [page 20] Press to select DVD mode for playback. G VCR mode [page 17] Press to reverse playback of a selected section. 44. To select channels, enter channel numbers as a two...page 24] 37. Sets Black level. 40. Press to enter digits when setting program (For example: setting clock or timer program). DISPLAY Button G DVD mode [page 29] Press to view the picture rapidly in fast reverse motion or to select TV channels on -screen status display. 31. However, if...

Owner's Manual
Page 11
...: setting clock or timer program), press to determine your selection and proceed to the next step you need to watch one frame at the DVD/VCR. Press to temporarily stop the recording (pause). G VCR mode [page 19] While recording, press to enter digits when setting program...VCR, or an audio source here. 59. Or, press during tape playback to add or delete channel numbers during playback (Forward Search). g Button G DVD mode Press to begin slow motion playback. G You can not pause a One-Touch Recording. Press to change the forward speed of a camcorder, another...
...: setting clock or timer program), press to determine your selection and proceed to the next step you need to watch one frame at the DVD/VCR. Press to temporarily stop the recording (pause). G VCR mode [page 19] While recording, press to enter digits when setting program...VCR, or an audio source here. 59. Or, press during tape playback to add or delete channel numbers during playback (Forward Search). g Button G DVD mode Press to begin slow motion playback. G You can not pause a One-Touch Recording. Press to change the forward speed of a camcorder, another...

Owner's Manual
Page 12
...when the A-B repeat function is inserted on No disc inserted Tray open Lights up when the inserted disc comes to a pause. Lights up when a DVD is displayed. Open the battery compartment cover. 2. Insert two AA batteries, with your TV. COAXIAL Jack Connect an optional coaxial digital audio cable here .... - 12 - Notes ¡The S-VIDEO OUT jack, COAXIAL jack, and OPTICAL jack are only useful in DVD mode. Power off LOADING THE BATTERIES 1. Lights up when a CD is on your DVD/VCR. 65. Connect the supplied audio cables here and to the Audio In jacks of a decoder or audio receiver...
...when the A-B repeat function is inserted on No disc inserted Tray open Lights up when the inserted disc comes to a pause. Lights up when a DVD is displayed. Open the battery compartment cover. 2. Insert two AA batteries, with your TV. COAXIAL Jack Connect an optional coaxial digital audio cable here .... - 12 - Notes ¡The S-VIDEO OUT jack, COAXIAL jack, and OPTICAL jack are only useful in DVD mode. Power off LOADING THE BATTERIES 1. Lights up when a CD is on your DVD/VCR. 65. Connect the supplied audio cables here and to the Audio In jacks of a decoder or audio receiver...

Owner's Manual
Page 13
... Light is necessary to select the correct mode on the front panel does not switch the mode of the remote control. POWER OPEN/CLOSE DVD OPERATION OUTPUT VCR OPERATION CHANNEL STOP SKIP/REV PLAY FWD/SKIP STOP/EJECT REW PLAY F.FWD REC/OTR TIMER SET VCR/TV CST.IN VIDEO ... PAUSE PLAY RECORD STOP MENU SETUP TITLE ENTER RETURN MODE ZOOM SEARCH MODE CLEAR/ C.RESET SUBTITLE ANGLE REPEAT A-B - 13 - VCR/DVD SWITCHING Since this product comprises VCR and DVD players, it is lit.) Notes ¡Pressing only the OUTPUT button on the remote control too. EN 1L25 You always need to...
... Light is necessary to select the correct mode on the front panel does not switch the mode of the remote control. POWER OPEN/CLOSE DVD OPERATION OUTPUT VCR OPERATION CHANNEL STOP SKIP/REV PLAY FWD/SKIP STOP/EJECT REW PLAY F.FWD REC/OTR TIMER SET VCR/TV CST.IN VIDEO ... PAUSE PLAY RECORD STOP MENU SETUP TITLE ENTER RETURN MODE ZOOM SEARCH MODE CLEAR/ C.RESET SUBTITLE ANGLE REPEAT A-B - 13 - VCR/DVD SWITCHING Since this product comprises VCR and DVD players, it is lit.) Notes ¡Pressing only the OUTPUT button on the remote control too. EN 1L25 You always need to...

Owner's Manual
Page 14
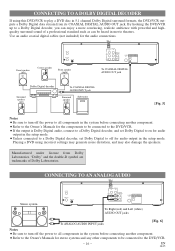
... whichever is in particular, specifies that the cable ground should be distorted due to either channel 3 or channel 4. OUT CH3 CH4 IN L AUDO R DVD/VCR OUT DVD/VCR AUDIO OUT L VIDEO R S-VIDEO DIGITAL AUDIO OUT OUT PCM / BITSTREAM COAXIAL To Right (red) and Left (white) AUDIO INPUT jacks AUDIO ...OUT jacks To S-VIDEO INPUT jack To S-VIDEO OUT jack - 14 - [Fig. 2] EN 1L25 OUT CH3 CH4 To VIDEO INPUT jack IN L AUDO R DVD/VCR OUT DVD/VCR AUDIO OUT L VIDEO R S-VIDEO DIGITAL AUDIO OUT OUT PCM / BITSTREAM COAXIAL To VIDEO OUT jack [Fig. 1] To Right (red) and Left (white)...
... whichever is in particular, specifies that the cable ground should be distorted due to either channel 3 or channel 4. OUT CH3 CH4 IN L AUDO R DVD/VCR OUT DVD/VCR AUDIO OUT L VIDEO R S-VIDEO DIGITAL AUDIO OUT OUT PCM / BITSTREAM COAXIAL To Right (red) and Left (white) AUDIO INPUT jacks AUDIO ...OUT jacks To S-VIDEO INPUT jack To S-VIDEO OUT jack - 14 - [Fig. 2] EN 1L25 OUT CH3 CH4 To VIDEO INPUT jack IN L AUDO R DVD/VCR OUT DVD/VCR AUDIO OUT L VIDEO R S-VIDEO DIGITAL AUDIO OUT OUT PCM / BITSTREAM COAXIAL To VIDEO OUT jack [Fig. 1] To Right (red) and Left (white)...

Owner's Manual
Page 15
...connecting another component. ¡Refer to the Owner's Manuals for the audio connections. OUT CH3 CH4 To COAXIAL DIGITAL AUDIO INPUT jack IN L AUDO R DVD/VCR OUT DVD/VCR AUDIO OUT L VIDEO R S-VIDEO DIGITAL AUDIO OUT OUT PCM / BITSTREAM COAXIAL To COAXIAL DIGITAL AUDIO OUT jack [Fig. 4] Notes ¡The...such as MD Deck or DAT Deck. ANT - Connecting to off the power to all components in the setup mode. IN ANT - Playing a DVD disc using incorrect settings may generate noise distortion, and may also damage the speakers. (See page 36 to set Dolby Digital to on a disc ...
...connecting another component. ¡Refer to the Owner's Manuals for the audio connections. OUT CH3 CH4 To COAXIAL DIGITAL AUDIO INPUT jack IN L AUDO R DVD/VCR OUT DVD/VCR AUDIO OUT L VIDEO R S-VIDEO DIGITAL AUDIO OUT OUT PCM / BITSTREAM COAXIAL To COAXIAL DIGITAL AUDIO OUT jack [Fig. 4] Notes ¡The...such as MD Deck or DAT Deck. ANT - Connecting to off the power to all components in the setup mode. IN ANT - Playing a DVD disc using incorrect settings may generate noise distortion, and may also damage the speakers. (See page 36 to set Dolby Digital to on a disc ...
Owner's Manual
Page 16
.... - 16 - IN ANT - Manufactured under license from its COAXIAL DIGITAL AUDIO OUT jack. IN ANT - OUT CH3 CH4 IN L AUDO R DVD/VCR OUT DVD/VCR AUDIO OUT L VIDEO R S-VIDEO DIGITAL AUDIO OUT OUT PCM / BITSTREAM COAXIAL To Right (red) and Left (white) AUDIO OUT jacks To ANALOG AUDIO INPUT ... off for audio output in the system before connecting another component. ¡Refer to the Owner's Manuals for the components to be connected to the DVD/VCR. ¡If the output is Dolby Digital audio, connect to a Dolby Digital decoder, and set Dolby Digital to on for audio output in the...
.... - 16 - IN ANT - Manufactured under license from its COAXIAL DIGITAL AUDIO OUT jack. IN ANT - OUT CH3 CH4 IN L AUDO R DVD/VCR OUT DVD/VCR AUDIO OUT L VIDEO R S-VIDEO DIGITAL AUDIO OUT OUT PCM / BITSTREAM COAXIAL To Right (red) and Left (white) AUDIO OUT jacks To ANALOG AUDIO INPUT ... off for audio output in the system before connecting another component. ¡Refer to the Owner's Manuals for the components to be connected to the DVD/VCR. ¡If the output is Dolby Digital audio, connect to a Dolby Digital decoder, and set Dolby Digital to on for audio output in the...

Owner's Manual
Page 17
... connections. Then, press the F.FWD button. 3 Select "AUTO SET UP" by pressing the POWER button. SETUP AUTOMATIC CHANNEL SET UP VCR The DVD/VCR can select the desired channel by using the Number buttons: ¡When selecting cable channels which is not used for using the CHANNEL buttons...preset again. The channel you only have to the same channel. The tuner scans and memorizes all active channels in your area. ¡The DVD/VCR distinguishes between standard TV channels and cable channels. EN 1L25 Note for normal broadcasts in your area. Then, press the F.FWD button. ...
... connections. Then, press the F.FWD button. 3 Select "AUTO SET UP" by pressing the POWER button. SETUP AUTOMATIC CHANNEL SET UP VCR The DVD/VCR can select the desired channel by using the Number buttons: ¡When selecting cable channels which is not used for using the CHANNEL buttons...preset again. The channel you only have to the same channel. The tuner scans and memorizes all active channels in your area. ¡The DVD/VCR distinguishes between standard TV channels and cable channels. EN 1L25 Note for normal broadcasts in your area. Then, press the F.FWD button. ...

Owner's Manual
Page 18
... it once). ¡If the clock is not set, the CLOCK SET menu appears first. In such cases, you can add the channels to the DVD/VCR memory manually. 1 Press the MENU button until the main menu appears. (If you have already set the clock, you only have to press it...
... it once). ¡If the clock is not set, the CLOCK SET menu appears first. In such cases, you can add the channels to the DVD/VCR memory manually. 1 Press the MENU button until the main menu appears. (If you have already set the clock, you only have to press it...

Owner's Manual
Page 19
... AUTO REPEAT PLAYBACK VCR This feature allows you to go in the reverse direction, press the REW button. ¡After index search, the DVD/VCR will stop playback, press the STOP button. INDEX SEARCH The index signal is distorted or rolling vertically, adjust the vertical hold control on...VHS Quasi Playback (SQPB): This unit allows you want to go in the reverse direction, press the REW button. ¡After time search, the DVD/VCR will start playback automatically. 3 Begin auto repeat playback by pressing the PLAY or the STOP button within 30 seconds. To adjust the tracking ...
... AUTO REPEAT PLAYBACK VCR This feature allows you to go in the reverse direction, press the REW button. ¡After index search, the DVD/VCR will stop playback, press the STOP button. INDEX SEARCH The index signal is distorted or rolling vertically, adjust the vertical hold control on...VHS Quasi Playback (SQPB): This unit allows you want to go in the reverse direction, press the REW button. ¡After time search, the DVD/VCR will start playback automatically. 3 Begin auto repeat playback by pressing the PLAY or the STOP button within 30 seconds. To adjust the tracking ...

Owner's Manual
Page 20
...item you to resume it, press the PAUSE button. cally stop recording or to set the timer recording. 1 Insert a tape with a safety tab into the DVD/VCR. ¡The desired recording speed is selected in "CLOCK SET" section on . REC SPEED - - Then, press the F.FWD button. Then, press... the F.FWD button. the same channel as the TIMER SET light blinks. (If the DVD power is a tape with its record safety tab. VIEWING AND RECORDING THE SAME PROGRAM VCR 1 Begin the recording by pressing the REC/OTR button repeatedly...
...item you to resume it, press the PAUSE button. cally stop recording or to set the timer recording. 1 Insert a tape with a safety tab into the DVD/VCR. ¡The desired recording speed is selected in "CLOCK SET" section on . REC SPEED - - Then, press the F.FWD button. Then, press... the F.FWD button. the same channel as the TIMER SET light blinks. (If the DVD power is a tape with its record safety tab. VIEWING AND RECORDING THE SAME PROGRAM VCR 1 Begin the recording by pressing the REC/OTR button repeatedly...

Owner's Manual
Page 21
... AN AUTOMATIC TIMER PROGRAM 1 Turn the power on by pressing the PLAY or the STOP HINTS FOR TIMER RECORDING button. ¡The details of the DVD/VCR. TO CLEAR A PROGRAM 2 Select main menu by pressing the MENU button. 3 Select "TIMER PROGRAMMING" by pressing the REW button while the program ...tape ends during TIMER RECORDING, the F.FWD or the REW button. Then, press the F.FWD button. TO STOP AN AUTOMATIC TIMER PRO- 5 To set the DVD/VCR to channel 3 or 4 i.e. And then, press the PLAY button or the STOP button for the desired channel ONE TIME PROGRAM PROGRAM NUMBER 4 DATE START...
... AN AUTOMATIC TIMER PROGRAM 1 Turn the power on by pressing the PLAY or the STOP HINTS FOR TIMER RECORDING button. ¡The details of the DVD/VCR. TO CLEAR A PROGRAM 2 Select main menu by pressing the MENU button. 3 Select "TIMER PROGRAMMING" by pressing the REW button while the program ...tape ends during TIMER RECORDING, the F.FWD or the REW button. Then, press the F.FWD button. TO STOP AN AUTOMATIC TIMER PRO- 5 To set the DVD/VCR to channel 3 or 4 i.e. And then, press the PLAY button or the STOP button for the desired channel ONE TIME PROGRAM PROGRAM NUMBER 4 DATE START...

Owner's Manual
Page 22
... button on the recording VCR to select the desired recording speed (SP/SLP). ¡When you use the A/V input jacks on the back of the DVD/VCR, select "L1" position by pressing [0], [0], [1] on the remote control or the CHANNEL buttons (o/p). ¡When you must select the Recording mode ... audio, SAP appears. ¡Although a program may be broadcast in both stereo and sub audio, you use the A/V input jacks on the front of the DVD/VCR, select "L2" position by pressing [0], [0], [2] on the remote control. Hi-Fi audio track (2-channel) L-channel R-channel Mono Mono Normal audio track Mono...
... button on the recording VCR to select the desired recording speed (SP/SLP). ¡When you use the A/V input jacks on the back of the DVD/VCR, select "L1" position by pressing [0], [0], [1] on the remote control or the CHANNEL buttons (o/p). ¡When you must select the Recording mode ... audio, SAP appears. ¡Although a program may be broadcast in both stereo and sub audio, you use the A/V input jacks on the front of the DVD/VCR, select "L2" position by pressing [0], [0], [2] on the remote control. Hi-Fi audio track (2-channel) L-channel R-channel Mono Mono Normal audio track Mono...


