

Owner's Manual
Page 4
...concerning chemical wastes. patents and other intellectual property rights owned by Macrovision Corporation, and is unique to playback of the DVD/VCR player. MP3 : refers to playback of video cassette tapes. Serial numbers are prohibited. Serial No. Use of this manual...cables Coaxial Cable (NA200UD) (approx. 3 feet (100 cm) long) (WPZ0102TM015) WPZ0901TM002 SYMBOLS USED IN THIS MANUAL The following meanings VCR : refers to aid identification in accordance with your machine. A NOTE ABOUT RECYCLING This product's packaging materials are recyclable and can be found...
...concerning chemical wastes. patents and other intellectual property rights owned by Macrovision Corporation, and is unique to playback of the DVD/VCR player. MP3 : refers to playback of video cassette tapes. Serial numbers are prohibited. Serial No. Use of this manual...cables Coaxial Cable (NA200UD) (approx. 3 feet (100 cm) long) (WPZ0102TM015) WPZ0901TM002 SYMBOLS USED IN THIS MANUAL The following meanings VCR : refers to aid identification in accordance with your machine. A NOTE ABOUT RECYCLING This product's packaging materials are recyclable and can be found...

Owner's Manual
Page 5
...TYPES 8 I OPERATING CONTROLS AND FUNCTIONS 9 DISPLAY 12 DISPLAYS DURING OPERATION 12 LOADING THE BATTERIES 12 I VIDEO/DVD SWITCHING 13 I HOOKUPS 14 DVD/VCR TO TV CONNECTION 14 SETTING THE CH3/CH4 SWITCH 14 CONNECTING TO A TV 14 CONNECTING TO A TV THAT HAS AN S-VIDEO INPUT JACK OR ... GUIDE 39 I HANDLING PRECAUTIONS 40 DISC HANDLING 40 I SPECIFICATIONS 41 INDICE I CONTROLES DEL FUNCIONAMIENETO Y SUS FUNCIONES 42 I CAMBIO DE VCR/DVD 45 I CONEXIONES 46 DVD/VCR A CONEXIÓN DE TV 46 AJUSTANDO EL CONMUTADOR CH3/CH4 46 CONECTANDO A UN TV 46 CONECTADO A UN TV QUE TIENE TOMA...
...TYPES 8 I OPERATING CONTROLS AND FUNCTIONS 9 DISPLAY 12 DISPLAYS DURING OPERATION 12 LOADING THE BATTERIES 12 I VIDEO/DVD SWITCHING 13 I HOOKUPS 14 DVD/VCR TO TV CONNECTION 14 SETTING THE CH3/CH4 SWITCH 14 CONNECTING TO A TV 14 CONNECTING TO A TV THAT HAS AN S-VIDEO INPUT JACK OR ... GUIDE 39 I HANDLING PRECAUTIONS 40 DISC HANDLING 40 I SPECIFICATIONS 41 INDICE I CONTROLES DEL FUNCIONAMIENETO Y SUS FUNCIONES 42 I CAMBIO DE VCR/DVD 45 I CONEXIONES 46 DVD/VCR A CONEXIÓN DE TV 46 AJUSTANDO EL CONMUTADOR CH3/CH4 46 CONECTANDO A UN TV 46 CONECTADO A UN TV QUE TIENE TOMA...

Owner's Manual
Page 7
...FIRE • Do not handle the power cord with insufficient ventilation for servicing. • Do not put your DVD/VCR: • Install the DVD/VCR in a horizontal and stable posi- EN 1L25 MOISTURE CONDENSATION WARNING Moisture condensation may be necessary to view scrambled cable ...channels.) Automatic functions ¡Auto power on system Automatically turns the DVD/VCR on when you insert the cassette. ¡Digital Auto Tracking (DTR) Playback ¡S-VHS Quasi Playback (SQPB) (Allows you to...
...FIRE • Do not handle the power cord with insufficient ventilation for servicing. • Do not put your DVD/VCR: • Install the DVD/VCR in a horizontal and stable posi- EN 1L25 MOISTURE CONDENSATION WARNING Moisture condensation may be necessary to view scrambled cable ...channels.) Automatic functions ¡Auto power on system Automatically turns the DVD/VCR on when you insert the cassette. ¡Digital Auto Tracking (DTR) Playback ¡S-VHS Quasi Playback (SQPB) (Allows you to...
Owner's Manual
Page 8
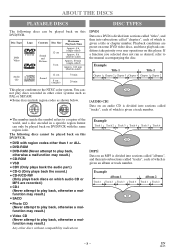
... can only be played back on this player. ABOUT THE DISCS PLAYABLE DISCS DISC TYPES The following discs cannot be played back on this DVD/VCR. Disc Type DVD Video Logo Contents Sound and Pictures Disc Size Maximum Playback Time 12 cm Approx. 4 h (single-sided) Approx. 8 h (... 3 Chapter 4 Chapter 1 Chapter 2 This player conforms to the manual accompanying the disc. EN 1L25 The following discs can be played back on DVD/VCR with region codes other than 1 or ALL. ¡DVD-ROM ¡DVD-RAM (Never attempt to play back, otherwise a malfunction may result.) &#...
... can only be played back on this player. ABOUT THE DISCS PLAYABLE DISCS DISC TYPES The following discs cannot be played back on this DVD/VCR. Disc Type DVD Video Logo Contents Sound and Pictures Disc Size Maximum Playback Time 12 cm Approx. 4 h (single-sided) Approx. 8 h (... 3 Chapter 4 Chapter 1 Chapter 2 This player conforms to the manual accompanying the disc. EN 1L25 The following discs can be played back on DVD/VCR with region codes other than 1 or ALL. ¡DVD-ROM ¡DVD-RAM (Never attempt to play back, otherwise a malfunction may result.) &#...

Owner's Manual
Page 9
...out jack of timer program. press to remove vertical jitter in standby mode or off for a timer recording, but there is in the DVD/VCR. 13. Press repeatedly to input. When setting program (For example:setting clock or timer program), press to determine your selection and proceed to the...during playback. (Forward Search). POWER Button [page 17] Press to rapidly advance the tape, or view the picture rapidly in the TV position. 14. VCR/TV Light [page 17] Lights up when a cassette is no tape in reverse during channel preset. 17. press to enter digits when setting program ...
...out jack of timer program. press to remove vertical jitter in standby mode or off for a timer recording, but there is in the DVD/VCR. 13. Press repeatedly to input. When setting program (For example:setting clock or timer program), press to determine your selection and proceed to the...during playback. (Forward Search). POWER Button [page 17] Press to rapidly advance the tape, or view the picture rapidly in the TV position. 14. VCR/TV Light [page 17] Lights up when a cassette is no tape in reverse during channel preset. 17. press to enter digits when setting program ...

Owner's Manual
Page 10
...Button (DVD) [page 23] Press to display the menu of timer program. MENU Button G DVD mode [page 23] Press to begin playback. 23. G VCR mode [page 18] Press to stop the disc motion. G STOP Button Press to reset the counter. SETUP Button [page 34] Press to perform a Time... Search or an Index Search. 45. G VCR mode [page 19] Press to enter the setup mode. 38. To select channels, enter channel numbers as a two-digit number for playback. example: setting...
...Button (DVD) [page 23] Press to display the menu of timer program. MENU Button G DVD mode [page 23] Press to begin playback. 23. G VCR mode [page 18] Press to stop the disc motion. G STOP Button Press to reset the counter. SETUP Button [page 34] Press to perform a Time... Search or an Index Search. 45. G VCR mode [page 19] Press to enter the setup mode. 38. To select channels, enter channel numbers as a two-digit number for playback. example: setting...

Owner's Manual
Page 11
...the front of a camcorder, another . 55. SKIP/CH. Buttons G DVD mode Press to accept a setting. 49. Verify that the green DVD OUTPUT Light is in VCR position (in TV position. Press to skip Chapters or Tracks. G TV Position Use to view Disc playback or menus. AC Power Cord Notes ¡To... forward the Disc. SLOW Button [page 19] During tape playback, press to advance the DVD picture step by pressing the DVD or the VCR button on screen menu. VCR/TV Button [page 21] Use to resume normal recording. G You can not pause a One-Touch Recording. When the green DVD OUTPUT light ...
...the front of a camcorder, another . 55. SKIP/CH. Buttons G DVD mode Press to accept a setting. 49. Verify that the green DVD OUTPUT Light is in VCR position (in TV position. Press to skip Chapters or Tracks. G TV Position Use to view Disc playback or menus. AC Power Cord Notes ¡To... forward the Disc. SLOW Button [page 19] During tape playback, press to advance the DVD picture step by pressing the DVD or the VCR button on screen menu. VCR/TV Button [page 21] Use to resume normal recording. G You can not pause a One-Touch Recording. When the green DVD OUTPUT light ...

Owner's Manual
Page 12
... IN Jack Connect a cable coming from the video out jack of the new title, chapter or track is switched, the number of a camcorder, another VCR, or an audio-visual source (laser disc player, video disc player, etc.) here. 64. Lit when the inserted disc is inserted into the tray...back. Notes ¡The S-VIDEO OUT jack, COAXIAL jack, and OPTICAL jack are only useful in DVD mode. Insert two AA batteries, with your DVD/VCR. 65. DISPLAY Lit when the A-B repeat function is inserted on . Open the battery compartment cover. 2. Notes ¡Do not mix alkaline and manganese batteries...
... IN Jack Connect a cable coming from the video out jack of the new title, chapter or track is switched, the number of a camcorder, another VCR, or an audio-visual source (laser disc player, video disc player, etc.) here. 64. Lit when the inserted disc is inserted into the tray...back. Notes ¡The S-VIDEO OUT jack, COAXIAL jack, and OPTICAL jack are only useful in DVD mode. Insert two AA batteries, with your DVD/VCR. 65. DISPLAY Lit when the A-B repeat function is inserted on . Open the battery compartment cover. 2. Notes ¡Do not mix alkaline and manganese batteries...

Owner's Manual
Page 13
... PLAY RECORD STOP MENU SETUP TITLE ENTER RETURN MODE ZOOM SEARCH MODE CLEAR/ C.RESET SUBTITLE ANGLE REPEAT A-B - 13 - VCR/DVD SWITCHING Since this product comprises VCR and DVD players, it is lit.) Notes ¡Pressing only the OUTPUT button on the remote control too. You always need to select... the correct output mode. SWITCHING TO VCR MODE Press the VCR button on the remote control. (Verify that the VCR OUTPUT Light is lit.) SWITCHING TO DVD MODE Press the DVD button on the remote control. (Verify that...
... PLAY RECORD STOP MENU SETUP TITLE ENTER RETURN MODE ZOOM SEARCH MODE CLEAR/ C.RESET SUBTITLE ANGLE REPEAT A-B - 13 - VCR/DVD SWITCHING Since this product comprises VCR and DVD players, it is lit.) Notes ¡Pressing only the OUTPUT button on the remote control too. You always need to select... the correct output mode. SWITCHING TO VCR MODE Press the VCR button on the remote control. (Verify that the VCR OUTPUT Light is lit.) SWITCHING TO DVD MODE Press the DVD button on the remote control. (Verify that...

Owner's Manual
Page 14
... A/V-compatible or wide screen TV ANT - IN ANT - OUT CH3 CH4 IN L AUDO R DVD/VCR OUT DVD/VCR AUDIO OUT L VIDEO R S-VIDEO DIGITAL AUDIO OUT OUT PCM / BITSTREAM COAXIAL To Right (red) and...the selector switch to the same channel. IN ANT - If the A/V cables are connected to a VCR, pictures may be connected to the grounding system of the building, as described earlier (Fig.1). The ...compatible or wide screen TV To ANT. OUT CH3 CH4 To VIDEO INPUT jack IN L AUDO R DVD/VCR OUT DVD/VCR AUDIO OUT L VIDEO R S-VIDEO DIGITAL AUDIO OUT OUT PCM / BITSTREAM COAXIAL To VIDEO OUT jack ...
... A/V-compatible or wide screen TV ANT - IN ANT - OUT CH3 CH4 IN L AUDO R DVD/VCR OUT DVD/VCR AUDIO OUT L VIDEO R S-VIDEO DIGITAL AUDIO OUT OUT PCM / BITSTREAM COAXIAL To Right (red) and...the selector switch to the same channel. IN ANT - If the A/V cables are connected to a VCR, pictures may be connected to the grounding system of the building, as described earlier (Fig.1). The ...compatible or wide screen TV To ANT. OUT CH3 CH4 To VIDEO INPUT jack IN L AUDO R DVD/VCR OUT DVD/VCR AUDIO OUT L VIDEO R S-VIDEO DIGITAL AUDIO OUT OUT PCM / BITSTREAM COAXIAL To VIDEO OUT jack ...

Owner's Manual
Page 15
... turn off the power to all components in the setup mode. ANT - OUT CH3 CH4 To COAXIAL DIGITAL AUDIO INPUT jack IN L AUDO R DVD/VCR OUT DVD/VCR AUDIO OUT L VIDEO R S-VIDEO DIGITAL AUDIO OUT OUT PCM / BITSTREAM COAXIAL To COAXIAL DIGITAL AUDIO OUT jack [Fig. 4] Notes ¡The audio source on...) for audio output in the system before connecting another component. ¡Refer to the Owner's Manuals for the components to be connected to the DVD/VCR. ¡Set Dolby Digital to off for the audio connections.
... turn off the power to all components in the setup mode. ANT - OUT CH3 CH4 To COAXIAL DIGITAL AUDIO INPUT jack IN L AUDO R DVD/VCR OUT DVD/VCR AUDIO OUT L VIDEO R S-VIDEO DIGITAL AUDIO OUT OUT PCM / BITSTREAM COAXIAL To COAXIAL DIGITAL AUDIO OUT jack [Fig. 4] Notes ¡The audio source on...) for audio output in the system before connecting another component. ¡Refer to the Owner's Manuals for the components to be connected to the DVD/VCR. ¡Set Dolby Digital to off for the audio connections.
Owner's Manual
Page 16
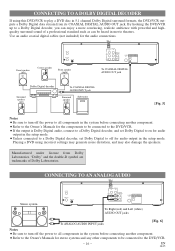
... PCM / BITSTREAM COAXIAL To COAXIAL DIGITAL AUDIO OUT jack Dolby Digital decoder Surround speaker (left ) ANT - OUT CH3 CH4 IN L AUDO R DVD/VCR OUT DVD/VCR AUDIO OUT L VIDEO R S-VIDEO DIGITAL AUDIO OUT OUT PCM / BITSTREAM COAXIAL To Right (red) and Left (white) AUDIO OUT jacks To ANALOG... for audio output in the system before connecting another component. ¡Refer to the Owner's Manuals for the components to be connected to the DVD/VCR. - 16 - Front speaker (left ) To COAXIAL DIGITAL AUDIO INPUT jack Surround speaker (right) Subwoofer [Fig. 5] Notes ¡Be sure to ...
... PCM / BITSTREAM COAXIAL To COAXIAL DIGITAL AUDIO OUT jack Dolby Digital decoder Surround speaker (left ) ANT - OUT CH3 CH4 IN L AUDO R DVD/VCR OUT DVD/VCR AUDIO OUT L VIDEO R S-VIDEO DIGITAL AUDIO OUT OUT PCM / BITSTREAM COAXIAL To Right (red) and Left (white) AUDIO OUT jacks To ANALOG... for audio output in the system before connecting another component. ¡Refer to the Owner's Manuals for the components to be connected to the DVD/VCR. - 16 - Front speaker (left ) To COAXIAL DIGITAL AUDIO INPUT jack Surround speaker (right) Subwoofer [Fig. 5] Notes ¡Be sure to ...

Owner's Manual
Page 17
... and so on). The tuner scans and memorizes all active channels in your TV to the same channel. SETUP AUTOMATIC CHANNEL SET UP VCR The DVD/VCR can select the desired channel by using the Number buttons: ¡When selecting cable channels which are higher than 30 seconds. (In ...these cases, the programmed channels are available in your area. ¡The DVD/VCR distinguishes between standard TV channels and cable channels. Note for more than 99, press the +100 button first, then press the last two digits. ...
... and so on). The tuner scans and memorizes all active channels in your TV to the same channel. SETUP AUTOMATIC CHANNEL SET UP VCR The DVD/VCR can select the desired channel by using the Number buttons: ¡When selecting cable channels which are higher than 30 seconds. (In ...these cases, the programmed channels are available in your area. ¡The DVD/VCR distinguishes between standard TV channels and cable channels. Note for more than 99, press the +100 button first, then press the last two digits. ...

Owner's Manual
Page 18
CLOCK SET UP VCR Set the clock accurately for proper automatic timer recording. Then, press the F.FWD button 3 Set the clock.... or PM Press the PLAY button or the STOP button repeatedly. In such cases, you can add the channels to the DVD/VCR memory manually. 1 Press the MENU button until the main menu appears. (If you have already set the clock, you have ... SET" by pressing the PLAY or the STOP button. ing the PLAY or the STOP button. TO CHANGE THE ON-SCREEN LANGUAGE VCR 1 Press the MENU button twice to call up the main menu. (If you have already set the clock, you only have ...
CLOCK SET UP VCR Set the clock accurately for proper automatic timer recording. Then, press the F.FWD button 3 Set the clock.... or PM Press the PLAY button or the STOP button repeatedly. In such cases, you can add the channels to the DVD/VCR memory manually. 1 Press the MENU button until the main menu appears. (If you have already set the clock, you have ... SET" by pressing the PLAY or the STOP button. ing the PLAY or the STOP button. TO CHANGE THE ON-SCREEN LANGUAGE VCR 1 Press the MENU button twice to call up the main menu. (If you have already set the clock, you only have ...

Owner's Manual
Page 19
... If you to go in the reverse direction, press the REW button. ¡After time search, the DVD/VCR will play the tape automatically. - 19 - INDEX SEARCH 03 3 Press the F.FWD or the REW button ...button during playback, press the F.FWD or the REW button. ¡Press it again and the DVD/VCR will stop playback, press the STOP button. EN 1L25 PAUSE/STILL/SLOW You can freeze the picture on.... ¡If a noise bar appears on . ¡If the safety tab has been removed, the DVD/VCR will play a tape over and over. 1 Select main menu by pressing the CHANNEL buttons (o/p). ¡If the ...
... If you to go in the reverse direction, press the REW button. ¡After time search, the DVD/VCR will play the tape automatically. - 19 - INDEX SEARCH 03 3 Press the F.FWD or the REW button ...button during playback, press the F.FWD or the REW button. ¡Press it again and the DVD/VCR will stop playback, press the STOP button. EN 1L25 PAUSE/STILL/SLOW You can freeze the picture on.... ¡If a noise bar appears on . ¡If the safety tab has been removed, the DVD/VCR will play a tape over and over. 1 Select main menu by pressing the CHANNEL buttons (o/p). ¡If the ...

Owner's Manual
Page 20
...select the desired frequency from damage. 2 Press the STOP button when the recording is completed. ¡If a tape ends during OTR, the VCR will be UNLAWFUL to record copyrighted material without the consent of tape SP mode SLP mode T60 1 hour 3 hours Recording/Playback Time T120 T160...automatically to protect the tape and the video head from PROGRAM NUMBER ONCE 4 ONCE, DAILY, or WEEKLY recording. OTR (One Touch Recording) VCR This feature allows you to set the recording length simply by pressing the PLAY or the STOP button. TIMER PROGRAMMING PROG. 1234567 DATE -...
...select the desired frequency from damage. 2 Press the STOP button when the recording is completed. ¡If a tape ends during OTR, the VCR will be UNLAWFUL to record copyrighted material without the consent of tape SP mode SLP mode T60 1 hour 3 hours Recording/Playback Time T120 T160...automatically to protect the tape and the video head from PROGRAM NUMBER ONCE 4 ONCE, DAILY, or WEEKLY recording. OTR (One Touch Recording) VCR This feature allows you to set the recording length simply by pressing the PLAY or the STOP button. TIMER PROGRAMMING PROG. 1234567 DATE -...

Owner's Manual
Page 21
...mode, then continue with the other features as in TIMER STANDBY status, press the TIMER SET button instead of the DVD/VCR. button. (If the DVD/VCR is on the DVD /VCR. Select the program number you want to record with the other DVD features as described in this manual. ¡When .... If you want to change by mode. - 21 - EN 1L25 Next, press the PLAY button or the STOP button for AM or PM. VCR/TV button to choose VCR position. Then, press the F.FWD button. ¡If a tape is off automatically. the same channel as "Set the start time First, press...
...mode, then continue with the other features as in TIMER STANDBY status, press the TIMER SET button instead of the DVD/VCR. button. (If the DVD/VCR is on the DVD /VCR. Select the program number you want to record with the other DVD features as described in this manual. ¡When .... If you want to change by mode. - 21 - EN 1L25 Next, press the PLAY button or the STOP button for AM or PM. VCR/TV button to choose VCR position. Then, press the F.FWD button. ¡If a tape is off automatically. the same channel as "Set the start time First, press...

Owner's Manual
Page 22
...audio program Main audio program Sub audio program R Sub audio program Main audio program Sub audio program L+R Sub audio program - 22 - Connect the recording DVD/VCR (this unit) ANT - TO MONITOR THE RECORDING 1 Turn on the TV and set the TV to channel 3 or 4. ¡Now set it to TV... STEREO or SAP before the lowest memorized channel. (Example: CH2) 4 Press the REC/OTR button on the recording VCR. 5 Begin playback of the tape in stereo, STEREO appears. Note "L1" and "L2" are not recommended. ¡You can use a video disc player, satellite...
...audio program Main audio program Sub audio program R Sub audio program Main audio program Sub audio program L+R Sub audio program - 22 - Connect the recording DVD/VCR (this unit) ANT - TO MONITOR THE RECORDING 1 Turn on the TV and set the TV to channel 3 or 4. ¡Now set it to TV... STEREO or SAP before the lowest memorized channel. (Example: CH2) 4 Press the REC/OTR button on the recording VCR. 5 Begin playback of the tape in stereo, STEREO appears. Note "L1" and "L2" are not recommended. ¡You can use a video disc player, satellite...

Owner's Manual
Page 23
... describes the contents of the disc or a selection menu for sound, language and other components which are connected to the DVD/VCR. (Change the input system to suite the DVD/VCR, and check that the sound volume is correct). 1 Press the POWER button. ¡The power will turn on. EN.... 2 Press the OPEN/CLOSE button. ¡The disc loading tray will open. After rewinding finishes, the DVD/VCR will eject the tape and switch itself off. ¡The DVD/VCR will not rewind the tape automatically during blank portions of a two layered disc, pictures may stop for playback program signals,...
... describes the contents of the disc or a selection menu for sound, language and other components which are connected to the DVD/VCR. (Change the input system to suite the DVD/VCR, and check that the sound volume is correct). 1 Press the POWER button. ¡The power will turn on. EN.... 2 Press the OPEN/CLOSE button. ¡The disc loading tray will open. After rewinding finishes, the DVD/VCR will eject the tape and switch itself off. ¡The DVD/VCR will not rewind the tape automatically during blank portions of a two layered disc, pictures may stop for playback program signals,...

Owner's Manual
Page 31
... disc is active. AUDIO L-CH Only the left channels are replaced. EN 1L25 SETTINGS CHANGING THE AUDIO LANGUAGE OR SOUND MODE DVD CD The DVD/VCR has a function which allows you first press the AUDIO button. ¡If the desired language is not shown after about 5 seconds. AUDIO 2.FRE DolbyD 5.1CH...
... disc is active. AUDIO L-CH Only the left channels are replaced. EN 1L25 SETTINGS CHANGING THE AUDIO LANGUAGE OR SOUND MODE DVD CD The DVD/VCR has a function which allows you first press the AUDIO button. ¡If the desired language is not shown after about 5 seconds. AUDIO 2.FRE DolbyD 5.1CH...


