

Owner's Manual
Page 1
If you need additional assistance for set-up or operating after reading owner's manual, please call TOLL FREE : 1-800-242-7158 Please read before using this equipment. OWNER'S MANUAL DVD PLAYER with VIDEO CASSETTE RECORDER WF802 INSTRUCCIONES EN ESPAÑOL INCLUIDAS.
If you need additional assistance for set-up or operating after reading owner's manual, please call TOLL FREE : 1-800-242-7158 Please read before using this equipment. OWNER'S MANUAL DVD PLAYER with VIDEO CASSETTE RECORDER WF802 INSTRUCCIONES EN ESPAÑOL INCLUIDAS.
Owner's Manual
Page 2
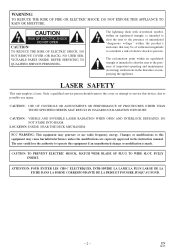
... employs a laser. Only a qualified service person should remove the cover or attempt to constitute a risk of important operating and maintenance (servicing) instructions in the instruction manual. DO NOT STARE INTO BEAM. This equipment may be of sufficient magnitude to service this equipment may cause harmful interference unless the modifications are expressly...
... employs a laser. Only a qualified service person should remove the cover or attempt to constitute a risk of important operating and maintenance (servicing) instructions in the instruction manual. DO NOT STARE INTO BEAM. This equipment may be of sufficient magnitude to service this equipment may cause harmful interference unless the modifications are expressly...

Owner's Manual
Page 4
...claims of certain U.S. Serial No. Use of this copyright protection technology must be thrown away or incinerated but disposed of in this manual, with your machine. MP3 : refers to playback of DVD video discs. A NOTE ABOUT RECYCLING This product's packaging materials are recyclable... Two AA batteries A/V cables Coaxial Cable (NA200UD) (approx. 3 feet (100 cm) long) (WPZ0102TM015) WPZ0901TM002 SYMBOLS USED IN THIS MANUAL The following symbols below appear in some headings and notes in accordance with the following meanings VCR : refers to aid identification in accordance with...
...claims of certain U.S. Serial No. Use of this copyright protection technology must be thrown away or incinerated but disposed of in this manual, with your machine. MP3 : refers to playback of DVD video discs. A NOTE ABOUT RECYCLING This product's packaging materials are recyclable... Two AA batteries A/V cables Coaxial Cable (NA200UD) (approx. 3 feet (100 cm) long) (WPZ0102TM015) WPZ0901TM002 SYMBOLS USED IN THIS MANUAL The following symbols below appear in some headings and notes in accordance with the following meanings VCR : refers to aid identification in accordance with...

Owner's Manual
Page 5
TABLE OF CONTENTS I LASER SAFETY 2 I IMPORTANT SAFEGUARDS 3 ABOUT COPYRIGHT 4 SUPPLIED ACCESSORIES 4 SYMBOLS USED IN THIS MANUAL 4 I FEATURES 6 I PRECAUTIONS 7 I ABOUT THE DISCS 8 PLAYABLE DISCS 8 DISC TYPES 8 I OPERATING CONTROLS AND FUNCTIONS 9 DISPLAY 12 DISPLAYS DURING OPERATION 12 LOADING THE BATTERIES 12 I VIDEO/DVD ...
TABLE OF CONTENTS I LASER SAFETY 2 I IMPORTANT SAFEGUARDS 3 ABOUT COPYRIGHT 4 SUPPLIED ACCESSORIES 4 SYMBOLS USED IN THIS MANUAL 4 I FEATURES 6 I PRECAUTIONS 7 I ABOUT THE DISCS 8 PLAYABLE DISCS 8 DISC TYPES 8 I OPERATING CONTROLS AND FUNCTIONS 9 DISPLAY 12 DISPLAYS DURING OPERATION 12 LOADING THE BATTERIES 12 I VIDEO/DVD ...
Owner's Manual
Page 8
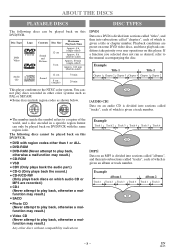
... back, otherwise a malfunction may result.) Any other color systems such as PAL or SECAM. ¡Some discs include region codes as desired, refer to the manual accompanying the disc. Disc Type DVD Video Logo Contents Sound and Pictures Disc Size Maximum Playback Time 12 cm Approx. 4 h (single-sided) Approx. 8 h (double-sided...
... back, otherwise a malfunction may result.) Any other color systems such as PAL or SECAM. ¡Some discs include region codes as desired, refer to the manual accompanying the disc. Disc Type DVD Video Logo Contents Sound and Pictures Disc Size Maximum Playback Time 12 cm Approx. 4 h (single-sided) Approx. 8 h (double-sided...

Owner's Manual
Page 15
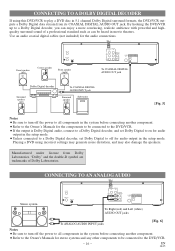
... DVD/VCR. ¡Set Dolby Digital to off the power to all components in the system before connecting another component. ¡Refer to the Owner's Manuals for the components to turn off for the audio connections. ANT - IN ANT -
... DVD/VCR. ¡Set Dolby Digital to off the power to all components in the system before connecting another component. ¡Refer to the Owner's Manuals for the components to turn off for the audio connections. ANT - IN ANT -
Owner's Manual
Page 16
... Notes ¡Be sure to turn off the power to all components in the system before connecting another component. ¡Refer to the Owner's Manuals for the components to be connected to the DVD/VCR. ¡If the output is Dolby Digital audio, connect to a Dolby Digital decoder, and... To Right (red) and Left (white) AUDIO OUT jacks To ANALOG AUDIO INPUT jacks [Fig. 6] Notes ¡Be sure to the Owner's Manuals for the audio connections. CONNECTING TO A DOLBY DIGITAL DECODER If using incorrect settings may generate noise distortion, and may also damage the speakers. Manufactured under...
... Notes ¡Be sure to turn off the power to all components in the system before connecting another component. ¡Refer to the Owner's Manuals for the components to be connected to the DVD/VCR. ¡If the output is Dolby Digital audio, connect to a Dolby Digital decoder, and... To Right (red) and Left (white) AUDIO OUT jacks To ANALOG AUDIO INPUT jacks [Fig. 6] Notes ¡Be sure to the Owner's Manuals for the audio connections. CONNECTING TO A DOLBY DIGITAL DECODER If using incorrect settings may generate noise distortion, and may also damage the speakers. Manufactured under...

Owner's Manual
Page 18
... to call up the main menu. (If you have already set the clock, you only have to a weak signal. Then, press the F.FWD button. 3 Select "MANUAL SET UP" by pressing the PLAY or the STOP button. Then, press the F.FWD button. 3 Select "ENGLISH", "FRANCAIS" or 6) Set AM or PM Press the... PM "ESPAÑOL" by pressing the PLAY or the STOP button. In such cases, you can add the channels to the DVD/VCR memory manually. 1 Press the MENU button until the main menu appears. (If you have already set the clock, you only have to press it once). 4) Set the...
... to call up the main menu. (If you have already set the clock, you only have to a weak signal. Then, press the F.FWD button. 3 Select "MANUAL SET UP" by pressing the PLAY or the STOP button. Then, press the F.FWD button. 3 Select "ENGLISH", "FRANCAIS" or 6) Set AM or PM Press the... PM "ESPAÑOL" by pressing the PLAY or the STOP button. In such cases, you can add the channels to the DVD/VCR memory manually. 1 Press the MENU button until the main menu appears. (If you have already set the clock, you only have to press it once). 4) Set the...

Owner's Manual
Page 19
... to vibrate vertically during the still mode, stabilize the picture by pressing the CHANNEL buttons (o/p). ¡If the picture is started. To adjust the tracking manually, press the CHANNEL buttons (o/p) on the tape automatically when the recording is distorted or rolling vertically, adjust the vertical hold control on your TV, if...
... to vibrate vertically during the still mode, stabilize the picture by pressing the CHANNEL buttons (o/p). ¡If the picture is started. To adjust the tracking manually, press the CHANNEL buttons (o/p) on the tape automatically when the recording is distorted or rolling vertically, adjust the vertical hold control on your TV, if...

Owner's Manual
Page 21
... button. Next, press the PLAY button or the STOP button for the hour. Then, press the F.FWD button. ¡If a tape is not in this manual. ¡When timer recordings are finished, the TIMER SET light will come on the back of the POWER button.) ¡When DVD sits idle for... timer recording will be turned off to timer stand-by pressing the ¡If there is a power failure or the DVD/VCR is in this manual. the information you connected the DVD/VCR to channel 3 or 4 i.e. TO CLEAR A PROGRAM 2 Select main menu by pressing the MENU button. 3 Select "TIMER PROGRAMMING" by...
... button. Next, press the PLAY button or the STOP button for the hour. Then, press the F.FWD button. ¡If a tape is not in this manual. ¡When timer recordings are finished, the TIMER SET light will come on the back of the POWER button.) ¡When DVD sits idle for... timer recording will be turned off to timer stand-by pressing the ¡If there is a power failure or the DVD/VCR is in this manual. the information you connected the DVD/VCR to channel 3 or 4 i.e. TO CLEAR A PROGRAM 2 Select main menu by pressing the MENU button. 3 Select "TIMER PROGRAMMING" by...
Owner's Manual
Page 24
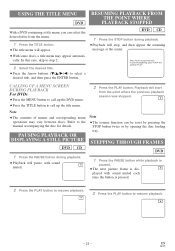
... UP A MENU SCREEN DURING PLAYBACK For DVDs ¡Press the MENU button to call up the DVD menu. ¡Press the TITLE button to the manual accompanying the disc for details.
... UP A MENU SCREEN DURING PLAYBACK For DVDs ¡Press the MENU button to call up the DVD menu. ¡Press the TITLE button to the manual accompanying the disc for details.

Owner's Manual
Page 31
Operation varies between discs, so refer to the manual accompanying the disc. ¡The current audio language and sound mode will be changed only if the disc is turned on or discs are active (...
Operation varies between discs, so refer to the manual accompanying the disc. ¡The current audio language and sound mode will be changed only if the disc is turned on or discs are active (...

Owner's Manual
Page 32
... 2 ANGLE 8 / 8 Angle 8 HELLO Bon jour Notes ¡Some discs allow subtitle language setting on the disc menu. (Operation varies between discs, so refer to the manual accompanying the disc.) ¡If the desired language is not shown after about 5 seconds. ¡The current camera angle will disappear after pressing the SUBTITLE...
... 2 ANGLE 8 / 8 Angle 8 HELLO Bon jour Notes ¡Some discs allow subtitle language setting on the disc menu. (Operation varies between discs, so refer to the manual accompanying the disc.) ¡If the desired language is not shown after about 5 seconds. ¡The current camera angle will disappear after pressing the SUBTITLE...

Owner's Manual
Page 39
... programs cannot be played. Check if the DVD OUTPUT Light is set it in the VCR mode. Read the description in this Owner's Manual for a moment, this Owner's Manual, check the player consulting the following checklist. IN and ANT. See page 14. • Press the VCR/TV button so that the VCR...
... programs cannot be played. Check if the DVD OUTPUT Light is set it in the VCR mode. Read the description in this Owner's Manual for a moment, this Owner's Manual, check the player consulting the following checklist. IN and ANT. See page 14. • Press the VCR/TV button so that the VCR...

Owner's Manual
Page 40
... cause damage and discoloration to the exposed surfaces. • Automatically cleans video heads as you insert or remove a cassette, so you can cause this Owner's Manual, the laser optical pickup unit may become inoperative, do not adhere to the surfaces of use a hard cloth since this will mar the disc. ¡...
... cause damage and discoloration to the exposed surfaces. • Automatically cleans video heads as you insert or remove a cassette, so you can cause this Owner's Manual, the laser optical pickup unit may become inoperative, do not adhere to the surfaces of use a hard cloth since this will mar the disc. ¡...

