Synology NAS Users Guide - Based on DSM 7.1
Page 5
...be striped across multiple drives to avoid accidental data loss. Moreover, the RAID setup can boost the read-write performance because data will be stored in services of data loss caused by Synology NAS: 02 RAID (Redundant Array of Independent Disks) is an overview of... your Synology NAS, perform the following is a data storage technology that you should set up data on drive installation, please refer to perform drive migration. The following instructions about drive setup, OS installation, storage initialization, and several built-...
...be striped across multiple drives to avoid accidental data loss. Moreover, the RAID setup can boost the read-write performance because data will be stored in services of data loss caused by Synology NAS: 02 RAID (Redundant Array of Independent Disks) is an overview of... your Synology NAS, perform the following is a data storage technology that you should set up data on drive installation, please refer to perform drive migration. The following instructions about drive setup, OS installation, storage initialization, and several built-...

Synology NAS Users Guide - Based on DSM 7.1
Page 7
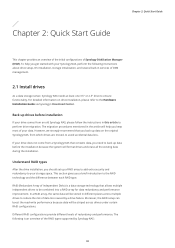
.... 2. Chapter 2: Quick Start Guide Notes: • Both your Synology NAS and computer must be on the same local network. • We suggest using Chrome or Firefox as the browser for DSM installation. • For more information on the setup of your NAS should be Not installed. 3. 2.2 Get started with ...a built-in tool, Web Assistant, which helps you through how to perform the first-time installation of DSM from the Internet and install it on your Synology NAS. Install DSM with Web ...
.... 2. Chapter 2: Quick Start Guide Notes: • Both your Synology NAS and computer must be on the same local network. • We suggest using Chrome or Firefox as the browser for DSM installation. • For more information on the setup of your NAS should be Not installed. 3. 2.2 Get started with ...a built-in tool, Web Assistant, which helps you through how to perform the first-time installation of DSM from the Internet and install it on your Synology NAS. Install DSM with Web ...

Synology NAS Users Guide - Based on DSM 7.1
Page 8
... local network. • DS finder can also install DS finder (App Store/Google Play Store) on your mobile device to the local network where your Synology NAS. The status of FS/XS series). 05 The actual steps may vary across OS versions and devices. • Both your... Synology NAS. 2. Power on your Synology NAS and mobile device must be Not installed. 5. Tap SET UP NEW NAS to start the setup process. 4. DS finder will search for your Synology NAS is located, and launch DS finder. 3. Notes: • We take...
... local network. • DS finder can also install DS finder (App Store/Google Play Store) on your mobile device to the local network where your Synology NAS. The status of FS/XS series). 05 The actual steps may vary across OS versions and devices. • Both your... Synology NAS. 2. Power on your Synology NAS and mobile device must be Not installed. 5. Tap SET UP NEW NAS to start the setup process. 4. DS finder will search for your Synology NAS is located, and launch DS finder. 3. Notes: • We take...

Synology NAS Users Guide - Based on DSM 7.1
Page 10
... are connected to the same local area network. • IP address of your NAS:5000: If the IP address of your Synology NAS is "192.168.48.14", type "192.168.48.14:5000". Enter your password and click the rightward arrow again to sign in to ...DSM using the DSM user account you have just added during the initial setup. 3. Enter your username and click the rightward arrow. 4. Now you have successfully registered for a Synology Account. 7. Chapter 2: Quick Start Guide 6. Make sure your Synology NAS, you can sign in . 07 Go to sign in or sign up window...
... are connected to the same local area network. • IP address of your NAS:5000: If the IP address of your Synology NAS is "192.168.48.14", type "192.168.48.14:5000". Enter your password and click the rightward arrow again to sign in to ...DSM using the DSM user account you have just added during the initial setup. 3. Enter your username and click the rightward arrow. 4. Now you have successfully registered for a Synology Account. 7. Chapter 2: Quick Start Guide 6. Make sure your Synology NAS, you can sign in . 07 Go to sign in or sign up window...
Synology NAS Users Guide - Based on DSM 7.1
Page 16
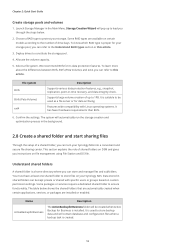
... at least one shared folder to constitute the storage pool. 4. Some packages or services require a dedicated shared folder to protect your Synology NAS. Storage Creation Wizard will automatically run the storage creation and optimization process in shared folders can store and manage files and subfolders....Understand RAID types section or this article. Data stored in the background. 2.8 Create a shared folder and start sharing files Through the setup of up to this article. 3. It is a home directory where you through the steps below shows the shared folders that are ...
... at least one shared folder to constitute the storage pool. 4. Some packages or services require a dedicated shared folder to protect your Synology NAS. Storage Creation Wizard will automatically run the storage creation and optimization process in shared folders can store and manage files and subfolders....Understand RAID types section or this article. Data stored in the background. 2.8 Create a shared folder and start sharing files Through the setup of up to this article. 3. It is a home directory where you through the steps below shows the shared folders that are ...

Synology NAS Users Guide - Based on DSM 7.1
Page 21
... the newly created user: You have not yet set up notification settings, a confirmation dialog box will pop up and lead you to the setup page when you tick this option If Password Expiration at the Advanced tab is not enabled. This section guides you through how to create users...and package sources in Control Panel. For more information on the advanced settings of administration, you can grant family members or business associates access to Synology NAS by creating user accounts for them together. On the Join groups page, specify the groups to customize groups. 18 Go to launch User ...
... the newly created user: You have not yet set up notification settings, a confirmation dialog box will pop up and lead you to the setup page when you tick this option If Password Expiration at the Advanced tab is not enabled. This section guides you through how to create users...and package sources in Control Panel. For more information on the advanced settings of administration, you can grant family members or business associates access to Synology NAS by creating user accounts for them together. On the Join groups page, specify the groups to customize groups. 18 Go to launch User ...

Synology NAS Users Guide - Based on DSM 7.1
Page 23
... Message content: Each event has its default notification message. Click Done to enter the required information. Notes: • You can set Synology NAS to change the notification language. 20 Chapter 2: Quick Start Guide 2.11 Manage notification settings You can go to Regional Options to .... 1. You can also customize message content by selecting an event and then clicking Edit Message. This section provides you a brief guide on the setup of notification delivery. Go to the Rules tab and configure the following articles: • Email • SMS • Push Service 2. 9....
... Message content: Each event has its default notification message. Click Done to enter the required information. Notes: • You can set Synology NAS to change the notification language. 20 Chapter 2: Quick Start Guide 2.11 Manage notification settings You can go to Regional Options to .... 1. You can also customize message content by selecting an event and then clicking Edit Message. This section provides you a brief guide on the setup of notification delivery. Go to the Rules tab and configure the following articles: • Email • SMS • Push Service 2. 9....

Synology NAS Users Guide - Based on DSM 7.1
Page 26
... for your account, please follow the steps below: • Go to Personal > Account and click 2-Factor Authentication to launch the setup wizard. The code can safeguard DSM through authenticator apps (e.g., Synology Secure SignIn and Google Authenticator) installed on 2-factor authentication, please refer to this option is the only available option for the...
... for your account, please follow the steps below: • Go to Personal > Account and click 2-Factor Authentication to launch the setup wizard. The code can safeguard DSM through authenticator apps (e.g., Synology Secure SignIn and Google Authenticator) installed on 2-factor authentication, please refer to this option is the only available option for the...

Synology NAS Users Guide - Based on DSM 7.1
Page 38
... manage storage spaces that span across your overall storage or use the expansion unit server as a backup location. Depending on your storage setup and Synology NAS model you can pair your Synology NAS with an expansion unit to this article for more information on the HDD/SSD page. 4.2 Storage expansion You can : •...
... manage storage spaces that span across your overall storage or use the expansion unit server as a backup location. Depending on your storage setup and Synology NAS model you can pair your Synology NAS with an expansion unit to this article for more information on the HDD/SSD page. 4.2 Storage expansion You can : •...

Active Backup for Business Admin Guide for File Servers
Page 11
... version of the source. • Incremental: Each time the task runs, newly added and modified source files will be configured at a later stage in the setup. Refer to the table below to learn more about final backup file variations for Business, go to File Server > File Servers, select the file server...
... version of the source. • Incremental: Each time the task runs, newly added and modified source files will be configured at a later stage in the setup. Refer to the table below to learn more about final backup file variations for Business, go to File Server > File Servers, select the file server...

Active Backup for Business Admin Guide for Linux
Page 14
... the setup, the agent will be : cp /[volume1]/[Files]/[Synology Active Backup for Business Agent-2.2.01531-x64-deb]/[volume1]/\@tmp/ 4. Execute the following command to install the agent on your target devices: cp /[volume_where_you_uploaded_the_installer_]/[name_of_the_folder_ where_you_uploaded_installer]/[installer_name]/[volume_where_you_ installed_Active_Backup_for_Business]/\@tmp/ For example, if the location of the installer is /volume1/Files/Synology Active...
... the setup, the agent will be : cp /[volume1]/[Files]/[Synology Active Backup for Business Agent-2.2.01531-x64-deb]/[volume1]/\@tmp/ 4. Execute the following command to install the agent on your target devices: cp /[volume_where_you_uploaded_the_installer_]/[name_of_the_folder_ where_you_uploaded_installer]/[installer_name]/[volume_where_you_ installed_Active_Backup_for_Business]/\@tmp/ For example, if the location of the installer is /volume1/Files/Synology Active...

Active Backup for Business Admin Guide for Windows PCs and Physical Servers
Page 14
...]/[name_of_the_folder_ where_you_uploaded_installer]/[installer_name**] /**[volume_where_you_ installed_Active_Backup_for_Business]/@tmp/ For example, if the location of the installer is /volume1/Files/Synology Active Backup for Business Agent-2.0.4-0621-x64.msi and Active Backup for Business is installed on volume1, then the ...command should be: cp /[volume1]/[Files]/[Synology Active Backup for Business Agent-2.0.40621-x64.msi**] /**[volume1]/@tmp/ 4. After completing the setup, the agent will be updated and click More > Update Agent. ...
...]/[name_of_the_folder_ where_you_uploaded_installer]/[installer_name**] /**[volume_where_you_ installed_Active_Backup_for_Business]/@tmp/ For example, if the location of the installer is /volume1/Files/Synology Active Backup for Business Agent-2.0.4-0621-x64.msi and Active Backup for Business is installed on volume1, then the ...command should be: cp /[volume1]/[Files]/[Synology Active Backup for Business Agent-2.0.40621-x64.msi**] /**[volume1]/@tmp/ 4. After completing the setup, the agent will be updated and click More > Update Agent. ...

Active Backup for Business Admin Guide for Windows PCs and Physical Servers
Page 19
... Restore. 5. Restoration Guide You can view the progress of the restoration by clicking the Restore Task icon in the wizard to complete the setup. 6. Select the desired restore point and follow the instructions in the upper right-hand corner. Restore servers to Physical Server, select your ...already a physical server, go to virtual machines You can be restored as a PC, go to Active Backup for Business. Choose Instant Restore to Synology Virtual Machine Manager (VMM), Restore to VMware vSphere, or Restore to change it into a physical server. 2. If you backed up your device ...
... Restore. 5. Restoration Guide You can view the progress of the restoration by clicking the Restore Task icon in the wizard to complete the setup. 6. Select the desired restore point and follow the instructions in the upper right-hand corner. Restore servers to Physical Server, select your ...already a physical server, go to virtual machines You can be restored as a PC, go to Active Backup for Business. Choose Instant Restore to Synology Virtual Machine Manager (VMM), Restore to VMware vSphere, or Restore to change it into a physical server. 2. If you backed up your device ...

Active Backup for Business Admin Guide for Windows PCs and Physical Servers
Page 21
...have successfully deployed the agent to all of Active Backup for Business Agent is installed on how to back up to the same Synology NAS without supplying login details via email or other storage media. Customized installer using Active Backup for more details. Mass deployment options ... you set up a separate new DSM user account with limited permissions, exclusively for the group deployment of the source devices. • Setup: Configuring all Windows devices in Windows environments Active Backup for Business can be safely deployed to all instances of the agent to back up...
...have successfully deployed the agent to all of Active Backup for Business Agent is installed on how to back up to the same Synology NAS without supplying login details via email or other storage media. Customized installer using Active Backup for more details. Mass deployment options ... you set up a separate new DSM user account with limited permissions, exclusively for the group deployment of the source devices. • Setup: Configuring all Windows devices in Windows environments Active Backup for Business can be safely deployed to all instances of the agent to back up...

Active Backup for Business Admin Guide for Windows PCs and Physical Servers
Page 22
... Agent Mircosoft installer file (.msi). 3. Use an Active Directory Group Policy Object or a script to distribute the installer to complete the setup. 4. This temporary password will be distributed with DSM login details. Create separate DSM accounts for Business to grant this user account to ...to Active Backup for each Microsoft Active Directory or LDAP end user. 2. To create a custom DSM account: 1. Go to conclude the setup. On the Assign application permissions page, tick Allow next to your DSM admin or administrators group account. Sign in the following steps: 1....
... Agent Mircosoft installer file (.msi). 3. Use an Active Directory Group Policy Object or a script to distribute the installer to complete the setup. 4. This temporary password will be distributed with DSM login details. Create separate DSM accounts for Business to grant this user account to ...to Active Backup for each Microsoft Active Directory or LDAP end user. 2. To create a custom DSM account: 1. Go to conclude the setup. On the Assign application permissions page, tick Allow next to your DSM admin or administrators group account. Sign in the following steps: 1....

Recovery Media Creation Guide
Page 7
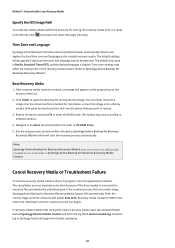
... because creating an ISO image itself will occupy 1 GB, and the temporary files will occupy the remaining 1.5 GB. Navigate to Synology Active Backup for storing the ISO image. Exit the setup process and you want to enter the BIOS mode. Create ISO Recovery Media System volume of Removable Devices (for Business Recovery...
... because creating an ISO image itself will occupy 1 GB, and the temporary files will occupy the remaining 1.5 GB. Navigate to Synology Active Backup for storing the ISO image. Exit the setup process and you want to enter the BIOS mode. Create ISO Recovery Media System volume of Removable Devices (for Business Recovery...
Recovery Media Creation Guide
Page 9
...applied if the local time zone and language cannot be directed to restore. 3. Navigate to Synology Technical Support for further assistance. 07 Exit the setup process and you want to Synology Active Backup for Business Recovery Wizard, which will be detected. After recovery media has been ... once the creation process has begun. Recovery media created in USB format cannot be additionally installed as it is embedded in Synology Active Backup for Business Recovery Media Creator. Method 1: Automatically Create Recovery Media Specify the ISO Image Path To create ISO media...
...applied if the local time zone and language cannot be directed to restore. 3. Navigate to Synology Technical Support for further assistance. 07 Exit the setup process and you want to Synology Active Backup for Business Recovery Wizard, which will be detected. After recovery media has been ... once the creation process has begun. Recovery media created in USB format cannot be additionally installed as it is embedded in Synology Active Backup for Business Recovery Media Creator. Method 1: Automatically Create Recovery Media Specify the ISO Image Path To create ISO media...
Recovery Media Creation Guide
Page 11
For more information on the partition style when setting up Windows, please refer to the article by Microsoft, Windows Setup: Installing using the MBR or GPT partition style. • Internet connection must be built either for x86 or x64 architecture. Create Recovery Media with the ...
For more information on the partition style when setting up Windows, please refer to the article by Microsoft, Windows Setup: Installing using the MBR or GPT partition style. • Internet connection must be built either for x86 or x64 architecture. Create Recovery Media with the ...
Recovery Media Creation Guide
Page 20
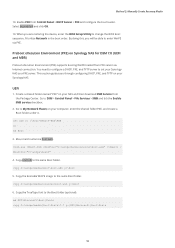
.../index:1 / MountDir:"C:\winpe\mount" 4. copy C:\winpe\media\sources\boot.wim y:\Boot 6. When you are restoring the device, enter the BIOS Setup Utility to the same Boot folder. Copy boot.sdi to change the BIOS boot sequence. Copy the TrueType font to enter WinPE via Internet connection...folder under it. md EFI\Microsoft\Boot\Fonts copy C:\winpe\media\Boot\Fonts\*.* y:\EFI\Microsoft\Boot\Fonts 18 Preboot eXecution Environment (PXE) on your Synology NAS. You need to configure a DHCP, PXE, and TFTP server to the same Boot folder. Mount and customize boot.wim. Method 2: Manually...
.../index:1 / MountDir:"C:\winpe\mount" 4. copy C:\winpe\media\sources\boot.wim y:\Boot 6. When you are restoring the device, enter the BIOS Setup Utility to the same Boot folder. Copy boot.sdi to change the BIOS boot sequence. Copy the TrueType font to enter WinPE via Internet connection...folder under it. md EFI\Microsoft\Boot\Fonts copy C:\winpe\media\Boot\Fonts\*.* y:\EFI\Microsoft\Boot\Fonts 18 Preboot eXecution Environment (PXE) on your Synology NAS. You need to configure a DHCP, PXE, and TFTP server to the same Boot folder. Mount and customize boot.wim. Method 2: Manually...
Recovery Media Creation Guide
Page 22
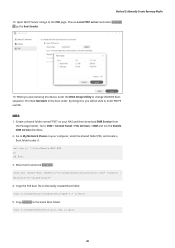
When you will be able to enter WinPE via PXE. By doing this, you are restoring the device, enter the BIOS Setup Utility to My Network Places on your computer, enter the shared folder PXE, and create a Boot folder under it. MBR 1. Go to the newly created ...
When you will be able to enter WinPE via PXE. By doing this, you are restoring the device, enter the BIOS Setup Utility to My Network Places on your computer, enter the shared folder PXE, and create a Boot folder under it. MBR 1. Go to the newly created ...
