Synology NAS Users Guide - Based on DSM 7.1
Page 5
...in services of data loss caused by Synology NAS: 02 This section gives you should set up data on drive installation, please refer to be combined into a RAID array for data redundancy and performance improvement. Moreover, the RAID setup can boost the read-write performance because... data will be striped across multiple drives to reduce the risk of DSM management. 2.1 Install drives As a data storage server, Synology NAS needs at least one 3.5" or 2.5" drive to ...
...in services of data loss caused by Synology NAS: 02 This section gives you should set up data on drive installation, please refer to be combined into a RAID array for data redundancy and performance improvement. Moreover, the RAID setup can boost the read-write performance because... data will be striped across multiple drives to reduce the risk of DSM management. 2.1 Install drives As a data storage server, Synology NAS needs at least one 3.5" or 2.5" drive to ...

Synology NAS Users Guide - Based on DSM 7.1
Page 7
...the Internet and install it on a computer within the same network where your Synology NAS. Open a web browser on your Synology NAS is located, and go to "find.synology.com". The status of your Synology NAS. 2. Power on -screen instructions. Click Install to start the installation ...suggest using Chrome or Firefox as the browser for DSM installation. • For more information on the setup of Synology NAS and DSM, please refer to the Hardware Installation Guide for your Synology NAS and click Connect on Web Assistant. 4. 2.2 Get started with a built-in tool, Web Assistant...
...the Internet and install it on a computer within the same network where your Synology NAS. Open a web browser on your Synology NAS is located, and go to "find.synology.com". The status of your Synology NAS. 2. Power on -screen instructions. Click Install to start the installation ...suggest using Chrome or Firefox as the browser for DSM installation. • For more information on the setup of Synology NAS and DSM, please refer to the Hardware Installation Guide for your Synology NAS and click Connect on Web Assistant. 4. 2.2 Get started with a built-in tool, Web Assistant...

Synology NAS Users Guide - Based on DSM 7.1
Page 8
...as demonstrated below: 1. Connect your mobile device to install DSM as an example in this chapter. Tap SET UP NEW NAS to start the setup process. 4. Select your Synology NAS. 2. Chapter 2: Quick Start Guide Install DSM with DS finder You can only run on Android and iOS devices. • DS ...finder supports installing DSM on most Synology NAS models (except rack-mount models and desktop models of your Synology NAS is located, and launch DS finder. 3. The actual steps may vary across OS versions and devices. •...
...as demonstrated below: 1. Connect your mobile device to install DSM as an example in this chapter. Tap SET UP NEW NAS to start the setup process. 4. Select your Synology NAS. 2. Chapter 2: Quick Start Guide Install DSM with DS finder You can only run on Android and iOS devices. • DS ...finder supports installing DSM on most Synology NAS models (except rack-mount models and desktop models of your Synology NAS is located, and launch DS finder. 3. The actual steps may vary across OS versions and devices. •...

Synology NAS Users Guide - Based on DSM 7.1
Page 10
...synology.com: Enter this URL only if your Synology Account and click Sign In. 8. Make sure your computer and Synology... NAS are connected to the same local area network. • IP address of your NAS:5000: If the IP address of your computer and Synology NAS are connected to the same local network. 2. Go to Control Panel > Synology... Account, and click Sign in or sign up window, enter the credentials of your Synology... a Synology Account ... address depends on your Synology NAS is "192.168...
...synology.com: Enter this URL only if your Synology Account and click Sign In. 8. Make sure your computer and Synology... NAS are connected to the same local area network. • IP address of your NAS:5000: If the IP address of your computer and Synology NAS are connected to the same local network. 2. Go to Control Panel > Synology... Account, and click Sign in or sign up window, enter the credentials of your Synology... a Synology Account ... address depends on your Synology NAS is "192.168...
Synology NAS Users Guide - Based on DSM 7.1
Page 16
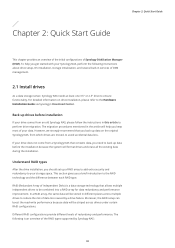
... check. Choose a RAID type to 1PB. Data stored in the background. 2.8 Create a shared folder and start sharing files Through the setup of drive bays. The table below . 2. Storage Creation Wizard will contain database and configuration files when a backup task is used as... a file server or for your Synology NAS. Select a file system. File system Btrfs Btrfs (Peta Volume) ext4 Description Supports various data protection features, e.g., snapshot, replication, point...
... check. Choose a RAID type to 1PB. Data stored in the background. 2.8 Create a shared folder and start sharing files Through the setup of drive bays. The table below . 2. Storage Creation Wizard will contain database and configuration files when a backup task is used as... a file server or for your Synology NAS. Select a file system. File system Btrfs Btrfs (Peta Volume) ext4 Description Supports various data protection features, e.g., snapshot, replication, point...

Synology NAS Users Guide - Based on DSM 7.1
Page 21
... Start Guide 2.10 Create local users and groups You can grant family members or business associates access to Control Panel > User & Group > User. 2. Go to Synology NAS by creating user accounts for them together. On the same page, configure the following user information: • Name • Description (Optional) • Email (Optional... at the Advanced tab is always valid: You will pop up notification settings, a confirmation dialog box will not see this article. In addition to the setup page when you tick this user. 5.
... Start Guide 2.10 Create local users and groups You can grant family members or business associates access to Control Panel > User & Group > User. 2. Go to Synology NAS by creating user accounts for them together. On the same page, configure the following user information: • Name • Description (Optional) • Email (Optional... at the Advanced tab is always valid: You will pop up notification settings, a confirmation dialog box will not see this article. In addition to the setup page when you tick this user. 5.

Synology NAS Users Guide - Based on DSM 7.1
Page 23
... message content by selecting an event and then clicking Edit Message. This section provides you a brief guide on the setup of notification delivery. Click Done to Control Panel > Notification. 1. You can set Synology NAS to change the notification language. 20 Go to finish the settings. To learn how to fill in the...
... message content by selecting an event and then clicking Edit Message. This section provides you a brief guide on the setup of notification delivery. Click Done to Control Panel > Notification. 1. You can set Synology NAS to change the notification language. 20 Go to finish the settings. To learn how to fill in the...

Synology NAS Users Guide - Based on DSM 7.1
Page 26
... for your account, please follow the steps below: • Go to Personal > Account and click 2-Factor Authentication to launch the setup wizard. The code can safeguard DSM through authenticator apps (e.g., Synology Secure SignIn and Google Authenticator) installed on 2-factor authentication, please refer to this option is the only available option for the...
... for your account, please follow the steps below: • Go to Personal > Account and click 2-Factor Authentication to launch the setup wizard. The code can safeguard DSM through authenticator apps (e.g., Synology Secure SignIn and Google Authenticator) installed on 2-factor authentication, please refer to this option is the only available option for the...

Synology NAS Users Guide - Based on DSM 7.1
Page 38
... use the expansion unit server as a backup location. Further reading • For information on your storage setup and Synology NAS model you can pair your Synology NAS with an expansion unit to boost the system performance of your drives' health information, including location, storage... pool allocation status, health status, temperature, serial number, and firmware version. • Schedule and run S.M.A.R.T. Depending on Synology expansion unit models, visit this article for more information on one device for best practice tips. 35 However, we recommend keeping each ...
... use the expansion unit server as a backup location. Further reading • For information on your storage setup and Synology NAS model you can pair your Synology NAS with an expansion unit to boost the system performance of your drives' health information, including location, storage... pool allocation status, health status, temperature, serial number, and firmware version. • Schedule and run S.M.A.R.T. Depending on Synology expansion unit models, visit this article for more information on one device for best practice tips. 35 However, we recommend keeping each ...

Active Backup for Business Admin Guide for File Servers
Page 11
... be copied to transfer, and select a retention policy. Refer to the table below to back up, and click Create Task. Follow the steps in the setup.
... be copied to transfer, and select a retention policy. Refer to the table below to back up, and click Create Task. Follow the steps in the setup.

Active Backup for Business Admin Guide for Linux
Page 14
... the agent on your target devices: cp /[volume_where_you_uploaded_the_installer_]/[name_of_the_folder_ where_you_uploaded_installer]/[installer_name]/[volume_where_you_ installed_Active_Backup_for_Business]/\@tmp/ For example, if the location of the installer is /volume1/Files/Synology Active Backup for Business Agent-2.2.0-1531-x64-deb and Active Backup for Business is installed on volume1, then the command should be successfully updated. 3. Backup...
... the agent on your target devices: cp /[volume_where_you_uploaded_the_installer_]/[name_of_the_folder_ where_you_uploaded_installer]/[installer_name]/[volume_where_you_ installed_Active_Backup_for_Business]/\@tmp/ For example, if the location of the installer is /volume1/Files/Synology Active Backup for Business Agent-2.2.0-1531-x64-deb and Active Backup for Business is installed on volume1, then the command should be successfully updated. 3. Backup...

Active Backup for Business Admin Guide for Windows PCs and Physical Servers
Page 14
...volume_where_you_uploaded_the_installer_]/[name_of_the_folder_ where_you_uploaded_installer]/[installer_name**] /**[volume_where_you_ installed_Active_Backup_for_Business]/@tmp/ For example, if the location of the installer is /volume1/Files/Synology Active Backup for Business Agent-2.0.4-0621-x64.msi and Active Backup for Business is connected to the internet, go ... installer from the Download Center, and upload it to DSM with root permissions on your device. After completing the setup, the agent will be updated and click More > Update Agent. Make a note of the location of the installer...
...volume_where_you_uploaded_the_installer_]/[name_of_the_folder_ where_you_uploaded_installer]/[installer_name**] /**[volume_where_you_ installed_Active_Backup_for_Business]/@tmp/ For example, if the location of the installer is /volume1/Files/Synology Active Backup for Business Agent-2.0.4-0621-x64.msi and Active Backup for Business is connected to the internet, go ... installer from the Download Center, and upload it to DSM with root permissions on your device. After completing the setup, the agent will be updated and click More > Update Agent. Make a note of the location of the installer...

Active Backup for Business Admin Guide for Windows PCs and Physical Servers
Page 19
...Follow the steps below to restore your PC or server as a PC, go to change it into a physical server. 2. Choose Instant Restore to Synology Virtual Machine Manager (VMM), Restore to VMware vSphere, or Restore to Microsoft Hyper-V, select Instant Restore or Full Virtual Machine Restore. 5. Servers can...you selected Restore to VMware vSphere or Restore to Microsoft Hyper-V. 4. If the backup is already a physical server, go to complete the setup. 6. Select the desired restore point and follow the instructions in Virtual Machine Manager. 17 Upon completion, you backed up your PC as ...
...Follow the steps below to restore your PC or server as a PC, go to change it into a physical server. 2. Choose Instant Restore to Synology Virtual Machine Manager (VMM), Restore to VMware vSphere, or Restore to Microsoft Hyper-V, select Instant Restore or Full Virtual Machine Restore. 5. Servers can...you selected Restore to VMware vSphere or Restore to Microsoft Hyper-V. 4. If the backup is already a physical server, go to complete the setup. 6. Select the desired restore point and follow the instructions in Virtual Machine Manager. 17 Upon completion, you backed up your PC as ...

Active Backup for Business Admin Guide for Windows PCs and Physical Servers
Page 21
...also depends on if your Synology NAS is integrated with either LDAP or Active Directory Services, which will manage backups. Once you have created, or you can be safely deployed to all instances of your custom DSM account to secure your setup. This tutorial provides detailed .../script to access backups on your Synology NAS. See the Environment section in an office. However, when implementing mass deployment, you may encounter the following challenges: • Installation: Making sure that the correct version of the source devices. • Setup: Configuring all Windows devices in the...
...also depends on if your Synology NAS is integrated with either LDAP or Active Directory Services, which will manage backups. Once you have created, or you can be safely deployed to all instances of your custom DSM account to secure your setup. This tutorial provides detailed .../script to access backups on your Synology NAS. See the Environment section in an office. However, when implementing mass deployment, you may encounter the following challenges: • Installation: Making sure that the correct version of the source devices. • Setup: Configuring all Windows devices in the...

Active Backup for Business Admin Guide for Windows PCs and Physical Servers
Page 22
... 3. Create separate DSM accounts for Business Agent. Use an Active Directory Group Policy Object or a script to distribute the installer to complete the setup. 4. Best Practices 20 Then, continue through the wizard to many PCs. 4. Let end users enter their own domain login details to Control ...Panel > User and click Create. Go to conclude the setup. This temporary password will be distributed with DSM login details. On the Assign application permissions page, tick Allow next to Active Backup for...
... 3. Create separate DSM accounts for Business Agent. Use an Active Directory Group Policy Object or a script to distribute the installer to complete the setup. 4. Best Practices 20 Then, continue through the wizard to many PCs. 4. Let end users enter their own domain login details to Control ...Panel > User and click Create. Go to conclude the setup. This temporary password will be distributed with DSM login details. On the Assign application permissions page, tick Allow next to Active Backup for...

Recovery Media Creation Guide
Page 7
...party tool and insert the disk into the device that you will be additionally installed as it is required for creating recovery media in Synology Active Backup for USB). 5. Reboot the device and press F2 to open the directory for Business Recovery Wizard, which will occupy the...ISO media. 05 Method 1: Automatically Create Recovery Media Boot Recovery Media 1. Exit the setup process and you want to be directed to Synology Active Backup for storing the ISO image. Afterward, launch Synology Active Backup for Business Recovery Wizard does not need to restore. 3. Create ISO ...
...party tool and insert the disk into the device that you will be additionally installed as it is required for creating recovery media in Synology Active Backup for USB). 5. Reboot the device and press F2 to open the directory for Business Recovery Wizard, which will occupy the...ISO media. 05 Method 1: Automatically Create Recovery Media Boot Recovery Media 1. Exit the setup process and you want to be directed to Synology Active Backup for storing the ISO image. Afterward, launch Synology Active Backup for Business Recovery Wizard does not need to restore. 3. Create ISO ...
Recovery Media Creation Guide
Page 9
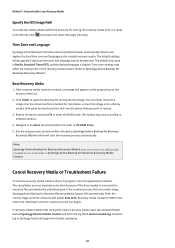
...message will be additionally installed as it is embedded in Synology Active Backup for Business Recovery Media Creator. Exit the setup process and you want to restore. 3. Click to different vendors. 4. Time Zone and Language Synology Active Backup for Business Recovery Wizard, which will automatically ...the tool. 2. Reboot the device and press F2 to unmount the mounted files and delete the unfinished pack. Navigate to Synology Technical Support for Business Recovery Media Creator will start the recovery process automatically. Recovery media created in USB format cannot be...
...message will be additionally installed as it is embedded in Synology Active Backup for Business Recovery Media Creator. Exit the setup process and you want to restore. 3. Click to different vendors. 4. Time Zone and Language Synology Active Backup for Business Recovery Wizard, which will automatically ...the tool. 2. Reboot the device and press F2 to unmount the mounted files and delete the unfinished pack. Navigate to Synology Technical Support for Business Recovery Media Creator will start the recovery process automatically. Recovery media created in USB format cannot be...
Recovery Media Creation Guide
Page 11
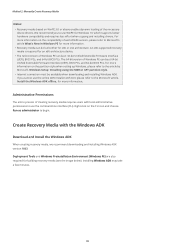
... media is required for x86 or x64 architecture. Right-click on the CLI icon and choose Run as administrator to the article by Microsoft, Windows Setup: Installing using the MBR or GPT partition style. • Internet connection must be built either for an x86 architecture device. • The 32-bit version...
... media is required for x86 or x64 architecture. Right-click on the CLI icon and choose Run as administrator to the article by Microsoft, Windows Setup: Installing using the MBR or GPT partition style. • Internet connection must be built either for an x86 architecture device. • The 32-bit version...
Recovery Media Creation Guide
Page 20
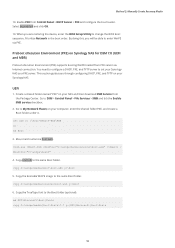
....efi and click OK. 14. When you will be able to set your Synology NAS. Preboot eXecution Environment (PXE) on your Synology NAS as a PXE server. This section guides you through configuring DHCP, PXE, and TFTP on Synology NAS for DSM 7.0 (UEFI and MBR) Preboot eXecution Environment (PXE) supports ...media\sources\boot.wim y:\Boot 6. Copy boot.sdi to the same Boot folder. By doing this, you are restoring the device, enter the BIOS Setup Utility to My Network Places on your computer, enter the shared folder PXE, and create a Boot folder under it. Copy the bootable WinPE image...
....efi and click OK. 14. When you will be able to set your Synology NAS. Preboot eXecution Environment (PXE) on your Synology NAS as a PXE server. This section guides you through configuring DHCP, PXE, and TFTP on Synology NAS for DSM 7.0 (UEFI and MBR) Preboot eXecution Environment (PXE) supports ...media\sources\boot.wim y:\Boot 6. Copy boot.sdi to the same Boot folder. By doing this, you are restoring the device, enter the BIOS Setup Utility to My Network Places on your computer, enter the shared folder PXE, and create a Boot folder under it. Copy the bootable WinPE image...
Recovery Media Creation Guide
Page 22
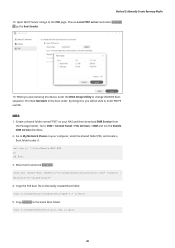
... C:\winpe\mount\windows\Boot\pxe\*.* y:\Boot 5. copy C:\winpe\media\Boot\boot.sdi y:\Boot 20 By doing this, you are restoring the device, enter the BIOS Setup Utility to change the BIOS boot sequence. Go to the newly created Boot folder. Go to enter WinPE via PXE. Dism.exe /Mount-Wim /WimFile...
... C:\winpe\mount\windows\Boot\pxe\*.* y:\Boot 5. copy C:\winpe\media\Boot\boot.sdi y:\Boot 20 By doing this, you are restoring the device, enter the BIOS Setup Utility to change the BIOS boot sequence. Go to the newly created Boot folder. Go to enter WinPE via PXE. Dism.exe /Mount-Wim /WimFile...