
Owners Manual
Page 4
... carefully to appear on the TV screen, depending on the condition of the electric waves of the TV broadcast. See Page 12 for choosing TEAC. DO NOT MOVE THE UNIT DURING PLAYBACK During playback, the disc rotates at high speed. Do NOT lift or move the unit during operation...Handling Cassette Tape 8 Connection 9 Unit Functions and Remote Control 10 Parts of the Turntable 12 Remote Control Unit 13 Basic Operation 13 Listening to the Radio 14 Preset Tuning 15 Listening to a Record 16 Listening to a CD 18 Programmed Playback 20 Repeat Playback 21 Shuffle Playback 22 Time Display 22 ...
... carefully to appear on the TV screen, depending on the condition of the electric waves of the TV broadcast. See Page 12 for choosing TEAC. DO NOT MOVE THE UNIT DURING PLAYBACK During playback, the disc rotates at high speed. Do NOT lift or move the unit during operation...Handling Cassette Tape 8 Connection 9 Unit Functions and Remote Control 10 Parts of the Turntable 12 Remote Control Unit 13 Basic Operation 13 Listening to the Radio 14 Preset Tuning 15 Listening to a Record 16 Listening to a CD 18 Programmed Playback 20 Repeat Playback 21 Shuffle Playback 22 Time Display 22 ...

Owners Manual
Page 10
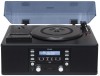
Press the PHONO/TAPE/AUX button and select PHONO/TAPE to the radio. Press the FM/AM button to listen to play a tape. Also use this button to erase or unfinalize a CD-RW disc. B PHONO/TAPE/AUX, CD, ...
Press the PHONO/TAPE/AUX button and select PHONO/TAPE to the radio. Press the FM/AM button to listen to play a tape. Also use this button to erase or unfinalize a CD-RW disc. B PHONO/TAPE/AUX, CD, ...
Owners Manual
Page 14
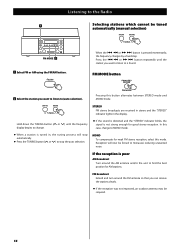
... antenna so that you can receive the stations clearly. < If the reception was not improved, an outdoor antenna may be required. 14 Listening to the Radio Selecting stations which cannot be forced to monaural, reducing unwanted noise. STEREO FM stereo broadcasts are received in stereo and the "STEREO" indicator lights in...
... antenna so that you can receive the stations clearly. < If the reception was not improved, an outdoor antenna may be required. 14 Listening to the Radio Selecting stations which cannot be forced to monaural, reducing unwanted noise. STEREO FM stereo broadcasts are received in stereo and the "STEREO" indicator lights in...

Owners Manual
Page 25
... AUX sources can be recorded on the display, or the RECORD button in auto track setting, more than actual tracks recorded. ENGLISH Recording 1 To record a radio broadcast Select FM or AM using the FM/AM button and select the station using the MANUAL/AUTO REC button. Press the MANUAL/AUTO REC... button repeatedly to select any other mode. < When you record a radio broadcast, press the MANUAL/AUTO REC button of the remote control unit. (The MANUAL/AUTO REC button on the disc tray with a lot of track...
... AUX sources can be recorded on the display, or the RECORD button in auto track setting, more than actual tracks recorded. ENGLISH Recording 1 To record a radio broadcast Select FM or AM using the FM/AM button and select the station using the MANUAL/AUTO REC button. Press the MANUAL/AUTO REC... button repeatedly to select any other mode. < When you record a radio broadcast, press the MANUAL/AUTO REC button of the remote control unit. (The MANUAL/AUTO REC button on the disc tray with a lot of track...

Owners Manual
Page 26
... recording is finished, the setting is 0 dB. The unit enters record pause mode. To record from -00 (-∞) dB to the headphones jack of the radio cassette recorder or portable player etc. Not to record excessive operation sound, press the STOP button (H) to MANUAL (off ). To record a sound played by a component...
... recording is finished, the setting is 0 dB. The unit enters record pause mode. To record from -00 (-∞) dB to the headphones jack of the radio cassette recorder or portable player etc. Not to record excessive operation sound, press the STOP button (H) to MANUAL (off ). To record a sound played by a component...

Owners Manual
Page 30
... the REC OFF timer. REC OFF Timer 4 Press the RECORD button again. The REC OFF timer function does not work . < Before recording, tune in the radio station, set the track number assignment, set the recording level and prepare the external source connected to the AUX IN jacks. 3 Press the RECORD button... the .m or ,/ button to record pause mode. Each time the button is finished, the recording timer will not work when the unit records from the radio or other equipment connected to the AUX IN jacks, select AUX. 2 Load a recordable CD-R or CD-RW disc into the unit.
... the REC OFF timer. REC OFF Timer 4 Press the RECORD button again. The REC OFF timer function does not work . < Before recording, tune in the radio station, set the track number assignment, set the recording level and prepare the external source connected to the AUX IN jacks. 3 Press the RECORD button... the .m or ,/ button to record pause mode. Each time the button is finished, the recording timer will not work when the unit records from the radio or other equipment connected to the AUX IN jacks, select AUX. 2 Load a recordable CD-R or CD-RW disc into the unit.

Owners Manual
Page 31
... on the audio timer outlet. Once the audio timer reaches the on time, the unit will turn off If you want to record an FM radio program from "65:00" to the instruction manual of the unit and off time. 31 At the same time, the display for operations. 2 Turn on...
... on the audio timer outlet. Once the audio timer reaches the on time, the unit will turn off If you want to record an FM radio program from "65:00" to the instruction manual of the unit and off time. 31 At the same time, the display for operations. 2 Turn on...