

Archer C4000US V3 User Guide
Page 2
Connect Your Router 8 Chapter 3. Manually Set Up Your Internet Connection 14 4. 3. Set Up WAN Aggregation 23 Chapter 5. Change Your TP-Link ID Information 26 5. 3. Manage the Router via the TP-Link Tether App 29 Chapter 6. Set Up an IPv6 Internet Connection 20 4. ... Set Up the Router as an Access Point 18 4. 4. Set Portal Authentication 31 6. 3. USB Settings 34 Connect the Hardware 7 2. 1. TP-Link Cloud Service 25 5. 1. Register a TP-Link ID 26 5. 2. Appearance 4 2. 2. 1.The Back Panel 4 2. 2. 2.The Front Panel 5 Chapter 2. Set Up Internet Connection 13 ...
Connect Your Router 8 Chapter 3. Manually Set Up Your Internet Connection 14 4. 3. Set Up WAN Aggregation 23 Chapter 5. Change Your TP-Link ID Information 26 5. 3. Manage the Router via the TP-Link Tether App 29 Chapter 6. Set Up an IPv6 Internet Connection 20 4. ... Set Up the Router as an Access Point 18 4. 4. Set Portal Authentication 31 6. 3. USB Settings 34 Connect the Hardware 7 2. 1. TP-Link Cloud Service 25 5. 1. Register a TP-Link ID 26 5. 2. Appearance 4 2. 2. 1.The Back Panel 4 2. 2. 2.The Front Panel 5 Chapter 2. Set Up Internet Connection 13 ...
Archer C4000US V3 User Guide
Page 17
... Up Internet Connection This chapter introduces how to connect your ISP provides IPv6 service. It contains the following sections: • Use Quick Setup Wizard • Manually Set Up Your Internet Connection • Set Up the Router as an Access Point • Set Up an IPv6 Internet Connection • Set Up WAN...
... Up Internet Connection This chapter introduces how to connect your ISP provides IPv6 service. It contains the following sections: • Use Quick Setup Wizard • Manually Set Up Your Internet Connection • Set Up the Router as an Access Point • Set Up an IPv6 Internet Connection • Set Up WAN...

Archer C4000US V3 User Guide
Page 18
... your router. 1. Select your internet connection type from TP-Link (remote management, TP-Link DDNS, and more.), log in with the password you set up your current internet connection settings. Follow the steps below to the internet. 3. Manually Set Up Your Internet Connection In this part, you need... the IPv6 internet connection, please refer to the router. 4. 2. To enjoy a more about the TP-Link Cloud service, please refer to the TP-Link Cloud Service section. • If you do...
... your router. 1. Select your internet connection type from TP-Link (remote management, TP-Link DDNS, and more.), log in with the password you set up your current internet connection settings. Follow the steps below to the internet. 3. Manually Set Up Your Internet Connection In this part, you need... the IPv6 internet connection, please refer to the router. 4. 2. To enjoy a more about the TP-Link Cloud service, please refer to the TP-Link Cloud Service section. • If you do...

Archer C4000US V3 User Guide
Page 25
Click Advanced to input further information if your ISP provides two separate accounts for the IPv4 and IPv6 connections, please untick the PPPoE same session with IPv4 connection checkbox and manually enter the username and password for the IPv6 connection. 21 Click Save and then click Connect. Click Save. 3 ) PPPoE: By default, the router uses the IPv4 account to connect to input further information if your ISP requires. Note: If your ISP requires. Chapter 4 Set Up Internet Connection 2 ) Dynamic IP (SLAAC/DHCPv6): Click Advanced to the IPv6 server.
Click Advanced to input further information if your ISP provides two separate accounts for the IPv4 and IPv6 connections, please untick the PPPoE same session with IPv4 connection checkbox and manually enter the username and password for the IPv6 connection. 21 Click Save and then click Connect. Click Save. 3 ) PPPoE: By default, the router uses the IPv4 account to connect to input further information if your ISP requires. Note: If your ISP requires. Chapter 4 Set Up Internet Connection 2 ) Dynamic IP (SLAAC/DHCPv6): Click Advanced to the IPv6 server.

Archer C4000US V3 User Guide
Page 26
Click Save and then click Connect. 5 ) Pass-Through (Bridge): Click Save and skip to input further information if your ISP requires. Click Advanced to Step 6. 22 Chapter 4 Set Up Internet Connection 4 ) 6to4 Tunnel: An IPv4 internet connection type is a prerequisite for this connection type (Manually Set Up Your Internet Connection).
Click Save and then click Connect. 5 ) Pass-Through (Bridge): Click Save and skip to input further information if your ISP requires. Click Advanced to Step 6. 22 Chapter 4 Set Up Internet Connection 4 ) 6to4 Tunnel: An IPv4 internet connection type is a prerequisite for this connection type (Manually Set Up Your Internet Connection).

Archer C4000US V3 User Guide
Page 35
...Create a Network for the router. 2. Now your guests can access your customers. Visit http://tplinkwifi.net, and log in with your TP-Link ID or the password you want to seize every opportunity to promote your shop, which your own password. 4. You want your guests ...Don't select Hide SSID unless you set ! Customers will be directed to a web page for guest network access. 3 ) Set Security to manually input the SSID for access verification, on which makes portal authentication an excellent choice. Go to Advanced > Status and locate the Guest Network section. ...
...Create a Network for the router. 2. Now your guests can access your customers. Visit http://tplinkwifi.net, and log in with your TP-Link ID or the password you want to seize every opportunity to promote your shop, which your own password. 4. You want your guests ...Don't select Hide SSID unless you set ! Customers will be directed to a web page for guest network access. 3 ) Set Security to manually input the SSID for access verification, on which makes portal authentication an excellent choice. Go to Advanced > Status and locate the Guest Network section. ...

Archer C4000US V3 User Guide
Page 53
... Basic > HomeCare > QoS or Advanced > QoS. 3. Go to prioritize this online activity. The default is Standard, with no application prioritized. 5. You can also choose Set Manually and enter bandwidth in the Timing column and select 2 hours as the duration you want the device to set the total bandwidth. Chapter 8 HomeCare - Done...
... Basic > HomeCare > QoS or Advanced > QoS. 3. Go to prioritize this online activity. The default is Standard, with no application prioritized. 5. You can also choose Set Manually and enter bandwidth in the Timing column and select 2 hours as the duration you want the device to set the total bandwidth. Chapter 8 HomeCare - Done...

Archer C4000US V3 User Guide
Page 63
Done! Follow the steps below to Set Up a Dynamic DNS Service Account. Users on the internet can enter the corresponding parameters manually. Tips: • The WAN IP should not be overlapped. Chapter 10 NAT Forwarding Tips: • It is recommended to keep the default settings of the ...
Done! Follow the steps below to Set Up a Dynamic DNS Service Account. Users on the internet can enter the corresponding parameters manually. Tips: • The WAN IP should not be overlapped. Chapter 10 NAT Forwarding Tips: • It is recommended to keep the default settings of the ...
Archer C4000US V3 User Guide
Page 64
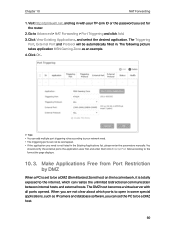
... Applications Free from Port Restriction by DMZ When a PC is set to be overlapped. • If the application you set the PC to your TP-Link ID or the password you need is totally exposed to the internet, which ports to open in some special applications, such as an example. 4. The...and database software, you can add multiple port triggering rules according to be automatically filled in the Existing Applications list, please enter the parameters manually. Tips: • You can set for the router. 2. Chapter 10 NAT Forwarding 1. Go to the format the page displays. 10. 3.
... Applications Free from Port Restriction by DMZ When a PC is set to be overlapped. • If the application you set the PC to your TP-Link ID or the password you need is totally exposed to the internet, which ports to open in some special applications, such as an example. 4. The...and database software, you can add multiple port triggering rules according to be automatically filled in the Existing Applications list, please enter the parameters manually. Tips: • You can set for the router. 2. Chapter 10 NAT Forwarding 1. Go to the format the page displays. 10. 3.

Archer C4000US V3 User Guide
Page 81
Create Static Routes Static routing is a form of your account. 5. The manually-configured routing information guides the router in the following figure so that is established. Now I need to configure the static routing. 77 I want to: Visit ...-IP or DynDNS, enter the username, password and domain name of routing that the physical connection between my PC and my company's server is configured manually by a network administrator or a user by adding entries into a routing table. I also want to use a new DDNS account, please click Logout first, and then log...
Create Static Routes Static routing is a form of your account. 5. The manually-configured routing information guides the router in the following figure so that is established. Now I need to configure the static routing. 77 I want to: Visit ...-IP or DynDNS, enter the username, password and domain name of routing that the physical connection between my PC and my company's server is configured manually by a network administrator or a user by adding entries into a routing table. I also want to use a new DDNS account, please click Logout first, and then log...

Archer C4000US V3 User Guide
Page 84
... devices. Keep the default values or set a new SSID and password, and click Save. Select the wireless network 2.4GHz, 5GHz-1 or 5GHz-2. 3. If you to manually join the network. • To use . • To hide SSID: 1.
... devices. Keep the default values or set a new SSID and password, and click Save. Select the wireless network 2.4GHz, 5GHz-1 or 5GHz-2. 3. If you to manually join the network. • To use . • To hide SSID: 1.

Archer C4000US V3 User Guide
Page 90
Select Enable Daylight Saving Time. 86 Set the current Time (In HH/MM/SS format). 4. Set the current Date (In MM/DD/YYYY format). 3. The time of your computer will then be displayed and click Save. • To manually set up Daylight Saving Time: 1. Click Save. • To set the date and time: 1. In the Set Time field, select Manually. 2. Chapter 13 Manage the Router 2.
Select Enable Daylight Saving Time. 86 Set the current Time (In HH/MM/SS format). 4. Set the current Date (In MM/DD/YYYY format). 3. The time of your computer will then be displayed and click Save. • To manually set up Daylight Saving Time: 1. Click Save. • To set the date and time: 1. In the Set Time field, select Manually. 2. Chapter 13 Manage the Router 2.

Archer C4000US V3 User Guide
Page 100
... to Advanced > System Tools > Administration and complete the settings in with your TP-Link ID or the password you to control remote devices' authority to manage the router from the Existing Devices list, or enter the MAC address of the device manually. 4. Select Enable Remote Management. 96 Visit http://tplinkwifi.net, and log...
... to Advanced > System Tools > Administration and complete the settings in with your TP-Link ID or the password you to control remote devices' authority to manage the router from the Existing Devices list, or enter the MAC address of the device manually. 4. Select Enable Remote Management. 96 Visit http://tplinkwifi.net, and log...

Archer C4000US V3 User Guide
Page 106
... 2. Click Survey to scan all available networks and select the network you want to Advanced > System Tools > System Parameters. You can also manually fill in with your TP-Link ID or the password you set for the access point as the network to be bridged. 4. Note: You need to enable and configure...parameters, which should be the same as the network to be the same as well. • To bridge a network manually: 1. Visit http://tplinkwifi.net, and log in with your TP-Link ID or the password you set for the router. 102 Focus on the internet, which protects the local network by ...
... 2. Click Survey to scan all available networks and select the network you want to Advanced > System Tools > System Parameters. You can also manually fill in with your TP-Link ID or the password you set for the access point as the network to be bridged. 4. Note: You need to enable and configure...parameters, which should be the same as the network to be the same as well. • To bridge a network manually: 1. Visit http://tplinkwifi.net, and log in with your TP-Link ID or the password you set for the router. 102 Focus on the internet, which protects the local network by ...

Archer C4000US V3 User Guide
Page 113
Please manually configure the DNS server. 1 ) Go to factory default settings and reconfigure the router. 109 • Your computer might not recognize any DNS server addresses. Tips: 8.8.8.8 ...
Please manually configure the DNS server. 1 ) Go to factory default settings and reconfigure the router. 109 • Your computer might not recognize any DNS server addresses. Tips: 8.8.8.8 ...
