

Operator Manual
Page 1
General Safety Precautions 1 II. How to Get Service 3 III. Starting Your Engine 7 VI. Transporting Your Engine 21 IX. Safety Definitions ii I. Maintenance Intervals 24 California & US EPA Emission Control Warranty Statement.......... 28 Emission Control System Warranty 29 XII. LV148EA/LV148XA LV156EA/LV156XA LV195EA/LV195XA (LEV90-120) Four-Cycle Engine • Vertical Crankshaft &#...Maintenance 13 VIII. Stopping Your Engine and Short-Term Storage 13 VII. Preventing Forest, Brush and Grass Fires 24 XI. Storing Your Engine 22 X. Before Starting Your Engine 4 V.
General Safety Precautions 1 II. How to Get Service 3 III. Starting Your Engine 7 VI. Transporting Your Engine 21 IX. Safety Definitions ii I. Maintenance Intervals 24 California & US EPA Emission Control Warranty Statement.......... 28 Emission Control System Warranty 29 XII. LV148EA/LV148XA LV156EA/LV156XA LV195EA/LV195XA (LEV90-120) Four-Cycle Engine • Vertical Crankshaft &#...Maintenance 13 VIII. Stopping Your Engine and Short-Term Storage 13 VII. Preventing Forest, Brush and Grass Fires 24 XI. Storing Your Engine 22 X. Before Starting Your Engine 4 V.

Operator Manual
Page 3
...To prevent injury or death from Rotating Parts NEVER operate the engine with potential sources of the engine, especially by mouth. Avoid Accidental Starts" instructions on page 2. D. The equipment manufacturer may be drawn into a building through openings such as barns, garages, basements, carports... leading to ventilate engine exhaust with a capacity of safely and responsibly operating, maintaining and/or fueling it is allowed to start the engine if an adult has determined they are highly flammable and can cause headaches, dizziness, drowsiness, nausea, confusion and ...
...To prevent injury or death from Rotating Parts NEVER operate the engine with potential sources of the engine, especially by mouth. Avoid Accidental Starts" instructions on page 2. D. The equipment manufacturer may be drawn into a building through openings such as barns, garages, basements, carports... leading to ventilate engine exhaust with a capacity of safely and responsibly operating, maintaining and/or fueling it is allowed to start the engine if an adult has determined they are highly flammable and can cause headaches, dizziness, drowsiness, nausea, confusion and ...

Operator Manual
Page 4
... hearing damage. Typical Grounding Post/Spark Plug Connection Page 2 Four-Cycle Engine • Vertical Crankshaft • Air-Cooled 181-1215-14 Avoid Accidental Starts To prevent accidental starting when working on fun-carts, go-karts, or mini-bikes can burn, including grass and leaves, away from spark plug. TecumsehPower Company manufactures the...
... hearing damage. Typical Grounding Post/Spark Plug Connection Page 2 Four-Cycle Engine • Vertical Crankshaft • Air-Cooled 181-1215-14 Avoid Accidental Starts To prevent accidental starting when working on fun-carts, go-karts, or mini-bikes can burn, including grass and leaves, away from spark plug. TecumsehPower Company manufactures the...

Operator Manual
Page 6
...; Vertical Crankshaft • Air-Cooled 181-1215-14 Fuel Use unleaded regular, unleaded premium or reformulated automotive fuel only. Before Starting Your Engine A. Table 1. Recommended Oil TecumsehPower Recommended Oil Usage Straight Grade TecumsehPower Part No. 730225A or SAE 30W Multi Grade ...available at your Authorized TecumsehPower Servicing Dealer for long periods. • NEVER mix oil with high alcohol content can cause hard starting, poor engine performance, and may use gasoline containing the components identified in Table 2. • DO NOT use of oil ...
...; Vertical Crankshaft • Air-Cooled 181-1215-14 Fuel Use unleaded regular, unleaded premium or reformulated automotive fuel only. Before Starting Your Engine A. Table 1. Recommended Oil TecumsehPower Recommended Oil Usage Straight Grade TecumsehPower Part No. 730225A or SAE 30W Multi Grade ...available at your Authorized TecumsehPower Servicing Dealer for long periods. • NEVER mix oil with high alcohol content can cause hard starting, poor engine performance, and may use gasoline containing the components identified in Table 2. • DO NOT use of oil ...

Operator Manual
Page 8
... (see Table 2 and "III. Be sure engine is outdoors and in the tank to allow children to cool before starting engine. NOTE For recommended fuel, see equipment manufacturer's instructions) is spilled DO NOT start engine. See Figure 11. C. See Figure 7 on page 4. Oil and Fuel Specifications" instructions on page 5. Leave space in...
... (see Table 2 and "III. Be sure engine is outdoors and in the tank to allow children to cool before starting engine. NOTE For recommended fuel, see equipment manufacturer's instructions) is spilled DO NOT start engine. See Figure 11. C. See Figure 7 on page 4. Oil and Fuel Specifications" instructions on page 5. Leave space in...
Operator Manual
Page 9
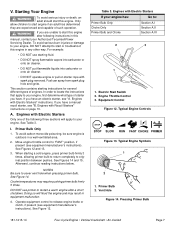
...ignite. Engines with Electric Starters Only one of starter you are experienced and capable of engines. Primer Bulb Only 1. DO NOT use starting fluid. • DO NOT spray flammable vapors into carburetor or onto air cleaner. • DO NOT put flammable liquids into ...following three sections will flood the engine and may require pushing primer bulb firmly 5 times. For example: • DO NOT use primer to start or troubleshoot this engine in this engine. Typical Engine Symbols 1 2 1. Engine Throttle Control 3. If you have an electric starter, see ...
...ignite. Engines with Electric Starters Only one of starter you are experienced and capable of engines. Primer Bulb Only 1. DO NOT use starting fluid. • DO NOT spray flammable vapors into carburetor or onto air cleaner. • DO NOT put flammable liquids into ...following three sections will flood the engine and may require pushing primer bulb firmly 5 times. For example: • DO NOT use primer to start or troubleshoot this engine in this engine. Typical Engine Symbols 1 2 1. Engine Throttle Control 3. If you have an electric starter, see ...

Operator Manual
Page 10
..." Position Figure 16. Page 8 Four-Cycle Engine • Vertical Crankshaft • Air-Cooled 181-1215-14 See Figures 12, 13 and 16 starting on page 7. Afterward, continue reading instructions below . See Figure 12 on page 7. NOTE DO NOT operate an electric starter for more than 5 ...Move engine throttle control to "FAST" position: a. Muffler 65 4 Figure 15. "SLOW" Position 2. II. See Figures 12, 13 and 16 starting on page 7. DO NOT attempt to "FAST "position. Push starter button or turn ignition switch key to desired speed in any other way. When ...
..." Position Figure 16. Page 8 Four-Cycle Engine • Vertical Crankshaft • Air-Cooled 181-1215-14 See Figures 12, 13 and 16 starting on page 7. Afterward, continue reading instructions below . See Figure 12 on page 7. NOTE DO NOT operate an electric starter for more than 5 ...Move engine throttle control to "FAST" position: a. Muffler 65 4 Figure 15. "SLOW" Position 2. II. See Figures 12, 13 and 16 starting on page 7. DO NOT attempt to "FAST "position. Push starter button or turn ignition switch key to desired speed in any other way. When ...

Operator Manual
Page 11
...outdoors in equipment malfunction. 4. Move engine throttle control to cover vent hole when pressing primer bulb. NOTES Be sure to "CHOKE" or "START" position, if present (see equipment manufacturer's instructions). NOTE DO NOT operate an electric starter for more than 5 seconds each attempt. 5. ...b. See Figures 17 thru 19. Typical Engine Symbols 3 2 1 1. "FAST" Position Figure 19. III. See "I. When starting on page 7. DO NOT use primer to original position between pushes. Doing so will flood the engine and may require pushing primer bulb firmly 5 times...
...outdoors in equipment malfunction. 4. Move engine throttle control to cover vent hole when pressing primer bulb. NOTES Be sure to "CHOKE" or "START" position, if present (see equipment manufacturer's instructions). NOTE DO NOT operate an electric starter for more than 5 seconds each attempt. 5. ...b. See Figures 17 thru 19. Typical Engine Symbols 3 2 1 1. "FAST" Position Figure 19. III. See "I. When starting on page 7. DO NOT use primer to original position between pushes. Doing so will flood the engine and may require pushing primer bulb firmly 5 times...

Operator Manual
Page 12
...3. To avoid carbon monoxide poisoning, be sure engine is outdoors in the "FAST" position, move engine throttle control to start engine. 8. Start/Choke Control Positions Page 10 Four-Cycle Engine • Vertical Crankshaft • Air-Cooled 181-1215-14 If engine fires ...but does NOT continue to run, move engine throttle control to "CHOKE" position and start after 3 attempts in a well-ventilated area. 2. Engines with Recoil Starters If your engine. Equipment Control Figure 21. Typical Engine Symbols 3 2 ...
...3. To avoid carbon monoxide poisoning, be sure engine is outdoors in the "FAST" position, move engine throttle control to start engine. 8. Start/Choke Control Positions Page 10 Four-Cycle Engine • Vertical Crankshaft • Air-Cooled 181-1215-14 If engine fires ...but does NOT continue to run, move engine throttle control to "CHOKE" position and start after 3 attempts in a well-ventilated area. 2. Engines with Recoil Starters If your engine. Equipment Control Figure 21. Typical Engine Symbols 3 2 ...

Operator Manual
Page 13
...release engine brake or clutch, if present (see equipment manufacturer's instructions). Next, move engine throttle control to "CHOKE" or "START" position, if present (see equipment manufacturer's instructions). Choke Only 1. Afterward, continue reading instructions below . Grasp starter cord handle.... II. Move engine throttle control to "FAST" position instead of "CHOKE" or "START" position. Move engine throttle control back to release engine brake or clutch, if present (see equipment manufacturer's instructions). DO...
...release engine brake or clutch, if present (see equipment manufacturer's instructions). Next, move engine throttle control to "CHOKE" or "START" position, if present (see equipment manufacturer's instructions). Choke Only 1. Afterward, continue reading instructions below . Grasp starter cord handle.... II. Move engine throttle control to "FAST" position instead of "CHOKE" or "START" position. Move engine throttle control back to release engine brake or clutch, if present (see equipment manufacturer's instructions). DO...

Operator Manual
Page 14
... restart a warm engine after following steps 1 thru 8, contact your Authorized Tecumseh Servicing Dealer. Return rope slowly to "CHOKE" or "START" position, if present (see equipment manufacturer's instructions). NOTES If engine starts but does NOT continue to run, move engine throttle control to restart engine...a. Move engine throttle control to retract, continue pulling rope with one rapid full arm stroke. If engine does NOT start engine. 8. When starting a cold engine, push primer bulb firmly 3 times, allowing primer bulb to return completely to the recoil mechanism. ...
... restart a warm engine after following steps 1 thru 8, contact your Authorized Tecumseh Servicing Dealer. Return rope slowly to "CHOKE" or "START" position, if present (see equipment manufacturer's instructions). NOTES If engine starts but does NOT continue to run, move engine throttle control to restart engine...a. Move engine throttle control to retract, continue pulling rope with one rapid full arm stroke. If engine does NOT start engine. 8. When starting a cold engine, push primer bulb firmly 3 times, allowing primer bulb to return completely to the recoil mechanism. ...

Operator Manual
Page 15
... it away from metal parts where arcing could occur. • Carefully attach the spark plug wire to serious injury or death. WWAARRNNININGG To prevent accidental starting when working on equipment, always: • Carefully disconnect spark plug wire and keep it is warm. Disconnecting/Connecting Spark Plug 1 2 1.
... it away from metal parts where arcing could occur. • Carefully attach the spark plug wire to serious injury or death. WWAARRNNININGG To prevent accidental starting when working on equipment, always: • Carefully disconnect spark plug wire and keep it is warm. Disconnecting/Connecting Spark Plug 1 2 1.

Operator Manual
Page 16
I. See Figures 30 and 31. Avoid Accidental Starts" instructions on and tightened securely. Be sure fuel fill cap is on page 2. Carefully turn engine on the side with the carburetor side up . Typical ...
I. See Figures 30 and 31. Avoid Accidental Starts" instructions on and tightened securely. Be sure fuel fill cap is on page 2. Carefully turn engine on the side with the carburetor side up . Typical ...

Operator Manual
Page 17
... oil level to fall below . Figure 35. Wipe away any spilled oil. 12. Grounding Post Connection 2. Doing so may result in oil carry-over to start engine. Disconnecting/Connecting Spark Plug 1 2 11. NOTES The oil filter if so equipped, should be changed more often if the engine is operated in extremely...
... oil level to fall below . Figure 35. Wipe away any spilled oil. 12. Grounding Post Connection 2. Doing so may result in oil carry-over to start engine. Disconnecting/Connecting Spark Plug 1 2 11. NOTES The oil filter if so equipped, should be changed more often if the engine is operated in extremely...

Operator Manual
Page 18
... Four-Cycle Engine • Vertical Crankshaft • Air-Cooled 181-1215-14 II. Oil Fill Cap/Dipstick" instructions on and tightened securely. See "G" Avoid Accidental Starts" instructions on the engine (see equipment manufacturer's instructions). 6. Remove oil drain plug and drain oil into an approved recyclable oil container. Afterward, continue reading instructions...
... Four-Cycle Engine • Vertical Crankshaft • Air-Cooled 181-1215-14 II. Oil Fill Cap/Dipstick" instructions on and tightened securely. See "G" Avoid Accidental Starts" instructions on the engine (see equipment manufacturer's instructions). 6. Remove oil drain plug and drain oil into an approved recyclable oil container. Afterward, continue reading instructions...

Operator Manual
Page 19
... securely. Figure 43. NOTES The oil filter if so equipped, should be changed more often if the engine is operated in oil carry-over to start engine. Spark Plug Connection Figure 44. Typical Grounding Post/Spark Plug Connection Figure 45. Doing so may result in extremely dusty or dirty conditions. Wipe...
... securely. Figure 43. NOTES The oil filter if so equipped, should be changed more often if the engine is operated in oil carry-over to start engine. Spark Plug Connection Figure 44. Typical Grounding Post/Spark Plug Connection Figure 45. Doing so may result in extremely dusty or dirty conditions. Wipe...

Operator Manual
Page 20
... Authorized TecumsehPower Servicing Dealer for discoloration or dirt accumulation. Your air cleaner periodically needs to -.030 in . (0.76 mm) Gap 2. See Figures 48 thru 52 starting on page 19. Afterward, continue reading instructions below : 1. Afterward, continue reading instructions below. Air Intake Screen 3. Levers and Linkage Figure 46.
... Authorized TecumsehPower Servicing Dealer for discoloration or dirt accumulation. Your air cleaner periodically needs to -.030 in . (0.76 mm) Gap 2. See Figures 48 thru 52 starting on page 19. Afterward, continue reading instructions below : 1. Afterward, continue reading instructions below. Air Intake Screen 3. Levers and Linkage Figure 46.

Operator Manual
Page 25
... from spark plug hole. Pull out slowly using a full arm stroke. Draining Fuel NOTES Clean debris from engine before attempting to "START" position. If you operate the engine during storage.) 7. WWAARRNNININGG To avoid serious injury or death, DO NOT pour fuel from spark...53. Battery See equipment manufacturer's instructions for short-term storage it is consumed. Immediately release starter button or turn ignition switch key to start engine. Oil Cylinder Bore" instructions. Grounding Post Connection 2. Install spark plug. 9. Push starter button or turn ignition switch key to...
... from spark plug hole. Pull out slowly using a full arm stroke. Draining Fuel NOTES Clean debris from engine before attempting to "START" position. If you operate the engine during storage.) 7. WWAARRNNININGG To avoid serious injury or death, DO NOT pour fuel from spark...53. Battery See equipment manufacturer's instructions for short-term storage it is consumed. Immediately release starter button or turn ignition switch key to start engine. Oil Cylinder Bore" instructions. Grounding Post Connection 2. Install spark plug. 9. Push starter button or turn ignition switch key to...

