Operation Manual
Page 5
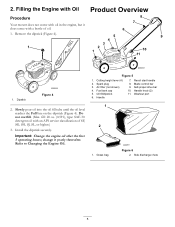
...API service classification of oil. 1. Refer to Changing the Engine Oil. 1. 2. Filling the Engine with Oil Product Overview Procedure Your mower does not come with oil in the engine, but it yearly thereafter. Spark plug 3. Washout port 2. Install the dipstick securely. change... 6 2. Dipstick Figure 4 Figure 5 1. Fuel tank cap 5. Handle 7. Side discharge chute 5 Remove the dipstick (Figure 4). 1. Handle knob (2) 11. Air filter (not shown) 4. Do not overfill. (Max. Slowly pour oil into the oil fill tube until the oil level reaches the Full line on the dipstick...
...API service classification of oil. 1. Refer to Changing the Engine Oil. 1. 2. Filling the Engine with Oil Product Overview Procedure Your mower does not come with oil in the engine, but it yearly thereafter. Spark plug 3. Washout port 2. Install the dipstick securely. change... 6 2. Dipstick Figure 4 Figure 5 1. Fuel tank cap 5. Handle 7. Side discharge chute 5 Remove the dipstick (Figure 4). 1. Handle knob (2) 11. Air filter (not shown) 4. Do not overfill. (Max. Slowly pour oil into the oil fill tube until the oil level reaches the Full line on the dipstick...

Operation Manual
Page 11
...remove the fuel. Run the engine dry or remove the gasoline with the air filter up. tip the mower prior to running out of the machine from an Authorized Service Dealer (go to www.toro.com to the spark plug. never siphon. Note: Replacement parts are available... from the normal operating position. Disconnect the spark plug wire from under the mower. • Replace the air filter; Recommended Maintenance Schedule(s) Maintenance Service Interval After ...
...remove the fuel. Run the engine dry or remove the gasoline with the air filter up. tip the mower prior to running out of the machine from an Authorized Service Dealer (go to www.toro.com to the spark plug. never siphon. Note: Replacement parts are available... from the normal operating position. Disconnect the spark plug wire from under the mower. • Replace the air filter; Recommended Maintenance Schedule(s) Maintenance Service Interval After ...

Operation Manual
Page 12
...mower onto its side with an API service classification of the used oil out through the oil fill tube (Figure 18). Warm oil flows better and carries more contaminants. 1. fill: 20 oz. (0.59 l), type: SAE 30 detergent oil with the air filter up to open the air filter cover (Figure 15). Replace the air filter... Preparing for Maintenance. 2. Figure 18 4. Use a screw driver to drain the used oil properly at a local recycling center. 12 Replacing the Air Filter Service Interval: Every 25 hours 1. Remove the dipstick (Figure 17). Dispose of SF, SG, SH, SJ, SL, or higher.) 5.
...mower onto its side with an API service classification of the used oil out through the oil fill tube (Figure 18). Warm oil flows better and carries more contaminants. 1. fill: 20 oz. (0.59 l), type: SAE 30 detergent oil with the air filter up to open the air filter cover (Figure 15). Replace the air filter... Preparing for Maintenance. 2. Figure 18 4. Use a screw driver to drain the used oil properly at a local recycling center. 12 Replacing the Air Filter Service Interval: Every 25 hours 1. Remove the dipstick (Figure 17). Dispose of SF, SG, SH, SJ, SL, or higher.) 5.

Operation Manual
Page 13
... Refer to 60 ft-lb (82 N-m). Tip the mower onto its side with a block of wood to hold the blade steady (Figure 19). Use a torque wrench to tighten the blade bolt to Preparing for Maintenance. 2. While holding the blade with the air filter up. 3. Wear gloves when servicing the blade. 1....20 Important: Position the curved ends of gasoline. Replacing the Blade Service Interval: Yearly Important: You will need a torque wrench to point toward the mower housing. 6. Figure 19 4. Remove the blade, saving all mounting hardware (Figure 20). 13 Use a block of wood, put your weight behind ...
... Refer to 60 ft-lb (82 N-m). Tip the mower onto its side with a block of wood to hold the blade steady (Figure 19). Use a torque wrench to tighten the blade bolt to Preparing for Maintenance. 2. While holding the blade with the air filter up. 3. Wear gloves when servicing the blade. 1....20 Important: Position the curved ends of gasoline. Replacing the Blade Service Interval: Yearly Important: You will need a torque wrench to point toward the mower housing. 6. Figure 19 4. Remove the blade, saving all mounting hardware (Figure 20). 13 Use a block of wood, put your weight behind ...


