
Parts Catalog
Page 3
Contents Housing Assembly 4 Rear Wheel and Height-of-Cut Assembly 5 Transmission, Front Wheel and Height-of-Cut Assembly 6 Engine and Blade Assembly 7 Handle Assembly 8 Rear Bag Assembly 9 Attachments and Accessories 10 3
Contents Housing Assembly 4 Rear Wheel and Height-of-Cut Assembly 5 Transmission, Front Wheel and Height-of-Cut Assembly 6 Engine and Blade Assembly 7 Handle Assembly 8 Rear Bag Assembly 9 Attachments and Accessories 10 3

Parts Catalog
Page 7
Part Number Qty. Description 1 1 Engine-Briggs, 126T02-0299-B1 ● ■ 2 105-3031-03 1 Guide-Belt 3 106-3999 1 Spacer-Driver 4 106-3987 1 Blade Driver ASM 5 108-9764-03 1 Blade-22 Inch 6 108-3766-03 1 Support-Blade 7 105-8579 1 Bolt-Blade 8 95-1726 3 Screw-Taptite 9 104-7577-03 1 Shield-Muffler 10 32144-1 3 Screw-Taptite 11 2210-316 1 Stop-Rope 12 117-1017 1 Decal ● Not serviced separately 06 ■ Obtain parts from www.briggsandstratton.com 7 3365-712A Engine and Blade Assembly Ref.
Part Number Qty. Description 1 1 Engine-Briggs, 126T02-0299-B1 ● ■ 2 105-3031-03 1 Guide-Belt 3 106-3999 1 Spacer-Driver 4 106-3987 1 Blade Driver ASM 5 108-9764-03 1 Blade-22 Inch 6 108-3766-03 1 Support-Blade 7 105-8579 1 Bolt-Blade 8 95-1726 3 Screw-Taptite 9 104-7577-03 1 Shield-Muffler 10 32144-1 3 Screw-Taptite 11 2210-316 1 Stop-Rope 12 117-1017 1 Decal ● Not serviced separately 06 ■ Obtain parts from www.briggsandstratton.com 7 3365-712A Engine and Blade Assembly Ref.

Operation Manual
Page 1
...safety messages identified by the safety alert symbol CALIFORNIA Proposition 65 Warning The engine exhaust from an Authorized Service Dealer or at www.Toro.com. Other states or federal areas may contact Toro directly at www.Toro.com for information regarding the US Environmental Protection Agency (EPA) and ...information worthy of the model and serial numbers on any forest-covered, brush-covered, or grass-covered land. 22in Recycler® Lawn Mower Model No. 20330-Serial No. 290000001 and Up Model No. 20330C-Serial No. 290000001 and Up Model No. 20331-Serial No. 290000001 and Up ...
...safety messages identified by the safety alert symbol CALIFORNIA Proposition 65 Warning The engine exhaust from an Authorized Service Dealer or at www.Toro.com. Other states or federal areas may contact Toro directly at www.Toro.com for information regarding the US Environmental Protection Agency (EPA) and ...information worthy of the model and serial numbers on any forest-covered, brush-covered, or grass-covered land. 22in Recycler® Lawn Mower Model No. 20330-Serial No. 290000001 and Up Model No. 20330C-Serial No. 290000001 and Up Model No. 20331-Serial No. 290000001 and Up ...

Operation Manual
Page 2
.... Only use accessories approved by the blade. Stay behind the handle when the engine is running machine unattended. • Stop the engine and wait until the blade comes to a complete stop the engine and check for walk-behind before starting . • Do not put hands or feet near drop...-offs, ditches, or embankments. Exercise extreme caution when changing direction on this mower could cause a slip and fall accident. Poor footing could...
.... Only use accessories approved by the blade. Stay behind the handle when the engine is running machine unattended. • Stop the engine and wait until the blade comes to a complete stop the engine and check for walk-behind before starting . • Do not put hands or feet near drop...-offs, ditches, or embankments. Exercise extreme caution when changing direction on this mower could cause a slip and fall accident. Poor footing could...

Operation Manual
Page 3
... on a truck or trailer bed with manufacturer's recommended parts, when necessary. • Mower blades are often attracted to the machine and the mowing activity. Allow engine to cool before filling. • Remove gas-powered equipment from the truck or trailer and refuel it on the ground away from a gasoline...rim of grass, leaves, or other sources of Gasoline To avoid personal injury or property damage, use extreme care in contact with the engine running . Never assume that can occur if the operator is not alert to the presence of a child. Disconnect the spark plug wire...
... on a truck or trailer bed with manufacturer's recommended parts, when necessary. • Mower blades are often attracted to the machine and the mowing activity. Allow engine to cool before filling. • Remove gas-powered equipment from the truck or trailer and refuel it on the ground away from a gasoline...rim of grass, leaves, or other sources of Gasoline To avoid personal injury or property damage, use extreme care in contact with the engine running . Never assume that can occur if the operator is not alert to the presence of a child. Disconnect the spark plug wire...

Operation Manual
Page 4
...operate up . Cutting/dismemberment hazard of hand or foot, mower blade-remove the ignition key and read the Operator's Manual. 2. Figure 3 2. Install and tighten the handle knobs that covers the engine. 1. Important: Remove and discard the protective plastic sheet that...you install the handle. 114-7982 1. Thrown object hazard-keep bystanders a safe distance from the mower housing (Figure 3). operate side to the operating position. 3. stop the engine before servicing or performing maintenance. 4. Remove the handle knobs from the machine. 3. Cutting/dismemberment ...
...operate up . Cutting/dismemberment hazard of hand or foot, mower blade-remove the ignition key and read the Operator's Manual. 2. Figure 3 2. Install and tighten the handle knobs that covers the engine. 1. Important: Remove and discard the protective plastic sheet that...you install the handle. 114-7982 1. Thrown object hazard-keep bystanders a safe distance from the mower housing (Figure 3). operate side to the operating position. 3. stop the engine before servicing or performing maintenance. 4. Remove the handle knobs from the machine. 3. Cutting/dismemberment ...
Operation Manual
Page 5
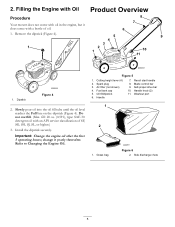
...Do not overfill. (Max. Spark plug 3. Oil fill/dipstick 6. change it does come with oil in the engine, but it yearly thereafter. Important: Change the engine oil after the first 5 operating hours; Refer to Changing the Engine Oil. 1. Dipstick Figure 4 Figure 5 1. Washout port 2. Side discharge chute 5 Recoil start handle 8. Grass ...fill: 20 oz. (0.59 l), type: SAE 30 detergent oil with a bottle of SF, SG, SH, SJ, SL, or higher.) 3. Filling the Engine with Oil Product Overview Procedure Your mower does not come with an API service classification of oil. 1.
...Do not overfill. (Max. Spark plug 3. Oil fill/dipstick 6. change it does come with oil in the engine, but it yearly thereafter. Important: Change the engine oil after the first 5 operating hours; Refer to Changing the Engine Oil. 1. Dipstick Figure 4 Figure 5 1. Washout port 2. Side discharge chute 5 Recoil start handle 8. Grass ...fill: 20 oz. (0.59 l), type: SAE 30 detergent oil with a bottle of SF, SG, SH, SJ, SL, or higher.) 3. Filling the Engine with Oil Product Overview Procedure Your mower does not come with an API service classification of oil. 1.

Operation Manual
Page 6
...will be damaged. Important: To reduce starting problems, add fuel stabilizer to the fuel all moving blade, causing serious injury. • Stop the engine and wait for all season, mixing it clean, and fully install the dipstick (Figure 8). Do not overfill. (Max. A fire or explosion...Operation Filling the Fuel Tank Checking the Engine Oil Level Service Interval: Before each use methanol, gasoline containing methanol, or gasohol containing more than 30 days old. 1. Keep away from igniting the gasoline, place the container and/or mower directly on the dipstick. Remove the ...
...will be damaged. Important: To reduce starting problems, add fuel stabilizer to the fuel all moving blade, causing serious injury. • Stop the engine and wait for all season, mixing it clean, and fully install the dipstick (Figure 8). Do not overfill. (Max. A fire or explosion...Operation Filling the Fuel Tank Checking the Engine Oil Level Service Interval: Before each use methanol, gasoline containing methanol, or gasohol containing more than 30 days old. 1. Keep away from igniting the gasoline, place the container and/or mower directly on the dipstick. Remove the ...

Operation Manual
Page 7
... all the cutting height levers forward (Figure 9). Recoil start after several attempts, contact an Authorized Service Dealer. Starting the Engine 1. Lower the mower Note: The cutting height settings are 1 inch (25 mm); 1-3/8 inches (35 mm); 1-3/4 inches (44 mm); 2-1/8 inches (54 mm); 2-1/2 inches (64 mm); 2-7/8 inches ... to the same height as desired. Figure 11 1. Hold the blade control bar against the handle (Figure 10). 1. Set the front wheels to the handle slowly (Figure 10). Using the Self-propel Drive To operate the self-propel drive, squeeze the self-propel drive bar ...
... all the cutting height levers forward (Figure 9). Recoil start after several attempts, contact an Authorized Service Dealer. Starting the Engine 1. Lower the mower Note: The cutting height settings are 1 inch (25 mm); 1-3/8 inches (35 mm); 1-3/4 inches (44 mm); 2-1/8 inches (54 mm); 2-1/2 inches (64 mm); 2-7/8 inches ... to the same height as desired. Figure 11 1. Hold the blade control bar against the handle (Figure 10). 1. Set the front wheels to the handle slowly (Figure 10). Using the Self-propel Drive To operate the self-propel drive, squeeze the self-propel drive bar ...

Operation Manual
Page 8
... to stop within 3 seconds. If the side discharge chute is on the mower, remove it (refer to Removing the Grass Bag) before recycling the clippings. The blade is damaged, install a new Toro replacement bag. Lower the rear deflector. Removing the Grass Bag To remove the... bag, reverse the steps above. 8 Recycling the Clippings Your mower comes from the lawn. Stopping the Engine To stop using your mower immediately and contact an Authorized Service Dealer...
... to stop within 3 seconds. If the side discharge chute is on the mower, remove it (refer to Removing the Grass Bag) before recycling the clippings. The blade is damaged, install a new Toro replacement bag. Lower the rear deflector. Removing the Grass Bag To remove the... bag, reverse the steps above. 8 Recycling the Clippings Your mower comes from the lawn. Stopping the Engine To stop using your mower immediately and contact an Authorized Service Dealer...

Operation Manual
Page 9
... the mower, remove it before leaving the operating position. Replace the blade or have it is sharp; If the bag is unsatisfactory, try one or more of sticks, stones, wire, branches, and other debris that the blade could hit. • Avoid striking solid objects with a Toro replacement blade...when grass growth begins to stop the engine, disconnect the wire from the spark plug, and examine the mower for cutting very tall grass. This helps disperse the clippings over 6 inches (15 cm) tall, mow at the highest cutting height setting and walk slower; Figure 13 Wet grass or ...
... the mower, remove it before leaving the operating position. Replace the blade or have it is sharp; If the bag is unsatisfactory, try one or more of sticks, stones, wire, branches, and other debris that the blade could hit. • Avoid striking solid objects with a Toro replacement blade...when grass growth begins to stop the engine, disconnect the wire from the spark plug, and examine the mower for cutting very tall grass. This helps disperse the clippings over 6 inches (15 cm) tall, mow at the highest cutting height setting and walk slower; Figure 13 Wet grass or ...

Operation Manual
Page 11
...'s manual for any maintenance procedure. Refer to your engine operator's manual. • Refer to remove the fuel. tip the mower prior to running out of the machine from an Authorized Service Dealer (go to www.toro.com to stop. 2. Important: Before tipping the mower to change the oil or replace the blade, allow the...
...'s manual for any maintenance procedure. Refer to your engine operator's manual. • Refer to remove the fuel. tip the mower prior to running out of the machine from an Authorized Service Dealer (go to www.toro.com to stop. 2. Important: Before tipping the mower to change the oil or replace the blade, allow the...

Operation Manual
Page 12
Replace the air filter (Figure 16). 1. Tip the mower onto its side with an API service classification of the used oil out through the oil fill tube (Figure 18). Refer to drain the used ... 30 detergent oil with the air filter up to Preparing for Maintenance. 2. Use a screw driver to warm it. Changing the Engine Oil Service Interval: After the first 5 hours Yearly Run the engine a few minutes before changing the oil to open the air filter cover (Figure 15). Figure 16 3. Warm oil flows better...
Replace the air filter (Figure 16). 1. Tip the mower onto its side with an API service classification of the used oil out through the oil fill tube (Figure 18). Refer to drain the used ... 30 detergent oil with the air filter up to Preparing for Maintenance. 2. Use a screw driver to warm it. Changing the Engine Oil Service Interval: After the first 5 hours Yearly Run the engine a few minutes before changing the oil to open the air filter cover (Figure 15). Figure 16 3. Warm oil flows better...

Operation Manual
Page 14
...is out of clarity. 2. Start the engine and run it from the housing to its lowest cutting height setting. Cleaning the Mower Service Interval: Before each use or daily The mower may dislodge material from the mower. 9. For best results, clean the mower soon after you install a new self-...propel drive is connected to a water supply to cool before storing the mower in both the fully forward and fully rearward positions. 4. Wash out the area under the mower housing. 7. Tighten the nut on . 6. Stop the engine. 8. Loosen the cable support nut (Figure 21). Adjusting the Self-...
...is out of clarity. 2. Start the engine and run it from the housing to its lowest cutting height setting. Cleaning the Mower Service Interval: Before each use or daily The mower may dislodge material from the mower. 9. For best results, clean the mower soon after you install a new self-...propel drive is connected to a water supply to cool before storing the mower in both the fully forward and fully rearward positions. 4. Wash out the area under the mower housing. 7. Tighten the nut on . 6. Stop the engine. 8. Loosen the cable support nut (Figure 21). Adjusting the Self-...

Operation Manual
Page 15
...upper handle forward as shown in an enclosure near an open flame. • Allow the engine to prevent cylinder corrosion during the off-season. 8. Install the spark plug and tighten it . 1. Run the mower until the engine stops from the cylinder. 2. Remove the spark plug, add 1 oz. (30 ml)... of fuel. 4. Loosen the handle knobs until it is sufficiently dry. 6. Preparing the Mower for Storage Gasoline vapors can no longer start handle to ...
...upper handle forward as shown in an enclosure near an open flame. • Allow the engine to prevent cylinder corrosion during the off-season. 8. Install the spark plug and tighten it . 1. Run the mower until the engine stops from the cylinder. 2. Remove the spark plug, add 1 oz. (30 ml)... of fuel. 4. Loosen the handle knobs until it is sufficiently dry. 6. Preparing the Mower for Storage Gasoline vapors can no longer start handle to ...

Operation Manual
Page 16
.... The transmission is covered under The Toro Total Coverage Guarantee The Toro Company and its affiliate, Toro Warranty Company, pursuant to correct starting procedures. Contaminants in Recycler® walk power mowers and their Toro Distributor (Dealer) to obtain guarantee policies...so the above exclusions may require more than an Authorized Toro Service Dealer • Repairs or adjustments to an agreement between them , jointly guarantee that your product's engine in Recycler® Walk Power Mowers Conditions and Products Covered under warranty. 3. If all ...
.... The transmission is covered under The Toro Total Coverage Guarantee The Toro Company and its affiliate, Toro Warranty Company, pursuant to correct starting procedures. Contaminants in Recycler® walk power mowers and their Toro Distributor (Dealer) to obtain guarantee policies...so the above exclusions may require more than an Authorized Toro Service Dealer • Repairs or adjustments to an agreement between them , jointly guarantee that your product's engine in Recycler® Walk Power Mowers Conditions and Products Covered under warranty. 3. If all ...

Service Manual
Page 7
...Toro Vacu Power/Lawn-Boy Medallion 6-15 Under Deck Components Assembly (Toro Vacu Power/Lawn-Boy Medallion 6-17 BBC Cable Removal (Toro Vacu Power/Lawn-Boy Medallion 6-19 BBC Cable Installation (Toro Vacu Power/Lawn-Boy Medallion 6-20 ENGINE & BLADE ASSEMBLY (Toro Recycler/Rear Bagger 6-21 TORO...10 Installation 4-10 Special Assembly Notes for Toro Vacu Power/Lawn-Boy Medallion 4-11 TROUBLESHOOTING TIPS - 3 SPEED TRANSMISSION Hard Shifting 4-12 Slipping Gears 4-12 WHEEL PINION CLUTCH GEAR CASE & WHEEL ASSEMBLY, ROCKING KEY STYLE 5-2 Wheel Pinion Clutch 5-3 Component Definitions ...
...Toro Vacu Power/Lawn-Boy Medallion 6-15 Under Deck Components Assembly (Toro Vacu Power/Lawn-Boy Medallion 6-17 BBC Cable Removal (Toro Vacu Power/Lawn-Boy Medallion 6-19 BBC Cable Installation (Toro Vacu Power/Lawn-Boy Medallion 6-20 ENGINE & BLADE ASSEMBLY (Toro Recycler/Rear Bagger 6-21 TORO...10 Installation 4-10 Special Assembly Notes for Toro Vacu Power/Lawn-Boy Medallion 4-11 TROUBLESHOOTING TIPS - 3 SPEED TRANSMISSION Hard Shifting 4-12 Slipping Gears 4-12 WHEEL PINION CLUTCH GEAR CASE & WHEEL ASSEMBLY, ROCKING KEY STYLE 5-2 Wheel Pinion Clutch 5-3 Component Definitions ...

Service Manual
Page 20
... Gear D. Shift Fork F. A shift fork moves the clutch jaw to maintain tension on 21" front wheel drive mowers. Spring C. Input Shaft (worm shaft) A B E CDF G 1-2 Fig 001 fig 1 WPM... Drive Systems Manual The second version is constant mesh and is ) and to the mower housing, pivots the transmission forward to engage and disengage the transmission. INTERNALLY CLUTCHED Description This is ...axle then begins to the axle. When the clutch jaw engages the helical gear, power is provided by a belt from the clutch jaw to the sleeve inside the clutch jaw. ...
... Gear D. Shift Fork F. A shift fork moves the clutch jaw to maintain tension on 21" front wheel drive mowers. Spring C. Input Shaft (worm shaft) A B E CDF G 1-2 Fig 001 fig 1 WPM... Drive Systems Manual The second version is constant mesh and is ) and to the mower housing, pivots the transmission forward to engage and disengage the transmission. INTERNALLY CLUTCHED Description This is ...axle then begins to the axle. When the clutch jaw engages the helical gear, power is provided by a belt from the clutch jaw to the sleeve inside the clutch jaw. ...

Service Manual
Page 27
...Tool P/N 27-0490 Fig 019 3428-0159 A. Plug 3428-0166 6. There are two control cables used with gear oil AFTER it in the mower. If the bearing in the cover is fully seated in bearing. 7. Fill the transmission with this transmission is installed in place. One cable ...operates the engine kill switch and flywheel brake; It will leak if tipped on the bottom case and start the 4 self-tapping screws. A A B A. ...
...Tool P/N 27-0490 Fig 019 3428-0159 A. Plug 3428-0166 6. There are two control cables used with gear oil AFTER it in the mower. If the bearing in the cover is fully seated in bearing. 7. Fill the transmission with this transmission is installed in place. One cable ...operates the engine kill switch and flywheel brake; It will leak if tipped on the bottom case and start the 4 self-tapping screws. A A B A. ...

Service Manual
Page 31
Remove the retaining rings, springs, gears, keys, clutches, and pivot arms on both rear wheels. 2. Stop the engine. 3. Each bracket has 2 screws. Cable fig 19 Adjusting Wheel Traction Drive 1. To check the adjustment, slowly squeeze the control bar towards the handle. WPM Drive Systems ... 3. Knob Fig 024 2. The cable is adjusted correctly when resistance is felt when the control bar is approximately 1" (25mm) from the mower proceed as follows: 1. Once they are removed, the transmission will drop out. Hold the control cable while rotating the knob to the chassis...
Remove the retaining rings, springs, gears, keys, clutches, and pivot arms on both rear wheels. 2. Stop the engine. 3. Each bracket has 2 screws. Cable fig 19 Adjusting Wheel Traction Drive 1. To check the adjustment, slowly squeeze the control bar towards the handle. WPM Drive Systems ... 3. Knob Fig 024 2. The cable is adjusted correctly when resistance is felt when the control bar is approximately 1" (25mm) from the mower proceed as follows: 1. Once they are removed, the transmission will drop out. Hold the control cable while rotating the knob to the chassis...


