Owner's Manual
Page 6
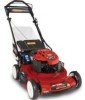
... Changing the Engine Oil. [3 Charging the Battery No Parts Required Procedure Electric-start handle 7. Blade control bar 3. Bag-on the dipstick reads Full. Grass bag 2. Oil fill/dipstick 12. Recoil start models only Refer to Charging the Battery in the Maintenance section. Spark ... height lever (4) 9. Important: Do not overfill the crankcase oil and run the engine. Ignition key (electric-start models only) Product Overview 1 2 3 4 5 6 7 8 11 10 9 Figure 5 G009503 1. Air filter 10. with oil until 6. Battery charger (electric-start 8. Side discharge chute 3.
... Changing the Engine Oil. [3 Charging the Battery No Parts Required Procedure Electric-start handle 7. Blade control bar 3. Bag-on the dipstick reads Full. Grass bag 2. Oil fill/dipstick 12. Recoil start models only Refer to Charging the Battery in the Maintenance section. Spark ... height lever (4) 9. Important: Do not overfill the crankcase oil and run the engine. Ignition key (electric-start models only) Product Overview 1 2 3 4 5 6 7 8 11 10 9 Figure 5 G009503 1. Air filter 10. with oil until 6. Battery charger (electric-start 8. Side discharge chute 3.

Owner's Manual
Page 14
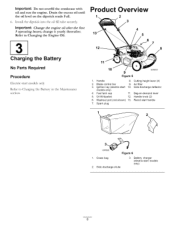
... edge dulls quickly). • Clean the air cooling system; Always tip the mower onto its side, with a hand pump; Tipping Gasoline personal the mower may cause the fuel to stop. 2. Maintenance...: Refer to remove the fuel. Stop the engine and wait for 24 hours (electric-start models only). • Empty the fuel tank before repairs as directed and before ...never siphon. Figure 18 G009500 . Note: Replacement parts are available from under the mower. • Replace the air filter; Recommended Maintenance Schedule(s) Maintenance Service Interval After the first 5 hours Before each ...
... edge dulls quickly). • Clean the air cooling system; Always tip the mower onto its side, with a hand pump; Tipping Gasoline personal the mower may cause the fuel to stop. 2. Maintenance...: Refer to remove the fuel. Stop the engine and wait for 24 hours (electric-start models only). • Empty the fuel tank before repairs as directed and before ...never siphon. Figure 18 G009500 . Note: Replacement parts are available from under the mower. • Replace the air filter; Recommended Maintenance Schedule(s) Maintenance Service Interval After the first 5 hours Before each ...
Owner's Manual
Page 15
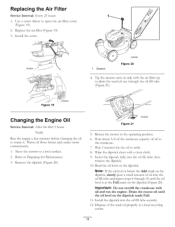
...better and carries more contaminants. 1. Return the mower to a level surface. 2. Use a screw driver to warm it. Insert the dipstick fury into the oil fill tube secure1> 12. Dipstick Figure 20 , Tip the mower onto its side with the air filter up to settle. 8. Read the oil level... on the dipstick reads Full. 11. Replace the air filter (Figure 19). 3. Figure 21 ooo 5. Pour about 3/4 of the crankcase ...
...better and carries more contaminants. 1. Return the mower to a level surface. 2. Use a screw driver to warm it. Insert the dipstick fury into the oil fill tube secure1> 12. Dipstick Figure 20 , Tip the mower onto its side with the air filter up to settle. 8. Read the oil level... on the dipstick reads Full. 11. Replace the air filter (Figure 19). 3. Figure 21 ooo 5. Pour about 3/4 of the crankcase ...
Owner's Manual
Page 17
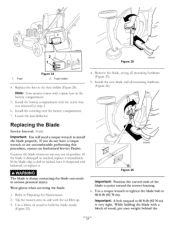
...• 5. While holding the blade with a spare fuse in step 3. 51 \ 1 Figure 25 G005454 1. Fuse holder 4• Replace the fuse in serious personal injury. If you do not have it sharpened and balanced, or replace it immediatel3: If the blade edge is sharp; If the blade is damaged... curved ends of wood to hold the blade steady (Figure 25). , Remove the blade, saving all mounting hardware (Figure 26). with the air filter up. 3. Tip the mower onto its side with the screw that 6. Refer to 60 ft-lb (82 N-m). Install the new blade and all mounting hardware (Figure 25...
...• 5. While holding the blade with a spare fuse in step 3. 51 \ 1 Figure 25 G005454 1. Fuse holder 4• Replace the fuse in serious personal injury. If you do not have it sharpened and balanced, or replace it immediatel3: If the blade edge is sharp; If the blade is damaged... curved ends of wood to hold the blade steady (Figure 25). , Remove the blade, saving all mounting hardware (Figure 26). with the air filter up. 3. Tip the mower onto its side with the screw that 6. Refer to 60 ft-lb (82 N-m). Install the new blade and all mounting hardware (Figure 25...

Owner's Manual
Page 20
... provided, contact us at more than two pulls: - Neither The Toro Company nor Toro Warranty Company is no longer start on the same lot as filters, fuel, lubricants, oil changes, spark plugs, air filters blade sharpening or worn blades, cable!linkage adjustments, or brake and ... for Commercial Use) The Toro GTS Starting Guarantee A 3-Year Full Warranty (Not Applicable for Commercial Use) 22 in Recycler ¢ 20 in Mulcher/Bagger Walk Power Mowers Conditions and Products Covered Items and Conditions Not Covered The Toro Company and its affiliate, Toro Warranty Company, pursuant to...
... provided, contact us at more than two pulls: - Neither The Toro Company nor Toro Warranty Company is no longer start on the same lot as filters, fuel, lubricants, oil changes, spark plugs, air filters blade sharpening or worn blades, cable!linkage adjustments, or brake and ... for Commercial Use) The Toro GTS Starting Guarantee A 3-Year Full Warranty (Not Applicable for Commercial Use) 22 in Recycler ¢ 20 in Mulcher/Bagger Walk Power Mowers Conditions and Products Covered Items and Conditions Not Covered The Toro Company and its affiliate, Toro Warranty Company, pursuant to...


