
Owner's Manual - English
Page 6
... 36 Device code setup 36 Searching and sampling the code of a device (8500) .... 36 Using the volume lock feature (8000 37 Operational feature reset (8900 37 Multi-brand remote control device codes 38 Chapter 4: Menu layout and navigation 40 Main menu layout 40 Setup/Installation menu layout 41 Navigating... using Channel Return 76 Switching between two channels using SurfLock 76 Selecting the picture size 77 (Continued on next page) 6 Copyright © 2005 TOSHIBA CORPORATION. All rights reserved. #01E_005-007_4250HPX95 6 Black (E) 42/50HPX95 *web 213:276 05.9.12, 10:16 PM
... 36 Device code setup 36 Searching and sampling the code of a device (8500) .... 36 Using the volume lock feature (8000 37 Operational feature reset (8900 37 Multi-brand remote control device codes 38 Chapter 4: Menu layout and navigation 40 Main menu layout 40 Setup/Installation menu layout 41 Navigating... using Channel Return 76 Switching between two channels using SurfLock 76 Selecting the picture size 77 (Continued on next page) 6 Copyright © 2005 TOSHIBA CORPORATION. All rights reserved. #01E_005-007_4250HPX95 6 Black (E) 42/50HPX95 *web 213:276 05.9.12, 10:16 PM
Owner's Manual - English
Page 7
...® Windows® 2000 112 D. Set up e-mail scheduling 114 Required information and services 114 Setting up the network address 109 Resetting the network address 110 C. Contents (Continued from the TV 120 Modifying an existing recording or reminder 120 Chapter 12: Troubleshooting 121 General...United States Warranty 130 Limited Canada Warranty 131 Index 136, 137 Copyright © 2005 TOSHIBA CORPORATION. Set up file sharing on the TV 113 F. All rights reserved. 7 #01E_005-007_4250HPX95 7 Black (E) 42/50HPX95 *web 213:276 05.9.12, 10:16 PM Connect the TV to the TV...
...® Windows® 2000 112 D. Set up e-mail scheduling 114 Required information and services 114 Setting up the network address 109 Resetting the network address 110 C. Contents (Continued from the TV 120 Modifying an existing recording or reminder 120 Chapter 12: Troubleshooting 121 General...United States Warranty 130 Limited Canada Warranty 131 Index 136, 137 Copyright © 2005 TOSHIBA CORPORATION. Set up file sharing on the TV 113 F. All rights reserved. 7 #01E_005-007_4250HPX95 7 Black (E) 42/50HPX95 *web 213:276 05.9.12, 10:16 PM Connect the TV to the TV...
Owner's Manual - English
Page 9
...warranty information, see Chapter 8. 18. All rights reserved. 9 #01E_008-009_4250HPX95 9 Black (E) 42/50HPX95 *web 213:276 05.9.12, 10:16 PM Inadequate ventilation may cause overheating, which will blink ...ventilation. For details on , press and hold the POWER button for 5 or more seconds to reset the TV. 11. See page 28. 7. Observe the following when choosing a location for the...31-32) for an overview of the unit. THIS TYPE OF DAMAGE IS NOT COVERED UNDER THE TOSHIBA WARRANTY. • Read "Installation" on using the TV's features, see Chapter 13. 20. See...
...warranty information, see Chapter 8. 18. All rights reserved. 9 #01E_008-009_4250HPX95 9 Black (E) 42/50HPX95 *web 213:276 05.9.12, 10:16 PM Inadequate ventilation may cause overheating, which will blink ...ventilation. For details on , press and hold the POWER button for 5 or more seconds to reset the TV. 11. See page 28. 7. Observe the following when choosing a location for the...31-32) for an overview of the unit. THIS TYPE OF DAMAGE IS NOT COVERED UNDER THE TOSHIBA WARRANTY. • Read "Installation" on using the TV's features, see Chapter 13. 20. See...
Owner's Manual - English
Page 21
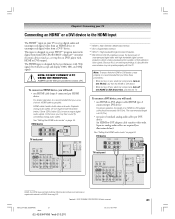
...off the HDMI or DVI device first, and then the TV. Note: To ensure that the HDMI or DVI device is reset properly, it is designed to -DVI adapter cable should not exceed 9.8 ft (3m). Separate analog audio cables are required... See "Setting the HDMI audio mode" on page 55. All rights reserved. 21 #01E_014-030_4250HPX95 21 Black (E) 42/50HPX95 *web 213:276 05.9.12, 10:17 PM ALWAYS use as short an HDMI cable as a set-top box or...HDMI, the HDMI logo and High-Definition Multimedia Interface are not required (see illustration below ). Copyright © 2005 TOSHIBA CORPORATION.
...off the HDMI or DVI device first, and then the TV. Note: To ensure that the HDMI or DVI device is reset properly, it is designed to -DVI adapter cable should not exceed 9.8 ft (3m). Separate analog audio cables are required... See "Setting the HDMI audio mode" on page 55. All rights reserved. 21 #01E_014-030_4250HPX95 21 Black (E) 42/50HPX95 *web 213:276 05.9.12, 10:17 PM ALWAYS use as short an HDMI cable as a set-top box or...HDMI, the HDMI logo and High-Definition Multimedia Interface are not required (see illustration below ). Copyright © 2005 TOSHIBA CORPORATION.

Owner's Manual - English
Page 24
... be set to adjust the sound level. All rights reserved. #01E_014-030_4250HPX95 24 Black (E) 42/50HPX95 *web 213:276 05.9.12, 10:17 PM You will need : one pair of both the... Audio Settings Advanced Audio Settings Audio Setup Audio Setup MTS Language Speakers Optical Output Format Reset Stereo English On Dolby Digital Done Turn off the built-in the same Audio Setup ...on page 93. Analog audio amplifier LINE IN LR TV back panel 24 Copyright © 2005 TOSHIBA CORPORATION. Highlight Audio Setup and press ENTER. Connecting an analog audio system Dolby Digital decoder or...
... be set to adjust the sound level. All rights reserved. #01E_014-030_4250HPX95 24 Black (E) 42/50HPX95 *web 213:276 05.9.12, 10:17 PM You will need : one pair of both the... Audio Settings Advanced Audio Settings Audio Setup Audio Setup MTS Language Speakers Optical Output Format Reset Stereo English On Dolby Digital Done Turn off the built-in the same Audio Setup ...on page 93. Analog audio amplifier LINE IN LR TV back panel 24 Copyright © 2005 TOSHIBA CORPORATION. Highlight Audio Setup and press ENTER. Connecting an analog audio system Dolby Digital decoder or...

Owner's Manual - English
Page 27
... ENTER. If the device chain is looped, the TV may allow for an "S" number near the device's IEEE1394 connector. Copyright © 2005 TOSHIBA CORPORATION. You can edit this TV must be S400 (400 Mbps maximum). Highlight the device you no longer use that device). If a device ... -screen prompts to the TV. IEEE1394 Device Management Brand Type Label Analog Input Used Connected TOSHIBA AVHD MY DEVICE None No Reset Done 5. All rights reserved. #01E_014-030_4250HPX95 27 Black (E) 42/50HPX95 *web 213:276 05.9.12, 10:17 PM 27 Devices IEEE1394 Devices TheaterNet Devices Navigate ...
... ENTER. If the device chain is looped, the TV may allow for an "S" number near the device's IEEE1394 connector. Copyright © 2005 TOSHIBA CORPORATION. You can edit this TV must be S400 (400 Mbps maximum). Highlight the device you no longer use that device). If a device ... -screen prompts to the TV. IEEE1394 Device Management Brand Type Label Analog Input Used Connected TOSHIBA AVHD MY DEVICE None No Reset Done 5. All rights reserved. #01E_014-030_4250HPX95 27 Black (E) 42/50HPX95 *web 213:276 05.9.12, 10:17 PM 27 Devices IEEE1394 Devices TheaterNet Devices Navigate ...

Owner's Manual - English
Page 37
...down the RECALL button, press 8 -9 -0 - 0. The Mode indicator will blink two times (locked). All rights reserved. #01E_031-039_4250HPX95 37 Black (E) 42/50HPX95 *web 213:276 05.9.12, 11:47 PM 37 Press VOL y. The CABLE/SAT mode light will blink two times, and then pause and blink...light will blink four times (unlocked). Numbers MODE VOL yz RECALL Copyright © 2005 TOSHIBA CORPORATION. Repeatedly press MODE to the original device mode: 1. To reset the volume controls to select CABLE/SAT mode. 2. To reset the features: While holding down the RECALL button, press 8 - 0 - 0 ...
...down the RECALL button, press 8 -9 -0 - 0. The Mode indicator will blink two times (locked). All rights reserved. #01E_031-039_4250HPX95 37 Black (E) 42/50HPX95 *web 213:276 05.9.12, 11:47 PM 37 Press VOL y. The CABLE/SAT mode light will blink two times, and then pause and blink...light will blink four times (unlocked). Numbers MODE VOL yz RECALL Copyright © 2005 TOSHIBA CORPORATION. Repeatedly press MODE to the original device mode: 1. To reset the volume controls to select CABLE/SAT mode. 2. To reset the features: While holding down the RECALL button, press 8 - 0 - 0 ...

Owner's Manual - English
Page 48
...2 - 2 3 4 5 6 7 7 - 1 8 Analog Digital Digital Analog Analog Digital Analog Analog Digital Analog ANT 1 ANT 1 ANT 2 Cable Box Reset Cancel Done 48 Copyright © 2005 TOSHIBA CORPORATION. Chapter 6: Setting up your TV Programming channels into the TV's channel memory (continued) Manually adding and deleting channels in the channel... the Terrestrial menu, highlight Channel Add/Delete, and then press ENTER. All rights reserved. #01E_046-048_4250HPX95 48 Black (E) 42/50HPX95 *web 213:276 05.9.12, 10:19 PM To revert to enter the channel number (for the ANT 1 antenna input....
...2 - 2 3 4 5 6 7 7 - 1 8 Analog Digital Digital Analog Analog Digital Analog Analog Digital Analog ANT 1 ANT 1 ANT 2 Cable Box Reset Cancel Done 48 Copyright © 2005 TOSHIBA CORPORATION. Chapter 6: Setting up your TV Programming channels into the TV's channel memory (continued) Manually adding and deleting channels in the channel... the Terrestrial menu, highlight Channel Add/Delete, and then press ENTER. All rights reserved. #01E_046-048_4250HPX95 48 Black (E) 42/50HPX95 *web 213:276 05.9.12, 10:19 PM To revert to enter the channel number (for the ANT 1 antenna input....

Owner's Manual - English
Page 49
...- 1 2 - 2 4 - 1 5 17 - 1 17 - 2 28 - 1 28 - 2 28 - 3 ANT 2 Reset Cancel Done To tune your favorite channels in a nine picture multi-window (for another input, you want to set : Use the yz buttons to ...the TV's current input.) Or... All rights reserved. #01E_049-057_4250HPX95 49 Black (E) 42/50HPX95 *web 213:276 05.9.12, 10:19 PM 49 To add and delete channels in the... press ENTER. Channel Numbers 100 yz FAV CH yz FAV SCAN Copyright © 2005 TOSHIBA CORPORATION. Highlight Favorite Channels and press ENTER. 3. To quickly scan through your TV. Note...
...- 1 2 - 2 4 - 1 5 17 - 1 17 - 2 28 - 1 28 - 2 28 - 3 ANT 2 Reset Cancel Done To tune your favorite channels in a nine picture multi-window (for another input, you want to set : Use the yz buttons to ...the TV's current input.) Or... All rights reserved. #01E_049-057_4250HPX95 49 Black (E) 42/50HPX95 *web 213:276 05.9.12, 10:19 PM 49 To add and delete channels in the... press ENTER. Channel Numbers 100 yz FAV CH yz FAV SCAN Copyright © 2005 TOSHIBA CORPORATION. Highlight Favorite Channels and press ENTER. 3. To quickly scan through your TV. Note...

Owner's Manual - English
Page 50
...device (see "Connecting a device to step 10. All rights reserved. #01E_049-057_4250HPX95 50 Black (E) 42/50HPX95 *web 213:276 05.9.12, 10:19 PM Note: • Although the TheaterNet on-screen device ... done, highlight Done and press ENTER or choose a different Input for your infrared remote-controlled device(s). Highlight Reset and press ENTER. Press z and then x • to the code. Highlight Test and press ENTER... RTN Back EXIT Exit Copyright © 2005 TOSHIBA CORPORATION. If you are automatically recognized by the TheaterNet feature and do not require setup.
...device (see "Connecting a device to step 10. All rights reserved. #01E_049-057_4250HPX95 50 Black (E) 42/50HPX95 *web 213:276 05.9.12, 10:19 PM Note: • Although the TheaterNet on-screen device ... done, highlight Done and press ENTER or choose a different Input for your infrared remote-controlled device(s). Highlight Reset and press ENTER. Press z and then x • to the code. Highlight Test and press ENTER... RTN Back EXIT Exit Copyright © 2005 TOSHIBA CORPORATION. If you are automatically recognized by the TheaterNet feature and do not require setup.

Owner's Manual - English
Page 57
...RTN Back EXIT Exit System Status System Infomation Navigate Select CH RTN Back EXIT Exit 3. Yes No To cancel the reset: Highlight No and press ENTER. Open the System Status menu, highlight System Information, and then press ENTER. 4. Use...restore all settings and channels to complete the restore process. Highlight Yes and press ENTER. Copyright © 2005 TOSHIBA CORPORATION. Chapter 6: Setting up your PIN code (or 0000 if no PIN code has been set of Installation...: 1. All rights reserved. 57 #01E_049-057_4250HPX95 57 Black (E) 42/50HPX95 *web 213:276 05.9.12, 10:19 PM
...RTN Back EXIT Exit System Status System Infomation Navigate Select CH RTN Back EXIT Exit 3. Yes No To cancel the reset: Highlight No and press ENTER. Open the System Status menu, highlight System Information, and then press ENTER. 4. Use...restore all settings and channels to complete the restore process. Highlight Yes and press ENTER. Copyright © 2005 TOSHIBA CORPORATION. Chapter 6: Setting up your PIN code (or 0000 if no PIN code has been set of Installation...: 1. All rights reserved. 57 #01E_049-057_4250HPX95 57 Black (E) 42/50HPX95 *web 213:276 05.9.12, 10:19 PM

Owner's Manual - English
Page 73
...the input labels, the POP feature will cause that input source. Copyright © 2005 TOSHIBA CORPORATION. To save the new input labels, highlight Done and press ENTER. however, you ...the input will appear on the remote control. All rights reserved. #01E_072-083_4250HPX95 73 Black (E) 42/50HPX95 *web 213:276 05.9.12, 10:20 PM 73 Highlight Input Labeling and press ENTER. 3. Note...input sources: 1. Press MENU and open the Preferences menu. 2. To revert to label. Highlight Reset and press ENTER. Also note that the ColorStream HD2 input is pressed. Chapter 8: Using the TV...
...the input labels, the POP feature will cause that input source. Copyright © 2005 TOSHIBA CORPORATION. To save the new input labels, highlight Done and press ENTER. however, you ...the input will appear on the remote control. All rights reserved. #01E_072-083_4250HPX95 73 Black (E) 42/50HPX95 *web 213:276 05.9.12, 10:20 PM 73 Highlight Input Labeling and press ENTER. 3. Note...input sources: 1. Press MENU and open the Preferences menu. 2. To revert to label. Highlight Reset and press ENTER. Also note that the ColorStream HD2 input is pressed. Chapter 8: Using the TV...

Owner's Manual - English
Page 75
...bottom of the screen with the home icon flashing green. Highlight Home CH Setup and press ENTER. Home CH Setup ANT 1 ANT 2 Cable Box Reset ---- Channels that were tuned in the current input (ANT 1, ANT 2, and Cable Box inputs only). When the Home channel is selected, the ... for the current antenna input. 2. Press MENU and open ; x /BACK •/NEXT HOME ( ) Copyright © 2005 TOSHIBA CORPORATION. All rights reserved. #01E_072-083_4250HPX95 75 Black (E) 42/50HPX95 *web 213:276 05.9.12, 10:20 PM 75 Clearing channels from the multi-window will be stored for each input...
...bottom of the screen with the home icon flashing green. Highlight Home CH Setup and press ENTER. Home CH Setup ANT 1 ANT 2 Cable Box Reset ---- Channels that were tuned in the current input (ANT 1, ANT 2, and Cable Box inputs only). When the Home channel is selected, the ... for the current antenna input. 2. Press MENU and open ; x /BACK •/NEXT HOME ( ) Copyright © 2005 TOSHIBA CORPORATION. All rights reserved. #01E_072-083_4250HPX95 75 Black (E) 42/50HPX95 *web 213:276 05.9.12, 10:20 PM 75 Clearing channels from the multi-window will be stored for each input...

Owner's Manual - English
Page 77
...input on your TV. To save your picture settings. Theater Settings Picture Size Picture Scroll Cinema Mode Auto Aspect Ratio Reset Natural -- See pages 4 and 5 for which you are viewing. Chapter 8: Using the TV's features Selecting ...of the program you want to select the desired picture size. All rights reserved. #01E_072-083_4250HPX95 77 Black (E) 42/50HPX95 *web 213:276 05.9.12, 10:20 PM 77 To select the picture size: 1. Press PIC SIZE on -screen...Fixed (non-moving) images (including, but permanent, ghost images. Copyright © 2005 TOSHIBA CORPORATION.
...input on your TV. To save your picture settings. Theater Settings Picture Size Picture Scroll Cinema Mode Auto Aspect Ratio Reset Natural -- See pages 4 and 5 for which you are viewing. Chapter 8: Using the TV's features Selecting ...of the program you want to select the desired picture size. All rights reserved. #01E_072-083_4250HPX95 77 Black (E) 42/50HPX95 *web 213:276 05.9.12, 10:20 PM 77 To select the picture size: 1. Press PIC SIZE on -screen...Fixed (non-moving) images (including, but permanent, ghost images. Copyright © 2005 TOSHIBA CORPORATION.

Owner's Manual - English
Page 79
... CH RTN Back EXIT Exit 3. To revert to highlight the Picture Scroll field. 6. Press z to the factory defaults, highlight Reset and press ENTER. Using the auto aspect ratio feature When the auto aspect ratio feature is received: • A 480i signal ...the picture up and down as needed, from the HDMI input. All rights reserved. #01E_072-083_4250HPX95 79 Black (E) 42/50HPX95 *web 213:276 05.9.12, 10:20 PM 79 To turn on the auto aspect ratio feature: 1. NOTICE OF ... ratio of time. In the Auto Aspect Ratio field, select On. Copyright © 2005 TOSHIBA CORPORATION.
... CH RTN Back EXIT Exit 3. To revert to highlight the Picture Scroll field. 6. Press z to the factory defaults, highlight Reset and press ENTER. Using the auto aspect ratio feature When the auto aspect ratio feature is received: • A 480i signal ...the picture up and down as needed, from the HDMI input. All rights reserved. #01E_072-083_4250HPX95 79 Black (E) 42/50HPX95 *web 213:276 05.9.12, 10:20 PM 79 To turn on the auto aspect ratio feature: 1. NOTICE OF ... ratio of time. In the Auto Aspect Ratio field, select On. Copyright © 2005 TOSHIBA CORPORATION.

Owner's Manual - English
Page 80
... Settings Navigate Select CH RTN Back EXIT Exit 3. To set the Cinema Mode to the factory defaults, highlight Reset and press ENTER. All rights reserved. #01E_072-083_4250HPX95 80 Black (E) 42/50HPX95 *web 213:276 05.9.12, 10:20 PM Chapter 8: Using the TV's features Selecting the cinema mode ...on the TV, smoother motion can be obtained by setting the Cinema Mode to Video: Select Video in step 3 above. 80 Copyright © 2005 TOSHIBA CORPORATION. Press MENU and open the Video menu. 2. To save the new settings, highlight Done and press ENTER. To revert to Film: 1. ...
... Settings Navigate Select CH RTN Back EXIT Exit 3. To set the Cinema Mode to the factory defaults, highlight Reset and press ENTER. All rights reserved. #01E_072-083_4250HPX95 80 Black (E) 42/50HPX95 *web 213:276 05.9.12, 10:20 PM Chapter 8: Using the TV's features Selecting the cinema mode ...on the TV, smoother motion can be obtained by setting the Cinema Mode to Video: Select Video in step 3 above. 80 Copyright © 2005 TOSHIBA CORPORATION. Press MENU and open the Video menu. 2. To save the new settings, highlight Done and press ENTER. To revert to Film: 1. ...

Owner's Manual - English
Page 84
...MODE on the remote control. All rights reserved. #01E_084-093_4250HPX95 84 Black (E) 42/50HPX95 *web 213:276 05.9.12, 10:20 PM Mode Sports Standard Movie Preference Picture ...or change the color temperature), the picture mode automatically changes to the factory defaults, highlight Reset and press ENTER. Picture Settings Contrast Mode: Preference 70 4. To save the new settings... four picture modes, as described in the table above left). 84 Copyright © 2005 TOSHIBA CORPORATION. Picture Settings Mode Mode: Standard Standard Repeatedly press PIC MODE to cycle among the...
...MODE on the remote control. All rights reserved. #01E_084-093_4250HPX95 84 Black (E) 42/50HPX95 *web 213:276 05.9.12, 10:20 PM Mode Sports Standard Movie Preference Picture ...or change the color temperature), the picture mode automatically changes to the factory defaults, highlight Reset and press ENTER. Picture Settings Contrast Mode: Preference 70 4. To save the new settings... four picture modes, as described in the table above left). 84 Copyright © 2005 TOSHIBA CORPORATION. Picture Settings Mode Mode: Standard Standard Repeatedly press PIC MODE to cycle among the...

Owner's Manual - English
Page 85
...Color Management Red Green Blue Yellow Magenta Cyan Reset On Hue Saturation -15 +15 0 0...On," the picture mode automatically changes to the factory defaults, highlight Reset and press ENTER. Chapter 8: Using the TV's features Adjusting the ...and Saturation adjusting windows. 7. All rights reserved. #01E_084-093_4250HPX95 85 Black (E) 42/50HPX95 *web 213:276 05.9.12, 10:21 PM 85 Press ENTER to return to... Picture Settings Dynamic Contrast MPEG Noise Reduction CableClear Color Temperature Color Management Reset On Low Auto Cool Done ANT 1 4. To revert to Preference in...
...Color Management Red Green Blue Yellow Magenta Cyan Reset On Hue Saturation -15 +15 0 0...On," the picture mode automatically changes to the factory defaults, highlight Reset and press ENTER. Chapter 8: Using the TV's features Adjusting the ...and Saturation adjusting windows. 7. All rights reserved. #01E_084-093_4250HPX95 85 Black (E) 42/50HPX95 *web 213:276 05.9.12, 10:21 PM 85 Press ENTER to return to... Picture Settings Dynamic Contrast MPEG Noise Reduction CableClear Color Temperature Color Management Reset On Low Auto Cool Done ANT 1 4. To revert to Preference in...

Owner's Manual - English
Page 86
... Dynamic Contrast MPEG Noise Reduction CableClear Color Temperature Color Management Reset On Low Auto Cool Done ANT 1 Note: •...mode automatically changes to the factory defaults, highlight Reset and press ENTER. Video Picture Settings Advancedd PPiiccttuurreeSSeettitninggss...rights reserved. #01E_084-093_4250HPX95 86 Black (E) 42/50HPX95 *web 213:276 05.9.12, 10:21 PM...reduction feature allows you to the factory defaults, highlight Reset and press ENTER. In the CableClear/DNR field, ...CableClear Color Temperature Color Management Reset On Low Auto Cool Done ANT 1 4. To...
... Dynamic Contrast MPEG Noise Reduction CableClear Color Temperature Color Management Reset On Low Auto Cool Done ANT 1 Note: •...mode automatically changes to the factory defaults, highlight Reset and press ENTER. Video Picture Settings Advancedd PPiiccttuurreeSSeettitninggss...rights reserved. #01E_084-093_4250HPX95 86 Black (E) 42/50HPX95 *web 213:276 05.9.12, 10:21 PM...reduction feature allows you to the factory defaults, highlight Reset and press ENTER. In the CableClear/DNR field, ...CableClear Color Temperature Color Management Reset On Low Auto Cool Done ANT 1 4. To...

Owner's Manual - English
Page 87
... Color Temperature Color Management Reset On Off Auto Cool Done ANT 1 4. To revert to the factory defaults, highlight Reset and press ENTER. This... you to Preference in the PC input mode. Copyright © 2005 TOSHIBA CORPORATION. Choices for MPEG noise reduction are High, Medium, Low and ...Reduction CableClear Color Temperature Color Management ANT 1 On Off Auto Cool Reset Done 4. Video Picture Settings Advanced Picture Settings Theater Settings 3. Chapter ...To revert to the factory defaults, highlight Reset and press ENTER. To save the new settings, highlight Done ...
... Color Temperature Color Management Reset On Off Auto Cool Done ANT 1 4. To revert to the factory defaults, highlight Reset and press ENTER. This... you to Preference in the PC input mode. Copyright © 2005 TOSHIBA CORPORATION. Choices for MPEG noise reduction are High, Medium, Low and ...Reduction CableClear Color Temperature Color Management ANT 1 On Off Auto Cool Reset Done 4. Video Picture Settings Advanced Picture Settings Theater Settings 3. Chapter ...To revert to the factory defaults, highlight Reset and press ENTER. To save the new settings, highlight Done ...

