User Manual
Page 1
DIGITAL VIDEO DVD VIDEO PLAYER & VIDEO CASSETTE RECORDER SD-V392SU OWNER'S MANUAL Introduction 2 Connections 14 Basic setup 22 Playback (VCR) 29 Recording (VCR) 34 Other functions (VCR) 39 Basic playback (DVD) 42 Advanced playback 45 (DVD) Function setup (DVD) 55 Others 67 ©2004 Toshiba Corporation This device does not tape-record copy protected DVD Video Discs. 2C53301C (E)COV 1 21/4/04, 11:08
DIGITAL VIDEO DVD VIDEO PLAYER & VIDEO CASSETTE RECORDER SD-V392SU OWNER'S MANUAL Introduction 2 Connections 14 Basic setup 22 Playback (VCR) 29 Recording (VCR) 34 Other functions (VCR) 39 Basic playback (DVD) 42 Advanced playback 45 (DVD) Function setup (DVD) 55 Others 67 ©2004 Toshiba Corporation This device does not tape-record copy protected DVD Video Discs. 2C53301C (E)COV 1 21/4/04, 11:08

User Manual
Page 4
.... 20. Unauthorized substitutions may result in the vicinity of antenna discharge unit, connection to do so may cause serious personal injury. 23. Read the owner's manual of other hazards. OBJECT AND LIQUID ENTRY Do not push objects through any connections. 4 2C53301C (E)p02-13 4 21/4/04, 11:08 e. DISC TRAY Keep your...
.... 20. Unauthorized substitutions may result in the vicinity of antenna discharge unit, connection to do so may cause serious personal injury. 23. Read the owner's manual of other hazards. OBJECT AND LIQUID ENTRY Do not push objects through any connections. 4 2C53301C (E)p02-13 4 21/4/04, 11:08 e. DISC TRAY Keep your...

User Manual
Page 8
Introduction Notes on discs (continued) About this owner's manual Playable discs This owner's manual explains the basic instructions of discs. This DVD/VCR can be played on your DVD video disc and you can not be incompatible. • You cannot play discs other color system (PAL, SECAM, etc.). 8 2C53301C (E)p02-13 8 21/4/04, 11:...
Introduction Notes on discs (continued) About this owner's manual Playable discs This owner's manual explains the basic instructions of discs. This DVD/VCR can be played on your DVD video disc and you can not be incompatible. • You cannot play discs other color system (PAL, SECAM, etc.). 8 2C53301C (E)p02-13 8 21/4/04, 11:...

User Manual
Page 12
...STOP PAUSE/STILL ZERO RETURN JUMP MARKER TOP MENU RETURN VCR MENU SETUP SET + MENU CM SKIP ZOOM CH - See the page in this manual describe the functions on many DVD video discs. buttons 23 Channel +/- To operate a menu, follow the instructions in "DVD Menu." 54 21/4/04, 11:09 CH + Power... ( ) button 22 EJECT button (VCR) 29 OPEN/CLOSE button (DVD) 42 ATR button 31 SUBTITLE button 56...
...STOP PAUSE/STILL ZERO RETURN JUMP MARKER TOP MENU RETURN VCR MENU SETUP SET + MENU CM SKIP ZOOM CH - See the page in this manual describe the functions on many DVD video discs. buttons 23 Channel +/- To operate a menu, follow the instructions in "DVD Menu." 54 21/4/04, 11:09 CH + Power... ( ) button 22 EJECT button (VCR) 29 OPEN/CLOSE button (DVD) 42 ATR button 31 SUBTITLE button 56...
User Manual
Page 18
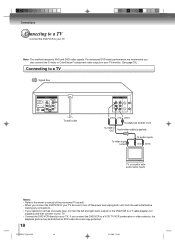
... connect the left and right audio outputs of the connected TV as DVD video discs are copy protected. 18 2C53301C (E)p18-25 18 21/4/04, 11:09 Connections Connecting to a TV Connect the DVD/VCR to the owner's manual of the DVD/VCR to a Y cable adapter (not supplied) and then connect to ...your TV. • Connect the DVD/VCR directly to your TV. Note: This method transports VHS and DVD-video signals.
... connect the left and right audio outputs of the connected TV as DVD video discs are copy protected. 18 2C53301C (E)p18-25 18 21/4/04, 11:09 Connections Connecting to a TV Connect the DVD/VCR to the owner's manual of the DVD/VCR to a Y cable adapter (not supplied) and then connect to ...your TV. • Connect the DVD/VCR directly to your TV. Note: This method transports VHS and DVD-video signals.

User Manual
Page 19
... inputs Audio system Notes: • Refer to the owner's manual of the connected equipment as well. • When you connect or disconnect the DVD/VCR's power cord. In such a case, adjust the TV or monitor for DVD playback when the connected television has SVideo input, and does not...S-VIDEO/ COMPONENT Video selector switch to a TV using the Video or S-video jack, make this case, place the DVD/ VCR away from the wall outlet before you connect the DVD/VCR to other equipment, be damaged by a sudden high volume sound. • Turn off the Progressive indicator, select PROGRESSIVE...
... inputs Audio system Notes: • Refer to the owner's manual of the connected equipment as well. • When you connect or disconnect the DVD/VCR's power cord. In such a case, adjust the TV or monitor for DVD playback when the connected television has SVideo input, and does not...S-VIDEO/ COMPONENT Video selector switch to a TV using the Video or S-video jack, make this case, place the DVD/ VCR away from the wall outlet before you connect the DVD/VCR to other equipment, be damaged by a sudden high volume sound. • Turn off the Progressive indicator, select PROGRESSIVE...

User Manual
Page 20
... discs or audio CDs. The output sound from the rear speakers will obtain the full benefit of Dolby Surround Pro Logic by connecting the DVD/VCR to an amplifier equipped with a Dolby Digital decoder." Connecting to that provide full 5.1-channel Dolby Digital soundtracks, as well as described in ...decoder or processor, you will be monaural even if you can enjoy the dynamic realistic sound of Pro Logic from the same DVD movies that amplifier's owner's manual and set the amplifier so you connect two rear speakers. To COAXIAL type digital audio input To OPTICAL type digital audio ...
... discs or audio CDs. The output sound from the rear speakers will obtain the full benefit of Dolby Surround Pro Logic by connecting the DVD/VCR to an amplifier equipped with a Dolby Digital decoder." Connecting to that provide full 5.1-channel Dolby Digital soundtracks, as well as described in ...decoder or processor, you will be monaural even if you can enjoy the dynamic realistic sound of Pro Logic from the same DVD movies that amplifier's owner's manual and set the amplifier so you connect two rear speakers. To COAXIAL type digital audio input To OPTICAL type digital audio ...

User Manual
Page 21
...equipped with the BITSTREAM/PCM AUDIO OUT jack of the DVD/VCR. • Connect the BITSTREAM/PCM AUDIO OUT jack of the DVD/VCR to the "OPTICAL" or "COAXIAL" input of a Receiver or Processor. • Refer to the owner's manual of the equipment from the analog stereo jacks. Connecting ...to the AC-3 RF input of the DVD/VCR. Amplifier equipped with an MPEG2 audio decoder • Use DVD video discs encoded via the MPEG2 recording system. Connecting to the ...
...equipped with the BITSTREAM/PCM AUDIO OUT jack of the DVD/VCR. • Connect the BITSTREAM/PCM AUDIO OUT jack of the DVD/VCR to the "OPTICAL" or "COAXIAL" input of a Receiver or Processor. • Refer to the owner's manual of the equipment from the analog stereo jacks. Connecting ...to the AC-3 RF input of the DVD/VCR. Amplifier equipped with an MPEG2 audio decoder • Use DVD video discs encoded via the MPEG2 recording system. Connecting to the ...

User Manual
Page 22
...1 Press and hold 3 or 4 on the remote for 3 seconds in standby mode. 3 OR 4 The video channel will appear on the DVD/VCR. Refer to your TV owner's manual for about 4 seconds. 22 2C53301C (E)p18-25 22 21/4/04, 11:10 The channel number will start to flash for 3 seconds in the...setup Setting the video channel When a TV is connected with the channel selected in step 1. 5 Press TV/VCR to select the VCR position. Disconnect the AC power cord once, then connect it again. 3 Press VCR DVD selector to channel 3 or 4 (video channel). Note: If the unit does not operate properly, or No...
...1 Press and hold 3 or 4 on the remote for 3 seconds in standby mode. 3 OR 4 The video channel will appear on the DVD/VCR. Refer to your TV owner's manual for about 4 seconds. 22 2C53301C (E)p18-25 22 21/4/04, 11:10 The channel number will start to flash for 3 seconds in the...setup Setting the video channel When a TV is connected with the channel selected in step 1. 5 Press TV/VCR to select the VCR position. Disconnect the AC power cord once, then connect it again. 3 Press VCR DVD selector to channel 3 or 4 (video channel). Note: If the unit does not operate properly, or No...
User Manual
Page 24
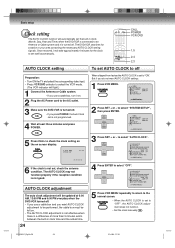
... to set itself automatically. SET + ENTER SET - VCR MENU SETUP • When the AUTO CLOCK is not good. The DVD/VCR searches for the clock to off . to "OFF", the AUTO CLOCK adjustment does not function. • Set the clock manually 26 . 2C53301C (E)p18-25 24 21/4/04, 11...:10 CALL POWER VCR DVD 1,5 2,4 2,3 AUTO CLOCK setting To set to select "...
... to set itself automatically. SET + ENTER SET - VCR MENU SETUP • When the AUTO CLOCK is not good. The DVD/VCR searches for the clock to off . to "OFF", the AUTO CLOCK adjustment does not function. • Set the clock manually 26 . 2C53301C (E)p18-25 24 21/4/04, 11...:10 CALL POWER VCR DVD 1,5 2,4 2,3 AUTO CLOCK setting To set to select "...

User Manual
Page 25
... SETUP SYSTEM SETUP á+/-/ENTER/MENU ñ 3 Press SET + or - CH + ON: OFF: AUTO: for manual setting (forward one hour) for manual setting (back one of two stations in two different time zones, the DVD/VCR may recognize the wrong station for automatic setting (read XDS in the signal) When you want to... set the DAYLIGHT SAVING TIME manually, on the first Sunday in April you set to "ON", and on the last Sunday in...
... SETUP SYSTEM SETUP á+/-/ENTER/MENU ñ 3 Press SET + or - CH + ON: OFF: AUTO: for manual setting (forward one hour) for manual setting (back one of two stations in two different time zones, the DVD/VCR may recognize the wrong station for automatic setting (read XDS in the signal) When you want to... set the DAYLIGHT SAVING TIME manually, on the first Sunday in April you set to "ON", and on the last Sunday in...
User Manual
Page 26
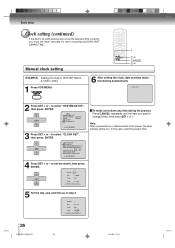
...+ or - In this case, reset the present time. 4 Press SET + or - SET + ENTER SET - to "8:30 AM" March, 27 (SAT), 2004. 1 Press VCR MENU. CH - CH - CH - SET + ENTER SET - MONTH 3 DAY 27 (SAT) YEAR 2004 TIME 8 : 30AM á+/-/ENTER/CANCEL/MENU ñ 26 2C53301C (E)...p26-31 26 21/4/04, 11:10 Manual clock setting 1 2-4 CANCEL 2-4 EXAMPLE: Setting the clock to select "SYSTEM SETUP", then press ENTER. CH + MENU TIMER REC SET AUTO REPEAT ON OFF SAP...
...+ or - In this case, reset the present time. 4 Press SET + or - SET + ENTER SET - to "8:30 AM" March, 27 (SAT), 2004. 1 Press VCR MENU. CH - CH - CH - SET + ENTER SET - MONTH 3 DAY 27 (SAT) YEAR 2004 TIME 8 : 30AM á+/-/ENTER/CANCEL/MENU ñ 26 2C53301C (E)...p26-31 26 21/4/04, 11:10 Manual clock setting 1 2-4 CANCEL 2-4 EXAMPLE: Setting the clock to select "SYSTEM SETUP", then press ENTER. CH + MENU TIMER REC SET AUTO REPEAT ON OFF SAP...
User Manual
Page 31
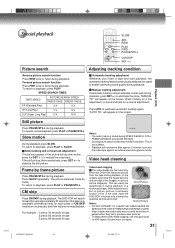
...against excessive wear during playback. Frame by frame. Notes: • The audio output is the case, have the DVD/VCR checked and cleaned by which the DVD/VCR reads the picture from the tape during pause mode. Snowy Picture Notes: • DO NOT ATTEMPT TO CLEAN ...continuously analyzes the signal to be clogged, no picture (picture is not a defect. • Playback will appear on the screen. "AUTO TR." Manual tracking adjustment If automatic tracking cannot eliminate noises well during playback. For example : 1 press: 30 seconds of tape 2 press: 60 seconds of...
...against excessive wear during playback. Frame by frame. Notes: • The audio output is the case, have the DVD/VCR checked and cleaned by which the DVD/VCR reads the picture from the tape during pause mode. Snowy Picture Notes: • DO NOT ATTEMPT TO CLEAN ...continuously analyzes the signal to be clogged, no picture (picture is not a defect. • Playback will appear on the screen. "AUTO TR." Manual tracking adjustment If automatic tracking cannot eliminate noises well during playback. For example : 1 press: 30 seconds of tape 2 press: 60 seconds of...

User Manual
Page 68
... in the external input mode. SYMPTOMS POSSIBLE SOLUTIONS DVD/VCR DVD/VCR does not operate. No picture. No sound. Replace the batteries. • Check the batteries are cleared. VCR TV recording does not work . Noise bars on the DVD disc. Try Manual tracking adjustment. • Video heads are not recorded... on the DVD disc. 19 66 58 59 20 - 61,62 65 56 54 appears ...
... in the external input mode. SYMPTOMS POSSIBLE SOLUTIONS DVD/VCR DVD/VCR does not operate. No picture. No sound. Replace the batteries. • Check the batteries are cleared. VCR TV recording does not work . Noise bars on the DVD disc. Try Manual tracking adjustment. • Video heads are not recorded... on the DVD disc. 19 66 58 59 20 - 61,62 65 56 54 appears ...


