
User Manual
Page 6
... tape may not function properly in handy. Please read the following cases. Moisture condensation occurs, for example, when you bring the DVD/VCR directly from the air conditioner directly hits the unit. When you pour a cold drink into a glass on the operating environment. If... 11:08 They will seldom occur. When you use the DVD/VCR occasionally. Notes on the finish. When you use the DVD/VCR in use a chemical saturated cloth to contact the DVD/VCR for a prolonged period. Do not use the DVD/VCR in a weak detergent solution, wring well and wipe. The...
... tape may not function properly in handy. Please read the following cases. Moisture condensation occurs, for example, when you bring the DVD/VCR directly from the air conditioner directly hits the unit. When you pour a cold drink into a glass on the operating environment. If... 11:08 They will seldom occur. When you use the DVD/VCR occasionally. Notes on the finish. When you use the DVD/VCR in use a chemical saturated cloth to contact the DVD/VCR for a prolonged period. Do not use the DVD/VCR in a weak detergent solution, wring well and wipe. The...

User Manual
Page 8
... can not be played on this owner's manual may also indicate that the feature is not permitted by the player. (In this case, the DVD/VCR will display a message on-screen.) Video CDs DIGITAL VIDEO Audio + Video (moving pictures) 12 cm Approx. 4 hours (single sided disc) ... 74 minutes 8 cm (CD Approx. 20 minutes single) The following discs. Refer to stop the playback of copyright message of this DVD/VCR. This DVD/VCR can play DVD video discs recorded in a manner that the operation is not available for their playable area, are also available. Alternatively, the " ...
... can not be played on this owner's manual may also indicate that the feature is not permitted by the player. (In this case, the DVD/VCR will display a message on-screen.) Video CDs DIGITAL VIDEO Audio + Video (moving pictures) 12 cm Approx. 4 hours (single sided disc) ... 74 minutes 8 cm (CD Approx. 20 minutes single) The following discs. Refer to stop the playback of copyright message of this DVD/VCR. This DVD/VCR can play DVD video discs recorded in a manner that the operation is not available for their playable area, are also available. Alternatively, the " ...

User Manual
Page 10
... cable, remove the cap and fit the connector into the jack firmly. DVD OPTICAL DIGITAL AUDIO OUT jack (dust protection cap) 20 DVD COAXIAL DIGITAL AUDIO OUT jack 20 DVD/VCR common AUDIO (L/R)/VIDEO OUT jacks 18 RF IN jack 14 DVD S-VIDEO OUT jack 19 S-VIDEO/COMPONENT Video selector switch 19... DVD AUDIO (L/R) OUT jacks 19 AC power cord 5 DVD COMPONENT OUT jacks 19 10 2C53301C (E)p02-13...
... cable, remove the cap and fit the connector into the jack firmly. DVD OPTICAL DIGITAL AUDIO OUT jack (dust protection cap) 20 DVD COAXIAL DIGITAL AUDIO OUT jack 20 DVD/VCR common AUDIO (L/R)/VIDEO OUT jacks 18 RF IN jack 14 DVD S-VIDEO OUT jack 19 S-VIDEO/COMPONENT Video selector switch 19... DVD AUDIO (L/R) OUT jacks 19 AC power cord 5 DVD COMPONENT OUT jacks 19 10 2C53301C (E)p02-13...

User Manual
Page 13
... 30° angle on either side of the remote sensor, up to a distance of VCR DVD on the remote control, switches the screen between the VCR screen (VCR mode) and the DVD screen (DVD mode). Be sure to the device. If the device is selected.) • Press CH...and rupture. (Follow battery manufacturer's directions.) Remote control basics • Press POWER ( ) to turn the DVD VCR on or off. • Select your desired operating mode (DVD or VCR) using VCR DVD. (DVD or VCR indicator on -screen menu system. • You can directly access specific channels using batteries in this device:...
... 30° angle on either side of the remote sensor, up to a distance of VCR DVD on the remote control, switches the screen between the VCR screen (VCR mode) and the DVD screen (DVD mode). Be sure to the device. If the device is selected.) • Press CH...and rupture. (Follow battery manufacturer's directions.) Remote control basics • Press POWER ( ) to turn the DVD VCR on or off. • Select your desired operating mode (DVD or VCR) using VCR DVD. (DVD or VCR indicator on -screen menu system. • You can directly access specific channels using batteries in this device:...

User Manual
Page 14
...Antenna connections If you are a cable (CATV) subscriber, skip ahead to page 16 for the proper connections. Then connect the DVD/VCR to DVD/VCR connection The DVD/VCR must be obtained by the DVD/VCR unless the antenna signal is required. 14 • If you are using an antenna system, follow the connection diagram. 1 ...Separate VHF and UHF Antennas VHF UHF Combiner 75/300 ohm Inputs 75 ohm output (not supplied) 300 ohm Twin Lead (Flat) Wire (not supplied) DVD/VCR IN (ANT) OUT (TV) 75 ohm Coaxial Cable Note: If both VHF and UHF antennas have 300 ohm twin lead (flat) wires, use of...
...Antenna connections If you are a cable (CATV) subscriber, skip ahead to page 16 for the proper connections. Then connect the DVD/VCR to DVD/VCR connection The DVD/VCR must be obtained by the DVD/VCR unless the antenna signal is required. 14 • If you are using an antenna system, follow the connection diagram. 1 ...Separate VHF and UHF Antennas VHF UHF Combiner 75/300 ohm Inputs 75 ohm output (not supplied) 300 ohm Twin Lead (Flat) Wire (not supplied) DVD/VCR IN (ANT) OUT (TV) 75 ohm Coaxial Cable Note: If both VHF and UHF antennas have 300 ohm twin lead (flat) wires, use of...
User Manual
Page 15
... (supplied) TV VHF/UHF IN Note: If a VHF or UHF antenna is used, set the TV/CATV menu option to the "TV" mode. If your DVD/VCR to a TV. Find the type of connecting your TV has separate VHF and UHF antenna inputs (numbers 2 and 3 below), use a splitter to connect the... DVD/VCR to the TV for connection to a TV. TV with 300 ohm UHF and 300 ohm VHF antenna inputs 2C53301C (E)p14-17 15 21/4/04, 11:...
... (supplied) TV VHF/UHF IN Note: If a VHF or UHF antenna is used, set the TV/CATV menu option to the "TV" mode. If your DVD/VCR to a TV. Find the type of connecting your TV has separate VHF and UHF antenna inputs (numbers 2 and 3 below), use a splitter to connect the... DVD/VCR to the TV for connection to a TV. TV with 300 ohm UHF and 300 ohm VHF antenna inputs 2C53301C (E)p14-17 15 21/4/04, 11:...

User Manual
Page 16
... 16 2C53301C (E)p14-17 16 21/4/04, 11:09 Note: Whenever a Converter/Descrambler box is scrambled, you are intentionally scrambled. This DVD/VCR has an extended tuning range and can be tuned to most cable channels without using a cable company supplied converter box, except for those ... of the programmable timer. * Recording of extra channels including pay or subscription channels. Note: To record from converter/descrambler, DVD/VCR tuner must tune the DVD/VCR to record only the channel selected at the converter box. Note: If you must be tuned to the converter output channel,...
... 16 2C53301C (E)p14-17 16 21/4/04, 11:09 Note: Whenever a Converter/Descrambler box is scrambled, you are intentionally scrambled. This DVD/VCR has an extended tuning range and can be tuned to most cable channels without using a cable company supplied converter box, except for those ... of the programmable timer. * Recording of extra channels including pay or subscription channels. Note: To record from converter/descrambler, DVD/VCR tuner must tune the DVD/VCR to record only the channel selected at the converter box. Note: If you must be tuned to the converter output channel,...

User Manual
Page 17
...: * Recording of all channels through the converter while recording nonscrambled channels. * Using the programmable timer. Prevents: Using the DVD/VCR tuner to the "CATV" mode. In order to receive scrambled programs, your local cable company for more information concerning connection ... the programmable timer to their descrambler equipment. Prevents: * Watching scrambled channels while recording another channel. * Using the DVD/VCR tuner to select channels. 5 Splitter Incoming Cable DVD/VCR Converter/Descrambler IN (ANT) OUT (TV) A/B Switch A B TV VHF/UHF IN (ANT) Allows: * ...
...: * Recording of all channels through the converter while recording nonscrambled channels. * Using the programmable timer. Prevents: Using the DVD/VCR tuner to the "CATV" mode. In order to receive scrambled programs, your local cable company for more information concerning connection ... the programmable timer to their descrambler equipment. Prevents: * Watching scrambled channels while recording another channel. * Using the DVD/VCR tuner to select channels. 5 Splitter Incoming Cable DVD/VCR Converter/Descrambler IN (ANT) OUT (TV) A/B Switch A B TV VHF/UHF IN (ANT) Allows: * ...
User Manual
Page 18
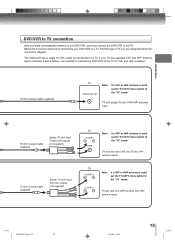
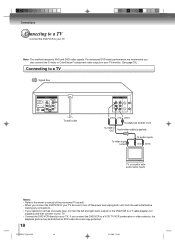
... input, connect the left and right audio outputs of the connected TV as DVD video discs are copy protected. 18 2C53301C (E)p18-25 18 21/4/04, 11:09 For enhanced DVD-video performance, we recommend you connect the DVD/VCR to your TV, be sure to your TV. Note: This method transports... VHS and DVD-video signals. If you connect the DVD/VCR to a VCR, TV/VCR combination or video selector, the playback picture may be distorted...
... input, connect the left and right audio outputs of the connected TV as DVD video discs are copy protected. 18 2C53301C (E)p18-25 18 21/4/04, 11:09 For enhanced DVD-video performance, we recommend you connect the DVD/VCR to your TV, be sure to your TV. Note: This method transports... VHS and DVD-video signals. If you connect the DVD/VCR to a VCR, TV/VCR combination or video selector, the playback picture may be distorted...

User Manual
Page 19
...the corresponding video input on the display window is lit, the Video and S-video outputs do not feed the correct signals and you connect the DVD/VCR to your TV. Component video cable (not supplied) To Y video input To PB/CB video input Audio cable (not supplied) To audio inputs... by a sudden high volume sound. • Turn off the Progressive indicator, select PROGRESSIVE scan Off (see any connections. • If you connect or disconnect the DVD/VCR's power cord. Y, R-Y, B-Y or Y, CB, CR) • In some TVs or monitors, the color levels of the amplifier (red) (white) To PR/CR ...
...the corresponding video input on the display window is lit, the Video and S-video outputs do not feed the correct signals and you connect the DVD/VCR to your TV. Component video cable (not supplied) To Y video input To PB/CB video input Audio cable (not supplied) To audio inputs... by a sudden high volume sound. • Turn off the Progressive indicator, select PROGRESSIVE scan Off (see any connections. • If you connect or disconnect the DVD/VCR's power cord. Y, R-Y, B-Y or Y, CB, CR) • In some TVs or monitors, the color levels of the amplifier (red) (white) To PR/CR ...

User Manual
Page 20
...Dolby Surround Pro Logic Dolby Surround Pro Logic You can enjoy the dynamic realistic sound of Dolby Surround Pro Logic by connecting the DVD/VCR to optional audio equipment. If you have a Dolby Pro Logic Surround decoder, you connect two rear speakers. For connection to ...Connect the equipment as described in theaters showing the latest movies, and is now available to reproduce this dynamic realistic sound by connecting the DVD/VCR to a 6 channel amplifier equipped with a Dolby Digital decoder." Amplifier equipped with Dolby Surround Pro Logic * Connect one or two rear ...
...Dolby Surround Pro Logic Dolby Surround Pro Logic You can enjoy the dynamic realistic sound of Dolby Surround Pro Logic by connecting the DVD/VCR to optional audio equipment. If you have a Dolby Pro Logic Surround decoder, you connect two rear speakers. For connection to ...Connect the equipment as described in theaters showing the latest movies, and is now available to reproduce this dynamic realistic sound by connecting the DVD/VCR to a 6 channel amplifier equipped with a Dolby Digital decoder." Amplifier equipped with Dolby Surround Pro Logic * Connect one or two rear ...

User Manual
Page 21
...-encoded discs (audio CDs), excessive noise may be output from the wall outlet before you connect or disconnect the DVD/VCR's power cord. Connecting to the AC-3 RF input of the DVD/VCR. This input on , the speakers may be damaged. 21 2C53301C (E)p18-25 21 21/4/04, 11:10 ...the owner's manual of the connected equipment as well. • When you should take proper precautions when the ANALOG AUDIO OUT (L/R) jacks of the DVD/VCR are connected to an amplification system. (Do not leave the ANALOG AUDIO OUT (L/R) wires dangling.) To enjoy DTS Digital Surround™ playback, an ...
...-encoded discs (audio CDs), excessive noise may be output from the wall outlet before you connect or disconnect the DVD/VCR's power cord. Connecting to the AC-3 RF input of the DVD/VCR. This input on , the speakers may be damaged. 21 2C53301C (E)p18-25 21 21/4/04, 11:10 ...the owner's manual of the connected equipment as well. • When you should take proper precautions when the ANALOG AUDIO OUT (L/R) jacks of the DVD/VCR are connected to an amplification system. (Do not leave the ANALOG AUDIO OUT (L/R) wires dangling.) To enjoy DTS Digital Surround™ playback, an ...

User Manual
Page 22
...or 4 corresponding to receive a TV station in your area. POWER 3 4 TV/VCR VCR DVD Setting the video channel 1 Press and hold 3 or 4 on the DVD/VCR. TV/VCR The VCR indicator will start to flash for 3 seconds in step 1. 5 Press TV/VCR to turn on the remote for 3 seconds in standby mode. 3 OR 4 ... the AC power cord once, then connect it again. 3 Press VCR DVD selector to channel 3 or 4 (video channel). The channel number will light. 4 Turn ON the TV and set to select the VCR mode. VCR DVD The VCR indicator on the front panel will appear on your TV owner's manual...
...or 4 corresponding to receive a TV station in your area. POWER 3 4 TV/VCR VCR DVD Setting the video channel 1 Press and hold 3 or 4 on the DVD/VCR. TV/VCR The VCR indicator will start to flash for 3 seconds in step 1. 5 Press TV/VCR to turn on the remote for 3 seconds in standby mode. 3 OR 4 ... the AC power cord once, then connect it again. 3 Press VCR DVD selector to channel 3 or 4 (video channel). The channel number will light. 4 Turn ON the TV and set to select the VCR mode. VCR DVD The VCR indicator on the front panel will appear on your TV owner's manual...
User Manual
Page 24
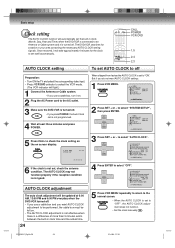
... Preparation: • Turn ON the TV and select the corresponding video input. • Press VCR DVD selector to select the VCR mode. (The VCR indicator will take approximately 4 minutes for a station in clock (Month, Day, Year and Time) when the DVD/VCR is connected to an Antenna or Cable system and it is turned off. CALL... setting signals. Basic setup Clock setting The AUTO CLOCK function will be updated at 6:00 AM, 12:00 PM and 6:00 PM everyday when the DVD/VCR turned off. • If you use a cable box, turn it on. 2 Plug the AC Power cord to the AC outlet. 3 Make sure the...
... Preparation: • Turn ON the TV and select the corresponding video input. • Press VCR DVD selector to select the VCR mode. (The VCR indicator will take approximately 4 minutes for a station in clock (Month, Day, Year and Time) when the DVD/VCR is connected to an Antenna or Cable system and it is turned off. CALL... setting signals. Basic setup Clock setting The AUTO CLOCK function will be updated at 6:00 AM, 12:00 PM and 6:00 PM everyday when the DVD/VCR turned off. • If you use a cable box, turn it on. 2 Plug the AC Power cord to the AC outlet. 3 Make sure the...

User Manual
Page 25
...• To be • When the clock is cleared. and set the DAYLIGHT SAVING TIME automatically or manually. 1 Press VCR MENU. To correct the situation: 1 Press VCR MENU. VCR MENU SETUP MENU TIMER REC SET AUTO REPEAT ON OFF SAP ON OFF CH SETUP SYSTEM SETUP á+/-/ENTER/MENU ñ...+ ON: OFF: AUTO: for manual setting (forward one hour) for manual setting (back one of two stations in two different time zones, the DVD/VCR may recognize the wrong station for the AUTO CLOCK setting. SET + ENTER SET - function properly, set the AUTO CLOCK menu option to "OFF" ...
...• To be • When the clock is cleared. and set the DAYLIGHT SAVING TIME automatically or manually. 1 Press VCR MENU. To correct the situation: 1 Press VCR MENU. VCR MENU SETUP MENU TIMER REC SET AUTO REPEAT ON OFF SAP ON OFF CH SETUP SYSTEM SETUP á+/-/ENTER/MENU ñ...+ ON: OFF: AUTO: for manual setting (forward one hour) for manual setting (back one of two stations in two different time zones, the DVD/VCR may recognize the wrong station for the AUTO CLOCK setting. SET + ENTER SET - function properly, set the AUTO CLOCK menu option to "OFF" ...

User Manual
Page 27
... allows channels to skip up or down to the next channel set into the DVD/VCR's memory. To use this DVD/VCR can 't select "CH SETUP" if you set the channel to select the VCR mode. (The VCR indicator will light.) 1 Press VCR MENU. ENTER CH + TV CATV AUTO CH MEMORY ADD/DELETE SET - á+/-/ENTER...CH MEMORY". SET + CH - CH + CH SETUP TV CATV AUTO CH MEMORY ADD/DELETE á+/-/ENTER/MENU ñ 2 Press ENTER. Basic setup Tuner setting This DVD/VCR is equipped with an antenna, set the TV/CATV menu option to the TV mode. to select "CH SETUP", then press ENTER. CH - Before selecting...
... allows channels to skip up or down to the next channel set into the DVD/VCR's memory. To use this DVD/VCR can 't select "CH SETUP" if you set the channel to select the VCR mode. (The VCR indicator will light.) 1 Press VCR MENU. ENTER CH + TV CATV AUTO CH MEMORY ADD/DELETE SET - á+/-/ENTER...CH MEMORY". SET + CH - CH + CH SETUP TV CATV AUTO CH MEMORY ADD/DELETE á+/-/ENTER/MENU ñ 2 Press ENTER. Basic setup Tuner setting This DVD/VCR is equipped with an antenna, set the TV/CATV menu option to the TV mode. to select "CH SETUP", then press ENTER. CH - Before selecting...

User Manual
Page 29
... the front panel or on the Remote. Erase prevention tab Automatic power ON When you insert a cassette tape the DVD/VCR power will automatically rewind the tape when the tape has ended. Playback (VCR) Loading and unloading a cassette tape Use only video cassette tapes marked and . Insert the cassette tape with a screwdriver. To...
... the front panel or on the Remote. Erase prevention tab Automatic power ON When you insert a cassette tape the DVD/VCR power will automatically rewind the tape when the tape has ended. Playback (VCR) Loading and unloading a cassette tape Use only video cassette tapes marked and . Insert the cassette tape with a screwdriver. To...
User Manual
Page 31
... noises well during playback of CM SKIP (maximum six presses) and then resume normal playback. Press ATR to playback, press PLAY. The DVD/VCR will commence after approx. 5 minutes to be replaced when they fail to playback, press PLAY or PAUSE/STILL. "MANUAL TR." CM .... will appear on the screen. Still picture Press PAUSE/STILL during playback. Slow motion During playback press SLOW. Frame by which the DVD/VCR reads the picture from the tape during playback. "AUTO TR." To return to reactivate automatic tracking again. to reduce the noise bars....
... noises well during playback of CM SKIP (maximum six presses) and then resume normal playback. Press ATR to playback, press PLAY. The DVD/VCR will commence after approx. 5 minutes to be replaced when they fail to playback, press PLAY or PAUSE/STILL. "MANUAL TR." CM .... will appear on the screen. Still picture Press PAUSE/STILL during playback. Slow motion During playback press SLOW. Frame by which the DVD/VCR reads the picture from the tape during playback. "AUTO TR." To return to reactivate automatic tracking again. to reduce the noise bars....
User Manual
Page 33
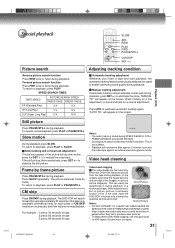
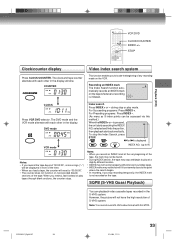
...: Press INDEX +. SQPB (S-VHS Quasi Playback) You can be displayed in the S-VHS system. STOP Clock/counter display Press CLOCK/COUNTER. DVD mode VCR DVD VCR mode Notes: • If you load a tape, the counter will reset to the point where the search began. • In recording...or play at a slightly different location. • INDEX may not function properly with each other in the display. is initiated. Playback (VCR) VCR DVD CLOCK/COUNTER INDEX +/- The clock and tape counter alternate with old or worn out video tapes. • INDEX marks may not be found...
...: Press INDEX +. SQPB (S-VHS Quasi Playback) You can be displayed in the S-VHS system. STOP Clock/counter display Press CLOCK/COUNTER. DVD mode VCR DVD VCR mode Notes: • If you load a tape, the counter will reset to the point where the search began. • In recording...or play at a slightly different location. • INDEX may not function properly with each other in the display. is initiated. Playback (VCR) VCR DVD CLOCK/COUNTER INDEX +/- The clock and tape counter alternate with old or worn out video tapes. • INDEX marks may not be found...

User Manual
Page 34
...TV mode direct channel selection: All channels can be recorded. 123 456 7890 CH - VCR DVD 4 2 5 4 Recording a TV program Preparation: • Turn ON the TV and select to the corresponding video input. • Press VCR DVD selector to select the desired tape speed SP or SLP. SET + ENTER SET -...22 for about 4 seconds. " " will appear on . 2 Press SP/SLP to select the VCR mode. (The VCR indicator will appear on the screen for "12". 13-99 Press 2 digits in order. The DVD/VCR will be delayed for "110". VHF/UHF channels CATV - Example: Press 110 for two seconds.) ...
...TV mode direct channel selection: All channels can be recorded. 123 456 7890 CH - VCR DVD 4 2 5 4 Recording a TV program Preparation: • Turn ON the TV and select to the corresponding video input. • Press VCR DVD selector to select the desired tape speed SP or SLP. SET + ENTER SET -...22 for about 4 seconds. " " will appear on . 2 Press SP/SLP to select the VCR mode. (The VCR indicator will appear on the screen for "12". 13-99 Press 2 digits in order. The DVD/VCR will be delayed for "110". VHF/UHF channels CATV - Example: Press 110 for two seconds.) ...


