
Owners Manual
Page 2
.... MASTERCONTROL, PowerBlaster, MacroPower, and SimpleSound are trademarks of their respective companies or organizations. UNIVERSAL REMOTE CONTROL, INC. LOCATION OF CONTROLS Keypad Layout 2 3 The RF20 Remote GETTING STARTED Overview 4 Battery Installation 4 Activating Component Commands 5 Light Button 6 BASIC SETUP Overview 7 Pre-Programmed Code Method 7 Learning Method 15 Transmitting (Busy Signal) Icon. 19 Child Lock Feature 19...
.... MASTERCONTROL, PowerBlaster, MacroPower, and SimpleSound are trademarks of their respective companies or organizations. UNIVERSAL REMOTE CONTROL, INC. LOCATION OF CONTROLS Keypad Layout 2 3 The RF20 Remote GETTING STARTED Overview 4 Battery Installation 4 Activating Component Commands 5 Light Button 6 BASIC SETUP Overview 7 Pre-Programmed Code Method 7 Learning Method 15 Transmitting (Busy Signal) Icon. 19 Child Lock Feature 19...
Owners Manual
Page 5
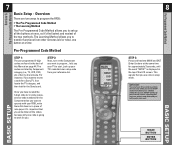
...program... STEP 2: Now, turn on the Component you write down on page 44. This signals that you want to transfer functions from other remotes (old or new), one code is displayed at once, so it's the fastest and easiest of the two methods. IMPORTANT: You now have 30 seconds to start . If... only one button at the same time for you are two ways to program the RF20: • The Pre-Programmed Code Method • The Learning Method The Pre-Programmed Code Method allows you to work for approximately 3 seconds, until the word "SETUP" is going to set up your TV to start over. ...
...program... STEP 2: Now, turn on the Component you write down on page 44. This signals that you want to transfer functions from other remotes (old or new), one code is displayed at once, so it's the fastest and easiest of the two methods. IMPORTANT: You now have 30 seconds to start . If... only one button at the same time for you are two ways to program the RF20: • The Pre-Programmed Code Method • The Learning Method The Pre-Programmed Code Method allows you to work for approximately 3 seconds, until the word "SETUP" is going to set up your TV to start over. ...

Owners Manual
Page 7
...the Number buttons 0-9 on the remote to turn the Component back on. STEP 8: When the Component turns off, press the ON button to punch in this case TV) by using the UP or DOWN display buttons on the screen. (There is the case, try the next code number listed for that your...& DOWN BUTTONS NUMBER BUTTONS 12 example, maybe your list until you find a new correct code. Some brands have entered all the code numbers listed for your brand, you want to find a perfect match. STEP 7: Point the RF20 toward the Component you can test the Volume and Channel buttons (for TV), or PLAY...
...the Number buttons 0-9 on the remote to turn the Component back on. STEP 8: When the Component turns off, press the ON button to punch in this case TV) by using the UP or DOWN display buttons on the screen. (There is the case, try the next code number listed for that your...& DOWN BUTTONS NUMBER BUTTONS 12 example, maybe your list until you find a new correct code. Some brands have entered all the code numbers listed for your brand, you want to find a perfect match. STEP 7: Point the RF20 toward the Component you can test the Volume and Channel buttons (for TV), or PLAY...

Owners Manual
Page 8
13 14 Pre-Programmed Code Method Pre-Programmed Code Methoda STEP 9: Once you are back in normal operating mode. IN MOST SYSTEMS,YOU CAN FINISH BASIC SETUP IN JUST A FEW MINUTES AND PUT ALL YOUR OLD REMOTES AWAY. MAIN BUTTON BASIC SETUP BASIC SETUP IF YOU ARE STILL MISSING COMMANDS TO... 9. SAVE BUTTON STEP 10: Exit SETUP mode by pressing the SAVE display button that the code number has been successfully saved. When the LCD screen displays MAIN, you have found the right code, save the code number by pressing the MAIN button two times. The LCD screen will blink "SAVED" two...
13 14 Pre-Programmed Code Method Pre-Programmed Code Methoda STEP 9: Once you are back in normal operating mode. IN MOST SYSTEMS,YOU CAN FINISH BASIC SETUP IN JUST A FEW MINUTES AND PUT ALL YOUR OLD REMOTES AWAY. MAIN BUTTON BASIC SETUP BASIC SETUP IF YOU ARE STILL MISSING COMMANDS TO... 9. SAVE BUTTON STEP 10: Exit SETUP mode by pressing the SAVE display button that the code number has been successfully saved. When the LCD screen displays MAIN, you have found the right code, save the code number by pressing the MAIN button two times. The LCD screen will blink "SAVED" two...

Owners Manual
Page 10
... the learning process. Try 1", 2" and so on, up to another room. The only buttons you can't teach are retained even after a different Setup Code Number is programmed into the remote. • To return to an original pre-programmed function, a learned function must be erased. STEP 7: Now, continue to teach the... screen will change to teach on the LCD screen, use the PAGE ( ) ( ) buttons. NOTE: Test all the button commands to the RF20, return to the RF20 once again by pressing the MAIN button twice. BASIC SETUP BASIC SETUP NOTE: If you don't see the display button you would like to...
... the learning process. Try 1", 2" and so on, up to another room. The only buttons you can't teach are retained even after a different Setup Code Number is programmed into the remote. • To return to an original pre-programmed function, a learned function must be erased. STEP 7: Now, continue to teach the... screen will change to teach on the LCD screen, use the PAGE ( ) ( ) buttons. NOTE: Test all the button commands to the RF20, return to the RF20 once again by pressing the MAIN button twice. BASIC SETUP BASIC SETUP NOTE: If you don't see the display button you would like to...

Owners Manual
Page 19
... down the Pre-Programmed Code Numbers that you used to set up Page 2 of Setup and display the CLONE button. STEP 2: Go to Page 2 of the Setup Menu by pressing the MAIN button twice. The display will disappear from one RF20 to another. STEP 1: For both remotes are in SETUP mode..... STEP 5: Press the RECV display button on each remote to bring up your code numbers. NOTE: Cloning typically takes about an inch apart. STEP 3: Press the RECAL display button on each remote. STEP 3: Press the CLONE button on the unprogrammed RF20 that you have 30 seconds to perform the next step...
... down the Pre-Programmed Code Numbers that you used to set up Page 2 of Setup and display the CLONE button. STEP 2: Go to Page 2 of the Setup Menu by pressing the MAIN button twice. The display will disappear from one RF20 to another. STEP 1: For both remotes are in SETUP mode..... STEP 5: Press the RECV display button on each remote to bring up your code numbers. NOTE: Cloning typically takes about an inch apart. STEP 3: Press the RECAL display button on each remote. STEP 3: Press the CLONE button on the unprogrammed RF20 that you have 30 seconds to perform the next step...


