
RoboSHOT 12 and 30 QCCU System Manual
Page 3
...Configuration ...23 Screen SHOT: Admin Menu - Admin Menu - Document Number 342-0797 Rev A Page 3 of the RoboSHOT 15 Setting the RoboSHOT Switch Gear: ...15 Dip Switch Settings Further Explained (DSSFE): ...15 Setting the CCU ...15 Controlling the Camera ...16 IR Remote Commander ...16 Telnet...from the Camera Control Page 20 Screen Shot: Admin Menu - RoboSHOT HD Cameras TABLE OF CONTENTS Overview ...4 Unpacking the Camera Systems ...6 Image: RoboSHOT 12 HD PTZ Camera ...7 Image: RoboSHOT 30 HD PTZ Camera ...8 Image: RoboSHOT 12X and 30X Rear Panel Connections 9 Rear panel connections are ...
...Configuration ...23 Screen SHOT: Admin Menu - Admin Menu - Document Number 342-0797 Rev A Page 3 of the RoboSHOT 15 Setting the RoboSHOT Switch Gear: ...15 Dip Switch Settings Further Explained (DSSFE): ...15 Setting the CCU ...15 Controlling the Camera ...16 IR Remote Commander ...16 Telnet...from the Camera Control Page 20 Screen Shot: Admin Menu - RoboSHOT HD Cameras TABLE OF CONTENTS Overview ...4 Unpacking the Camera Systems ...6 Image: RoboSHOT 12 HD PTZ Camera ...7 Image: RoboSHOT 30 HD PTZ Camera ...8 Image: RoboSHOT 12X and 30X Rear Panel Connections 9 Rear panel connections are ...
RoboSHOT 12 and 30 QCCU System Manual
Page 9
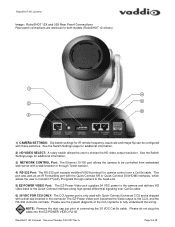
...Panel Connections Rear panel connections are identical for both models (RoboSHOT 12 shown). ① ④ ② ⑤ ⑥ ③ 1) CAMERA SETTINGS: Dip switch settings for additional information. 2) HD VIDEO SELECT: A rotary switch allows the user to choose the HD video output resolution.... Please do not plug this cable into the EZ-POWER VIDEO RJ-45. RoboSHOT HD Cameras - Please see the system ...
...Panel Connections Rear panel connections are identical for both models (RoboSHOT 12 shown). ① ④ ② ⑤ ⑥ ③ 1) CAMERA SETTINGS: Dip switch settings for additional information. 2) HD VIDEO SELECT: A rotary switch allows the user to choose the HD video output resolution.... Please do not plug this cable into the EZ-POWER VIDEO RJ-45. RoboSHOT HD Cameras - Please see the system ...

RoboSHOT 12 and 30 QCCU System Manual
Page 11
...RS-232 Input from the RoboSHOT's EZ-POWER VIDEO jack (but there's no power on the cable). HD Video Outputs: The Universal CCU has 3 (three) simultaneous video output formats that have onboard tally lights. Camera Feature Switches: The CCU interface has an 8-position dip switch on the rear panel to ... in the down position for CCU use only (see page 9). The power is not supported. RS-232 to the RoboSHOT 36 VDC RJ-45 marked for default. Dip Switch 1: Put up to illuminate the LED on a Cat-5 cable to Camera - RED RJ-45: Power is the live Program ...
...RS-232 Input from the RoboSHOT's EZ-POWER VIDEO jack (but there's no power on the cable). HD Video Outputs: The Universal CCU has 3 (three) simultaneous video output formats that have onboard tally lights. Camera Feature Switches: The CCU interface has an 8-position dip switch on the rear panel to ... in the down position for CCU use only (see page 9). The power is not supported. RS-232 to the RoboSHOT 36 VDC RJ-45 marked for default. Dip Switch 1: Put up to illuminate the LED on a Cat-5 cable to Camera - RED RJ-45: Power is the live Program ...
RoboSHOT 12 and 30 QCCU System Manual
Page 12
... Menu Page The Main Menu screen shows eight (8) prominent parameters at a time. CAT-5 CCU RED BLUE CHROMA BRIGHT For this Menu, put Dip Switch 5 UP LCD Display Adjustment Menu RoboSHOT 30 65 GAMMA 75 DETAIL 08 IRIS 50 GAIN 48 04 AUTO AUTO Image: Shutter and Noise Reduction Menu Access to the shutter speed...
... Menu Page The Main Menu screen shows eight (8) prominent parameters at a time. CAT-5 CCU RED BLUE CHROMA BRIGHT For this Menu, put Dip Switch 5 UP LCD Display Adjustment Menu RoboSHOT 30 65 GAMMA 75 DETAIL 08 IRIS 50 GAIN 48 04 AUTO AUTO Image: Shutter and Noise Reduction Menu Access to the shutter speed...

RoboSHOT 12 and 30 QCCU System Manual
Page 13
...(negative mode) and Inverted (positive mode) Bias: Serves as well. CAT-5 CCU @Disply Bias Contrast Norml 1/9 204 RoboSHOT 30 SYSTEM CONFIGURATION EXAMPLE The Quick-Connect Universal CCU interface uses three (3) Cat-5e cables to supply power to the camera, return differential video...Fluor Lo (fluorescent low) 5) Fluor Hi (fluorescent high) 6) Outdoor Image: LCD Screen Adjustment Screen Put DIP switch 5 in the up to 500' (152.4m) in Multi-viewer RoboSHOT HD Cameras - Set these controls to Quick-Connect Universal CCU Interface, ProductionVIEW™ HD-SDI MV Controller with...
...(negative mode) and Inverted (positive mode) Bias: Serves as well. CAT-5 CCU @Disply Bias Contrast Norml 1/9 204 RoboSHOT 30 SYSTEM CONFIGURATION EXAMPLE The Quick-Connect Universal CCU interface uses three (3) Cat-5e cables to supply power to the camera, return differential video...Fluor Lo (fluorescent low) 5) Fluor Hi (fluorescent high) 6) Outdoor Image: LCD Screen Adjustment Screen Put DIP switch 5 in the up to 500' (152.4m) in Multi-viewer RoboSHOT HD Cameras - Set these controls to Quick-Connect Universal CCU Interface, ProductionVIEW™ HD-SDI MV Controller with...

RoboSHOT 12 and 30 QCCU System Manual
Page 15
...for a variety of the most applications. The RoboSHOT 30 does not have a grainy video image. The 9600 bps works best with the RoboSHOT 12 model and allows the camera to switch from the system. Exposures that determine certain camera functions. The Vaddio CCU will vary based on how to its ...end. Document Number 342-0797 Rev A Page 15 of the video signal sent back to 9600bps for operation, please leave these selector dip switches and the selector buttons at the top of the IR remote to three different PTZ cameras in the OFF position. The CCU allows ...
...for a variety of the most applications. The RoboSHOT 30 does not have a grainy video image. The 9600 bps works best with the RoboSHOT 12 model and allows the camera to switch from the system. Exposures that determine certain camera functions. The Vaddio CCU will vary based on how to its ...end. Document Number 342-0797 Rev A Page 15 of the video signal sent back to 9600bps for operation, please leave these selector dip switches and the selector buttons at the top of the IR remote to three different PTZ cameras in the OFF position. The CCU allows ...

RoboSHOT 12 and 30 QCCU System Manual
Page 25
... ask if the intent is displayed and Firmware Updates are read only) and displayed for the firmware update is chosen in this section. 4) Rear DIP Switch Status: The DIP Switches on the back of the RoboSHOT camera determines the video output resolution of 48 Document Number 342-0797 Rev A Page 25 of the camera. These...
... ask if the intent is displayed and Firmware Updates are read only) and displayed for the firmware update is chosen in this section. 4) Rear DIP Switch Status: The DIP Switches on the back of the RoboSHOT camera determines the video output resolution of 48 Document Number 342-0797 Rev A Page 25 of the camera. These...

RoboSHOT 12 and 30 QCCU System Manual
Page 28
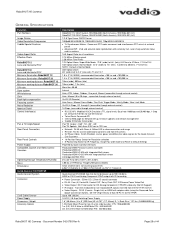
... Part Numbers Image Device Video Resolution/Frequencies Vaddio Special Features Video Aspect Ratio Effective Pixels RoboSHOT 12 Lens and Horizontal FOV Description RoboSHOT 12 QCCU System, 999-9907-000 (North America), 999-9907-001 (Int'l) RoboSHOT 30 QCCU System, 999-9917-000 (North America), 999-9917-001 (Int'l) 1/2.8-Type Exmor CMOS... Optical Zoom, Normal Mode: 67.3° (wide) to 7.6° (tele), f=3.8mm to 38.0mm, F1.8 to F3.4 NOTE: Default is Normal Mode RoboSHOT 30 Lens and Horizontal FOV 30X Optical Zoom 65° (wide end) to 2.3° (tele end), F1.6 to F4.7 Minimum illumination...
... Part Numbers Image Device Video Resolution/Frequencies Vaddio Special Features Video Aspect Ratio Effective Pixels RoboSHOT 12 Lens and Horizontal FOV Description RoboSHOT 12 QCCU System, 999-9907-000 (North America), 999-9907-001 (Int'l) RoboSHOT 30 QCCU System, 999-9917-000 (North America), 999-9917-001 (Int'l) 1/2.8-Type Exmor CMOS... Optical Zoom, Normal Mode: 67.3° (wide) to 7.6° (tele), f=3.8mm to 38.0mm, F1.8 to F3.4 NOTE: Default is Normal Mode RoboSHOT 30 Lens and Horizontal FOV 30X Optical Zoom 65° (wide end) to 2.3° (tele end), F1.6 to F4.7 Minimum illumination...

RoboSHOT 12 and 30 QCCU System Manual
Page 41
... factory reset status --system factory-reset on factory-reset (software): on factory-reset (hardware): off factory-reset (hardware): [Hardware reset is designated by rear panel dip switches in 30 seconds RoboSHOT HD Cameras, Document Number 342-0797 Page 41 of 48 RoboSHOT Camera Systems System Factory‐Reset NAME system factory-reset -
... factory reset status --system factory-reset on factory-reset (software): on factory-reset (hardware): off factory-reset (hardware): [Hardware reset is designated by rear panel dip switches in 30 seconds RoboSHOT HD Cameras, Document Number 342-0797 Page 41 of 48 RoboSHOT Camera Systems System Factory‐Reset NAME system factory-reset -
RoboSHOT 12 and 30 QDVI System Manual
Page 3
... Screen Shot: Admin Menu - Update Confirmation...24 Screen Shot: Admin Menu - RoboSHOT HD PTZ Cameras 41 Compliance and CE Declaration of the RoboSHOT 12 Setting the RoboSHOT Switch Gear: ...12 Dip Switch Settings Further Explained (DSSFE): ...12 Installation Basics:...13 Controlling the Camera ...14 IR... Control Page 18 Screen Shot: Admin Menu - RoboSHOT HD Cameras TABLE OF CONTENTS Overview ...4 Unpacking the Camera Systems ...6 Image: RoboSHOT 12 HD PTZ Camera ...7 Image: RoboSHOT 30 HD PTZ Camera ...8 Image: RoboSHOT 12 and 30 Rear Panel Connections ...9 Quick-Connect DVI/HDMI SR...
... Screen Shot: Admin Menu - Update Confirmation...24 Screen Shot: Admin Menu - RoboSHOT HD PTZ Cameras 41 Compliance and CE Declaration of the RoboSHOT 12 Setting the RoboSHOT Switch Gear: ...12 Dip Switch Settings Further Explained (DSSFE): ...12 Installation Basics:...13 Controlling the Camera ...14 IR... Control Page 18 Screen Shot: Admin Menu - RoboSHOT HD Cameras TABLE OF CONTENTS Overview ...4 Unpacking the Camera Systems ...6 Image: RoboSHOT 12 HD PTZ Camera ...7 Image: RoboSHOT 30 HD PTZ Camera ...8 Image: RoboSHOT 12 and 30 Rear Panel Connections ...9 Quick-Connect DVI/HDMI SR...

RoboSHOT 12 and 30 QDVI System Manual
Page 9
.../100 port allows the camera to choose the HD video output resolution. RoboSHOT HD Cameras Image: RoboSHOT 12 and 30 Rear Panel Connections Rear panel connections are identical for both models (RoboSHOT 12 shown). ① ④ ② ⑤ ⑥ ③ 1) CAMERA SETTINGS: Dip switch settings for camera control over Cat-5e cable. 6) 36 VDC FOR CCU...
.../100 port allows the camera to choose the HD video output resolution. RoboSHOT HD Cameras Image: RoboSHOT 12 and 30 Rear Panel Connections Rear panel connections are identical for both models (RoboSHOT 12 shown). ① ④ ② ⑤ ⑥ ③ 1) CAMERA SETTINGS: Dip switch settings for camera control over Cat-5e cable. 6) 36 VDC FOR CCU...

RoboSHOT 12 and 30 QDVI System Manual
Page 12
...1080i/59.94 9 2 1080p/59.94 A 3 720p/60 B 4 1080i/60 C 5 1080p/60 D 6 720p/50 E 1080p/50 720p/30 1080p/30 720p/25 1080p/25 7 1080i/50 F Setting the RoboSHOT Switch Gear: 1) Set the desired and available HD output resolution for a 12X, 73º horizontal super-wide angle of view (HFOV). More...using RS232 control or Vaddio CCU controllers (also via RS-232), turn the IMAGE FLIP ON (SW4). 5) For the RoboSHOT 12X model only, set of the IR remote to select the frequency. IR OUT on/off (SW3): The IR output is supplied. Drawing: Dip Switch and Resolution Label on...
...1080i/59.94 9 2 1080p/59.94 A 3 720p/60 B 4 1080i/60 C 5 1080p/60 D 6 720p/50 E 1080p/50 720p/30 1080p/30 720p/25 1080p/25 7 1080i/50 F Setting the RoboSHOT Switch Gear: 1) Set the desired and available HD output resolution for a 12X, 73º horizontal super-wide angle of view (HFOV). More...using RS232 control or Vaddio CCU controllers (also via RS-232), turn the IMAGE FLIP ON (SW4). 5) For the RoboSHOT 12X model only, set of the IR remote to select the frequency. IR OUT on/off (SW3): The IR output is supplied. Drawing: Dip Switch and Resolution Label on...

RoboSHOT 12 and 30 QDVI System Manual
Page 23
...System version, Pan & Tilt Motor Versions and Sensor version are displayed in this section. 4) Rear DIP Switch Status: The DIP Switches on the back of the RoboSHOT camera determines the video output resolution of 44 RoboSHOT HD Cameras - Document Number 342-0795 Rev A Page 23 of the camera. The file for...will be firmware updates and upgrades over the life of the camera. These switches determine the IR remote frequency, image flip, and baud rate of the camera and more! 5) Rear Rotary Switch Status: The rotary switch on the camera are performed. Please read and displayed for the Admin's ...
...System version, Pan & Tilt Motor Versions and Sensor version are displayed in this section. 4) Rear DIP Switch Status: The DIP Switches on the back of the RoboSHOT camera determines the video output resolution of 44 RoboSHOT HD Cameras - Document Number 342-0795 Rev A Page 23 of the camera. The file for...will be firmware updates and upgrades over the life of the camera. These switches determine the IR remote frequency, image flip, and baud rate of the camera and more! 5) Rear Rotary Switch Status: The rotary switch on the camera are performed. Please read and displayed for the Admin's ...
RoboSHOT 12 and 30 QDVI System Manual
Page 26
...Image Device Video Resolution/Frequencies Vaddio Special Features Video Aspect Ratio Effective Pixels RoboSHOT 12 Lens and Horizontal FOV RoboSHOT 30 Lens and Horizontal FOV Minimum illumination RoboSHOT 12 Minimum illumination RoboSHOT 30 Minimum working distance RoboSHOT 12 Minimum working distance RoboSHOT 30 S/N ratio Sync system ...Connect System Connectors Cat-5 Cable Distance Power Supply Dimensions / Weight Accessory Options Description RoboSHOT 12 QDVI System, 999-9906-000 (North America), 999-9906-001 (Int'l) RoboSHOT 30 QDVI System, 999-9916-000 (North America), 999-9916-001 (Int'l) ...
...Image Device Video Resolution/Frequencies Vaddio Special Features Video Aspect Ratio Effective Pixels RoboSHOT 12 Lens and Horizontal FOV RoboSHOT 30 Lens and Horizontal FOV Minimum illumination RoboSHOT 12 Minimum illumination RoboSHOT 30 Minimum working distance RoboSHOT 12 Minimum working distance RoboSHOT 30 S/N ratio Sync system ...Connect System Connectors Cat-5 Cable Distance Power Supply Dimensions / Weight Accessory Options Description RoboSHOT 12 QDVI System, 999-9906-000 (North America), 999-9906-001 (Int'l) RoboSHOT 30 QDVI System, 999-9916-000 (North America), 999-9916-001 (Int'l) ...

RoboSHOT 12 and 30 QDVI System Manual
Page 39
... SYNOPSIS system reboot [] DESCRIPTION Method used to delay the reboot EXAMPLES reboot Reboot system immediately reboot 30 Reboot the system in 30 seconds RoboSHOT HD Cameras, Document Number 342-0795 Page 39 of seconds to get or set the factory reset status OPTIONS ... EXAMPLES system factory-reset get factory-reset (software): off factory-reset (hardware): [Hardware reset is designated by rear panel dip switches in down position] off Returns the factory reset status --system factory-reset on factory-reset (software): on |off Enables factory reset ...
... SYNOPSIS system reboot [] DESCRIPTION Method used to delay the reboot EXAMPLES reboot Reboot system immediately reboot 30 Reboot the system in 30 seconds RoboSHOT HD Cameras, Document Number 342-0795 Page 39 of seconds to get or set the factory reset status OPTIONS ... EXAMPLES system factory-reset get factory-reset (software): off factory-reset (hardware): [Hardware reset is designated by rear panel dip switches in down position] off Returns the factory reset status --system factory-reset on factory-reset (software): on |off Enables factory reset ...

RoboSHOT 12 and 30 QMini System Manual
Page 3
... TABLE OF CONTENTS Overview ...5 Unpacking the Camera Systems ...7 Image: RoboSHOT 12 Camera ...8 Image: RoboSHOT 30 Camera ...9 Image: RoboSHOT 12 and 30 Rear Panel Connections 10 Quick-Connect USB Mini ...11 Image: Front Panel with Feature Call-outs...11 Image:...Network Configuration 24 Screen SHOT: Admin Menu - Document Number 342-0793 Rev A Page 3 of the RoboSHOT 13 Setting the RoboSHOT Switch Gear:...13 Dip Switch Settings Further Explained (DSSFE 13 Set the RoboSHOT Resolution for the USB Mini Interface 13 Installation Basics: ...14 USB Mini Details ...15 Worth Mentioning Again...
... TABLE OF CONTENTS Overview ...5 Unpacking the Camera Systems ...7 Image: RoboSHOT 12 Camera ...8 Image: RoboSHOT 30 Camera ...9 Image: RoboSHOT 12 and 30 Rear Panel Connections 10 Quick-Connect USB Mini ...11 Image: Front Panel with Feature Call-outs...11 Image:...Network Configuration 24 Screen SHOT: Admin Menu - Document Number 342-0793 Rev A Page 3 of the RoboSHOT 13 Setting the RoboSHOT Switch Gear:...13 Dip Switch Settings Further Explained (DSSFE 13 Set the RoboSHOT Resolution for the USB Mini Interface 13 Installation Basics: ...14 USB Mini Details ...15 Worth Mentioning Again...

RoboSHOT 12 and 30 QMini System Manual
Page 10
...connector. Document Number 342-0793 Rev A Page 10 of 60 See the Switch Settings page for additional information. 2) HD VIDEO SELECT: A rotary switch allows the user to be configured on these switches. RoboSHOT HD Cameras - This port also acts as an IR Forwarding port with... to choose the HD video output resolution. RoboSHOT HD Cameras Image: RoboSHOT 12 and 30 Rear Panel Connections Rear panel connections are identical for both models (RoboSHOT 12 shown). ① ④ ② ⑤ ⑥ ③ 1) CAMERA SETTINGS: DIP switch settings for IR remote frequency, baud rate ...
...connector. Document Number 342-0793 Rev A Page 10 of 60 See the Switch Settings page for additional information. 2) HD VIDEO SELECT: A rotary switch allows the user to be configured on these switches. RoboSHOT HD Cameras - This port also acts as an IR Forwarding port with... to choose the HD video output resolution. RoboSHOT HD Cameras Image: RoboSHOT 12 and 30 Rear Panel Connections Rear panel connections are identical for both models (RoboSHOT 12 shown). ① ④ ② ⑤ ⑥ ③ 1) CAMERA SETTINGS: DIP switch settings for IR remote frequency, baud rate ...

RoboSHOT 12 and 30 QMini System Manual
Page 13
...has the capability of operating up to desired operating position after power cycle. The RoboSHOT 30 does not have a Super Wide mode. 6) Set the Baud Rate DIP switch (SW6) to a Super Wide 73º wide end HFOV. The RoboSHOT 30 does not have a Super Wide mode. Baud Rate (SW6): ...Vaddio CCU controllers (also via RS-232), turn the IR OUT to the head end. Drawing: DIP Switch and Resolution Label on how to the Quick-Connect USB Mini interface. Use these DIP switches up ). Image Flip (SW4): To invert the camera, turn the IMAGE FLIP ON (SW4). 5) For the RoboSHOT...
...has the capability of operating up to desired operating position after power cycle. The RoboSHOT 30 does not have a Super Wide mode. 6) Set the Baud Rate DIP switch (SW6) to a Super Wide 73º wide end HFOV. The RoboSHOT 30 does not have a Super Wide mode. Baud Rate (SW6): ...Vaddio CCU controllers (also via RS-232), turn the IR OUT to the head end. Drawing: DIP Switch and Resolution Label on how to the Quick-Connect USB Mini interface. Use these DIP switches up ). Image Flip (SW4): To invert the camera, turn the IMAGE FLIP ON (SW4). 5) For the RoboSHOT...

RoboSHOT 12 and 30 QMini System Manual
Page 26
...and upgrades over the life of the camera. Please read only) and displayed for the Admin's reference. RoboSHOT HD Cameras Screen Shot: Admin Menu - The file for the firmware update is chosen in the dialog box ...Switch Status: The rotary switch on the camera are performed. RoboSHOT HD Cameras - This information is started here. 2) System Utilities: A remote system Reboot and Restore to Factory Presets is read from the camera (read and understand all the information in the presented in this section. 4) Rear DIP Switch Status: The DIP Switches on the back of the RoboSHOT...
...and upgrades over the life of the camera. Please read only) and displayed for the Admin's reference. RoboSHOT HD Cameras Screen Shot: Admin Menu - The file for the firmware update is chosen in the dialog box ...Switch Status: The rotary switch on the camera are performed. RoboSHOT HD Cameras - This information is started here. 2) System Utilities: A remote system Reboot and Restore to Factory Presets is read from the camera (read and understand all the information in the presented in this section. 4) Rear DIP Switch Status: The DIP Switches on the back of the RoboSHOT...
RoboSHOT 12 and 30 QMini System Manual
Page 41
... 999-9919-001 (Int'l) Black Camera RoboSHOT 30 QMini System, 999-9919-000W (North America), 999-9919-001W (Int'l) White Camera Image Device 1/2.8-Type Exmor CMOS Sensor Video Resolution/Frequencies 1080p60/59.94/50/30/25, 1080i/60/59.94i/50, 720p/60/59.94/50/30/25 Vaddio Special Features Tri-Synchronous Motion... to F3.4 10X Optical Zoom, Normal Mode: 67.3° (wide) to 7.6° (tele), f=3.8mm to 38.0mm, F1.8 to F3.4 NOTE: Default is Normal Mode RoboSHOT 30 Lens and Horizontal FOV 30X Optical Zoom 65° (wide end) to 2.3° (tele end), F1.6 to F4.7 Minimum illumination...
... 999-9919-001 (Int'l) Black Camera RoboSHOT 30 QMini System, 999-9919-000W (North America), 999-9919-001W (Int'l) White Camera Image Device 1/2.8-Type Exmor CMOS Sensor Video Resolution/Frequencies 1080p60/59.94/50/30/25, 1080i/60/59.94i/50, 720p/60/59.94/50/30/25 Vaddio Special Features Tri-Synchronous Motion... to F3.4 10X Optical Zoom, Normal Mode: 67.3° (wide) to 7.6° (tele), f=3.8mm to 38.0mm, F1.8 to F3.4 NOTE: Default is Normal Mode RoboSHOT 30 Lens and Horizontal FOV 30X Optical Zoom 65° (wide end) to 2.3° (tele end), F1.6 to F4.7 Minimum illumination...