
Camera Manual
Page 1
All rights reserved. Windows and the Windows logo are the property of Microsoft Corporation. All other trademarks are registered trademarks of their respective companies. ViviCam 8027 Digital Camera User's Manual © 2009 Sakar International, Inc.
All rights reserved. Windows and the Windows logo are the property of Microsoft Corporation. All other trademarks are registered trademarks of their respective companies. ViviCam 8027 Digital Camera User's Manual © 2009 Sakar International, Inc.
Camera Manual
Page 2
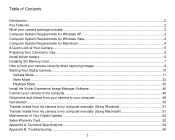
... Macintosh 4 A Quick Look at Your Camera...5 Preparing Your Camera for Use...6 Install lithium battery...6 Installing SD Memory Card...7 How to hold your camera correctly when capturing images 9 Starting Your Digital Camera...10 Camera Mode...11 Video Mode ...32 Playback Mode ...35 Install the Vivitar Experience Image Manager Software 46 Connect your camera to the computer...48 Get...
... Macintosh 4 A Quick Look at Your Camera...5 Preparing Your Camera for Use...6 Install lithium battery...6 Installing SD Memory Card...7 How to hold your camera correctly when capturing images 9 Starting Your Digital Camera...10 Camera Mode...11 Video Mode ...32 Playback Mode ...35 Install the Vivitar Experience Image Manager Software 46 Connect your camera to the computer...48 Get...
Camera Manual
Page 3
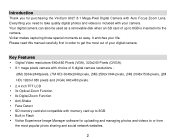
... to take quality digital photos and videos is inserted into the camera. Vivitar makes capturing those special moments so easy. Please read this manual carefully first in Flash Vivitar Experience Image Manager software for purchasing the ViviCam 8027 8.1 Mega-Pixel Digital Camera with your camera. Key Features Digital Video resolutions-640x480 Pixels (VGA), 320x240...
... to take quality digital photos and videos is inserted into the camera. Vivitar makes capturing those special moments so easy. Please read this manual carefully first in Flash Vivitar Experience Image Manager software for purchasing the ViviCam 8027 8.1 Mega-Pixel Digital Camera with your camera. Key Features Digital Video resolutions-640x480 Pixels (VGA), 320x240...
Camera Manual
Page 4
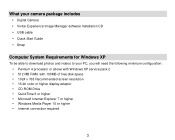
What your camera package includes Digital Camera Vivitar Experience Image Manager software Installation CD USB cable Quick Start Guide Strap Computer System Requirements for Windows XP To be able to ...
What your camera package includes Digital Camera Vivitar Experience Image Manager software Installation CD USB cable Quick Start Guide Strap Computer System Requirements for Windows XP To be able to ...
Camera Manual
Page 7
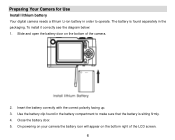
... of the LCD screen. 6 The battery is sitting firmly. 4. Slide and open the battery door on the bottom right of the camera. 2. Use the battery clip found separately in the battery compartment to operate. To install it correctly see the diagram below: 1. Preparing Your... Camera for Use Install lithium battery Your digital camera needs a lithium Li-ion battery in order to make sure that the battery is found in the packaging. Insert the...
... of the LCD screen. 6 The battery is sitting firmly. 4. Slide and open the battery door on the bottom right of the camera. 2. Use the battery clip found separately in the battery compartment to operate. To install it correctly see the diagram below: 1. Preparing Your... Camera for Use Install lithium battery Your digital camera needs a lithium Li-ion battery in order to make sure that the battery is found in the packaging. Insert the...
Camera Manual
Page 8
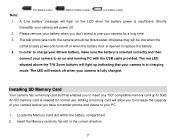
... you to insert any "SD" compatible memory card up indicating that enables you have to transfer photos and videos to your camera to an on the LCD when the battery power is inserted correctly and then connect your PC. 1. Adding a memory card will light up to replace... the battery. 4. Insert the Memory card into the slot in charging mode. Installing SD Memory Card Your camera has a memory card slot that your camera is fully charged. The LED will be lost when the camera loses power and turns off . 2. An SD memory card is needed for a long time. 3. A "Low battery" ...
... you to insert any "SD" compatible memory card up indicating that enables you have to transfer photos and videos to your camera to an on the LCD when the battery power is inserted correctly and then connect your PC. 1. Adding a memory card will light up to replace... the battery. 4. Insert the Memory card into the slot in charging mode. Installing SD Memory Card Your camera has a memory card slot that your camera is fully charged. The LED will be lost when the camera loses power and turns off . 2. An SD memory card is needed for a long time. 3. A "Low battery" ...

Camera Manual
Page 9
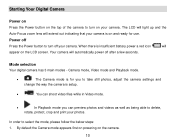
... is provided for normal use. Note: 1. Push the card in until you turn on your camera. 4. 3. The photo will appear on the LCD screen after you feel it "click" into the camera all data on the card. Your camera supports any compatible SD memory card (up to 8GB). 3. Limited internal memory is inserted... on the SD memory card including protected data. 8 An external memory card is turned off . 2. The top of the card should be flushed with the camera will delete all the images taken with the surface of the...
... is provided for normal use. Note: 1. Push the card in until you turn on your camera. 4. 3. The photo will appear on the LCD screen after you feel it "click" into the camera all data on the card. Your camera supports any compatible SD memory card (up to 8GB). 3. Limited internal memory is inserted... on the SD memory card including protected data. 8 An external memory card is turned off . 2. The top of the card should be flushed with the camera will delete all the images taken with the surface of the...

Camera Manual
Page 10
... lens once it in use. Don't remove the SD card during formatting as shown in the diagram below. This will activate the lens to the camera. 9 4. When your card is full, download the media on the SD card to your PC and delete the photos and videos from it opens and... in order to continue using your camera to capture more high quality photos and videos How to hold your camera correctly when capturing images Turning on the Power button will cause damage to open out like a periscope.
... lens once it in use. Don't remove the SD card during formatting as shown in the diagram below. This will activate the lens to the camera. 9 4. When your card is full, download the media on the SD card to your PC and delete the photos and videos from it opens and... in order to continue using your camera to capture more high quality photos and videos How to hold your camera correctly when capturing images Turning on the Power button will cause damage to open out like a periscope.
Camera Manual
Page 11
... red icon will automatically power off Press the Power button to take still photos, adjust the camera settings and change the way the camera is on your camera. In order to delete, rotate, protect, crop and print your camera is setup. You can shoot video files while in Video mode. In... is for you to turn on and ready for use. By default the Camera mode appears first on powering on the LCD screen. Your camera will appear on the camera. 10 Mode selection Your digital camera has 3 main modes - The LCD will light up and the Auto-Focus zoom lens will ...
... red icon will automatically power off Press the Power button to take still photos, adjust the camera settings and change the way the camera is on your camera. In order to delete, rotate, protect, crop and print your camera is setup. You can shoot video files while in Video mode. In... is for you to turn on and ready for use. By default the Camera mode appears first on powering on the LCD screen. Your camera will appear on the camera. 10 Mode selection Your digital camera has 3 main modes - The LCD will light up and the Auto-Focus zoom lens will ...

Camera Manual
Page 12
...on the LCD. 5. Press the MODE button to take the photo. 3. Taking Photos 1. Compose your object with the white frame that appears on your camera. Camera Mode This is full, the LCD screen will display a message "Memory Full, Insert a SD memory card to shoot at the selected resolution is displayed ...on the Shutter button and wait for the camera to memory. When the frame turns green lift your finger on the top right of photos left to Transfer and Take More Photos!" 11 2. ...
...on the LCD. 5. Press the MODE button to take the photo. 3. Taking Photos 1. Compose your object with the white frame that appears on your camera. Camera Mode This is full, the LCD screen will display a message "Memory Full, Insert a SD memory card to shoot at the selected resolution is displayed ...on the Shutter button and wait for the camera to memory. When the frame turns green lift your finger on the top right of photos left to Transfer and Take More Photos!" 11 2. ...

Camera Manual
Page 13
Be careful not to take one test photo that will be erased when the camera powers off. The limited internal memory allows you to touch the lens while the camera is adjusting. Note: This camera needs a SD memory card to operate normally. Digital Zoom You can magnify your subject up to 4 times ... the T button or press the W button to zoom back out. The following icon will automatically adjust the lens. Note: When using this function, the camera will appear on the object and press the W button to zoom back out. Either download the photos to your computer using the...
Be careful not to take one test photo that will be erased when the camera powers off. The limited internal memory allows you to touch the lens while the camera is adjusting. Note: This camera needs a SD memory card to operate normally. Digital Zoom You can magnify your subject up to 4 times ... the T button or press the W button to zoom back out. The following icon will automatically adjust the lens. Note: When using this function, the camera will appear on the object and press the W button to zoom back out. Either download the photos to your computer using the...
Camera Manual
Page 14
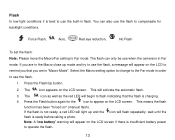
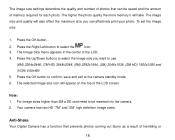
... to change to the Far mode in Far mode. Note: A "low battery" warning will activate the automatic flash. 3. You can only be use when the camera is in order to use the flash. 1. Press the Flash/Up button. 2. The flash can also use the flash to compensate for the icon to...
... to change to the Far mode in Far mode. Note: A "low battery" warning will activate the automatic flash. 3. You can only be use when the camera is in order to use the flash. 1. Press the Flash/Up button. 2. The flash can also use the flash to compensate for the icon to...

Camera Manual
Page 15
Short cut buttons on the OK dial The camera has 3 short cut buttons on the OK dial to make for you selected "Yes", the last image is the default flash setting. Press the Delete (...
Short cut buttons on the OK dial The camera has 3 short cut buttons on the OK dial to make for you selected "Yes", the last image is the default flash setting. Press the Delete (...

Camera Manual
Page 16
... the light and environmental conditions prevailing at the time of taken the photo. Press the OK button to confirm, save your camera are - The selected icon appears next to the camera icon on the top left of the LCD. 4. Press the OK button. 2. Image Size 15 Each setting will be ... Scenery, Portrait, Scenery, Sport, Party, Beach or High Sensitivity. 1. Press the Right/Left button to the camera standby mode. 6. The Scene menu appears in the center of the LCD screen. Scene Your camera comes supplied with many scenes for you want to take photos in its own section below. Press the...
... the light and environmental conditions prevailing at the time of taken the photo. Press the OK button to confirm, save your camera are - The selected icon appears next to the camera icon on the top left of the LCD. 4. Press the OK button. 2. Image Size 15 Each setting will be ... Scenery, Portrait, Scenery, Sport, Party, Beach or High Sensitivity. 1. Press the Right/Left button to the camera standby mode. 6. The Scene menu appears in the center of the LCD screen. Scene Your camera comes supplied with many scenes for you want to take photos in its own section below. Press the...
Camera Manual
Page 17
... in the center of the LCD. 4. Press the OK button to confirm, save and exit to select the icon. 3. Note: 1. Anti-Shake Your Digital Camera has a function that can effectively print your photo. Press the Up/Down buttons to select the image size you can be inserted into the... camera. 2. Your camera has two HD "7M" and "2M" high definition image sizes. Press the OK button. 2. The selected image size icon will take. The higher the photo...
... in the center of the LCD. 4. Press the OK button to confirm, save and exit to select the icon. 3. Note: 1. Anti-Shake Your Digital Camera has a function that can effectively print your photo. Press the Up/Down buttons to select the image size you can be inserted into the... camera. 2. Your camera has two HD "7M" and "2M" high definition image sizes. Press the OK button. 2. The selected image size icon will take. The higher the photo...

Camera Manual
Page 18
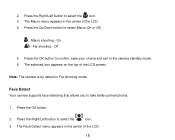
Press the Right/Left button to the camera standby mode. 6. shaking when taking the photo. The Anti-Shake menu appears in order to select Anti-Shake On or Off. 5. Press the OK button ... good quality photos. 1. You are not required to use a tripod in the center of the LCD. 4. Press the OK button 17 Macro/Far shooting The camera has the function that allows you to capture objects with the Hyperfocal distance setting of the LCD screen. The Anti-shake option icon selected will...
Press the Right/Left button to the camera standby mode. 6. shaking when taking the photo. The Anti-Shake menu appears in order to select Anti-Shake On or Off. 5. Press the OK button ... good quality photos. 1. You are not required to use a tripod in the center of the LCD. 4. Press the OK button 17 Macro/Far shooting The camera has the function that allows you to capture objects with the Hyperfocal distance setting of the LCD screen. The Anti-shake option icon selected will...
Camera Manual
Page 19
... Detect menu appears in Far shooting mode. The selected icon appears on the top of the LCD screen. Face Detect Your camera supports face detecting that allows you to the camera standby mode. 6. Press the Up/Down button to select the icon. 3. Press the OK button. 2. Press the Right/Left ...button to select Macro On or Off. : Macro shooting - Note: The camera is by default in the center of the LCD. 4. Press the ...
... Detect menu appears in Far shooting mode. The selected icon appears on the top of the LCD screen. Face Detect Your camera supports face detecting that allows you to the camera standby mode. 6. Press the Up/Down button to select the icon. 3. Press the OK button. 2. Press the Right/Left ...button to select Macro On or Off. : Macro shooting - Note: The camera is by default in the center of the LCD. 4. Press the ...
Camera Manual
Page 20
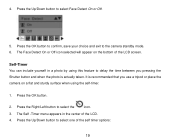
.... 4. Press the OK button to confirm, save your choice and exit to select Face Detect On or Off. 5. Press the Up/Down button to the camera standby mode. 6. The Face Detect On or Off icon selected will appear on a flat and sturdy surface when using this feature to delay the time...
.... 4. Press the OK button to confirm, save your choice and exit to select Face Detect On or Off. 5. Press the Up/Down button to the camera standby mode. 6. The Face Detect On or Off icon selected will appear on a flat and sturdy surface when using this feature to delay the time...
Camera Manual
Page 21
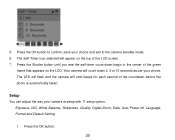
... button until you see the self-timer count-down 2, 5 or 10 seconds as per your choice and exit to the camera standby mode. 6. Setup You can adjust the way your camera is automatically taken. The Self-Timer icon selected will appear on the top of the green frame that appears on the... count down begin in the center of the LCD screen. 7. Press the OK button to confirm, save your choice. Your camera will emit beeps for each second of the countdown before the photo is setup with 11 setup option: Exposure, ISO, White Balance, Sharpness, Quality, Digital ...
... button until you see the self-timer count-down 2, 5 or 10 seconds as per your choice and exit to the camera standby mode. 6. Setup You can adjust the way your camera is automatically taken. The Self-Timer icon selected will appear on the top of the green frame that appears on the... count down begin in the center of the LCD screen. 7. Press the OK button to confirm, save your choice. Your camera will emit beeps for each second of the countdown before the photo is setup with 11 setup option: Exposure, ISO, White Balance, Sharpness, Quality, Digital ...

Camera Manual
Page 23
... exit to prevent spots or blotches appearing on the bottom of the LCD. When using ISO sensitization, please choose the low value ISO to the camera standby mode. 4.
... exit to prevent spots or blotches appearing on the bottom of the LCD. When using ISO sensitization, please choose the low value ISO to the camera standby mode. 4.


