Warranty
Page 1
... -1- TIME PERIOD OF THIS WARRANTY The time period of this warranty starts from the purchase, use or inability to use this product even if Vivitar has been advised of such damages. This warranty shall not extend to any defects in this product which result from accident, abuse, misuse, failure... or consequential damages arising from the date of the original purchase and expires on the first anniversary date of purchase. Limited One Year Warranty Vivitar warrants this quality product to be free of defects in or exposure to chemicals or liquids, extremes of climate, fungus, excessive wear and ...
... -1- TIME PERIOD OF THIS WARRANTY The time period of this warranty starts from the purchase, use or inability to use this product even if Vivitar has been advised of such damages. This warranty shall not extend to any defects in this product which result from accident, abuse, misuse, failure... or consequential damages arising from the date of the original purchase and expires on the first anniversary date of purchase. Limited One Year Warranty Vivitar warrants this quality product to be free of defects in or exposure to chemicals or liquids, extremes of climate, fungus, excessive wear and ...

Warranty
Page 2
... a sturdy mailing container to you would like to State thereof. c) When possible, a sample evidencing the problem. Return item (insured) to: (in the U.S.): Vivitar Attn: Technical Support 195 Carter Drive Edison NJ 08817 (in the U.K.) Sakar UK 2D Siskin Parkway East CV3 4PE, UK When service is a result in... from country and State to call 0800 917 4831. For phone support in the US please call 1-800-592-9541, in wear and tear, Vivitar may levy a handling charge for your problem. WHAT TO DO WHEN SERVICE IS NEEDED STEP 1. b) Detailed description of your questions. For more ...
... a sturdy mailing container to you would like to State thereof. c) When possible, a sample evidencing the problem. Return item (insured) to: (in the U.S.): Vivitar Attn: Technical Support 195 Carter Drive Edison NJ 08817 (in the U.K.) Sakar UK 2D Siskin Parkway East CV3 4PE, UK When service is a result in... from country and State to call 0800 917 4831. For phone support in the US please call 1-800-592-9541, in wear and tear, Vivitar may levy a handling charge for your problem. WHAT TO DO WHEN SERVICE IS NEEDED STEP 1. b) Detailed description of your questions. For more ...
Camera Manual
Page 1
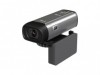
All rights reserved. Windows and the Windows logo are the property of Microsoft Corporation. All other trademarks are registered trademarks of their respective companies. DVR 650 Digital Video Camera User Manual © 2010 Sakar International, Inc.
All rights reserved. Windows and the Windows logo are the property of Microsoft Corporation. All other trademarks are registered trademarks of their respective companies. DVR 650 Digital Video Camera User Manual © 2010 Sakar International, Inc.

Camera Manual
Page 2
Contents Introduction ...2 What Your Camera Includes...2 Parts of the Camera ...3 Initial Camera Setup...4 Main Camera Modes ...5 Camera Technical Specifications 6 Computer System Requirements - Windows 7 Computer System Requirements - Macintosh 7 Using Your Digital Camera ...8 Changing Camera Mode ...8 Navigating the Menus...9 Video Capture Mode ...10 Video Playback Mode...18 Photo Capture Mode ...22 Photo Playback Mode ...32 Connecting the Camera to a TV 35 Connecting the Camera to a Headset 36 Installing the Software ...37 Connecting the Camera to the Computer 38 Getting Photos ...
Contents Introduction ...2 What Your Camera Includes...2 Parts of the Camera ...3 Initial Camera Setup...4 Main Camera Modes ...5 Camera Technical Specifications 6 Computer System Requirements - Windows 7 Computer System Requirements - Macintosh 7 Using Your Digital Camera ...8 Changing Camera Mode ...8 Navigating the Menus...9 Video Capture Mode ...10 Video Playback Mode...18 Photo Capture Mode ...22 Photo Playback Mode ...32 Connecting the Camera to a TV 35 Connecting the Camera to a Headset 36 Installing the Software ...37 Connecting the Camera to the Computer 38 Getting Photos ...

Camera Manual
Page 3
... 3. TV Cable 4. In order to expand the memory capacity to capture more images insert an SD Memory card (up to be purchased separately. Vivitar Experience Image Manager - Walmart Edition software Installation CD 5. SD Memory cards are not included and need to take quality digital photos and videos is ... with your digital camera. Everything you for purchasing this manual carefully first in order to get the most out of internal memory. Vivitar makes capturing those special moments as easy as possible. Wrist Strap Note: SD Memory Card not included 2 Digital Video Camera 2.
... 3. TV Cable 4. In order to expand the memory capacity to capture more images insert an SD Memory card (up to be purchased separately. Vivitar Experience Image Manager - Walmart Edition software Installation CD 5. SD Memory cards are not included and need to take quality digital photos and videos is ... with your digital camera. Everything you for purchasing this manual carefully first in order to get the most out of internal memory. Vivitar makes capturing those special moments as easy as possible. Wrist Strap Note: SD Memory Card not included 2 Digital Video Camera 2.

Camera Manual
Page 4
Shutter button 3. SET button 7. Delete / Right button 10. Wrist Strap connector 17. Parts of the Camera 1. Microphone /Speaker 3 Battery Compartment 14. T / Zoom In button 4. W / Zoom Out button 5. Slideshow / Up button 9. Power button 2. Scene / Left button 8. MODE button 6. ViviLink / Down button 11. LCD Screen 12. Lens 13. Memory Card Slot 15. USB/AV Slot 16.
Shutter button 3. SET button 7. Delete / Right button 10. Wrist Strap connector 17. Parts of the Camera 1. Microphone /Speaker 3 Battery Compartment 14. T / Zoom In button 4. W / Zoom Out button 5. Slideshow / Up button 9. Power button 2. Scene / Left button 8. MODE button 6. ViviLink / Down button 11. LCD Screen 12. Lens 13. Memory Card Slot 15. USB/AV Slot 16.
Camera Manual
Page 5
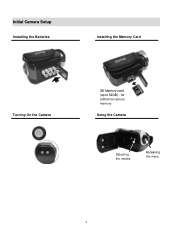
Initial Camera Setup Installing the Batteries Installing the Memory Card Turning On the Camera SD Memory card (up to 32GB) - for additional camera memory Using the Camera Selecting the modes Accessing the menu 4
Initial Camera Setup Installing the Batteries Installing the Memory Card Turning On the Camera SD Memory card (up to 32GB) - for additional camera memory Using the Camera Selecting the modes Accessing the menu 4

Camera Manual
Page 6
To take a picture, aim your camera as desired and press the Shutter button to start the record. The video will appear on the LCD screen while record is powered ON. To take a video, aim your camera as desired. Playback Mode (Photos & Videos) Use this mode to view and manage the photos and videos on your camera, press the MODE (M) button twice to open the Playback mode for photos and videos. This is the default mode when the camera is in the Video Capture mode. To access the various menus for the Playback mode for the Photo Capture mode, press the SET button while in ...
To take a picture, aim your camera as desired and press the Shutter button to start the record. The video will appear on the LCD screen while record is powered ON. To take a video, aim your camera as desired. Playback Mode (Photos & Videos) Use this mode to view and manage the photos and videos on your camera, press the MODE (M) button twice to open the Playback mode for photos and videos. This is the default mode when the camera is in the Video Capture mode. To access the various menus for the Playback mode for the Photo Capture mode, press the SET button while in ...

Camera Manual
Page 7
Camera Technical Specifications Image Sensor CMOS Sensor Image Resolution Video Resolution File Format (5M) 2592 x 1944 pixels, (3M) 2048 x 1536 pixels, (2M) 1600 x 1200 pixels, (2M HD) 1920 x 1080 pixels and (VGA) 640 x 480 pixels 640X480 pixels (30 fps), 320X240 pixels (30 fps) JPEG/AVI Internal Memory External Memory LCD Display 128 MB SD Card (up to 32GB) 1.8 Inch TFT Lens Zoom Exposure 3P 4X Digital Zoom -3.0EV ~ +3.0EV White Balance Scene Auto, Daylight, Cloudy, Incandescent , Fluorescent Auto / Scenery / Portrait / Night Scenery / Night Portrait / High Sensitivity / Sport / ...
Camera Technical Specifications Image Sensor CMOS Sensor Image Resolution Video Resolution File Format (5M) 2592 x 1944 pixels, (3M) 2048 x 1536 pixels, (2M) 1600 x 1200 pixels, (2M HD) 1920 x 1080 pixels and (VGA) 640 x 480 pixels 640X480 pixels (30 fps), 320X240 pixels (30 fps) JPEG/AVI Internal Memory External Memory LCD Display 128 MB SD Card (up to 32GB) 1.8 Inch TFT Lens Zoom Exposure 3P 4X Digital Zoom -3.0EV ~ +3.0EV White Balance Scene Auto, Daylight, Cloudy, Incandescent , Fluorescent Auto / Scenery / Portrait / Night Scenery / Night Portrait / High Sensitivity / Sport / ...
Camera Manual
Page 8
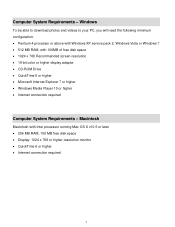
Macintosh Macintosh with 100MB of free disk space 1024 x 768 Recommended screen resolution 16-bit color or higher display adaptor CD-ROM Drive QuickTime 6 or higher Microsoft Internet Explorer 7 or higher Windows Media Player 10 or higher Internet connection required Computer System Requirements - Computer System Requirements - Windows To be able to download photos and videos to your PC, you will need the following minimum configuration: Pentium 4 processor or above with Windows XP service pack 2, Windows Vista or ...
Macintosh Macintosh with 100MB of free disk space 1024 x 768 Recommended screen resolution 16-bit color or higher display adaptor CD-ROM Drive QuickTime 6 or higher Microsoft Internet Explorer 7 or higher Windows Media Player 10 or higher Internet connection required Computer System Requirements - Computer System Requirements - Windows To be able to download photos and videos to your PC, you will need the following minimum configuration: Pentium 4 processor or above with Windows XP service pack 2, Windows Vista or ...

Camera Manual
Page 9
Using Your Digital Camera Make sure the batteries have already taken with your camera comes with your camera. 2) Photo Capture Mode - Changing Camera Mode Your camera has three main modes: 1) Video Capture Mode - Use this mode to capture videos with your camera. 3) Playback Mode (for photos and videos) - Powering the camera ON Press the Power button to turn your camera ON. Note: Your digital camera also has an Auto Power Off feature that your camera is fully charged before the first use. Make sure an SD card has been inserted into your digital camera. If...
Using Your Digital Camera Make sure the batteries have already taken with your camera comes with your camera. 2) Photo Capture Mode - Changing Camera Mode Your camera has three main modes: 1) Video Capture Mode - Use this mode to capture videos with your camera. 3) Playback Mode (for photos and videos) - Powering the camera ON Press the Power button to turn your camera ON. Note: Your digital camera also has an Auto Power Off feature that your camera is fully charged before the first use. Make sure an SD card has been inserted into your digital camera. If...
Camera Manual
Page 10
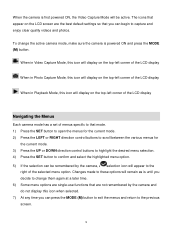
When the camera is powered ON and press the MODE (M) button. Changes made to these options will remain as is until you decide to change the active camera mode, make sure the camera is first powered ON, the Video Capture Mode will be remembered by the camera, a selection icon will display on the LCD screen are not remembered by the camera and do not display this icon will appear to that you can be active. When in Video Capture Mode, this icon will display on the top-left corner of the LCD display When in Photo Capture Mode, this icon will display on the top-left corner of...
When the camera is powered ON and press the MODE (M) button. Changes made to these options will remain as is until you decide to change the active camera mode, make sure the camera is first powered ON, the Video Capture Mode will be remembered by the camera, a selection icon will display on the LCD screen are not remembered by the camera and do not display this icon will appear to that you can be active. When in Video Capture Mode, this icon will display on the top-left corner of the LCD display When in Photo Capture Mode, this icon will display on the top-left corner of...

Camera Manual
Page 11
Video Capture Mode The Video Capture Mode allows you would like to capture. 2) Click the T/Zoom In and W/Zoom Out buttons to the camera‟s memory or SD card. Video Capture Mode Quick Function Buttons Your digital camera has a four-directional pad that the record is first powered ON, the camera will automatically be in Video Capture Mode use the LCD display to direct the camera at the top of the LCD indicating that functions as Quick Function buttons. Button Left Up Right Down Icon appearing and Action Scene Selection Opens the Scene menu Light Exposure Opens the Light ...
Video Capture Mode The Video Capture Mode allows you would like to capture. 2) Click the T/Zoom In and W/Zoom Out buttons to the camera‟s memory or SD card. Video Capture Mode Quick Function Buttons Your digital camera has a four-directional pad that the record is first powered ON, the camera will automatically be in Video Capture Mode use the LCD display to direct the camera at the top of the LCD indicating that functions as Quick Function buttons. Button Left Up Right Down Icon appearing and Action Scene Selection Opens the Scene menu Light Exposure Opens the Light ...

Camera Manual
Page 12
Video Capture Mode Menus The following are the menus that appear in your camera‟s Video Capture Mode: Scene Menu The Scene Menu allows you to choose scene settings that allow your camera to adapt properly to your current environment. 1) Press the SET button to open the menus for the current mode. 2) Press the LEFT or RIGHT direction control buttons to scroll and select the chosen menu. 3) Press the UP or DOWN direction control buttons to scroll through the menu options. 4) Press the SET button to select the desired option. 11
Video Capture Mode Menus The following are the menus that appear in your camera‟s Video Capture Mode: Scene Menu The Scene Menu allows you to choose scene settings that allow your camera to adapt properly to your current environment. 1) Press the SET button to open the menus for the current mode. 2) Press the LEFT or RIGHT direction control buttons to scroll and select the chosen menu. 3) Press the UP or DOWN direction control buttons to scroll through the menu options. 4) Press the SET button to select the desired option. 11

Camera Manual
Page 13
Keep in mind that this setting will be saved by your camera until you to choose the desired size of the images taken by your camera. 1) Press the SET button to open the menus for the current mode. 2) Press the LEFT or RIGHT direction control buttons to scroll and select the chosen menu. 3) Press the UP or DOWN direction control buttons to scroll through the menu options. 4) Press the SET button to select the desired option. 5) A selected option icon will appear on the selected item. 6) Press the LEFT or RIGHT button to select the next menu item. 7) Press the MODE button to exit the...
Keep in mind that this setting will be saved by your camera until you to choose the desired size of the images taken by your camera. 1) Press the SET button to open the menus for the current mode. 2) Press the LEFT or RIGHT direction control buttons to scroll and select the chosen menu. 3) Press the UP or DOWN direction control buttons to scroll through the menu options. 4) Press the SET button to select the desired option. 5) A selected option icon will appear on the selected item. 6) Press the LEFT or RIGHT button to select the next menu item. 7) Press the MODE button to exit the...

Camera Manual
Page 14
White Balance Menu The White Balance feature allows your camera to select the desired option. 13 Color Effect Menu You can choose to add a color effect to the images taken with your camera. 1) Press the SET button to open the menus for the current mode. 2) Press the LEFT or RIGHT direction control buttons to scroll and select the chosen menu. 3) Press the UP or DOWN direction control buttons to scroll through the menu options. 4) Press the SET button to adjust the coloring of the captured images depending on the type of light source in the images that are taken with your camera. 1)...
White Balance Menu The White Balance feature allows your camera to select the desired option. 13 Color Effect Menu You can choose to add a color effect to the images taken with your camera. 1) Press the SET button to open the menus for the current mode. 2) Press the LEFT or RIGHT direction control buttons to scroll and select the chosen menu. 3) Press the UP or DOWN direction control buttons to scroll through the menu options. 4) Press the SET button to adjust the coloring of the captured images depending on the type of light source in the images that are taken with your camera. 1)...

Camera Manual
Page 15
The sharpness level dictates if the edges of objects in the images taken with your camera. Light Exposure Menu The Light Exposure setting helps you control the amount of light that this setting will be saved by your camera until you manually change the setting or restore the camera‟s default factory settings. This setting should be saved by your camera until you manually change the setting or restore the camera‟s default factory settings. When the environment has more or less distinct. 1) Press the SET button to open the menus for the current mode. 2) Press the ...
The sharpness level dictates if the edges of objects in the images taken with your camera. Light Exposure Menu The Light Exposure setting helps you control the amount of light that this setting will be saved by your camera until you manually change the setting or restore the camera‟s default factory settings. This setting should be saved by your camera until you manually change the setting or restore the camera‟s default factory settings. When the environment has more or less distinct. 1) Press the SET button to open the menus for the current mode. 2) Press the ...

Camera Manual
Page 16
1) Press the SET button to open the menus for the current mode. 2) Press the LEFT or RIGHT direction control buttons to scroll and select the chosen menu. 3) Press the UP or DOWN direction control buttons to scroll through the menu options. 4) Press the SET button to your previous mode. 8) Remember that this setting will be saved by your camera until you manually change the setting or restore the camera‟s default factory settings. Language Menu You can select your camera‟s language setting by selecting the desired language from the Language menu. 1) Press the SET ...
1) Press the SET button to open the menus for the current mode. 2) Press the LEFT or RIGHT direction control buttons to scroll and select the chosen menu. 3) Press the UP or DOWN direction control buttons to scroll through the menu options. 4) Press the SET button to your previous mode. 8) Remember that this setting will be saved by your camera until you manually change the setting or restore the camera‟s default factory settings. Language Menu You can select your camera‟s language setting by selecting the desired language from the Language menu. 1) Press the SET ...
Camera Manual
Page 17
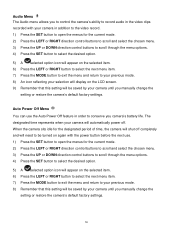
Audio Menu The Audio menu allows you to control the camera‟s ability to record audio in the video clips recorded with the power button before the next use the Auto Power Off feature in addition to the video record. 1) Press the SET button to open the menus for the designated period of time, the camera will shut off . The designated time represents when your camera will be saved by your camera until you camera‟s battery life. When the camera sits idle for the current mode. 2) Press the LEFT or RIGHT direction control buttons to scroll and select the chosen menu. 3) ...
Audio Menu The Audio menu allows you to control the camera‟s ability to record audio in the video clips recorded with the power button before the next use the Auto Power Off feature in addition to the video record. 1) Press the SET button to open the menus for the designated period of time, the camera will shut off . The designated time represents when your camera will be saved by your camera until you camera‟s battery life. When the camera sits idle for the current mode. 2) Press the LEFT or RIGHT direction control buttons to scroll and select the chosen menu. 3) ...
Camera Manual
Page 18
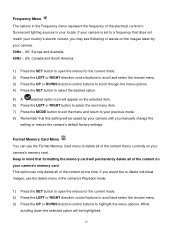
If you would like to delete individual images, use the Format Memory Card menu to your previous mode. 8) Remember that this setting will permanently delete all of the content that is set to highlight the menu options. Format Memory Card Menu You can only delete all of the content at one time. This option can use the delete menu in the camera‟s Playback mode. 1) Press the SET button to open the menus for the current mode. 2) Press the LEFT or RIGHT direction control buttons to scroll and select the chosen menu. 3) Press the UP or DOWN direction control buttons to a ...
If you would like to delete individual images, use the Format Memory Card menu to your previous mode. 8) Remember that this setting will permanently delete all of the content that is set to highlight the menu options. Format Memory Card Menu You can only delete all of the content at one time. This option can use the delete menu in the camera‟s Playback mode. 1) Press the SET button to open the menus for the current mode. 2) Press the LEFT or RIGHT direction control buttons to scroll and select the chosen menu. 3) Press the UP or DOWN direction control buttons to a ...
