
Camera Manual
Page 6
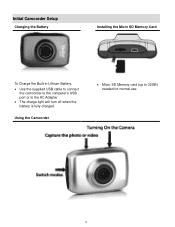
Initial Camcorder Setup Charging the Battery Installing the Micro SD Memory Card To Charge the Built-in Lithium Battery: Use the supplied USB cable to connect the camcorder to the computer's USB port or to 32GB) needed for normal use. 5 Using the Camcorder Micro SD Memory card (up to the AC Adapter. The charge light will turn off when the battery is fully charged.
Initial Camcorder Setup Charging the Battery Installing the Micro SD Memory Card To Charge the Built-in Lithium Battery: Use the supplied USB cable to connect the camcorder to the computer's USB port or to 32GB) needed for normal use. 5 Using the Camcorder Micro SD Memory card (up to the AC Adapter. The charge light will turn off when the battery is fully charged.
Camera Manual
Page 7
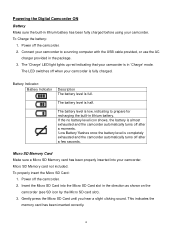
... to prepare for recharging the built-in lithium battery. If the no battery level icon shows, the battery is almost exhausted and the camcorder automatically turns off after a few seconds. To properly insert the Micro SD Card: 1. The battery level is completely exhausted and the camcorder automatically...
... to prepare for recharging the built-in lithium battery. If the no battery level icon shows, the battery is almost exhausted and the camcorder automatically turns off after a few seconds. To properly insert the Micro SD Card: 1. The battery level is completely exhausted and the camcorder automatically...
Camera Manual
Page 8
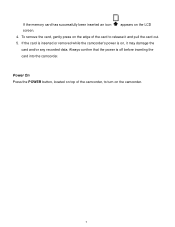
Always confirm that the power is on the camcorder. 7 If the card is inserted or removed while the camcorder's power is off before inserting the card into the camcorder. Power On Press the POWER button, located on top of the card to turn on , it and pull the card out. 5. To remove the card, gently press on the LCD 4. If the memory card has successfully been inserted an icon screen. appears on the edge of the camcorder, to release it may damage the card and/or any recorded data.
Always confirm that the power is on the camcorder. 7 If the card is inserted or removed while the camcorder's power is off before inserting the card into the camcorder. Power On Press the POWER button, located on top of the card to turn on , it and pull the card out. 5. To remove the card, gently press on the LCD 4. If the memory card has successfully been inserted an icon screen. appears on the edge of the camcorder, to release it may damage the card and/or any recorded data.
Camera Manual
Page 12
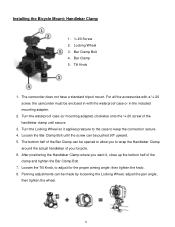
... up the bottom half of the clamp and tighten the Bar Clamp Bolt. 7. then tighten the wheel. 11 Locking Wheel 3. Tilt Knob 1. Bar Clamp Bolt 4. Turn the waterproof case (or mounting adapter) clockwise onto the ¼-20 screw of the handlebar clamp until the screw can be opened to allow you...
... up the bottom half of the clamp and tighten the Bar Clamp Bolt. 7. then tighten the wheel. 11 Locking Wheel 3. Tilt Knob 1. Bar Clamp Bolt 4. Turn the waterproof case (or mounting adapter) clockwise onto the ¼-20 screw of the handlebar clamp until the screw can be opened to allow you...

Camera Manual
Page 13
... only work with the Velcro strap. 4. Then insert the belt back through one of the Helmet Belt through the helmet vent. 3. Locking Wheel 5. Turn the Locking Wheel so it applies pressure to the case to tighten and then attach together with vented helmets. 12 Take both ends of the... Helmet Mount. 2. Thread the same end in the base of the belt inside the helmet. Installing the Helmet Mounting System 1. Helmet Belt 2. Turn the Waterproof case (or mounting adapter) onto the ¼-20 screw of the Helmet mount. Loosen the Tilt Knob, to the Helmet Mount through the...
... only work with the Velcro strap. 4. Then insert the belt back through one of the Helmet Belt through the helmet vent. 3. Locking Wheel 5. Turn the Locking Wheel so it applies pressure to the case to tighten and then attach together with vented helmets. 12 Take both ends of the... Helmet Mount. 2. Thread the same end in the base of the belt inside the helmet. Installing the Helmet Mounting System 1. Helmet Belt 2. Turn the Waterproof case (or mounting adapter) onto the ¼-20 screw of the Helmet mount. Loosen the Tilt Knob, to the Helmet Mount through the...
Camera Manual
Page 14
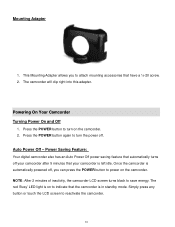
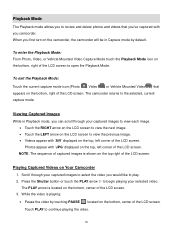
... camcorder will clip right into this adapter. Auto Power Off - NOTE: After 2 minutes of inactivity, the camcorder LCD screen turns black to reactivate the camcorder. 13 This Mounting Adapter allows you to attach mounting accessories that the camcorder is automatically powered off .... Press the POWER button again to power on the camcorder. 2. Powering On Your Camcorder Turning Power On and Off 1. Once the camcorder is in standby mode. Simply press any button or touch the LCD screen to save energy. ...
... camcorder will clip right into this adapter. Auto Power Off - NOTE: After 2 minutes of inactivity, the camcorder LCD screen turns black to reactivate the camcorder. 13 This Mounting Adapter allows you to attach mounting accessories that the camcorder is automatically powered off .... Press the POWER button again to power on the camcorder. 2. Powering On Your Camcorder Turning Power On and Off 1. Once the camcorder is in standby mode. Simply press any button or touch the LCD screen to save energy. ...
Camera Manual
Page 19
When you first turn on the camcorder, the camcorder will be in Playback mode, you can scroll through your selected video. The camcorder returns to continue playing the video. ...
When you first turn on the camcorder, the camcorder will be in Playback mode, you can scroll through your selected video. The camcorder returns to continue playing the video. ...

