

E190VA Quick Start Guide
Page 2
PACKAGE CONTENTS VIZIO Razor LED™ LCD HDTV with Stand Cleaning Cloth Remote Control with Batteries User Manual and Quick Start Guide
PACKAGE CONTENTS VIZIO Razor LED™ LCD HDTV with Stand Cleaning Cloth Remote Control with Batteries User Manual and Quick Start Guide

E190VA Quick Start Guide
Page 3
... guide. When mute is activated, the TV's audio is turned off . Last: Return to the channel last viewed. Sleep: Activate the sleep timer. USING THE REMOTE Input Wide Sleep Menu/OK Arrow Left Volume Up/Down Last Info Power/Standby Input (Specific) Closed Caption (CC) Exit Arrow Up Arrow Right Arrow...
... guide. When mute is activated, the TV's audio is turned off . Last: Return to the channel last viewed. Sleep: Activate the sleep timer. USING THE REMOTE Input Wide Sleep Menu/OK Arrow Left Volume Up/Down Last Info Power/Standby Input (Specific) Closed Caption (CC) Exit Arrow Up Arrow Right Arrow...

E190VA Quick Start Guide
Page 5
2 3 Initial Setup Allow the VIZIO setup Wizard to the next screen. The Setup App is displayed. Press the Right Arrow button on the back of the TV. Welcome Next EXIT Exit Connect your antenna or cable/satellite box to the coaxial port on the remote to go to help you tune your channels. Turn the TV on by pressing the Power/Standby button on the remote.
2 3 Initial Setup Allow the VIZIO setup Wizard to the next screen. The Setup App is displayed. Press the Right Arrow button on the back of the TV. Welcome Next EXIT Exit Connect your antenna or cable/satellite box to the coaxial port on the remote to go to help you tune your channels. Turn the TV on by pressing the Power/Standby button on the remote.

E190VA Quick Start Guide
Page 6
Press Right Arrow to go to the next screen. Press Right Arrow to go to the next screen. 5 Press the Up/Down Arrow buttons on the remote to highlight your input location: Mode Setting Home Retail Back Select Next EXIT Exit Press the Up/Down Arrow buttons on the remote to highlight Home. 4 Initial Setup Please select your language: Language English Español Français Back Select Next EXIT Exit 5 Initial Setup Please select your preferred language.
Press Right Arrow to go to the next screen. Press Right Arrow to go to the next screen. 5 Press the Up/Down Arrow buttons on the remote to highlight your input location: Mode Setting Home Retail Back Select Next EXIT Exit Press the Up/Down Arrow buttons on the remote to highlight Home. 4 Initial Setup Please select your language: Language English Español Français Back Select Next EXIT Exit 5 Initial Setup Please select your preferred language.

E190VA Quick Start Guide
Page 7
If the TV is connected to a cable or satellite set-top box, press the EXIT button on the remote to highlight Scan. When the channel scan is complete, the first-time setup is complete. Wait for the channel scan to begin the channel scan. ...Press the Up/Down Arrow buttons on the remote, then select the input to which your cable or antenna to the DTV/TV input Channel Scan Scan Skip Scan Back Select Next EXIT Exit...
If the TV is connected to a cable or satellite set-top box, press the EXIT button on the remote to highlight Scan. When the channel scan is complete, the first-time setup is complete. Wait for the channel scan to begin the channel scan. ...Press the Up/Down Arrow buttons on the remote, then select the input to which your cable or antenna to the DTV/TV input Channel Scan Scan Skip Scan Back Select Next EXIT Exit...

E190VA Quick Start Guide
Page 10
...is no sound. • Press the Volume Up button on the remote or on the right side of the TV. • Try plugging the power cord into a different electrical outlet. seems low. • Ensure all cables are integral parts of VIZIO's commitment to the AC socket on the TV and a working ...electrical outlet. • Press the Power/Standby button on the remote or on the right side of the TV. • Press the MUTE button on warranty...
...is no sound. • Press the Volume Up button on the remote or on the right side of the TV. • Try plugging the power cord into a different electrical outlet. seems low. • Ensure all cables are integral parts of VIZIO's commitment to the AC socket on the TV and a working ...electrical outlet. • Press the Power/Standby button on the remote or on the right side of the TV. • Press the MUTE button on warranty...

E190VA Quick Start Guide
Page 11
... There are turned on. • Press the INPUT button on -screen menu has guided setup. I press buttons on the remote control. • Insert new batteries into the remote. • Point the remote directly at the TV's sensor. • Ensure nothing is blocking the TV's sensor. (The sensor is on the front of... to a cable/satellite service with a set-top box via coaxial cable, press the TV button on the remote, then use the Number Pad to change the channel to • The on the remote and select the input to Wide or Zoom Mode. Enter your device is connected. • Perform a channel...
... There are turned on. • Press the INPUT button on -screen menu has guided setup. I press buttons on the remote control. • Insert new batteries into the remote. • Point the remote directly at the TV's sensor. • Ensure nothing is blocking the TV's sensor. (The sensor is on the front of... to a cable/satellite service with a set-top box via coaxial cable, press the TV button on the remote, then use the Number Pad to change the channel to • The on the remote and select the input to Wide or Zoom Mode. Enter your device is connected. • Perform a channel...
E261VA User Manual
Page 5
... such as vases, shall be placed on the power cord may cause the batteries to the presence of the marked voltage can damage the remote control or injure the operator. To reduce the risk of your TV may cause fire or electric shock. • Follow instructions for your TV in...
... such as vases, shall be placed on the power cord may cause the batteries to the presence of the marked voltage can damage the remote control or injure the operator. To reduce the risk of your TV may cause fire or electric shock. • Follow instructions for your TV in...

E261VA User Manual
Page 7
... 1 Installing the TV 1 Installing the TV Stand 1 Installing the TV on a Wall 2 Controls and Connections 3 Front Panel 3 Left Side Panel 3 Right Side Panel 3 Rear Panel 4 Remote Control 4 Replacing the Batteries 5 Completing the First-Time Setup 6 Connecting Your Devices to the TV 7 Before You Begin 7 Connecting Your Devices 7 Adjusting the TV Settings...
... 1 Installing the TV 1 Installing the TV Stand 1 Installing the TV on a Wall 2 Controls and Connections 3 Front Panel 3 Left Side Panel 3 Right Side Panel 3 Rear Panel 4 Remote Control 4 Replacing the Batteries 5 Completing the First-Time Setup 6 Connecting Your Devices to the TV 7 Before You Begin 7 Connecting Your Devices 7 Adjusting the TV Settings...

E261VA User Manual
Page 8
... is no image on the screen 30 There is no sound 30 The colors on the TV don't look right 30 The buttons on the remote aren't working 30 The image quality is not good 30 The picture is distorted 30 The display image does not cover the entire screen 31...
... is no image on the screen 30 There is no sound 30 The colors on the TV don't look right 30 The buttons on the remote aren't working 30 The image quality is not good 30 The picture is distorted 30 The display image does not cover the entire screen 31...

E261VA User Manual
Page 9
... to support the weight of the TV. However, the TV can still fall over . Use the images below to ensure nothing is not properly secured VIZIO Razor LED LCD HDTV with Stand Your TV comes in two ways: • On a flat surface, using the included stand • On a wall, using a VESA... TV After removing the TV from falling over if: • It is placed on a soft surface, such as carpet, rug, or blanket. 2. Quick Start Guide Remote Control with the holes on a clean, flat surface. To install the TV stand: 1. When you can be installed in the box with the base already...
... to support the weight of the TV. However, the TV can still fall over . Use the images below to ensure nothing is not properly secured VIZIO Razor LED LCD HDTV with Stand Your TV comes in two ways: • On a flat surface, using the included stand • On a wall, using a VESA... TV After removing the TV from falling over if: • It is placed on a soft surface, such as carpet, rug, or blanket. 2. Quick Start Guide Remote Control with the holes on a clean, flat surface. To install the TV stand: 1. When you can be installed in the box with the base already...

E261VA User Manual
Page 11
Controls and Connections Front Panel Remote Control Sensor Front Panel Remote Control When using the remote, point it directly at this sensor. Sensor: Left Side Panel 3.5mm Audio Composite AV USB 2 Right Side Panel Ambient Light Sensor Power Menu Channel Up/...
Controls and Connections Front Panel Remote Control Sensor Front Panel Remote Control When using the remote, point it directly at this sensor. Sensor: Left Side Panel 3.5mm Audio Composite AV USB 2 Right Side Panel Ambient Light Sensor Power Menu Channel Up/...

E261VA User Manual
Page 12
2 Rear Panel Remote Control Optical Audio RGB AC IN HDMI (1,2) Component Cable/Antenna Rear Panel Optical: Connect to an electrical ... game console, etc). Audio: Connect 1/8" mini stereo connector from computer. Connect the other end of the cable to audio device (VIZIO sound bar, home theater system). Cable/Antenna: Connect coaxial cable for external antenna or cable TV. Input Wide Sleep Menu/OK Arrow... (Specific) Closed Caption (CC) Exit Arrow Up Arrow Right Arrow Down Channel Up/Down Mute Number Pad Dash VR10 Remote Control Component: Connect component video/audio devices.
2 Rear Panel Remote Control Optical Audio RGB AC IN HDMI (1,2) Component Cable/Antenna Rear Panel Optical: Connect to an electrical ... game console, etc). Audio: Connect 1/8" mini stereo connector from computer. Connect the other end of the cable to audio device (VIZIO sound bar, home theater system). Cable/Antenna: Connect coaxial cable for external antenna or cable TV. Input Wide Sleep Menu/OK Arrow... (Specific) Closed Caption (CC) Exit Arrow Up Arrow Right Arrow Down Channel Up/Down Mute Number Pad Dash VR10 Remote Control Component: Connect component video/audio devices.

E261VA User Manual
Page 13
... old or dead batteries in accordance with local hazardous waste regulations. • Keep batteries away from children and pets. 5 Insert two AA batteries into the remote control. Up/Down: Channel Change the channel. Info: Display the Info Window. Replace the battery cover. • Use only good quality batteries. • Inserting the...
... old or dead batteries in accordance with local hazardous waste regulations. • Keep batteries away from children and pets. 5 Insert two AA batteries into the remote control. Up/Down: Channel Change the channel. Info: Display the Info Window. Replace the battery cover. • Use only good quality batteries. • Inserting the...
E261VA User Manual
Page 14
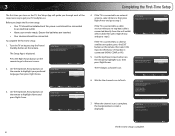
... • Have your set -top box (cable is connected to a cable or satellite set-top box, press the EXIT button on the remote. To complete the first-time setup: 1. Initial Setup completed EXIT Exit Complete Back Next The first-time setup is displayed. Initial Setup Please select...to complete. Ensure the batteries are inserted. • Your devices should be connected. The Setup App is complete. 6 Initial Setup Allow the VIZIO setup Wizard to help you through each of the steps necessary to step 5. Initial Setup Please select your TV ready for the channel scan to...
... • Have your set -top box (cable is connected to a cable or satellite set-top box, press the EXIT button on the remote. To complete the first-time setup: 1. Initial Setup completed EXIT Exit Complete Back Next The first-time setup is displayed. Initial Setup Please select...to complete. Ensure the batteries are inserted. • Your devices should be connected. The Setup App is complete. 6 Initial Setup Allow the VIZIO setup Wizard to help you through each of the steps necessary to step 5. Initial Setup Please select your TV ready for the channel scan to...

E261VA User Manual
Page 15
... connect a device to the HDTV: 1. Ensure each end of the cable is set to use your newly connected device, press the INPUT button on the remote and select the connection type (HDMI, RGB, etc) from wall) Perform a channel scan. Check the list of video ports available: HDMI RGB Component RF/Antenna... below for special instructions: Cable TV (without cable box/directly from the on the PC is securely connected. 3. See the Device Connection Chart on the remote. 4. RGB Make sure the desktop resolution on -screen menu.
... connect a device to the HDTV: 1. Ensure each end of the cable is set to use your newly connected device, press the INPUT button on the remote and select the connection type (HDMI, RGB, etc) from wall) Perform a channel scan. Check the list of video ports available: HDMI RGB Component RF/Antenna... below for special instructions: Cable TV (without cable box/directly from the on the PC is securely connected. 3. See the Device Connection Chart on the remote. 4. RGB Make sure the desktop resolution on -screen menu.

E261VA User Manual
Page 17
...make them easy to remember. (Custom names have multiple devices connected to your TV. Customizing Input Names To customize an input name: 1. The on the remote to which they are finished, highlight OK and press MENU/OK. 8. Press EXIT. Use the Arrow buttons to display, then press MENU/OK. 5. ...Press the MENU button on the remote to customize the names of the correct input faster. Your TV features the ability to highlight the TV icon and press MENU/ OK. 3. You can...
...make them easy to remember. (Custom names have multiple devices connected to your TV. Customizing Input Names To customize an input name: 1. The on the remote to which they are finished, highlight OK and press MENU/OK. 8. Press EXIT. Use the Arrow buttons to display, then press MENU/OK. 5. ...Press the MENU button on the remote to customize the names of the correct input faster. Your TV features the ability to highlight the TV icon and press MENU/ OK. 3. You can...

E261VA User Manual
Page 18
...you can change the signal source for the coaxial (TV) input. 5 Removing Unused Inputs from the Input List To remove unused inputs: 1. The on the remote to change the signal source: 1. Use the Arrow buttons on -screen menu is displayed. 3. To restore an input to the list, go to remove, ...then press MENU/OK. 5. The on the remote to highlight the input source you can : • Change the signal source • Customize the master channel list • Scan for new/additional channels &#...
...you can change the signal source for the coaxial (TV) input. 5 Removing Unused Inputs from the Input List To remove unused inputs: 1. The on the remote to change the signal source: 1. Use the Arrow buttons on -screen menu is displayed. 3. To restore an input to the list, go to remove, ...then press MENU/OK. 5. The on the remote to highlight the input source you can : • Change the signal source • Customize the master channel list • Scan for new/additional channels &#...

E261VA User Manual
Page 19
... Arrow buttons to On or Off. 6. To include only digital channels in your master channel list settings are preserved. This is displayed. 3. The on the remote to highlight the TV icon and press MENU/ OK. Perform a channel scan. Use the Arrow buttons on -screen menu is displayed. 5. E190VA / E220VA /...By customizing the master channel list, you can choose which channels can restrict the scan to new channels only. Use the Arrow buttons on the remote. The master channel list is displayed. 2. Use the Arrow buttons to highlight the TV icon and press MENU/ OK. Press the MENU ...
... Arrow buttons to On or Off. 6. To include only digital channels in your master channel list settings are preserved. This is displayed. 3. The on the remote to highlight the TV icon and press MENU/ OK. Perform a channel scan. Use the Arrow buttons on -screen menu is displayed. 5. E190VA / E220VA /...By customizing the master channel list, you can choose which channels can restrict the scan to new channels only. Use the Arrow buttons on the remote. The master channel list is displayed. 2. Use the Arrow buttons to highlight the TV icon and press MENU/ OK. Press the MENU ...

E261VA User Manual
Page 20
...where different free-to-air broadcast television channels are finished, highlight OK and press MENU/OK. 7. The on the remote. When you are available. Use the Arrow buttons on the remote to highlight Channels and press MENU/OK. 4. Press the MENU button on -screen menu is displayed. 6. The ...keyboard is displayed. 2. To scan for channels: 1. Use the Arrow buttons to highlight the TV icon and press MENU/ OK. The on the remote to highlight Channels and press MENU/OK. 4. Use the Arrow and MENU/OK buttons to spell the custom channel name. Press EXIT. 12 The ...
...where different free-to-air broadcast television channels are finished, highlight OK and press MENU/OK. 7. The on the remote. When you are available. Use the Arrow buttons on the remote to highlight Channels and press MENU/OK. 4. Press the MENU button on -screen menu is displayed. 6. The ...keyboard is displayed. 2. To scan for channels: 1. Use the Arrow buttons to highlight the TV icon and press MENU/ OK. The on the remote to highlight Channels and press MENU/OK. 4. Use the Arrow and MENU/OK buttons to spell the custom channel name. Press EXIT. 12 The ...


