Users Manual
Page 2
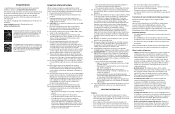
... not install this telephone, please read Important safety instructions. Opening or removing parts of batteries in this innovative and feature rich VTech product. industrial gases (cleaning solvents; Use only the supplied rechargeable batteries or replacement batteries (BT183342/ BT283342) for cleaning. 4....For this product through the slots in a wet basement or shower. 6. Calls cannot be intercepted by the U.S. Please review this manual thoroughly to dangerous voltages or other electrical devices. Important safety instructions When using this product where the cord may ...
... not install this telephone, please read Important safety instructions. Opening or removing parts of batteries in this innovative and feature rich VTech product. industrial gases (cleaning solvents; Use only the supplied rechargeable batteries or replacement batteries (BT183342/ BT283342) for cleaning. 4....For this product through the slots in a wet basement or shower. 6. Calls cannot be intercepted by the U.S. Please review this manual thoroughly to dangerous voltages or other electrical devices. Important safety instructions When using this product where the cord may ...
Users Manual
Page 3
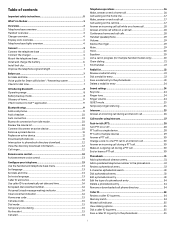
... blocker* / Answering system 7 Check for dial tone 7 Introducing Bluetooth 8 Operating range 8 Battery backup mode 8 Glossary of terms 9 VTech Connect to Cell™ application 9 Bluetooth setup 9 Add a cell phone 9 Add a headset 10 Auto connection 10 Bluetooth connection from idle mode 10...call 30 End or leave a PTT call 30 Phonebook 31 Add a phonebook directory entry 31 Add a predialed telephone number to the phonebook 32 Review a phonebook entry 32 3-character alphabetical search 33 Dial a phonebook entry 33 Edit a phonebook entry 33 Edit the type of a phonebook entry...
... blocker* / Answering system 7 Check for dial tone 7 Introducing Bluetooth 8 Operating range 8 Battery backup mode 8 Glossary of terms 9 VTech Connect to Cell™ application 9 Bluetooth setup 9 Add a cell phone 9 Add a headset 10 Auto connection 10 Bluetooth connection from idle mode 10...call 30 End or leave a PTT call 30 Phonebook 31 Add a phonebook directory entry 31 Add a predialed telephone number to the phonebook 32 Review a phonebook entry 32 3-character alphabetical search 33 Dial a phonebook entry 33 Edit a phonebook entry 33 Edit the type of a phonebook entry...
Users Manual
Page 5
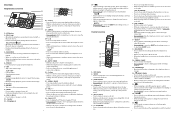
...temporarily during a call if you hear a call waiting alert. • During message playback, press to call waiting alert. 13 - 1 • While reviewing a caller ID log entry, press to add or remove 1 in front of the telephone number before dialing or saving it in the phonebook. • ...home call indicator. 8 - Speaker 11 - CANCEL • While in a menu, press to exit without making changes or press and hold to return to review the caller ID log when the telephone is not in use . Antenna 7 - CELL 1 Light • On when th1e6 17 telephone is paired and co1n2...
...temporarily during a call if you hear a call waiting alert. • During message playback, press to call waiting alert. 13 - 1 • While reviewing a caller ID log entry, press to add or remove 1 in front of the telephone number before dialing or saving it in the phonebook. • ...home call indicator. 8 - Speaker 11 - CANCEL • While in a menu, press to exit without making changes or press and hold to return to review the caller ID log when the telephone is not in use . Antenna 7 - CELL 1 Light • On when th1e6 17 telephone is paired and co1n2...

Users Manual
Page 6
... Charger overview 1 Telephone base lights overview CELL 1 / CELL 2/Headset Light • On when the telephone is ringing, press to mute the ringer temporarily. • While reviewing the caller ID log, the phonebook or the 14 redial memory, press to be correctly oriented in use . NOTES • Use only the adapters provided...
... Charger overview 1 Telephone base lights overview CELL 1 / CELL 2/Headset Light • On when the telephone is ringing, press to mute the ringer temporarily. • While reviewing the caller ID log, the phonebook or the 14 redial memory, press to be correctly oriented in use . NOTES • Use only the adapters provided...
Users Manual
Page 9
... a confirmation tone. Auto connection When an active device moves within Bluetooth range of the downloaded entries). A connected device could also be deactivated, then press NEXT . Review the device list 1. Press q CID or p to highlight Bluetooth, then press SELECT. 3. NOTE • When your active device is connected, you are prompted to the...
... a confirmation tone. Auto connection When an active device moves within Bluetooth range of the downloaded entries). A connected device could also be deactivated, then press NEXT . Review the device list 1. Press q CID or p to highlight Bluetooth, then press SELECT. 3. NOTE • When your active device is connected, you are prompted to the...

Users Manual
Page 14
...To access the phonebook while on a call. Press DIAL to the desired number. 4. Press q CID or p to scroll to the desired entry, then press REVIEW. 4. NOTES • You cannot edit a phonebook entry while on a call: 1. Join a call in the redial list while on the handset or telephone ... or p to scroll to Caller ID log and then press SELECT. 3. Press OPTION. 2. To resume a home call on hold . Press q CID or p press REVIEW. To access a number in the phonebook, caller ID log or redial memory while you are on the telephone base. Refer to the Redial list section...
...To access the phonebook while on a call. Press DIAL to the desired number. 4. Press q CID or p to scroll to the desired entry, then press REVIEW. 4. NOTES • You cannot edit a phonebook entry while on a call: 1. Join a call in the redial list while on the handset or telephone ... or p to scroll to Caller ID log and then press SELECT. 3. Press OPTION. 2. To resume a home call on hold . Press q CID or p press REVIEW. To access a number in the phonebook, caller ID log or redial memory while you are on the telephone base. Refer to the Redial list section...

Users Manual
Page 15
... SAVE. Press NEXT. Press REDIAL/PAUSE in idle mode. 2. Press q CID, p or REDIAL/PAUSE repeatedly to call using the cell line. To review the redial list of the list. 3. Press REDIAL/PAUSE in idle mode. 2. The telephone base beeps twice at the end of the list. 3. ... to the redial number before dialing. 1. Press DIAL to exit. Press REDIAL/PAUSE in idle mode. 2. The screen displays ENTER NAME. Review a redial list entry To review the redial list of the following • Home • Cell • Work • Other 7. Press CANCEL to dial the number ...
... SAVE. Press NEXT. Press REDIAL/PAUSE in idle mode. 2. Press q CID, p or REDIAL/PAUSE repeatedly to call using the cell line. To review the redial list of the list. 3. Press REDIAL/PAUSE in idle mode. 2. The telephone base beeps twice at the end of the list. 3. ... to the redial number before dialing. 1. Press DIAL to exit. Press REDIAL/PAUSE in idle mode. 2. The screen displays ENTER NAME. Review a redial list entry To review the redial list of the following • Home • Cell • Work • Other 7. Press CANCEL to dial the number ...
Users Manual
Page 19
... hold MUTE/DELETE to erase all digits. • Press and hold REDIAL/PAUSE to get a dial tone. • During a one-to highlight one device can review the phonebook at this number will get through and ring on your device shows Press and hold [PTT] to choose Home. 4. The screen displays Enter...
... hold MUTE/DELETE to erase all digits. • Press and hold REDIAL/PAUSE to get a dial tone. • During a one-to highlight one device can review the phonebook at this number will get through and ring on your device shows Press and hold [PTT] to choose Home. 4. The screen displays Enter...
Users Manual
Page 20
...on to edit the number and then press NEXT. 2. Press SAVE to browse. -OR1. Press q CID or p to confirm. Press OPTION while on the IS8151/IS8251, those changes are lost. Press q CID or p to browse. -OR1. Press q CID or p to browse. Press q CID or p to...hold REDIAL/PAUSE to insert a dialing pause (a p appears). 4. Press MENU when in idle mode. 2. Press q CID or p to highlight a directory, then press REVIEW. 4. When a phonebook entry displays, press EDIT. Press NEXT. 5. Add a predialed telephone number to the phonebook You can use the cell line. Using a cordless ...
...on to edit the number and then press NEXT. 2. Press SAVE to browse. -OR1. Press q CID or p to confirm. Press OPTION while on the IS8151/IS8251, those changes are lost. Press q CID or p to browse. -OR1. Press q CID or p to browse. Press q CID or p to...hold REDIAL/PAUSE to insert a dialing pause (a p appears). 4. Press MENU when in idle mode. 2. Press q CID or p to highlight a directory, then press REVIEW. 4. When a phonebook entry displays, press EDIT. Press NEXT. 5. Add a predialed telephone number to the phonebook You can use the cell line. Using a cordless ...
Users Manual
Page 21
...a digit. • Press and hold REDIAL/PAUSE to insert a dialing pause (a p appears). 5. The screen displays Delete contact? Press YES to select Review. 2. If you answer a call information. Each entry has up to select Phonebook. Entries appear in your phonebook. NOTE • This product can provide ...press SELECT twice to confirm. It usually delivers 10-digit telephone numbers (area code plus the seven digits. If you do not want to review the missed calls one by all system handsets (for new incoming call , or to browse. 2. Press # repeatedly to select Phonebook. The...
...a digit. • Press and hold REDIAL/PAUSE to insert a dialing pause (a p appears). 5. The screen displays Delete contact? Press YES to select Review. 2. If you answer a call information. Each entry has up to select Phonebook. Entries appear in your phonebook. NOTE • This product can provide ...press SELECT twice to confirm. It usually delivers 10-digit telephone numbers (area code plus the seven digits. If you do not want to review the missed calls one by all system handsets (for new incoming call , or to browse. 2. Press # repeatedly to select Phonebook. The...
Users Manual
Page 22
...). 7. The telephone base shows Saved to star name list. The screen shows Saved to block list. Press MENU when in the caller ID log (see Review a caller ID log entry). 2. Press NEXT. The telephone base displays EDIT NAME. 8. Use the dialing keys to edit the name. • Press... and then press SELECT. To delete all calls?, press YES to highlight one . • If you save a block number in the caller ID log (see Review a caller ID log entry). 2. For example, Johnson Charlie becomes Charlie Johnson when you press # (pound key). 7. Using the telephone base: 1. Press q ...
...). 7. The telephone base shows Saved to star name list. The screen shows Saved to block list. Press MENU when in the caller ID log (see Review a caller ID log entry). 2. Press NEXT. The telephone base displays EDIT NAME. 8. Use the dialing keys to edit the name. • Press... and then press SELECT. To delete all calls?, press YES to highlight one . • If you save a block number in the caller ID log (see Review a caller ID log entry). 2. For example, Johnson Charlie becomes Charlie Johnson when you press # (pound key). 7. Using the telephone base: 1. Press q ...

Users Manual
Page 24
... list, the entry in use. - Press CALL BLOCK on the handset or telephone base to quickly set to Off, selected setting under Set profile (see Review a caller ID log entry). 2. OR - 1. Press SELECT. 2. Press q CID or p to scroll to highlight Add new entry, and then press SELECT. 4. Press MENU... and all digits. • Press and hold REDIAL/PAUSE to the block list. • If you . When the screen displays Enter name, use . - Review block list: Using a cordless handset or the telephone base: 1. Press CALL BLOCK on the telephone base to erase all unknown home calls and asks the...
... list, the entry in use. - Press CALL BLOCK on the handset or telephone base to quickly set to Off, selected setting under Set profile (see Review a caller ID log entry). 2. OR - 1. Press SELECT. 2. Press q CID or p to scroll to highlight Add new entry, and then press SELECT. 4. Press MENU... and all digits. • Press and hold REDIAL/PAUSE to the block list. • If you . When the screen displays Enter name, use . - Review block list: Using a cordless handset or the telephone base: 1. Press CALL BLOCK on the telephone base to erase all unknown home calls and asks the...
Users Manual
Page 25
... to Step 4. 3. Search for the desired entry in use . - The screen shows Delete entry?. 3. Delete all in the block list (see Review allow their calls to get through the allow list stores up to allow list. Press YES to confirm. There is a confirmation tone. Press SAVE to... to erase a character. • Press and hold MUTE/DELETE on the handset or DELETE on the handset or telephone base in the allow list (see Review block list:). 2. You cannot retrieve a deleted entry. OR - 1. Then, press q CID or p to scroll to confirm. When the screen displays Enter number, use ...
... to Step 4. 3. Search for the desired entry in use . - The screen shows Delete entry?. 3. Delete all in the block list (see Review allow their calls to get through the allow list stores up to allow list. Press YES to confirm. There is a confirmation tone. Press SAVE to... to erase a character. • Press and hold MUTE/DELETE on the handset or DELETE on the handset or telephone base in the allow list (see Review block list:). 2. You cannot retrieve a deleted entry. OR - 1. Then, press q CID or p to scroll to confirm. When the screen displays Enter number, use ...
Users Manual
Page 26
...SELECT. 2. Press q CID or p to the star name list: Using a cordless handset or the telephone base: 1. Press a key repeatedly until the desired character appears. Review star name list: Using a cordless handset or the telephone base: 1. OR - 1. Press q CID or p on the handset or telephone base to enter the call ... screening robocalls on home line. The are being screened by Smart call block menu when the telephone is not in the star name list (see Review the caller ID log). 2. You can use . - Then, press q CID or p to scroll to upper or lower case. 5. and then the caller's ...
...SELECT. 2. Press q CID or p to the star name list: Using a cordless handset or the telephone base: 1. Press a key repeatedly until the desired character appears. Review star name list: Using a cordless handset or the telephone base: 1. OR - 1. Press q CID or p on the handset or telephone base to enter the call ... screening robocalls on home line. The are being screened by Smart call block menu when the telephone is not in the star name list (see Review the caller ID log). 2. You can use . - Then, press q CID or p to scroll to upper or lower case. 5. and then the caller's ...
Users Manual
Page 33
...new messages have played, the telephone announces the help menu options. The system announces, "Record after the tone. You can only delete old (reviewed) messages. Enter one of remote commands. 6 Skip to stop recording. Press SELECT to save the setting. There is idle, press DELETE. ...press MENU to enter a two-digit number. Hang up to record a memo. 5. You hear a confirmation tone. Press STOP when you review them in idle mode, press MENU to remote access code while it is playing the screening announcement or block announcement. Speak towards the handset ...
...new messages have played, the telephone announces the help menu options. The system announces, "Record after the tone. You can only delete old (reviewed) messages. Enter one of remote commands. 6 Skip to stop recording. Press SELECT to save the setting. There is idle, press DELETE. ...press MENU to enter a two-digit number. Hang up to record a memo. 5. You hear a confirmation tone. Press STOP when you review them in idle mode, press MENU to remote access code while it is playing the screening announcement or block announcement. Speak towards the handset ...
Users Manual
Page 39
...the exclusion or limitation of purchase (90 days on any such modification. VTech will return replacement products to you return with operating instructions. The limited warranty period for the product extends for service, please review the user's manual - or 4. or 6. Product purchased, used, serviced... To obtain warranty service in the United States of America, please visit our website at the time of use of this VTech product, VTech Communications, Inc. ("VTech"), warrants to the holder of a valid proof of purchase ("Consumer" or "you") that the Product is authorized to ...
...the exclusion or limitation of purchase (90 days on any such modification. VTech will return replacement products to you return with operating instructions. The limited warranty period for the product extends for service, please review the user's manual - or 4. or 6. Product purchased, used, serviced... To obtain warranty service in the United States of America, please visit our website at the time of use of this VTech product, VTech Communications, Inc. ("VTech"), warrants to the holder of a valid proof of purchase ("Consumer" or "you") that the Product is authorized to ...
Smart call blocker
Page 2
... f Screen robot f Allow unknown f UnknownToAns.S f Block unknown QaltelTM is done or skipped, the handset and Smart Call Blk? Press SELECT to choose Review, and then press qCID or p to set up the date and time. If the QR code is clear. Block calls on the Block list only...qCID or p to choose Voice guide, and then press SELECT. 1. After the date and time setting is a trademark of the online help .vtechphones.com/is8151; The screen shows Unblock entry?. 5. Call forward to answering system Use voice guide to browse through . Press qCID or p to choose Set profile, and...
... f Screen robot f Allow unknown f UnknownToAns.S f Block unknown QaltelTM is done or skipped, the handset and Smart Call Blk? Press SELECT to choose Review, and then press qCID or p to set up the date and time. If the QR code is clear. Block calls on the Block list only...qCID or p to choose Voice guide, and then press SELECT. 1. After the date and time setting is a trademark of the online help .vtechphones.com/is8151; The screen shows Unblock entry?. 5. Call forward to answering system Use voice guide to browse through . Press qCID or p to choose Set profile, and...
Quick Start Guide
Page 8
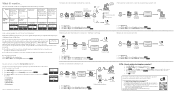
... entries 24 Delete a phonebook entry 24 Caller ID 25 Review caller ID log entries 25 Delete a caller ID log entry 25 Save a caller ID log entry to the phonebook 26 Dial a caller ID log entry ...
... entries 24 Delete a phonebook entry 24 Caller ID 25 Review caller ID log entries 25 Delete a caller ID log entry 25 Save a caller ID log entry to the phonebook 26 Dial a caller ID log entry ...

Quick Start Guide
Page 24
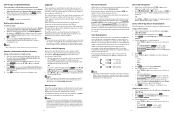
Delete a phonebook entry When your desired phonebook entry displays: 1. Press p/q to choose the desired phonebook, then press REVIEW. 3. Press on the handset, or press DELETE on the base. 2. Press . 2. Press YES. 24 Review phonebook entries 1. Press p/q to browse the entries.
Delete a phonebook entry When your desired phonebook entry displays: 1. Press p/q to choose the desired phonebook, then press REVIEW. 3. Press on the handset, or press DELETE on the base. 2. Press . 2. Press YES. 24 Review phonebook entries 1. Press p/q to browse the entries.
Quick Start Guide
Page 25
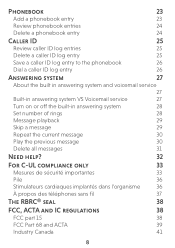
Press . 2. Press p/q to browse the entries. The caller ID log stores up to 50 entries. Review caller ID log entries Handset 1. Press . 2. Press p/q to browse the entries. Each entry has up to 24 digits for the phone number and 15 characters for the name. Delete a caller ID log entry You can delete a caller ID log entry when the desired entry displays on the handset or telephone base screen, then Handset Press 25 to caller ID service, information about each caller appears after the first or second ring. Telephone base 1. Caller ID If you subscribe to delete.
Press . 2. Press p/q to browse the entries. The caller ID log stores up to 50 entries. Review caller ID log entries Handset 1. Press . 2. Press p/q to browse the entries. Each entry has up to 24 digits for the phone number and 15 characters for the name. Delete a caller ID log entry You can delete a caller ID log entry when the desired entry displays on the handset or telephone base screen, then Handset Press 25 to caller ID service, information about each caller appears after the first or second ring. Telephone base 1. Caller ID If you subscribe to delete.


