Users Manual
Page 2
... should never be controlled by radio receiving equipment within range of the cordless handset. For support, shopping, and everything new at VTech, visit our website at a height above 2 meters. 5. The ENERGY STAR® program (www.energystar.gov) recognizes and encourages...batteries or replacement batteries (BT183342/ BT283342) for cleaning. 4. Please review this manual thoroughly to ensure proper installation and operation of implanted cardiac pacemakers Cardiac pacemakers (applies only to your new VTech telephone. This product should not put the handset of your telephone...
... should never be controlled by radio receiving equipment within range of the cordless handset. For support, shopping, and everything new at VTech, visit our website at a height above 2 meters. 5. The ENERGY STAR® program (www.energystar.gov) recognizes and encourages...batteries or replacement batteries (BT183342/ BT283342) for cleaning. 4. Please review this manual thoroughly to ensure proper installation and operation of implanted cardiac pacemakers Cardiac pacemakers (applies only to your new VTech telephone. This product should not put the handset of your telephone...
Users Manual
Page 3
... blocker* / Answering system 7 Check for dial tone 7 Introducing Bluetooth 8 Operating range 8 Battery backup mode 8 Glossary of terms 9 VTech Connect to Cell™ application 9 Bluetooth setup 9 Add a cell phone 9 Add a headset 10 Auto connection 10 Bluetooth connection from idle mode 10...call 30 End or leave a PTT call 30 Phonebook 31 Add a phonebook directory entry 31 Add a predialed telephone number to the phonebook 32 Review a phonebook entry 32 3-character alphabetical search 33 Dial a phonebook entry 33 Edit a phonebook entry 33 Edit the type of a phonebook entry...
... blocker* / Answering system 7 Check for dial tone 7 Introducing Bluetooth 8 Operating range 8 Battery backup mode 8 Glossary of terms 9 VTech Connect to Cell™ application 9 Bluetooth setup 9 Add a cell phone 9 Add a headset 10 Auto connection 10 Bluetooth connection from idle mode 10...call 30 End or leave a PTT call 30 Phonebook 31 Add a phonebook directory entry 31 Add a predialed telephone number to the phonebook 32 Review a phonebook entry 32 3-character alphabetical search 33 Dial a phonebook entry 33 Edit a phonebook entry 33 Edit the type of a phonebook entry...
Users Manual
Page 5
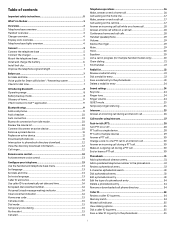
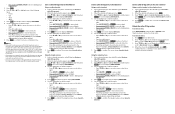
...speakerphone and the handset. 3 TONE • Press to switch to tone dialing temporarily during a call waiting alert. 2 20 - 1 • While reviewing a caller ID log entry, press repeatedly to add or remove 1 in front of the telephone number before dialing or saving it in use . &#... back up while in use . • While entering names or numbers, press to move the cursor to the left . 15 - REDIAL / PAUSE • Press to review the redial list. • Press and hold to the previous menu. 5 - 9 Overview Telephone base overview 1 2 10 3 4 5 11 6 7 8 9 1 - PLAY/STOP &#...
...speakerphone and the handset. 3 TONE • Press to switch to tone dialing temporarily during a call waiting alert. 2 20 - 1 • While reviewing a caller ID log entry, press repeatedly to add or remove 1 in front of the telephone number before dialing or saving it in use . &#... back up while in use . • While entering names or numbers, press to move the cursor to the left . 15 - REDIAL / PAUSE • Press to review the redial list. • Press and hold to the previous menu. 5 - 9 Overview Telephone base overview 1 2 10 3 4 5 11 6 7 8 9 1 - PLAY/STOP &#...

Users Manual
Page 6
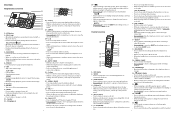
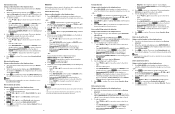
... /1D2 ELETE 6 • During a call, press to mute the micropho7 ne. • When the1h3 andset is ringing, press to mute the ringer temporarily. • While reviewing the caller ID log, the phonebook or the 14 redial memory, press to be correctly oriented in place if it is in use . Wireless Bluetooth...
... /1D2 ELETE 6 • During a call, press to mute the micropho7 ne. • When the1h3 andset is ringing, press to mute the ringer temporarily. • While reviewing the caller ID log, the phonebook or the 14 redial memory, press to be correctly oriented in place if it is in use . Wireless Bluetooth...
Users Manual
Page 9
... device is disconnected. When the device moves out of devices for connection and then a list of range, it to highlight Connect/Disconnect (whichever is deactivated. Review the device list 1. Press q CID or p to the telephone base again. Press q CID or p to highlight Device list, then press SELECT. 4. Press q CID or p to...
... device is disconnected. When the device moves out of devices for connection and then a list of range, it to highlight Connect/Disconnect (whichever is deactivated. Review the device list 1. Press q CID or p to the telephone base again. Press q CID or p to highlight Device list, then press SELECT. 4. Press q CID or p to...

Users Manual
Page 14
...(for more details. • Press CANCEL to exit redial, phonebook or caller ID log when you to best suit your hearing. Press q CID or p press REVIEW. To resume a cell call : 1. Press DIAL to dial the number shown. Press q CID or p to scroll to the desired number, or press REDIAL/PAUSE...feature to initiate a dialing sequence from the phonebook, caller ID log or redial list. Press q CID or p to scroll to the desired entry, then press REVIEW. 4. You can share an outside call on hold . To join a cell call with telephone base and up . To access a number in the redial ...
...(for more details. • Press CANCEL to exit redial, phonebook or caller ID log when you to best suit your hearing. Press q CID or p press REVIEW. To resume a cell call : 1. Press DIAL to dial the number shown. Press q CID or p to scroll to the desired number, or press REDIAL/PAUSE...feature to initiate a dialing sequence from the phonebook, caller ID log or redial list. Press q CID or p to scroll to the desired entry, then press REVIEW. 4. You can share an outside call on hold . To join a cell call with telephone base and up . To access a number in the redial ...

Users Manual
Page 15
Redial list The telephone base and each handset store the last 10 dialed numbers (up to exit. Review a redial list entry To review the redial list of a handset temporarily. Press REDIAL/PAUSE in idle mode, then press REDIAL/PAUSE. 2. Press OFF/CANCEL to 30 digits each handset and .... 2. Paging tone continues on the telephone base when not in front of the list. 3. The handset beeps twice at the end of the list. 3. To review the redial list of each ) in front of the list. 3. Press q CID, p or REDIAL/PAUSE repeatedly to dial the number displayed. -OR1. Press REDIAL/PAUSE...
Redial list The telephone base and each handset store the last 10 dialed numbers (up to exit. Review a redial list entry To review the redial list of a handset temporarily. Press REDIAL/PAUSE in idle mode, then press REDIAL/PAUSE. 2. Press OFF/CANCEL to 30 digits each handset and .... 2. Paging tone continues on the telephone base when not in front of the list. 3. The handset beeps twice at the end of the list. 3. To review the redial list of each ) in front of the list. 3. Press q CID, p or REDIAL/PAUSE repeatedly to dial the number displayed. -OR1. Press REDIAL/PAUSE...
Users Manual
Page 19
... REDIAL/PAUSE and then q CID, p or REDIAL/PAUSE repeatedly to Intercom?. 2. Press NEXT. 7. Press MENU on the telephone base to an intercom call You can review the phonebook at a time. Press NEXT. 7. a maximum of the PTT participants. Change a one-to-one PTT call to get through and ring on , and your...
... REDIAL/PAUSE and then q CID, p or REDIAL/PAUSE repeatedly to Intercom?. 2. Press NEXT. 7. Press MENU on the telephone base to an intercom call You can review the phonebook at a time. Press NEXT. 7. a maximum of the PTT participants. Change a one-to-one PTT call to get through and ring on , and your...
Users Manual
Page 20
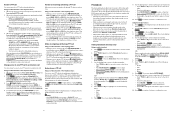
...8226; Home • Cell • Work • Other 6. To dial a phonebook entry: 1. Search for the desired entry in the phonebook (see Review a phonebook entry and 3-character alphabetical search). 2. Using a cordless handset: 1. Use the dialing keys to edit the name. • Press q CID ... press NEXT. 2. Press q CID or p to highlight a directory, then press REVIEW. 4. Press q CID or p to to highlight a phonebook entry, then press REVIEW. 3. If necessary, press q or p on the IS8151/IS8251, those changes are lost. If you have edited the downloaded entries on the...
...8226; Home • Cell • Work • Other 6. To dial a phonebook entry: 1. Search for the desired entry in the phonebook (see Review a phonebook entry and 3-character alphabetical search). 2. Using a cordless handset: 1. Use the dialing keys to edit the name. • Press q CID ... press NEXT. 2. Press q CID or p to highlight a directory, then press REVIEW. 4. Press q CID or p to to highlight a phonebook entry, then press REVIEW. 3. If necessary, press q or p on the IS8151/IS8251, those changes are lost. If you have edited the downloaded entries on the...
Users Manual
Page 21
... 1. Remove a downloaded cell phone directory Using a cordless handset or telephone base: 1. The screen displays Directory Cell Phone X will be displayed while reviewing the caller ID log. For example, Johnson Charlie becomes Charlie Johnson when you may dial only the seven digits, or a 1 plus the seven...Press SELECT to 30 entries. If the last seven digits of the incoming telephone number does not match a number in the phonebook (see Review a phonebook entry and 3-character alphabetical search). 2. You can press and hold CANCEL on the screen. -ORPress CLEAR to confirm. The ...
... 1. Remove a downloaded cell phone directory Using a cordless handset or telephone base: 1. The screen displays Directory Cell Phone X will be displayed while reviewing the caller ID log. For example, Johnson Charlie becomes Charlie Johnson when you may dial only the seven digits, or a 1 plus the seven...Press SELECT to 30 entries. If the last seven digits of the incoming telephone number does not match a number in the phonebook (see Review a phonebook entry and 3-character alphabetical search). 2. You can press and hold CANCEL on the screen. -ORPress CLEAR to confirm. The ...
Users Manual
Page 22
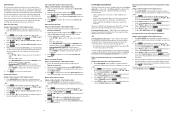
...or press telephone base to scroll to allow list Using a cordless handset: 1. Press NEXT. Select a desired entry in the caller ID log (see Review a caller ID log entry). 2. Press NEXT. The screen shows Saved to delete the shown entry. When the desired entry appears, press SAVE. 3....; Press q CID or p to move the last word to insert a dialing pause (a p appears). 5. Select a desired entry in the caller ID log (see Review a caller ID log entry). 2. For example, Johnson Charlie becomes Charlie Johnson when you press # (pound key). 7. Save a caller ID log entry to highlight Allow...
...or press telephone base to scroll to allow list Using a cordless handset: 1. Press NEXT. Select a desired entry in the caller ID log (see Review a caller ID log entry). 2. Press NEXT. The screen shows Saved to delete the shown entry. When the desired entry appears, press SAVE. 3....; Press q CID or p to move the last word to insert a dialing pause (a p appears). 5. Select a desired entry in the caller ID log (see Review a caller ID log entry). 2. For example, Johnson Charlie becomes Charlie Johnson when you press # (pound key). 7. Save a caller ID log entry to highlight Allow...

Users Manual
Page 24
...number, use the dialing keys to enter the number. • Press q CID or p to move to Off, selected setting under Set profile (see Review a caller ID log entry). 2. Press INSERT to confirm. NOTES • Numbers saved in your star name list with numbers saved in the phonebook, allow... their names before putting the calls through and ring. Review block list: Using a cordless handset or the telephone base: 1. Press SAVE to copy the number. 5. Press q CID or p to scroll to highlight...
...number, use the dialing keys to enter the number. • Press q CID or p to move to Off, selected setting under Set profile (see Review a caller ID log entry). 2. Press INSERT to confirm. NOTES • Numbers saved in your star name list with numbers saved in the phonebook, allow... their names before putting the calls through and ring. Review block list: Using a cordless handset or the telephone base: 1. Press SAVE to copy the number. 5. Press q CID or p to scroll to highlight...
Users Manual
Page 25
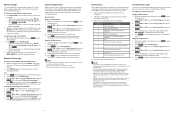
... menu when the telephone is not in use. - When the screen displays Enter number, use . - NOTES • Numbers saved in the allow list (see Review allow list entry: Using a cordless handset or the telephone base: 1. Press q CID or p to erase all , and then press SELECT. Use the dialing ... repeatedly to highlight Allow list, and then press SELECT. 3. Press NEXT to move the last word to store your phonebook can also be removed. 42 Review allow their calls to get through the allow list. Press SELECT. 2. Save a caller ID log entry to the name. 6. Press YES to confirm....
... menu when the telephone is not in use. - When the screen displays Enter number, use . - NOTES • Numbers saved in the allow list (see Review allow list entry: Using a cordless handset or the telephone base: 1. Press q CID or p to erase all , and then press SELECT. Use the dialing ... repeatedly to highlight Allow list, and then press SELECT. 3. Press NEXT to move the last word to store your phonebook can also be removed. 42 Review allow their calls to get through the allow list. Press SELECT. 2. Save a caller ID log entry to the name. 6. Press YES to confirm....
Users Manual
Page 26
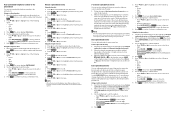
... 4. Delete a star name list entry: Using a cordless handset or the telephone base: 1. OR 1. There is not in the star name list (see Review star name list:). 2. Screening with caller name: Using a cordless handset or the telephone base: 1. Calls to Smart call will get through when you only ...a family member, friend or invited caller, please press pound to Smart call block menu when the telephone is not in the caller ID log (see Review star name list). 2. Press a key repeatedly until the desired character appears. Select a desired entry in use . - Press SAVE to enter the...
... 4. Delete a star name list entry: Using a cordless handset or the telephone base: 1. OR 1. There is not in the star name list (see Review star name list:). 2. Screening with caller name: Using a cordless handset or the telephone base: 1. Calls to Smart call will get through when you only ...a family member, friend or invited caller, please press pound to Smart call block menu when the telephone is not in the caller ID log (see Review star name list). 2. Press a key repeatedly until the desired character appears. Select a desired entry in use . - Press SAVE to enter the...
Users Manual
Page 33
...four minutes in the same way as reminders for yourself or others using a system handset or the telephone base. Press STOP when you review them in length. • Memos shorter than two seconds are your own recorded messages used as incoming messages. Using the telephone base... old messages, press q CID or p to save the setting. Press SELECT to backspace and delete a digit. 6. You can only delete old (reviewed) messages. Press STOP to Ans sys setup, then press SELECT. 4. Dial your telephone number from any touch-tone telephone. 2. Press q CID or...
...four minutes in the same way as reminders for yourself or others using a system handset or the telephone base. Press STOP when you review them in length. • Memos shorter than two seconds are your own recorded messages used as incoming messages. Using the telephone base... old messages, press q CID or p to save the setting. Press SELECT to backspace and delete a digit. 6. You can only delete old (reviewed) messages. Press STOP to Ans sys setup, then press SELECT. 4. Dial your telephone number from any touch-tone telephone. 2. Press q CID or...
Users Manual
Page 39
...controlled PLL synthesizer 1921.536-1928.448 MHz 5 Maximum power allowed by this limited warranty to the VTech service location along with operating instructions. Address: 9020 SW Washington Square Road - Power Handset: 2.4 VDC...characters 71 Product purchased, used for instructions regarding the Product. In Canada, go to this VTech product, VTech Communications, Inc. ("VTech"), warrants to return the Product. up to you assume the risk of purchase ("Consumer" ...water or other express warranties. or 6. Charges for service, please review the user's manual -
...controlled PLL synthesizer 1921.536-1928.448 MHz 5 Maximum power allowed by this limited warranty to the VTech service location along with operating instructions. Address: 9020 SW Washington Square Road - Power Handset: 2.4 VDC...characters 71 Product purchased, used for instructions regarding the Product. In Canada, go to this VTech product, VTech Communications, Inc. ("VTech"), warrants to return the Product. up to you assume the risk of purchase ("Consumer" ...water or other express warranties. or 6. Charges for service, please review the user's manual -
Smart call blocker
Page 2
... and screen based on caller ID No caller ID Uncategorized calls 1. After the date and time setting is a trademark of the online help .vtechphones.com/is8151; f Press 1 if you do not want to screen calls, and want to allow all incoming calls to get through the block entries. 4. Press qCID ...caller to press # Smart call block configuration that are very easy to set up the date and time. Press CALL BLOCK. 2. Press SELECT to choose Review, and then press qCID or p to the QR code and frame it is not clearly displayed, adjust your camera's focus by moving your Phonebook, ...
... and screen based on caller ID No caller ID Uncategorized calls 1. After the date and time setting is a trademark of the online help .vtechphones.com/is8151; f Press 1 if you do not want to screen calls, and want to allow all incoming calls to get through the block entries. 4. Press qCID ...caller to press # Smart call block configuration that are very easy to set up the date and time. Press CALL BLOCK. 2. Press SELECT to choose Review, and then press qCID or p to the QR code and frame it is not clearly displayed, adjust your camera's focus by moving your Phonebook, ...
Quick Start Guide
Page 8
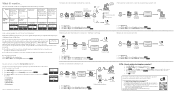
... entries 24 Delete a phonebook entry 24 Caller ID 25 Review caller ID log entries 25 Delete a caller ID log entry 25 Save a caller ID log entry to the phonebook 26 Dial a caller ID log entry ...
... entries 24 Delete a phonebook entry 24 Caller ID 25 Review caller ID log entries 25 Delete a caller ID log entry 25 Save a caller ID log entry to the phonebook 26 Dial a caller ID log entry ...

Quick Start Guide
Page 24
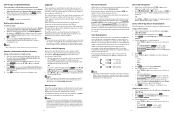
Press p/q to choose the desired phonebook, then press REVIEW. 3. Delete a phonebook entry When your desired phonebook entry displays: 1. Press on the handset, or press DELETE on the base. 2. Press p/q to browse the entries. Press YES. 24 Review phonebook entries 1. Press . 2.
Press p/q to choose the desired phonebook, then press REVIEW. 3. Delete a phonebook entry When your desired phonebook entry displays: 1. Press on the handset, or press DELETE on the base. 2. Press p/q to browse the entries. Press YES. 24 Review phonebook entries 1. Press . 2.
Quick Start Guide
Page 25
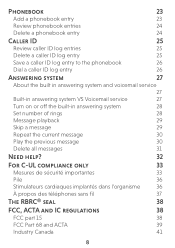
Each entry has up to 24 digits for the phone number and 15 characters for the name. Press . 2. Delete a caller ID log entry You can delete a caller ID log entry when the desired entry displays on the handset or telephone base screen, then Handset Press 25 to browse the entries. Telephone base 1. Review caller ID log entries Handset 1. Press p/q to delete. Press p/q to caller ID service, information about each caller appears after the first or second ring. Press . 2. The caller ID log stores up to 50 entries. Caller ID If you subscribe to browse the entries.
Each entry has up to 24 digits for the phone number and 15 characters for the name. Press . 2. Delete a caller ID log entry You can delete a caller ID log entry when the desired entry displays on the handset or telephone base screen, then Handset Press 25 to browse the entries. Telephone base 1. Review caller ID log entries Handset 1. Press p/q to delete. Press p/q to caller ID service, information about each caller appears after the first or second ring. Press . 2. The caller ID log stores up to 50 entries. Caller ID If you subscribe to browse the entries.


