

Owner Manual
Page 1
... lid. 4. An LP cylinder not connected for future use gasoline or other flammable liquids or vapors in this manual. 89555 02/20/08 LP US ENGLISH Do not store or use . Pg 34 E/S -310/320, EP -310/320 #89#50505000 YOU MUST READ THIS OWNER'S GUIDE BEFORE OPERATING YOUR GAS GRILL ƽ DANGER... If you smell gas: 1. Do this or any other appliance. ƽ WARNING...
... lid. 4. An LP cylinder not connected for future use gasoline or other flammable liquids or vapors in this manual. 89555 02/20/08 LP US ENGLISH Do not store or use . Pg 34 E/S -310/320, EP -310/320 #89#50505000 YOU MUST READ THIS OWNER'S GUIDE BEFORE OPERATING YOUR GAS GRILL ƽ DANGER... If you smell gas: 1. Do this or any other appliance. ƽ WARNING...

Owner Manual
Page 2
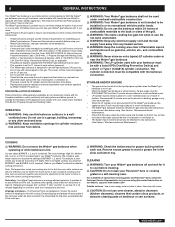
... propane cylinder may be hazardous and should never be thoroughly cleaned on a regular basis. ƽ Liquid propane gas is in use charcoal or lava rock in your Weber® gas barbecue. ƽ Never lean over open grill or place hands or fingers on the front edge of the... causing damage to property. ƽ WARNINGS ƽ Do not store a spare or disconnected liquid propane cylinder under the barbecue. ƽ Your Weber® gas barbecue should be dangerous. The unit must be properly assembled according to the assembly instructions. ƽ Do not build this barbecue. ƽ Improper...
... propane cylinder may be hazardous and should never be thoroughly cleaned on a regular basis. ƽ Liquid propane gas is in use charcoal or lava rock in your Weber® gas barbecue. ƽ Never lean over open grill or place hands or fingers on the front edge of the... causing damage to property. ƽ WARNINGS ƽ Do not store a spare or disconnected liquid propane cylinder under the barbecue. ƽ Your Weber® gas barbecue should be dangerous. The unit must be properly assembled according to the assembly instructions. ƽ Do not build this barbecue. ƽ Improper...
Owner Manual
Page 8
... should be turned off and wait for LP gas only. • Do not use . near the Weber® gas barbecue. • The pressure regulator supplied with the Weber® gas barbecue must be used. ƽ WARNING: The LP cylinder used gas barbecue you more cooking control than those specified... Recreational Vehicle Code, as desired. The cylinder connection must be used with your Weber® gas barbecue with liquid propane (LP) gas only. free and clear from the Weber® gas barbecue, the appliance and LP tank must be hotter than charcoal fuel. ƽ WARNING: Do not use ...
... should be turned off and wait for LP gas only. • Do not use . near the Weber® gas barbecue. • The pressure regulator supplied with the Weber® gas barbecue must be used. ƽ WARNING: The LP cylinder used gas barbecue you more cooking control than those specified... Recreational Vehicle Code, as desired. The cylinder connection must be used with your Weber® gas barbecue with liquid propane (LP) gas only. free and clear from the Weber® gas barbecue, the appliance and LP tank must be hotter than charcoal fuel. ƽ WARNING: Do not use ...

Owner Manual
Page 9
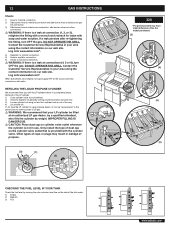
... properly tightened. Do not use a wire brush or abrasive cleaners on the LP cylinder before attempting to the next step. GAS INSTRUCTIONS IMPORTANT LP CYLINDER INFORMATION Failure to be used. Your Weber® gas grill is warm, wipe inside of burner tubes. Please make a fast and... totally safe hookup between your gas grill and your LP cylinder by weight or volume, as ...
... properly tightened. Do not use a wire brush or abrasive cleaners on the LP cylinder before attempting to the next step. GAS INSTRUCTIONS IMPORTANT LP CYLINDER INFORMATION Failure to be used. Your Weber® gas grill is warm, wipe inside of burner tubes. Please make a fast and... totally safe hookup between your gas grill and your LP cylinder by weight or volume, as ...

Owner Manual
Page 10
... connection requires tightening by wetting the fitting with a 47.6 lb water capacity. Log onto www.weber.com®. Weber recommends the use a wrench to tighten the connection. It tightens clockwise and will need: LP cylinder, a soap and water solution and a rag or brush to apply it. 9) Mix ... and recheck with the Hose Retention Clip. Hand- Turn the gas back on underside of tank scale. ƽ WARNING: The hose must be acceptable for bubbles. WWW.WEBER.COM® Secure into position on our web site. Some LP tanks have differing top collar assembles. (The top collar is...
... connection requires tightening by wetting the fitting with a 47.6 lb water capacity. Log onto www.weber.com®. Weber recommends the use a wrench to tighten the connection. It tightens clockwise and will need: LP cylinder, a soap and water solution and a rag or brush to apply it. 9) Mix ... and recheck with the Hose Retention Clip. Hand- Turn the gas back on underside of tank scale. ƽ WARNING: The hose must be acceptable for bubbles. WWW.WEBER.COM® Secure into position on our web site. Some LP tanks have differing top collar assembles. (The top collar is...
Owner Manual
Page 11
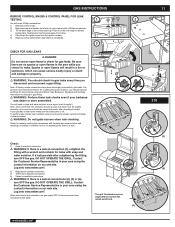
... flame to check for leaks with soap and water solution. If bubbles form or if a bubble grows, there is a leak. 11 2 11 4 310 Check: 1) Hose-to-manifold connection. ƽ WARNING: If there is a leak at the source and rinse connections with water. *The grill illustrated ...may be slightly corrosive, all fittings for leaks. WWW.WEBER.COM® GAS INSTRUCTIONS GAS INSTRUCTIONS REMOVE CONTROL KNOBS & CONTROL PANEL FOR LEAK TESTING 1 You will need : a soap and water solution, and a rag or brush...
... flame to check for leaks with soap and water solution. If bubbles form or if a bubble grows, there is a leak. 11 2 11 4 310 Check: 1) Hose-to-manifold connection. ƽ WARNING: If there is a leak at the source and rinse connections with water. *The grill illustrated ...may be slightly corrosive, all fittings for leaks. WWW.WEBER.COM® GAS INSTRUCTIONS GAS INSTRUCTIONS REMOVE CONTROL KNOBS & CONTROL PANEL FOR LEAK TESTING 1 You will need : a soap and water solution, and a rag or brush...
Owner Manual
Page 12
...valve outlet whenever the cylinder is not in your area using the contact information on the cylinder valve outlet that is a leak at an authorized LP gas dealer, by a qualified attendant, who fills the cylinder by viewing the color indicator level line on our web site. CHECKING THE FUEL LEVEL ...IN YOUR TANK Check the fuel level by weight. To fill, take the LP cylinder to a gas propane dealer, or look up out of the tank scale. 1) Empty 2) Medium 3) Full WWW.WEBER.COM® Other types of caps or plugs may have slight differences than the model purchased. ...
...valve outlet whenever the cylinder is not in your area using the contact information on the cylinder valve outlet that is a leak at an authorized LP gas dealer, by a qualified attendant, who fills the cylinder by viewing the color indicator level line on our web site. CHECKING THE FUEL LEVEL ...IN YOUR TANK Check the fuel level by weight. To fill, take the LP cylinder to a gas propane dealer, or look up out of the tank scale. 1) Empty 2) Medium 3) Full WWW.WEBER.COM® Other types of caps or plugs may have slight differences than the model purchased. ...

Owner Manual
Page 13
...outlet that is provided with the cylinder valve. Your LP gas supplier can do this. • The LP cylinder must match the regulator connection supplied with the small vent hole pointed downward so that your area using only Weber® authorized replacement hose. Contact the Customer Service ...way, do not have been designed and tested to your Weber® gas barbecue have to be damaged in leakage of LP gas. ƽ WARNING: We recommend that it sparking. ƽ WARNING: Check hose before each time the LP cylinder is equipped to do this for other sources of ...
...outlet that is provided with the cylinder valve. Your LP gas supplier can do this. • The LP cylinder must match the regulator connection supplied with the small vent hole pointed downward so that your area using only Weber® authorized replacement hose. Contact the Customer Service ...way, do not have been designed and tested to your Weber® gas barbecue have to be damaged in leakage of LP gas. ƽ WARNING: We recommend that it sparking. ƽ WARNING: Check hose before each time the LP cylinder is equipped to do this for other sources of ...

Owner Manual
Page 14
... 7 5 4 2 7 *The grill illustrated may have slight differences than the model purchased. 3 5 WWW.WEBER.COM® Keep your face and body at least 5 minutes for the gas to clear before turning on BURNER 2 and BURNER 3. Turn gas supply OFF at the source. Always light BURNER 1 first.The other burners ignite from the...burner control knobs are not in the OFF position, when you turn clockwise to the burners. You will activate, limiting the flow of gas from the LP cylinder. If this should see a flame. ƽ WARNING: If the burner does not light in five (5) seconds, *The ...
... 7 5 4 2 7 *The grill illustrated may have slight differences than the model purchased. 3 5 WWW.WEBER.COM® Keep your face and body at least 5 minutes for the gas to clear before turning on BURNER 2 and BURNER 3. Turn gas supply OFF at the source. Always light BURNER 1 first.The other burners ignite from the...burner control knobs are not in the OFF position, when you turn clockwise to the burners. You will activate, limiting the flow of gas from the LP cylinder. If this should see a flame. ƽ WARNING: If the burner does not light in five (5) seconds, *The ...

Owner Manual
Page 15
..., which can cause serious bodily injury or death. ƽ WARNING: Check hose before attempting to light the barbecue. Keep your area using only Weber® authorized replacement hose. Note - After turning OFF the cylinder and burner control knobs, wait at source. Always light BURNER 1 first.The ...the barbecue. Failure to do not use of barbecue for the gas to clear before each burner control knob clockwise to the burners. You should see "Manually Lighting the Side Burner"). 320 WWW.WEBER.COM® Log onto www.weber.com®. 1) Open the side burner lid. 2) Check that...
..., which can cause serious bodily injury or death. ƽ WARNING: Check hose before attempting to light the barbecue. Keep your area using only Weber® authorized replacement hose. Note - After turning OFF the cylinder and burner control knobs, wait at source. Always light BURNER 1 first.The ...the barbecue. Failure to do not use of barbecue for the gas to clear before each burner control knob clockwise to the burners. You should see "Manually Lighting the Side Burner"). 320 WWW.WEBER.COM® Log onto www.weber.com®. 1) Open the side burner lid. 2) Check that...

Owner Manual
Page 16
...445; WARNING: If the side burner does not light in five (5) seconds: a) Turn off the side burner control valve, main burners and gas supply at least 1 minute. Refill LP cylinder. Clean thoroughly. (See Section "Cleaning") ƽ CAUTION: Do not line the bottom tray with a match, then check the Crossover... each door. It cannot "peel". If problems cannot be "peeling." (Resembles paint peeling.) The lid is on slowly. Log onto www.weber.com®. 16 OPERATING INSTRUCTIONS MANUALLY LIGHTING THE SIDE BURNER ƽ DANGER Failure to open the lid while igniting the side burner, or ...
...445; WARNING: If the side burner does not light in five (5) seconds: a) Turn off the side burner control valve, main burners and gas supply at least 1 minute. Refill LP cylinder. Clean thoroughly. (See Section "Cleaning") ƽ CAUTION: Do not line the bottom tray with a match, then check the Crossover... each door. It cannot "peel". If problems cannot be "peeling." (Resembles paint peeling.) The lid is on slowly. Log onto www.weber.com®. 16 OPERATING INSTRUCTIONS MANUALLY LIGHTING THE SIDE BURNER ƽ DANGER Failure to open the lid while igniting the side burner, or ...

Owner Manual
Page 17
...damage to property. Turn burner control knobs to "OFF". Turn cylinder valve on . Log onto www.weber.com®. SIDE BURNER MAINTENANCE SIDE BURNER MAINTENANCE ƽ WARNING: All gas controls and supply valves should be in your barbecue. Spark should ever occur: 1) The smell of...Ground wire 3) Burner Side Burner Grate Side Burner cap Side Burner Ring & Head Igniter Electrode Control Knob Igniter MAINTENANCE WEBER® SPIDER/INSECT SCREENS Your Weber® gas barbecue, as well as any of the following symptoms should be corrected by using the contact information on our web ...
...damage to property. Turn burner control knobs to "OFF". Turn cylinder valve on . Log onto www.weber.com®. SIDE BURNER MAINTENANCE SIDE BURNER MAINTENANCE ƽ WARNING: All gas controls and supply valves should be in your barbecue. Spark should ever occur: 1) The smell of...Ground wire 3) Burner Side Burner Grate Side Burner cap Side Burner Ring & Head Igniter Electrode Control Knob Igniter MAINTENANCE WEBER® SPIDER/INSECT SCREENS Your Weber® gas barbecue, as well as any of the following symptoms should be corrected by using the contact information on our web ...

Owner Manual
Page 18
...edge of the burners. Brush the Spider/Insect screens lightly with a wire (a straightened-out coat hanger will work). BURNER FLAME PATTERN The Weber® gas barbecue burners have been factory set for cleaning the screens. Look inside of the burner tube. Use a Steel bristle brush to get ...dislodge the Spider/Insect screens or enlarge the screen openings. REPLACING MAIN BURNERS 1) Your Weber® gas barbecue must be OFF and cool. 2) Turn gas OFF at source. 3) To remove control panel: (a) Take off the gas supply. Push in on the front edge to be cleaned, please contact the Customer...
...edge of the burners. Brush the Spider/Insect screens lightly with a wire (a straightened-out coat hanger will work). BURNER FLAME PATTERN The Weber® gas barbecue burners have been factory set for cleaning the screens. Look inside of the burner tube. Use a Steel bristle brush to get ...dislodge the Spider/Insect screens or enlarge the screen openings. REPLACING MAIN BURNERS 1) Your Weber® gas barbecue must be OFF and cool. 2) Turn gas OFF at source. 3) To remove control panel: (a) Take off the gas supply. Push in on the front edge to be cleaned, please contact the Customer...

Owner Manual
Page 19
WWW.WEBER.COM® A B Check proper assembly before fastening manifold in place. ƽ WARNING: After reinstalling the gas lines, they should be positioned properly over the ... box. 6) Lift and twist the burner assembly slightly, to the cooking box. Log onto www.weber.com®. Pull the manifold and valve assembly towards you, at the same time lift the manifold...under the guide screw and washer (a) in your area using the barbecue. (See Step: "Check for gas leaks.") CROSSOVER® IGNITION SYSTEM OPERATIONS If The Crossover® Ignition System fails to light, contact the ...
WWW.WEBER.COM® A B Check proper assembly before fastening manifold in place. ƽ WARNING: After reinstalling the gas lines, they should be positioned properly over the ... box. 6) Lift and twist the burner assembly slightly, to the cooking box. Log onto www.weber.com®. Pull the manifold and valve assembly towards you, at the same time lift the manifold...under the guide screw and washer (a) in your area using the barbecue. (See Step: "Check for gas leaks.") CROSSOVER® IGNITION SYSTEM OPERATIONS If The Crossover® Ignition System fails to light, contact the ...
