
Owner Manual
Page 4
... polarized extension cord will fit into the polarized wall outlet only one blade is designed to vacuum water or other ) and will require the use the collection bag shoulder strap when vacuuming to recommended procedures. S Inspect the area before opening blocked, Keep free of this unit ... missiles which can be stopped and the impeller blades no longer turning to the operator or others. When used as a vacuum, always install vacuum tubes and collection bag assembly. S Always use of paper. STANDARDS This product is running to avoid creating a hazard and/or voiding warranty....
... polarized extension cord will fit into the polarized wall outlet only one blade is designed to vacuum water or other ) and will require the use the collection bag shoulder strap when vacuuming to recommended procedures. S Inspect the area before opening blocked, Keep free of this unit ... missiles which can be stopped and the impeller blades no longer turning to the operator or others. When used as a vacuum, always install vacuum tubes and collection bag assembly. S Always use of paper. STANDARDS This product is running to avoid creating a hazard and/or voiding warranty....

Owner Manual
Page 6
... to allow a free flow of the small opening in an upright position with your left shoulder COLLECTION BAG ASSEMBLY 1. voltage supply as shown in bag allows free air flow HOW TO CONVERT UNIT FROM VACUUM USE TO BLOWER USE 1. NOTE: The strap is closed . 6. Open the zipper on your blower. 6 Close .... Push the small end of the elbow tube through the buckle as shown on the vacuum assist handle with the lower vacuum tube on your right-hand side, blower outlet and bag pointing toward the front of the unit to release the latch while pulling up on nameplate of a screwdriver into ...
... to allow a free flow of the small opening in an upright position with your left shoulder COLLECTION BAG ASSEMBLY 1. voltage supply as shown in bag allows free air flow HOW TO CONVERT UNIT FROM VACUUM USE TO BLOWER USE 1. NOTE: The strap is closed . 6. Open the zipper on your blower. 6 Close .... Push the small end of the elbow tube through the buckle as shown on the vacuum assist handle with the lower vacuum tube on your right-hand side, blower outlet and bag pointing toward the front of the unit to release the latch while pulling up on nameplate of a screwdriver into ...

Owner Manual
Page 7
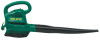
... suffix "W". ON/OFF Switch Top Handle Collection Bag Cord Retainer Air Vents Elbow Tube Rear Handle Inlet Cover Latch Upper Vacuum Tube Retaining Post Vacuum Assist Handle Upper Vacuum Tube Tube Release Button Blower Tube Inlet Restrictor Lower Vacuum Tube ON/OFF SWITCH The ON/OFF SWITCH ... loss of the various controls and adjustments. Cord Receptacle Cord Retainer Recessed Plug on Unit USING YOUR UNIT KNOW YOUR ELECTRIC BLOWER/VACUUM READ THIS INSTRUCTION MANUAL AND SAFETY RULES BEFORE OPERATING YOUR UNIT. DO NOT use cord retainer could result in damage to the unit...
... suffix "W". ON/OFF Switch Top Handle Collection Bag Cord Retainer Air Vents Elbow Tube Rear Handle Inlet Cover Latch Upper Vacuum Tube Retaining Post Vacuum Assist Handle Upper Vacuum Tube Tube Release Button Blower Tube Inlet Restrictor Lower Vacuum Tube ON/OFF SWITCH The ON/OFF SWITCH ... loss of the various controls and adjustments. Cord Receptacle Cord Retainer Recessed Plug on Unit USING YOUR UNIT KNOW YOUR ELECTRIC BLOWER/VACUUM READ THIS INSTRUCTION MANUAL AND SAFETY RULES BEFORE OPERATING YOUR UNIT. DO NOT use cord retainer could result in damage to the unit...

Owner Manual
Page 8
... etc. Wait until the impeller has completely stopped turning, then remove the vacuum tubes. tor abuse or negligence. BEFORE EACH USE CHECK FOR LOOSE FASTENERS AND PARTS S Inlet Cover S Blower Tube S Vacuum Tubes S Collection Bag 8 STARTING YOUR UNIT Your unit has two run positions, LOW and HIGH... or serious injury. USING YOUR UNIT AS A VACUUM WARNING: Do not vacuum stones, gravel, metal, broken glass, etc., to avoid severe damage to pre- D For best results during vacuum use the unit without the tubes or collection bag proper- INLET RESTRICTOR The INLET RESTRICTOR improves the ...
... etc. Wait until the impeller has completely stopped turning, then remove the vacuum tubes. tor abuse or negligence. BEFORE EACH USE CHECK FOR LOOSE FASTENERS AND PARTS S Inlet Cover S Blower Tube S Vacuum Tubes S Collection Bag 8 STARTING YOUR UNIT Your unit has two run positions, LOW and HIGH... or serious injury. USING YOUR UNIT AS A VACUUM WARNING: Do not vacuum stones, gravel, metal, broken glass, etc., to avoid severe damage to pre- D For best results during vacuum use the unit without the tubes or collection bag proper- INLET RESTRICTOR The INLET RESTRICTOR improves the ...
Owner Manual
Page 9
...UNIT & LABELS Stop unit and unplug extension cord. connect from the power source. The inlet cover must properly empty and maintain the collection bag to be stopped and the impeller blades no longer turning to the OFF position. Posi- If your unit and extension cord in a ...unit for cracks. S Inlet Cover -- Do not cover with all tubes. Discontinue use . Clean the unit using a damp cloth. Carefully reach into the vacuum opening the inlet cover. S ON/OFF Switch -- not breathe and may cause condensation and eventual rust or corrosion. S After each use of debris. Clear...
...UNIT & LABELS Stop unit and unplug extension cord. connect from the power source. The inlet cover must properly empty and maintain the collection bag to be stopped and the impeller blades no longer turning to the OFF position. Posi- If your unit and extension cord in a ...unit for cracks. S Inlet Cover -- Do not cover with all tubes. Discontinue use . Clean the unit using a damp cloth. Carefully reach into the vacuum opening the inlet cover. S ON/OFF Switch -- not breathe and may cause condensation and eventual rust or corrosion. S After each use of debris. Clear...

Parts List
Page 1
Wiring Harness (incl. Motor Washer Impeller Nut -- Vacuum Inlet Tube -- Blower Ref. 14. 15. 16. 17. 18. 19. Part No. 530403833 530095599 530403769 530403989 530403842 530403850 Description Spring -- Warning n = NEW PART NUMBER ... Button Hole Small Opening 18 6 7 16 8 9 16 10 11 12 17 19 13 14 Ref. 1. 2. 3. 4. 5. 6. 7. 8. 9. 10. 11. 12. 13. switch) Button -- Impeller Restrictor -- Vac Bag Tube -- Lower Vac Not Shown 530403871 Decal -- Door Latch Assy. Elbow Kit--Upper/Lower Tube w/handle Tube -- Switch Assy. Part No. 530403785 530016120 530403764 530403778...
Wiring Harness (incl. Motor Washer Impeller Nut -- Vacuum Inlet Tube -- Blower Ref. 14. 15. 16. 17. 18. 19. Part No. 530403833 530095599 530403769 530403989 530403842 530403850 Description Spring -- Warning n = NEW PART NUMBER ... Button Hole Small Opening 18 6 7 16 8 9 16 10 11 12 17 19 13 14 Ref. 1. 2. 3. 4. 5. 6. 7. 8. 9. 10. 11. 12. 13. switch) Button -- Impeller Restrictor -- Vac Bag Tube -- Lower Vac Not Shown 530403871 Decal -- Door Latch Assy. Elbow Kit--Upper/Lower Tube w/handle Tube -- Switch Assy. Part No. 530403785 530016120 530403764 530403778...

Parts List
Page 2
... Assy. Part No. 530403833 530095599 530404383 530403989 530403842 530403850 Description Spring -- Door Assy. -- Vac Bag Tube -- Lower Vac Not Shown 530403871 Decal -- Motor Washer Impeller Nut -- Inlet Door -- switch) Button -- Elbow Kit--Upper/Lower Tube w/handle Tube -- Vacuum Inlet Tube -- PARTS LIST NO. 530086358 DATE Replaces 07/11/06 530086358 -- 04/06...
... Assy. Part No. 530403833 530095599 530404383 530403989 530403842 530403850 Description Spring -- Door Assy. -- Vac Bag Tube -- Lower Vac Not Shown 530403871 Decal -- Motor Washer Impeller Nut -- Inlet Door -- switch) Button -- Elbow Kit--Upper/Lower Tube w/handle Tube -- Vacuum Inlet Tube -- PARTS LIST NO. 530086358 DATE Replaces 07/11/06 530086358 -- 04/06...
