

Owner Manual
Page 1
WEEDEATER 20V CORDLESS STRING TRIMMER Model: LT 20V a cGio5 218549 Owner's Manual TOLL-FREE HELPLINE: 1.800-554-6723 A Read all safety rules and instructions carefully before operating this tool.
WEEDEATER 20V CORDLESS STRING TRIMMER Model: LT 20V a cGio5 218549 Owner's Manual TOLL-FREE HELPLINE: 1.800-554-6723 A Read all safety rules and instructions carefully before operating this tool.

Owner Manual
Page 2
CONTENTS Contents Product Specifications General Safety Rules Symbols Know Your String Trimmer Assembly Operation Battery Charger Maintenance Environmentally Safe Battery Disposal Troubleshooting Warranty SPECIFICATIONS 20V LITHIUM-ION TRIMMER Type Speed Line Size Cutting Swath Weight (With Battery Pack) BATTERY PACK Type Output Voltage Chargering Time plillilllimillikr Do-v-v-ered by an ENERGY STAR qualified ... STAR hotter environment 2 2 3-5 6-7 8 9-11 12-16 17-18 19 -20 21 22 23 Cordless, battery-operated 7500 RPM 0,065in. 12in. 6.4 lbs (2.9 Kg) Lithium-ion rechargeable 20V DC 90 minutes 2
CONTENTS Contents Product Specifications General Safety Rules Symbols Know Your String Trimmer Assembly Operation Battery Charger Maintenance Environmentally Safe Battery Disposal Troubleshooting Warranty SPECIFICATIONS 20V LITHIUM-ION TRIMMER Type Speed Line Size Cutting Swath Weight (With Battery Pack) BATTERY PACK Type Output Voltage Chargering Time plillilllimillikr Do-v-v-ered by an ENERGY STAR qualified ... STAR hotter environment 2 2 3-5 6-7 8 9-11 12-16 17-18 19 -20 21 22 23 Cordless, battery-operated 7500 RPM 0,065in. 12in. 6.4 lbs (2.9 Kg) Lithium-ion rechargeable 20V DC 90 minutes 2

Owner Manual
Page 4
... the risk of serious personal injury. • If the power supply cord is more than 50°F but less than 100°F. Do not use , trimmer should be charged in contact with your eyes, flush them with clean water for possible special disposal instructions. • Do not open flame. Properly dispose...
... the risk of serious personal injury. • If the power supply cord is more than 50°F but less than 100°F. Do not use , trimmer should be charged in contact with your eyes, flush them with clean water for possible special disposal instructions. • Do not open flame. Properly dispose...

Owner Manual
Page 5
...care of a responsible adult, • Do not allow children under the age of 14 to operate this trimmer. Refer to them frequently and use them these instructions. Children who may use , the trimmer should be stored indoors in a dry, locked up place -out of the reach of children. •... the direction of people or pets, • Never run into the path of the trimmer, ^WARNING (PROPOSITION 65) Some dust created by a parent. • Stay alert, and turn the trimmer off if a child or any other masonry products, and • Arsenic and chromium from tool without the proper equipment ...
...care of a responsible adult, • Do not allow children under the age of 14 to operate this trimmer. Refer to them frequently and use them these instructions. Children who may use , the trimmer should be stored indoors in a dry, locked up place -out of the reach of children. •... the direction of people or pets, • Never run into the path of the trimmer, ^WARNING (PROPOSITION 65) Some dust created by a parent. • Stay alert, and turn the trimmer off if a child or any other masonry products, and • Arsenic and chromium from tool without the proper equipment ...
Owner Manual
Page 8
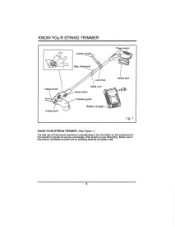
KNOW YOu R STRING TRIMMER Auxiliary handle Trigger switch Edging Guide Cutting spool Edge Adjustment Lock Knob Height Lock Adjust button c7: Protective guard Battery charger Battery pack 110)1,11 :- , fig. 1 KNOW YOUR STRING TRIMMER (See Figure 1.) The safe use of the project you are attempting. Before use of this product requires an understanding of the information on the product and in this operator's manual as well as a knowledge of this product, familiarize yourself with all operating features and safety rules. 8
KNOW YOu R STRING TRIMMER Auxiliary handle Trigger switch Edging Guide Cutting spool Edge Adjustment Lock Knob Height Lock Adjust button c7: Protective guard Battery charger Battery pack 110)1,11 :- , fig. 1 KNOW YOUR STRING TRIMMER (See Figure 1.) The safe use of the project you are attempting. Before use of this product requires an understanding of the information on the product and in this operator's manual as well as a knowledge of this product, familiarize yourself with all operating features and safety rules. 8

Owner Manual
Page 10
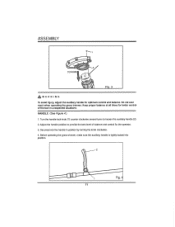
... To avoid injury, always remove the battery pack before installing the guard, changing a cutting line, or making any other part of the trimmer. • Read, understand, and follow the Battery Charger instructions. It can not be removed or disassembled. 1. Using a phillips head screwdriver..., remove the pre-installed screw (1) from the trimmer head. 4. Align the tongue (3) of the battery pack with the screw hole on the head. 5. Grasp Ke trigger handle (2) firmly. 3....
... To avoid injury, always remove the battery pack before installing the guard, changing a cutting line, or making any other part of the trimmer. • Read, understand, and follow the Battery Charger instructions. It can not be removed or disassembled. 1. Using a phillips head screwdriver..., remove the pre-installed screw (1) from the trimmer head. 4. Align the tongue (3) of the battery pack with the screw hole on the head. 5. Grasp Ke trigger handle (2) firmly. 3....
Owner Manual
Page 11
... the knob clockwise. 4. Securely lock the handle in unexpected situations. Keep proper balance at all times for optimum control and balance. Before operating the grass trimmer, make sure the auxiliary handle is tightly locked into position. 2 Fig. 11 Adjust the handle position to loosen the auxiliary handle (2), 2. ASSEMBLY ■t 2 O Fiq. 3 AWARNING...
... the knob clockwise. 4. Securely lock the handle in unexpected situations. Keep proper balance at all times for optimum control and balance. Before operating the grass trimmer, make sure the auxiliary handle is tightly locked into position. 2 Fig. 11 Adjust the handle position to loosen the auxiliary handle (2), 2. ASSEMBLY ■t 2 O Fiq. 3 AWARNING...
Owner Manual
Page 12
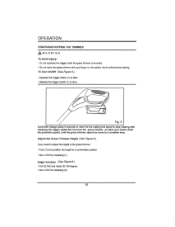
... To avoid injury: • Do not squeeze the trigger while the grass trimmer is inverted. • Do not carry the grass trimmer with your hands under the protective guard, until the grass trimmer spool has come to a complete stop. Edger function (See Figure 6.) • Pull (2) first and ...Squeeze the trigger switch (1) to start. • Release the trigger switch (1) to stop rotating after releasing the trigger switch.Do not invert the grass trimmer, or place your finger on the switch. Fig. 5 CAUTION: Always allow 5 seconds or more for the cutting line spool to a comfortable position...
... To avoid injury: • Do not squeeze the trigger while the grass trimmer is inverted. • Do not carry the grass trimmer with your hands under the protective guard, until the grass trimmer spool has come to a complete stop. Edger function (See Figure 6.) • Pull (2) first and ...Squeeze the trigger switch (1) to start. • Release the trigger switch (1) to stop rotating after releasing the trigger switch.Do not invert the grass trimmer, or place your finger on the switch. Fig. 5 CAUTION: Always allow 5 seconds or more for the cutting line spool to a comfortable position...
Owner Manual
Page 13
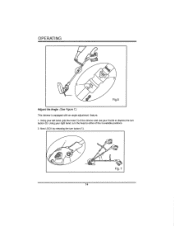
Now LOCK by releasing the turn button (2). OPERATING 2 1 s-J Fig.6 Adjust the Angle (See Figure 7.) This trimmer is equipped with an angle adjustment feature. 1, Using your left hand, grip the nose (1) of the 3 available positions, 2. Using your thumb to either of the trimmer and use your right hand, turn the head to depress the turn button (1). 3 2 14 Fig. 7
Now LOCK by releasing the turn button (2). OPERATING 2 1 s-J Fig.6 Adjust the Angle (See Figure 7.) This trimmer is equipped with an angle adjustment feature. 1, Using your left hand, grip the nose (1) of the 3 available positions, 2. Using your thumb to either of the trimmer and use your right hand, turn the head to depress the turn button (1). 3 2 14 Fig. 7
Owner Manual
Page 14
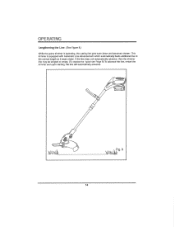
OPERATING Lengthening the Line (See Figure 8.) While the grass trimmer is equipped with Automatic Line Advancement which automatically feeds additional line to the correct length as it wears down and becomes shorter. This trimmer is operating, the cutting line gets worn down . If the fine does not automatically advance, then the trimmer line may be tangled or empty. (To replace the spool see Page 9) To advance the line, restart the trimmer and upon starting, the line will automatically advance. 0 \ fig. 8 \Mak 14
OPERATING Lengthening the Line (See Figure 8.) While the grass trimmer is equipped with Automatic Line Advancement which automatically feeds additional line to the correct length as it wears down and becomes shorter. This trimmer is operating, the cutting line gets worn down . If the fine does not automatically advance, then the trimmer line may be tangled or empty. (To replace the spool see Page 9) To advance the line, restart the trimmer and upon starting, the line will automatically advance. 0 \ fig. 8 \Mak 14

Owner Manual
Page 15
...the cutting head tipped down at night. Trimming with the side of the cutting line to do the tr€mming, especially near a furnace. OPERATING Trimmer Tips, Before each use • Make sure the protective guard is tightly Installed.Tighten the guard screw. • Make sure the battery is fully ...charged and that may become entangled in the cutting line and thrown. • Trim only when the grass and weeds are thrown away from you . • If possible, guide the grass trimmer to the left to prevent losing the line completely into the spool. 15
...the cutting head tipped down at night. Trimming with the side of the cutting line to do the tr€mming, especially near a furnace. OPERATING Trimmer Tips, Before each use • Make sure the protective guard is tightly Installed.Tighten the guard screw. • Make sure the battery is fully ...charged and that may become entangled in the cutting line and thrown. • Trim only when the grass and weeds are thrown away from you . • If possible, guide the grass trimmer to the left to prevent losing the line completely into the spool. 15

Owner Manual
Page 16
OPERATING • If the length of the cutting area gets smaller, the line is worn down and needs to be advanced more often. • If the grass trimmer is not cutting correctly, the cutting line may not be feeding properly. Remove and rewind the line spool, SEE MAINTENANCE SECTION for spool rewinding. 16
OPERATING • If the length of the cutting area gets smaller, the line is worn down and needs to be advanced more often. • If the grass trimmer is not cutting correctly, the cutting line may not be feeding properly. Remove and rewind the line spool, SEE MAINTENANCE SECTION for spool rewinding. 16

Owner Manual
Page 19
..., inspecting, or performing any time. • Once the battery is fully charged it is recommended to disconnect the charger from the trimmer while not in use will immediately cut power to provide full power without power fade unlike typical batteries; MAINTENANCE LWARNING To avoid risk... of fire, electric shock, or electrocution: • Do not use strong solvents or detergents on the trimmer. BATTERY PACK • Lithium-ion batteries while in use . • It is fully discharged the battery circuitry will continue to the tool...
..., inspecting, or performing any time. • Once the battery is fully charged it is recommended to disconnect the charger from the trimmer while not in use will immediately cut power to provide full power without power fade unlike typical batteries; MAINTENANCE LWARNING To avoid risk... of fire, electric shock, or electrocution: • Do not use strong solvents or detergents on the trimmer. BATTERY PACK • Lithium-ion batteries while in use . • It is fully discharged the battery circuitry will continue to the tool...
Owner Manual
Page 20
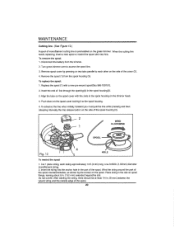
...overfill. Use 0.065in.(1.65mm) diameter monofilament string. 2. After winding the string, there should be at least 1/4 in . (152 mm) extended beyondthe slot. Turn grass trimmer over to access the spool line. 3, Remove spool cover by the arrows on the side of the cover (2), 4, Remove the spool (1) from the...6 in . (6 mm) between the wound string and the outside edge of the spool. Place string in the spool housing on the trimmer head. 4, Push down on the grass trimmer. Insert the end of line through the opening(4) in the spool housing(3). 3, Align the tabs on the spool cover with the slots...
...overfill. Use 0.065in.(1.65mm) diameter monofilament string. 2. After winding the string, there should be at least 1/4 in . (152 mm) extended beyondthe slot. Turn grass trimmer over to access the spool line. 3, Remove spool cover by the arrows on the side of the cover (2), 4, Remove the spool (1) from the...6 in . (6 mm) between the wound string and the outside edge of the spool. Place string in the spool housing on the trimmer head. 4, Push down on the grass trimmer. Insert the end of line through the opening(4) in the spool housing(3). 3, Align the tabs on the spool cover with the slots...

Owner Manual
Page 21
... solid waste stream. • Take them to open the battery pack. • If a leak develops, the released electrolytes are in the batteries used in this trimmer battery pack: Lithium, a toxic material. To avoid injury and risk of the environment. Dispose of it and do not swallow It. • DO NOT place...
... solid waste stream. • Take them to open the battery pack. • If a leak develops, the released electrolytes are in the batteries used in this trimmer battery pack: Lithium, a toxic material. To avoid injury and risk of the environment. Dispose of it and do not swallow It. • DO NOT place...


