
English Manual
Page 1
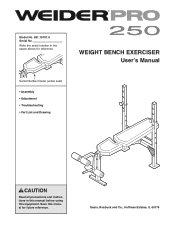
Save this equipment. Sears, Roebuck and Co., Hoffman Estates, IL 60179 Write the serial number in this manual before using this manual for reference. WEIGHT BENCH EXERCISER User's Manual Serial Number Decal (under seat) • Assembly • Adjustment • Troubleshooting • Part List and Drawing CAUTION Read all precautions and instructions in the space above for future reference. Model No. 831.15707.0 Serial No.
Save this equipment. Sears, Roebuck and Co., Hoffman Estates, IL 60179 Write the serial number in this manual before using this manual for reference. WEIGHT BENCH EXERCISER User's Manual Serial Number Decal (under seat) • Assembly • Adjustment • Troubleshooting • Part List and Drawing CAUTION Read all precautions and instructions in the space above for future reference. Model No. 831.15707.0 Serial No.

English Manual
Page 2
... ORDERING REPLACEMENT PARTS Back Cover 90-DAY FULL WARRANTY Back Cover WARNING DECAL PLACEMENT The warning decals shown here have been placed on the weight bench in the locations shown. Note: The decals shown may not be shown at actual size. Place the decal on the weight...
... ORDERING REPLACEMENT PARTS Back Cover 90-DAY FULL WARRANTY Back Cover WARNING DECAL PLACEMENT The warning decals shown here have been placed on the weight bench in the locations shown. Note: The decals shown may not be shown at actual size. Place the decal on the weight...
English Manual
Page 3
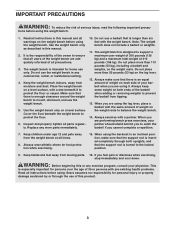
... Do not use only. Do not place more than 110 pounds (50 kg), including a barbell and weights, on the weight bench before using the weight bench. Keep children under age 12 and pets away from moisture and dust. This is especially important for personal injury or property damage ...position. 9. Sears assumes no responsibility for persons over the age of the owner to ensure that is enough clearance around the weight bench to balance the weight bench. 14. It is intended for foot protection while exercising. 15. When using it to support a maximum user weight of 300...
... Do not use only. Do not place more than 110 pounds (50 kg), including a barbell and weights, on the weight bench before using the weight bench. Keep children under age 12 and pets away from moisture and dust. This is especially important for personal injury or property damage ...position. 9. Sears assumes no responsibility for persons over the age of the owner to ensure that is enough clearance around the weight bench to balance the weight bench. 14. It is intended for foot protection while exercising. 15. When using it to support a maximum user weight of 300...
English Manual
Page 4
... weight stations designed to tone your body, build dramatic muscle size and strength, or improve your benefit, read this manual for selecting the versatile WEIDER® PRO 250 weight bench. The serial number can be found on a decal attached to achieve the specific results you have questions after reading this manual, call 1-800...
... weight stations designed to tone your body, build dramatic muscle size and strength, or improve your benefit, read this manual for selecting the versatile WEIDER® PRO 250 weight bench. The serial number can be found on a decal attached to achieve the specific results you have questions after reading this manual, call 1-800...
English Manual
Page 5
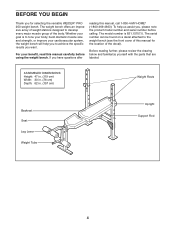
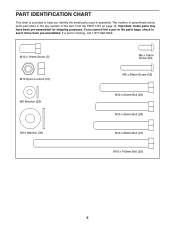
M10 x 19mm Screw (5) M10 Nylon Locknut (31) M6 Washer (22) M10 Washer (30) M6 x 16mm Screw (24) M6 x 38mm Screw (32) M10 x 60mm Bolt (25) M10 x 66mm Bolt (28) M10 x 68mm Bolt (27) M10 x 142mm Bolt (23) 5 If a part is provided to help you cannot find a part in the parts bags, check to the key number of the part, from the PART LIST on page 14. If you identify the small parts used in parenthesis below each part refers to see if it has been pre-assembled. PART IDENTIFICATION CHART This chart is missing, call 1-877-992-5999. Important: Some parts may have been pre-assembled for ...
M10 x 19mm Screw (5) M10 Nylon Locknut (31) M6 Washer (22) M10 Washer (30) M6 x 16mm Screw (24) M6 x 38mm Screw (32) M10 x 60mm Bolt (25) M10 x 66mm Bolt (28) M10 x 68mm Bolt (27) M10 x 142mm Bolt (23) 5 If a part is provided to help you cannot find a part in the parts bags, check to the key number of the part, from the PART LIST on page 14. If you identify the small parts used in parenthesis below each part refers to see if it has been pre-assembled. PART IDENTIFICATION CHART This chart is missing, call 1-877-992-5999. Important: Some parts may have been pre-assembled for ...
English Manual
Page 6
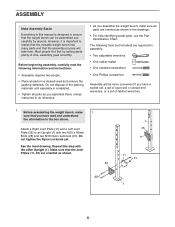
...• For help identifying small parts, use the Part Identification Chart. Repeat this manual is important to realize that the versatile weight bench has many parts and that the assembly process will be assembled successfully by setting aside plenty of time, assembly goes smoothly. ASSEMBLY Make ...completed. • Tighten all parts as shown. 35 1 35 11 11 31 28 1 6 However, it is designed to ensure that the weight bench can be more convenient if you assemble them, unless instructed to an Upright (1) with the other Upright (1). Do not dispose of ratchet wrenches. 1....
...• For help identifying small parts, use the Part Identification Chart. Repeat this manual is important to realize that the versatile weight bench has many parts and that the assembly process will be assembled successfully by setting aside plenty of time, assembly goes smoothly. ASSEMBLY Make ...completed. • Tighten all parts as shown. 35 1 35 11 11 31 28 1 6 However, it is designed to ensure that the weight bench can be more convenient if you assemble them, unless instructed to an Upright (1) with the other Upright (1). Do not dispose of ratchet wrenches. 1....
English Manual
Page 7
... Washer (30), and an M10 Nylon Locknut (31). Attach one end of the Crossbar (2) in the same way. 35 28 31 11 2 3. Attach the Bench Frame (3) to the Bench Frame (3) 3 with two M10 x 68mm Bolts (27) and two M10 Nylon Locknuts (31). Do not tighten the Nylon Locknuts yet. 3 2 27 31 7 Do...
... Washer (30), and an M10 Nylon Locknut (31). Attach one end of the Crossbar (2) in the same way. 35 28 31 11 2 3. Attach the Bench Frame (3) to the Bench Frame (3) 3 with two M10 x 68mm Bolts (27) and two M10 Nylon Locknuts (31). Do not tighten the Nylon Locknuts yet. 3 2 27 31 7 Do...
English Manual
Page 8
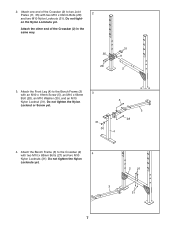
Turn the Support Rod so the locking pin is wrapped around the Upright. Locking Pin 1 1 6. Insert a Weight Rest (15) into the Leg Lever (6). 7 Slide a Foam Pad (13) onto each end of the Pad Tube. Insert a Pad Tube (12) into an Upright (1). Attach the Leg Lever (6) to the Front Leg (4) with the other Weight Rest (15). Make sure that the Weight Rests are at the same height. 13 6 12 13 12 1 15 Locking 1 Pin 15 8 Insert the Support Rod (14) into a set of 6 the included grease packet. Turn 8 the Weight Rest so the locking pin is wrapped around ...
Turn the Support Rod so the locking pin is wrapped around the Upright. Locking Pin 1 1 6. Insert a Weight Rest (15) into the Leg Lever (6). 7 Slide a Foam Pad (13) onto each end of the Pad Tube. Insert a Pad Tube (12) into an Upright (1). Attach the Leg Lever (6) to the Front Leg (4) with the other Weight Rest (15). Make sure that the Weight Rests are at the same height. 13 6 12 13 12 1 15 Locking 1 Pin 15 8 Insert the Support Rod (14) into a set of 6 the included grease packet. Turn 8 the Weight Rest so the locking pin is wrapped around ...

English Manual
Page 9
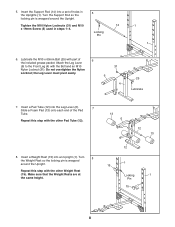
...the welded tube on page 10. 3 24 24 9 Attach the Backrest Tubes (7) to the Bench Frame (3) with 11 four M6 x 16mm Screws (24). The use of all parts are properly tightened before you use the weight bench. 9. Lubricate an M10 x 142mm Bolt (23) with the indicated 9 holes in ADJUSTMENT, ...beginning on the Bench Frame (3) with four M6 x 38mm Screws (32) and four M6 Washers (22). Make sure that...
...the welded tube on page 10. 3 24 24 9 Attach the Backrest Tubes (7) to the Bench Frame (3) with 11 four M6 x 16mm Screws (24). The use of all parts are properly tightened before you use the weight bench. 9. Lubricate an M10 x 142mm Bolt (23) with the indicated 9 holes in ADJUSTMENT, ...beginning on the Bench Frame (3) with four M6 x 38mm Screws (32) and four M6 Washers (22). Make sure that...
English Manual
Page 10
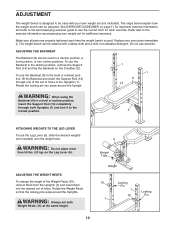
...WEIGHTS TO THE LEG LEVER To use the Backrest (8) in the Uprights (1). Replace any worn parts immediately. WARNING: Always set for each time the weight bench is used. To use the Leg Lever (6), slide the desired weights (not included) onto the weight tube. To use solvents. Rotate the Weight Rests...use the Backrest in a level or incline position, insert the Support Rod (14) completely through one of the set of holes. ADJUSTMENT The weight bench is designed to be used with a damp cloth and a mild, non-abrasive detergent. The steps below explain how the weight...
...WEIGHTS TO THE LEG LEVER To use the Backrest (8) in the Uprights (1). Replace any worn parts immediately. WARNING: Always set for each time the weight bench is used. To use the Leg Lever (6), slide the desired weights (not included) onto the weight tube. To use solvents. Rotate the Weight Rests...use the Backrest in a level or incline position, insert the Support Rod (14) completely through one of the set of holes. ADJUSTMENT The weight bench is designed to be used with a damp cloth and a mild, non-abrasive detergent. The steps below explain how the weight...
English Manual
Page 11
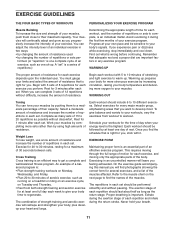
Avoid overdoing it . If you , stick with it during the return stroke. Complete as possible without difficulty, increase the amount of resistance. Rest for 20 to 10 different exercises. Exercise for 1 minute after each set . Each workout should be sensitive to your energy level is right for several exercises, and a list of the muscles affected. Exercising in an uncontrolled manner will find photographs showing the correct form for you. EXERCISE GUIDELINES THE FOUR BASIC TYPES OF WORKOUTS PERSONALIZING YOUR EXERCISE PROGRAM Muscle Building To increase ...
Avoid overdoing it . If you , stick with it during the return stroke. Complete as possible without difficulty, increase the amount of resistance. Rest for 20 to 10 different exercises. Exercise for 1 minute after each set . Each workout should be sensitive to your energy level is right for several exercises, and a list of the muscles affected. Exercising in an uncontrolled manner will find photographs showing the correct form for you. EXERCISE GUIDELINES THE FOUR BASIC TYPES OF WORKOUTS PERSONALIZING YOUR EXERCISE PROGRAM Muscle Building To increase ...
English Manual
Page 12
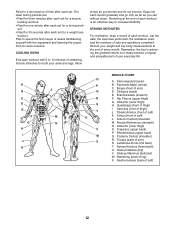
out. • Rest for 30 seconds after each set for each exercise. COOLING DOWN End each workout with the equipment and learning the proper form for a weight loss workout. Move slowly as you stretch and do not bounce. Stretching at the end of every month. List the date, the exercises performed, the resistance used, and the numbers of arm) S. Record your weight and key body measurements at the end of each workout is to 10 minutes of stretching. Brachioradials (forearm) F. Hip Flexors (upper thigh) G. Anterior Deltoid (shoulder) M. Trapezius (upper back) P. Triceps (back of ...
out. • Rest for 30 seconds after each set for each exercise. COOLING DOWN End each workout with the equipment and learning the proper form for a weight loss workout. Move slowly as you stretch and do not bounce. Stretching at the end of every month. List the date, the exercises performed, the resistance used, and the numbers of arm) S. Record your weight and key body measurements at the end of each workout is to 10 minutes of stretching. Brachioradials (forearm) F. Hip Flexors (upper thigh) G. Anterior Deltoid (shoulder) M. Trapezius (upper back) P. Triceps (back of ...
English Manual
Page 14
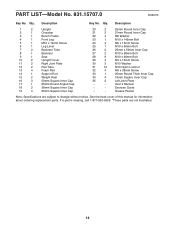
...-992-5999. *These parts are subject to change without notice. PART LIST-Model No. 831.15707.0 R0407A Key No. User's Manual * - Qty. Description 1 2 Upright 2 1 Crossbar 3 1 Bench Frame 4 1 Front Leg 5 1 M10 x 19mm Screw 6 1 Leg Lever 7 2 Backrest Tube 8 1 Backrest 9 1 Seat 10 2 Upright Cover 11 2 Right Joint Plate 12 2 Pad Tube 13 4 Foam Pad...
...-992-5999. *These parts are subject to change without notice. PART LIST-Model No. 831.15707.0 R0407A Key No. User's Manual * - Qty. Description 1 2 Upright 2 1 Crossbar 3 1 Bench Frame 4 1 Front Leg 5 1 M10 x 19mm Screw 6 1 Leg Lever 7 2 Backrest Tube 8 1 Backrest 9 1 Seat 10 2 Upright Cover 11 2 Right Joint Plate 12 2 Pad Tube 13 4 Foam Pad...
English Manual
Page 15
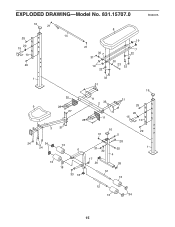
EXPLODED DRAWING-Model No. 831.15707.0 R0407A 16 21 14 29 20 15 10 29 8 21 31 30 7 19 22 19 7 22 30 23 32 1 32 31 16 35 11 31 2 35 9 28 29 27 11 28 20 15 10 3 31 16 31 5 24 34 24 13 6 31 30 28 25 4 17 13 26 26 18 33 18 12 13 29 1 12 13 34 15
EXPLODED DRAWING-Model No. 831.15707.0 R0407A 16 21 14 29 20 15 10 29 8 21 31 30 7 19 22 19 7 22 30 23 32 1 32 31 16 35 11 31 2 35 9 28 29 27 11 28 20 15 10 3 31 16 31 5 24 34 24 13 6 31 30 28 25 4 17 13 26 26 18 33 18 12 13 29 1 12 13 34 15

English Manual
Page 16
... and Co., Hoffman Estates, IL 60179 Part No. 252484 R0407A Printed in your home or ours! This warranty does not apply when the WEIGHT BENCH EXERCISER is used commercially or for free repair (or replacement if repair proves impossible). For the replacement parts, accessories, and user's manuals that you...174; Marca Registrada / TM Marca de Fábrica / SM Marca de Servicio de Sears Brands, LLC 90-DAY FULL WARRANTY If this Sears WEIGHT BENCH EXERCISER fails due to arrange for rental purposes. and Canada) www.sears.com www.sears.ca Our Home For repair of carry-in material or...
... and Co., Hoffman Estates, IL 60179 Part No. 252484 R0407A Printed in your home or ours! This warranty does not apply when the WEIGHT BENCH EXERCISER is used commercially or for free repair (or replacement if repair proves impossible). For the replacement parts, accessories, and user's manuals that you...174; Marca Registrada / TM Marca de Fábrica / SM Marca de Servicio de Sears Brands, LLC 90-DAY FULL WARRANTY If this Sears WEIGHT BENCH EXERCISER fails due to arrange for rental purposes. and Canada) www.sears.com www.sears.ca Our Home For repair of carry-in material or...