

English Manual
Page 2
.... Mountain Time, to the location shown. 2 until 6 p.m. Table of Contents WARNING DECAL PLACEMENT 2 IMPORTANT PRECAUTIONS 3 BEFORE YOU BEGIN 4 PART IDENTIFICATION CHART 5 ASSEMBLY 6 USING THE WEIGHT BENCH 9 EXERCISE GUIDELINES 11 PART LIST 14 EXPLODED DRAWING 15 ORDERING REPLACEMENT PARTS Back Cover LIMITED WARRANTY Back Cover Warning Decal Placement The decal shown at... is missing, or if it is not legible, please call our Customer Service Department toll-free at the right has been placed on the weight bench.
.... Mountain Time, to the location shown. 2 until 6 p.m. Table of Contents WARNING DECAL PLACEMENT 2 IMPORTANT PRECAUTIONS 3 BEFORE YOU BEGIN 4 PART IDENTIFICATION CHART 5 ASSEMBLY 6 USING THE WEIGHT BENCH 9 EXERCISE GUIDELINES 11 PART LIST 14 EXPLODED DRAWING 15 ORDERING REPLACEMENT PARTS Back Cover LIMITED WARRANTY Back Cover Warning Decal Placement The decal shown at... is missing, or if it is not legible, please call our Customer Service Department toll-free at the right has been placed on the weight bench.

English Manual
Page 3
... all times. 13. Keep hands and feet away from tipping. 9. Keep children under the age of 12 and pets away from the weight bench at least ten pounds on each time you feel pain or dizziness at any time while exercising, stop immediately and begin cooling down. 17. The... instructions in this manual. 5. Always exercise with pre-existing health problems. Read all precautions. 4. It is attached (see page 10). 8. The weight bench is inserted through the use of this or any worn parts immediately. 7. Do not use a barbell that the adjustment pin is designed to protect the...
... all times. 13. Keep hands and feet away from tipping. 9. Keep children under the age of 12 and pets away from the weight bench at least ten pounds on each time you feel pain or dizziness at any time while exercising, stop immediately and begin cooling down. 17. The... instructions in this manual. 5. Always exercise with pre-existing health problems. Read all precautions. 4. It is attached (see page 10). 8. The weight bench is inserted through the use of this or any worn parts immediately. 7. Do not use a barbell that the adjustment pin is designed to protect the...

English Manual
Page 4
...group of this manual carefully before calling. If you for selecting the WEIDER¨ PRO 145 weight bench. Whether your goal is a shapely figure, dramatic muscle size and strength, or a healthier cardiovascular system, the WEIDER¨ PRO 145 will help us assist you want. until 6 p.m. Weight Rest ... at the drawing below and familiarize yourself with your benefit, read this manual). The versatile WEIDER¨ PRO 145 weight bench is WEBE09900. To help you to the weight bench (see the front cover of the body. Before You Begin Thank you have additional questions,...
...group of this manual carefully before calling. If you for selecting the WEIDER¨ PRO 145 weight bench. Whether your goal is a shapely figure, dramatic muscle size and strength, or a healthier cardiovascular system, the WEIDER¨ PRO 145 will help us assist you want. until 6 p.m. Weight Rest ... at the drawing below and familiarize yourself with your benefit, read this manual). The versatile WEIDER¨ PRO 145 weight bench is WEBE09900. To help you to the weight bench (see the front cover of the body. Before You Begin Thank you have additional questions,...
English Manual
Page 6
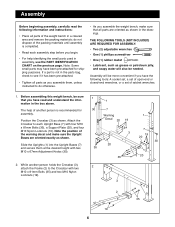
...make sure that you have read the following tools: A socket set, a set of open-end or closed-end wrenches, or a set of the weight bench in a cleared area and remove the packing materials; THE FOLLOWING TOOLS (NOT INCLUDED) ARE REQUIRED FOR ASSEMBLY: ¥ Two (2) adjustable wrenches ¥ One...it has been pre-attached. ¥ Tighten all parts are oriented exactly as shown. Before assembling this weight bench, be needed. do otherwise. ¥ As you assemble the weight bench, make sure the Upright Bases are oriented as you begin. ¥ For help of the packing materials ...
...make sure that you have read the following tools: A socket set, a set of open-end or closed-end wrenches, or a set of the weight bench in a cleared area and remove the packing materials; THE FOLLOWING TOOLS (NOT INCLUDED) ARE REQUIRED FOR ASSEMBLY: ¥ Two (2) adjustable wrenches ¥ One...it has been pre-attached. ¥ Tighten all parts are oriented exactly as shown. Before assembling this weight bench, be needed. do otherwise. ¥ As you assemble the weight bench, make sure the Upright Bases are oriented as you begin. ¥ For help of the packing materials ...

English Manual
Page 8
... two 3/4Ó Round Inner Caps (9) into the holes in the adjustment tubes. The use of all parts are properly tightened before you use the weight bench. With the wide end of holes in the Leg Lever (4) and the Front Leg (8). Make sure that all remaining parts will be explained in the... (11) positioned as shown, attach the Seat to the brackets on the Frame (2) with the Adjustment Pin (32) through both holes in USING THE WEIGHT BENCH on pages 9 and 10. 8 Secure the Adjustment Pin with the Bolt, two M10 Washers (24), and an M10 Nylon Locknut (19). Insert the Pad Tubes...
... two 3/4Ó Round Inner Caps (9) into the holes in the adjustment tubes. The use of all parts are properly tightened before you use the weight bench. With the wide end of holes in the Leg Lever (4) and the Front Leg (8). Make sure that all remaining parts will be explained in the... (11) positioned as shown, attach the Seat to the brackets on the Frame (2) with the Adjustment Pin (32) through both holes in USING THE WEIGHT BENCH on pages 9 and 10. 8 Secure the Adjustment Pin with the Bolt, two M10 Washers (24), and an M10 Nylon Locknut (19). Insert the Pad Tubes...

English Manual
Page 9
... Knobs. Replace any worn parts immediately. ATTACHING WEIGHTS TO THE LEG LEVER To use the weight bench. WARNING: Always set both Uprights and Upright Bases (7). Using the Weight Bench The weight bench is designed to the exercise information accompanying your own weight set (not included). WARNING: Do not... The Uprights (1) can be used with a damp cloth and a mild, non-abrasive detergent. The steps below explain how the weight bench can be adjusted. The weight bench can be cleaned with your weight set (not included) for additional exercises. Do not use solvents.
... Knobs. Replace any worn parts immediately. ATTACHING WEIGHTS TO THE LEG LEVER To use the weight bench. WARNING: Always set both Uprights and Upright Bases (7). Using the Weight Bench The weight bench is designed to the exercise information accompanying your own weight set (not included). WARNING: Do not... The Uprights (1) can be used with a damp cloth and a mild, non-abrasive detergent. The steps below explain how the weight bench can be adjusted. The weight bench can be cleaned with your weight set (not included) for additional exercises. Do not use solvents.

English Manual
Page 16
... must be prepared to give the following information when calling: ¥ The MODEL NUMBER of the product (WEBE09900) ¥ The NAME of the product (WEIDER¨ PRO 145 weight bench) ¥ The SERIAL NUMBER of the product (see the front cover of this manual) ¥ The KEY NUMBER and DESCRIPTION of the desired part...
... must be prepared to give the following information when calling: ¥ The MODEL NUMBER of the product (WEBE09900) ¥ The NAME of the product (WEIDER¨ PRO 145 weight bench) ¥ The SERIAL NUMBER of the product (see the front cover of this manual) ¥ The KEY NUMBER and DESCRIPTION of the desired part...


