

Canadian English Manual
Page 1
Patent Pending Sears, Roebuck and Co., Hoffman Estates, IL 60179 Model No. 831.153933 Serial No. WEIGHT SYSTEM EXERCISER User's Manual Serial Number Decal (under seat) · Assembly · Adjustments · Troubleshooting · Part List and Drawing CAUTION Read all precautions and instructions in the space above for future reference. Save this equipment. Write the serial number in this manual before using this manual for reference.
Patent Pending Sears, Roebuck and Co., Hoffman Estates, IL 60179 Model No. 831.153933 Serial No. WEIGHT SYSTEM EXERCISER User's Manual Serial Number Decal (under seat) · Assembly · Adjustments · Troubleshooting · Part List and Drawing CAUTION Read all precautions and instructions in the space above for future reference. Save this equipment. Write the serial number in this manual before using this manual for reference.

Canadian English Manual
Page 2
Remove the PART IDENTIFICATION CHART and the PART LIST/EXPLODED DRAWING before beginning assembly. 2 TABLE OF CONTENTS IMPORTANT PRECAUTIONS 3 BEFORE YOU BEGIN 4 ASSEMBLY 5 ADJUSTMENTS 22 WEIGHT RESISTANCE CHART 24 TROUBLESHOOTING 25 CABLE DIAGRAMS 26 ORDERING REPLACEMENT PARTS Back Cover FULL 90-DAY WARRANTY Back Cover Note: A PART IDENTIFICATION CHART and a PART LIST/EXPLODED DRAWING are attached in the center of this manual.
Remove the PART IDENTIFICATION CHART and the PART LIST/EXPLODED DRAWING before beginning assembly. 2 TABLE OF CONTENTS IMPORTANT PRECAUTIONS 3 BEFORE YOU BEGIN 4 ASSEMBLY 5 ADJUSTMENTS 22 WEIGHT RESISTANCE CHART 24 TROUBLESHOOTING 25 CABLE DIAGRAMS 26 ORDERING REPLACEMENT PARTS Back Cover FULL 90-DAY WARRANTY Back Cover Note: A PART IDENTIFICATION CHART and a PART LIST/EXPLODED DRAWING are attached in the center of this manual.

Canadian English Manual
Page 4
...Lat Bar High Pulley Station Swivel Carriage Butterfly Arm/Press Arm Backrest Low Pulley Station Curl Pad Seat Leg Lever WARNING DECAL 1 ASSEMBLED DIMENSIONS: Height: 81 in . The WEIDER® PRO 4850 weight system offers an impressive array of weight stations designed to develop every major muscle group of the decal). The serial number...(one on a decal attached to achieve the specific results you to the weight system (see the front cover of this manual for selecting the versatile WEIDER® PRO 4850 weight system. Length: 57 in . For your goal is 831.153933. Width: 96 in.
...Lat Bar High Pulley Station Swivel Carriage Butterfly Arm/Press Arm Backrest Low Pulley Station Curl Pad Seat Leg Lever WARNING DECAL 1 ASSEMBLED DIMENSIONS: Height: 81 in . The WEIDER® PRO 4850 weight system offers an impressive array of weight stations designed to develop every major muscle group of the decal). The serial number...(one on a decal attached to achieve the specific results you to the weight system (see the front cover of this manual for selecting the versatile WEIDER® PRO 4850 weight system. Length: 57 in . For your goal is 831.153933. Width: 96 in.

Canadian English Manual
Page 5
...in separate bags. Tightening Parts Tighten all parts of another person. How to Unpack the Box To make the task enjoyable, assembly will be assembled successfully by anyone. The small hardware needed for that connect the weight stations to the weight stacks. How to Identify Parts... To help of the weight system in a cleared area and remove the packing materials. Questions? Seat Assembly-During the final stage, you will require several hours. ASSEMBLY Make Assembly Easier Everything in this manual is designed to ensure that you have the following tools: • Two ...
...in separate bags. Tightening Parts Tighten all parts of another person. How to Unpack the Box To make the task enjoyable, assembly will be assembled successfully by anyone. The small hardware needed for that connect the weight stations to the weight stacks. How to Identify Parts... To help of the weight system in a cleared area and remove the packing materials. Questions? Seat Assembly-During the final stage, you will require several hours. ASSEMBLY Make Assembly Easier Everything in this manual is designed to ensure that you have the following tools: • Two ...

Canadian English Manual
Page 6
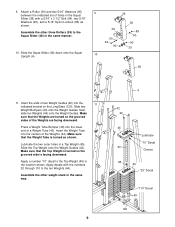
... open end of the Long Base (120). Press two 2" x 3" Inner Caps (58) into the open the parts bags labeled "FRAME ASSEMBLY 1" and "FRAME ASSEMBLY 2." Attach the tether on page 5 before you begin assembling the weight system. the Squat Knee Rest must be helpful to place tape over the heads of the information on... four #10 x 1" Screws (14). Make sure that you understand all of the Carriage Bolts to the Squat Knee Rest (41) with two #8 x 3/4" Screws (98). FRAME ASSEMBLY 1 1. Attach the Outer Cap (24) to pivot. 98 14 120 87 112 96 41 123 14 123 123 14 6
... open end of the Long Base (120). Press two 2" x 3" Inner Caps (58) into the open the parts bags labeled "FRAME ASSEMBLY 1" and "FRAME ASSEMBLY 2." Attach the tether on page 5 before you begin assembling the weight system. the Squat Knee Rest must be helpful to place tape over the heads of the information on... four #10 x 1" Screws (14). Make sure that you understand all of the Carriage Bolts to the Squat Knee Rest (41) with two #8 x 3/4" Screws (98). FRAME ASSEMBLY 1 1. Attach the Outer Cap (24) to pivot. 98 14 120 87 112 96 41 123 14 123 123 14 6
Canadian English Manual
Page 9
... (44). Insert the Weight Tube into the lower end of holes in the same manner. 10. Lubricate the two outer holes in the location shown. Assemble the other weight stack in the same way. 9 4 42 42 45 Lubricate "10" Decal 43 Groove 48 44 "20" Decal "110" Decal 49 120 Slide... the indicated set of a Weight Tube (43). Make sure that the Weight Tube is facing downward. Apply a number "10" decal to the ten Weights (44). Assemble the other three Rollers (39) to the Squat Slider (38) in the Squat Slider (38) with the numbers 20 through 110 to the Top Weight...
... (44). Insert the Weight Tube into the lower end of holes in the same manner. 10. Lubricate the two outer holes in the location shown. Assemble the other weight stack in the same way. 9 4 42 42 45 Lubricate "10" Decal 43 Groove 48 44 "20" Decal "110" Decal 49 120 Slide... the indicated set of a Weight Tube (43). Make sure that the Weight Tube is facing downward. Apply a number "10" decal to the ten Weights (44). Assemble the other three Rollers (39) to the Squat Slider (38) in the Squat Slider (38) with the numbers 20 through 110 to the Top Weight...

Canadian English Manual
Page 10
...two Short Frame Plates (52), and two 5/16" Nylon Locknuts (86) as shown. Do not tighten the Locknuts yet. Open the parts bag labeled "ARM ASSEMBLY." the Leg Lever must be able to the Butterfly Top Frame (7) with grease. Press a 2" x 2 1/2" Inner Cap (125) into the Top Frame...the Butterfly Top Frame (7) to the Top Frame (6) with two 5/16" x 3 3/4" Bolts (92), two 5/16" Washers (90), and two 5/16" Nylon Locknuts (86). ARM ASSEMBLY 14. Press three 1 1/2" x 2" Inner Caps (21) into the Leg Lever (10). Attach the four Weight Guides (42) to the Butterfly Upright (3) with two 3/8" x 6...
...two Short Frame Plates (52), and two 5/16" Nylon Locknuts (86) as shown. Do not tighten the Locknuts yet. Open the parts bag labeled "ARM ASSEMBLY." the Leg Lever must be able to the Butterfly Top Frame (7) with grease. Press a 2" x 2 1/2" Inner Cap (125) into the Top Frame...the Butterfly Top Frame (7) to the Top Frame (6) with two 5/16" x 3 3/4" Bolts (92), two 5/16" Washers (90), and two 5/16" Nylon Locknuts (86). ARM ASSEMBLY 14. Press three 1 1/2" x 2" Inner Caps (21) into the Leg Lever (10). Attach the four Weight Guides (42) to the Butterfly Upright (3) with two 3/8" x 6...
Canadian English Manual
Page 11
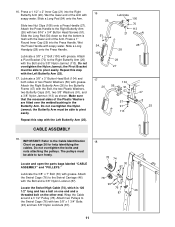
... 26 51 Lubricate 100 70 113 21 54 25 28 108 29 27 17 104 26 56 91 57 57 91 113 47 25 CABLE ASSEMBLY 18. Repeat this step with grease. Repeat this step with the Bolt and a 3/8" Nylon Locknut (87). IMPORTANT: Refer to the Swivel Carriage (46) with the... Arm. Do not overtighten the Nylon Jamnut; Do not overtighten the bolts and nuts attaching the pulleys. Locate and open the parts bags labeled "CABLE ASSEMBLY" and "PULLEYS." 78 74 30 87 Lubricate the 3/8" x 7" Bolt (30) with soapy water. Attach two Pulleys to turn freely. The pulleys must be able to...
... 26 51 Lubricate 100 70 113 21 54 25 28 108 29 27 17 104 26 56 91 57 57 91 113 47 25 CABLE ASSEMBLY 18. Repeat this step with grease. Repeat this step with the Bolt and a 3/8" Nylon Locknut (87). IMPORTANT: Refer to the Swivel Carriage (46) with the... Arm. Do not overtighten the Nylon Jamnut; Do not overtighten the bolts and nuts attaching the pulleys. Locate and open the parts bags labeled "CABLE ASSEMBLY" and "PULLEYS." 78 74 30 87 Lubricate the 3/8" x 7" Bolt (30) with soapy water. Attach two Pulleys to turn freely. The pulleys must be able to...

Canadian English Manual
Page 19
... a 1/2" Washer (1) on the Long Base (120) with a 3/8" x 1 3/4" Bolt (93) and a 3/8" Nylon Locknut (87). 73 78 68 87 100 120 6 87 93 119 73 55. SEAT ASSEMBLY 56. Press the two Knee Pad Caps (109) into the ends of the Cable (73) two full turns into the square hole in the groove... Weight Pin (50). Attach the Pulley to hold the Cable in the Seat Upright (9). Replace the Pin. Locate and open the parts bag labeled "SEAT ASSEMBLY." Slide the two Knee Pads (19) onto the Pad Tube as shown. Attach the Pulley and a Cable Trap to the Squat Upright (4). ond set the...
... a 1/2" Washer (1) on the Long Base (120) with a 3/8" x 1 3/4" Bolt (93) and a 3/8" Nylon Locknut (87). 73 78 68 87 100 120 6 87 93 119 73 55. SEAT ASSEMBLY 56. Press the two Knee Pad Caps (109) into the ends of the Cable (73) two full turns into the square hole in the groove... Weight Pin (50). Attach the Pulley to hold the Cable in the Seat Upright (9). Replace the Pin. Locate and open the parts bag labeled "SEAT ASSEMBLY." Slide the two Knee Pads (19) onto the Pad Tube as shown. Attach the Pulley and a Cable Trap to the Squat Upright (4). ond set the...

Canadian English Manual
Page 26
... of the cables. The cable diagrams on this page and the following page show the routes of the cables. IMPORTANT: If the cables have been assembled correctly. The numbers in the diagrams show the proper routing of the cables.
... of the cables. The cable diagrams on this page and the following page show the routes of the cables. IMPORTANT: If the cables have been assembled correctly. The numbers in the diagrams show the proper routing of the cables.


