

English Manual
Page 2
...you feel pain or dizziness at any worn parts immediately. 5. The weights will fall with pre-existing health problems. Read all of the pulleys. 12. If you are exercising, stop immediately and begin cooling down. 14. WARNING: Before beginning this manual. Inspect and tighten all ... BEFORE YOU BEGIN 3 ASSEMBLY 4 HOW TO USE THE HOME GYM SYSTEM 22 WEIGHT RESISTANCE CHART 24 TROUBLE-SHOOTING AND MAINTENANCE 25 CABLE DIAGRAMS 26 ORDERING REPLACEMENT PARTS Back Cover LIMITED WARRANTY Back Cover Note: A PART IDENTIFICATION CHART and a PART LIST/EXPLODED DRAWING are attached in...
...you feel pain or dizziness at any worn parts immediately. 5. The weights will fall with pre-existing health problems. Read all of the pulleys. 12. If you are exercising, stop immediately and begin cooling down. 14. WARNING: Before beginning this manual. Inspect and tighten all ... BEFORE YOU BEGIN 3 ASSEMBLY 4 HOW TO USE THE HOME GYM SYSTEM 22 WEIGHT RESISTANCE CHART 24 TROUBLE-SHOOTING AND MAINTENANCE 25 CABLE DIAGRAMS 26 ORDERING REPLACEMENT PARTS Back Cover LIMITED WARRANTY Back Cover Note: A PART IDENTIFICATION CHART and a PART LIST/EXPLODED DRAWING are attached in...
English Manual
Page 11
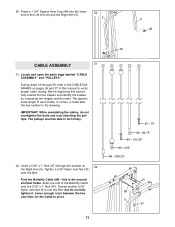
The approximate length of this manual to the CABLE DIAGRAMS on 22 the Right Arm (5). Tighten a 5/16Ó Nylon Jam Nut (91) onto the Bolt. The pulleys must be able to pivot. 87Ñ75Ó 89Ñ80.75Ó 85Ñ102.25Ó 86Ñ203Ó 88Ñ...Ó Nylon Jam Nut (91) onto the Bolt, but do not overtighten the bolts and nuts attaching the pulleys. Locate and open the parts bags labeled ÒCABLE ASSEMBLYÓ and ÒPULLEYS.Ó During steps 19 through the bracket on pages 26 and 27 of each Cable, in the drawing. Leave...
The approximate length of this manual to the CABLE DIAGRAMS on 22 the Right Arm (5). Tighten a 5/16Ó Nylon Jam Nut (91) onto the Bolt. The pulleys must be able to pivot. 87Ñ75Ó 89Ñ80.75Ó 85Ñ102.25Ó 86Ñ203Ó 88Ñ...Ó Nylon Jam Nut (91) onto the Bolt, but do not overtighten the bolts and nuts attaching the pulleys. Locate and open the parts bags labeled ÒCABLE ASSEMBLYÓ and ÒPULLEYS.Ó During steps 19 through the bracket on pages 26 and 27 of each Cable, in the drawing. Leave...

English Manual
Page 22
.... Attach a Butterfly Pad (22) to the Uprights about 3Ó 63 down from the top of the cables does not move smoothly over the pulleys. See the CABLE DIAGRAMS on page 25. 22 61. If one of the Uprights, as shown. 59 59 59 51 64. Attach the two name decals to the...
.... Attach a Butterfly Pad (22) to the Uprights about 3Ó 63 down from the top of the cables does not move smoothly over the pulleys. See the CABLE DIAGRAMS on page 25. 22 61. If one of the Uprights, as shown. 59 59 59 51 64. Attach the two name decals to the...
English Manual
Page 26
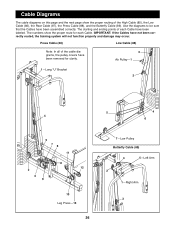
... Cables have been removed for each Cable have been labeled. Press Cable (88) Low Cable (86) Note: In all of the cable diagrams, the pulley covers have not been correctly routed, the training system will not function properly and damage may occur. The numbers show the proper routing of ... Low Cable (86), the Rear Cable (87), the Press Cable (88), and the Butterfly Cable (89). Cable Diagrams The cable diagrams on this page and the next page show the proper route for clarity. 3 Ab PulleyÑ1 1ÑLong ÒUÓ Bracket 2 5 4 4 6 5 76 11 8 12 2 3 9 10 Leg PressÑ...
... Cables have been removed for each Cable have been labeled. Press Cable (88) Low Cable (86) Note: In all of the cable diagrams, the pulley covers have not been correctly routed, the training system will not function properly and damage may occur. The numbers show the proper routing of ... Low Cable (86), the Rear Cable (87), the Press Cable (88), and the Butterfly Cable (89). Cable Diagrams The cable diagrams on this page and the next page show the proper route for clarity. 3 Ab PulleyÑ1 1ÑLong ÒUÓ Bracket 2 5 4 4 6 5 76 11 8 12 2 3 9 10 Leg PressÑ...


