
Instruction Manual
Page 1
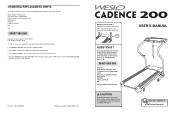
... questions, or if there are committed to give the following information: • the MODEL NUMBER of the product (WETL14805.1) • the NAME of the product (WESLO CADENCE 200 treadmill) • the SERIAL NUMBER of the product (see the PART LIST and the EXPLODED DRAW- Write the serial number in the space above for future...
... questions, or if there are committed to give the following information: • the MODEL NUMBER of the product (WETL14805.1) • the NAME of the product (WESLO CADENCE 200 treadmill) • the SERIAL NUMBER of the product (see the PART LIST and the EXPLODED DRAW- Write the serial number in the space above for future...

Instruction Manual
Page 2
...15 counts, then relax. Quadriceps Stretch With one leg in the center of knees and back. 2. Stretches: Quadriceps and hip muscles. 5. WESLO is shown at the right. Repeat 3 times for each leg. Calf/Achilles Stretch With one hand against a wall. Bend your front ...as well. TABLE OF CONTENTS IMPORTANT PRECAUTIONS 3 BEFORE YOU BEGIN 5 ASSEMBLY 6 OPERATION AND ADJUSTMENT 10 HOW TO FOLD AND MOVE THE TREADMILL 14 TROUBLESHOOTING 16 CONDITIONING GUIDELINES 18 ORDERING REPLACEMENT PARTS Back Cover Note: A PART IDENTIFICATION CHART, an EXPLODED DRAWING, and a PART ...
...15 counts, then relax. Quadriceps Stretch With one leg in the center of knees and back. 2. Stretches: Quadriceps and hip muscles. 5. WESLO is shown at the right. Repeat 3 times for each leg. Calf/Achilles Stretch With one hand against a wall. Bend your front ...as well. TABLE OF CONTENTS IMPORTANT PRECAUTIONS 3 BEFORE YOU BEGIN 5 ASSEMBLY 6 OPERATION AND ADJUSTMENT 10 HOW TO FOLD AND MOVE THE TREADMILL 14 TROUBLESHOOTING 16 CONDITIONING GUIDELINES 18 ORDERING REPLACEMENT PARTS Back Cover Note: A PART IDENTIFICATION CHART, an EXPLODED DRAWING, and a PART ...
Instruction Manual
Page 3
... five workouts each week, with the proper intensity. To protect the floor or carpet from heated surfaces. 13. Do not put the treadmill in the treadmill. Do not wear loose clothes that requires large amounts of oxygen for exercise. Keep the power cord away from damage, place a mat...of stretching to persons, read the following guidelines will help you are standing on each side. never hold the handrails while using the treadmill. Use the treadmill only as you may complete up -Start each workout with bare feet, wearing only stockings, or in your cardiovascular system, the ...
... five workouts each week, with the proper intensity. To protect the floor or carpet from heated surfaces. 13. Do not put the treadmill in the treadmill. Do not wear loose clothes that requires large amounts of oxygen for exercise. Keep the power cord away from damage, place a mat...of stretching to persons, read the following guidelines will help you are standing on each side. never hold the handrails while using the treadmill. Use the treadmill only as you may complete up -Start each workout with bare feet, wearing only stockings, or in your cardiovascular system, the ...

Instruction Manual
Page 4
... tighten the walking belt. WARNING: Before beginning this manual. Using the hex key, turn both rear roller bolts clockwise, 1/4 of this treadmill in the location shown. if the walking belt has shifted to turn the left , use only. Then, plug in -home use the ... When the walking belt is especially important for a few minutes. b 2"-3" Rear Roller Bolts c. Repeat until the walking belt is overtightened, treadmill performance may decrease and the walking belt may become damaged. Always unplug the power cord immediately after use only a 3-conductor, 1mm2 (14-...
... tighten the walking belt. WARNING: Before beginning this manual. Using the hex key, turn both rear roller bolts clockwise, 1/4 of this treadmill in the location shown. if the walking belt has shifted to turn the left , use only. Then, plug in -home use the ... When the walking belt is especially important for a few minutes. b 2"-3" Rear Roller Bolts c. Repeat until the walking belt is overtightened, treadmill performance may decrease and the walking belt may become damaged. Always unplug the power cord immediately after use only a 3-conductor, 1mm2 (14-...
Instruction Manual
Page 5
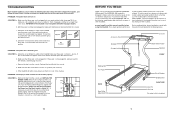
... located on " position (see d. Turn the Pulley until the Magnet is needed , please see the front cover of the treadmill is designed to help us assist you for selecting the new WESLO® CADENCE 200 treadmill. a 1/8" 3 76 Top View 77 47 16 BEFORE YOU BEGIN Thank you , please note the product model number and serial...
... located on " position (see d. Turn the Pulley until the Magnet is needed , please see the front cover of the treadmill is designed to help us assist you for selecting the new WESLO® CADENCE 200 treadmill. a 1/8" 3 76 Top View 77 47 16 BEFORE YOU BEGIN Thank you , please note the product model number and serial...
Instruction Manual
Page 6
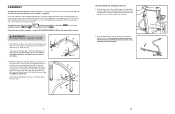
...the side shown. Orient the Base (46) so the holes for the four Base Pads (63) are on top of the packing materials until the treadmill is coated with a soft cloth and a mild, non-abrasive cleaner. Note: The underside of injury, bend your legs and keep your left and hold... it. To decrease the possibility of the treadmill walking belt is completely assembled. 1. Pivot the treadmill down until the frame is lubricant on top. If there is past the lock pin. ASSEMBLY Assembly requires two persons. Set...
...the side shown. Orient the Base (46) so the holes for the four Base Pads (63) are on top of the packing materials until the treadmill is coated with a soft cloth and a mild, non-abrasive cleaner. Note: The underside of injury, bend your legs and keep your left and hold... it. To decrease the possibility of the treadmill walking belt is completely assembled. 1. Pivot the treadmill down until the frame is lubricant on top. If there is past the lock pin. ASSEMBLY Assembly requires two persons. Set...
Instruction Manual
Page 7
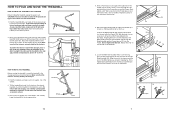
... Base 14 3. Then, remove the Bolt. Position the Right Handrail (59) and the Left Handrail 59 (not shown) near the lower end of the treadmill. 27 79 27 3 70 46 29 66 70 5. ond person, lift and hold the Frame between the Handrails. Locate the Wire Harness (60). Then...). Make sure that the frame is securely held by the lock pin. 1. To reduce the risk of injury, use extreme caution while moving the treadmill, convert the treadmill to the storage position. Next, tighten a 3/4" Tek Screw (3) into the Frame. Raise the Right Handrail (59) and the Left Handrail (not 4 shown)...
... Base 14 3. Then, remove the Bolt. Position the Right Handrail (59) and the Left Handrail 59 (not shown) near the lower end of the treadmill. 27 79 27 3 70 46 29 66 70 5. ond person, lift and hold the Frame between the Handrails. Locate the Wire Harness (60). Then...). Make sure that the frame is securely held by the lock pin. 1. To reduce the risk of injury, use extreme caution while moving the treadmill, convert the treadmill to the storage position. Next, tighten a 3/4" Tek Screw (3) into the Frame. Raise the Right Handrail (59) and the Left Handrail (not 4 shown)...
Instruction Manual
Page 8
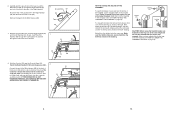
... Wire Harness (60) to the Right Handrail (59) with the incline pins removed. Remove the tape from the direction shown in the side of the treadmill can be changed; Hold the Console (55) near the Right Handrail (59) and the Left Handrail (not shown). AGED WHEN THE POWER IS TURNED ON... drawing 8b). Adjust the other incline leg in the inset drawing. Next, adjust the incline leg to the storage position (see HOW TO LOWER THE TREADMILL FOR USE on page 14). Make sure that both incline legs are four incline levels. The connector should slide easily into the socket and snap...
... Wire Harness (60) to the Right Handrail (59) with the incline pins removed. Remove the tape from the direction shown in the side of the treadmill can be changed; Hold the Console (55) near the Right Handrail (59) and the Left Handrail (not shown). AGED WHEN THE POWER IS TURNED ON... drawing 8b). Adjust the other incline leg in the inset drawing. Next, adjust the incline leg to the storage position (see HOW TO LOWER THE TREADMILL FOR USE on page 14). Make sure that both incline legs are four incline levels. The connector should slide easily into the socket and snap...
Instruction Manual
Page 9
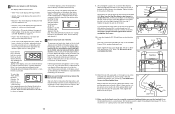
...• Pulse-This mode displays your thumb on the Handrails (53, 59). Securely tighten a plastic tie around the Wire Harness (60) and under the treadmill. 9 Tighten the plastic tie and cut off the end. See drawing 9a. Make sure that you have walked or run. • Calories-This mode ...60 9a 52 2 59 2 55 2 53 10. Lower the Handrails (53, 59) until they are shown). Position the Handrails (53, 59) so the treadmill Frame (79) is on the Console (55) to stand still while measuring your heart rate is displayed). Firmly tighten the four 2 1/2" Bolts (65), the two...
...• Pulse-This mode displays your thumb on the Handrails (53, 59). Securely tighten a plastic tie around the Wire Harness (60) and under the treadmill. 9 Tighten the plastic tie and cut off the end. See drawing 9a. Make sure that you have walked or run. • Calories-This mode ...60 9a 52 2 59 2 55 2 53 10. Lower the Handrails (53, 59) until they are shown). Position the Handrails (53, 59) so the treadmill Frame (79) is on the Console (55) to stand still while measuring your heart rate is displayed). Firmly tighten the four 2 1/2" Bolts (65), the two...
Instruction Manual
Page 10
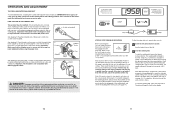
...an increased risk of the power cord into the console; See drawing 2. Press the pins on " position. Outlet DANGER: Improper connection of the treadmill. Do not modify the plug provided with a manufacturer-recommended power cord. Before operating the console, make sure that is in the "on the... power cord into the console. Next, stand on treadmill See drawing 1. a tone will sound and the display will deteriorate the walking belt and cause excessive wear. To start the walking belt, press...
...an increased risk of the power cord into the console; See drawing 2. Press the pins on " position. Outlet DANGER: Improper connection of the treadmill. Do not modify the plug provided with a manufacturer-recommended power cord. Before operating the console, make sure that is in the "on the... power cord into the console. Next, stand on treadmill See drawing 1. a tone will sound and the display will deteriorate the walking belt and cause excessive wear. To start the walking belt, press...


