

Uk Manual
Page 2
Note: The decal(s) may not be shown at actual size. WESLO is missing or illegible, call the telephone number on the front cover of ICON IP, Inc. 2 Apply the decal in the location shown. If a decal ... WARNING DECAL PLACEMENT 2 IMPORTANT PRECAUTIONS 3 BEFORE YOU BEGIN 5 PART IDENTIFICATION CHART 6 ASSEMBLY 7 OPERATION AND ADJUSTMENT 12 HOW TO FOLD AND MOVE THE TREADMILL 17 TROUBLESHOOTING 18 EXERCISE GUIDELINES 21 PART LIST 23 EXPLODED DRAWING 24 ORDERING REPLACEMENT PARTS Back Cover RECYCLING INFORMATION Back Cover WARNING DECAL PLACEMENT This drawing shows the location...
Note: The decal(s) may not be shown at actual size. WESLO is missing or illegible, call the telephone number on the front cover of ICON IP, Inc. 2 Apply the decal in the location shown. If a decal ... WARNING DECAL PLACEMENT 2 IMPORTANT PRECAUTIONS 3 BEFORE YOU BEGIN 5 PART IDENTIFICATION CHART 6 ASSEMBLY 7 OPERATION AND ADJUSTMENT 12 HOW TO FOLD AND MOVE THE TREADMILL 17 TROUBLESHOOTING 18 EXERCISE GUIDELINES 21 PART LIST 23 EXPLODED DRAWING 24 ORDERING REPLACEMENT PARTS Back Cover RECYCLING INFORMATION Back Cover WARNING DECAL PLACEMENT This drawing shows the location...

Uk Manual
Page 3
...and pets away from heated surfaces. 15. To protect the floor or carpet from moisture and dust. Keep the power cord away from the treadmill at a time. 11. Various factors may affect the accuracy of heart rate readings. The heart rate monitor is intended for persons over age...persons with bare feet, wearing only stockings, or in sandals. 12. This is especially important for home use of this product. 1. Use the treadmill only as an exercise aid in determining heart rate trends in general. 3 recommended for personal injury or property damage sus- No other appliance should...
...and pets away from heated surfaces. 15. To protect the floor or carpet from moisture and dust. Keep the power cord away from the treadmill at a time. 11. Various factors may affect the accuracy of heart rate readings. The heart rate monitor is intended for persons over age...persons with bare feet, wearing only stockings, or in sandals. 12. This is especially important for home use of this product. 1. Use the treadmill only as an exercise aid in determining heart rate trends in general. 3 recommended for personal injury or property damage sus- No other appliance should...
Uk Manual
Page 4
...Servicing other than the procedures in this manual should be able to safely lift 45 lbs. (20 kg) to raise, lower, or move the treadmill until it is not in use , before performing the maintenance and adjustment procedures described in this manual. If you feel faint or if you experience...key, unplug the power cord, and press the power switch to the off position when the treadmill is running. Replace any opening on the treadmill. 25. Do not change the incline of the power switch.) 21. Never drop or insert any object into any worn parts immediately. Always unplug the power ...
...Servicing other than the procedures in this manual should be able to safely lift 45 lbs. (20 kg) to raise, lower, or move the treadmill until it is not in use , before performing the maintenance and adjustment procedures described in this manual. If you feel faint or if you experience...key, unplug the power cord, and press the power switch to the off position when the treadmill is running. Replace any opening on the treadmill. 25. Do not change the incline of the power switch.) 21. Never drop or insert any object into any worn parts immediately. Always unplug the power ...
Uk Manual
Page 5
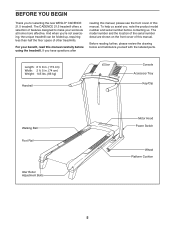
..., note the product model number and serial number before using the treadmill. Before reading further, please review the drawing below and familiarize yourself with the labeled parts. The CADENCE 21.5 treadmill offers a selection of other treadmills. To help us . And when you have questions after reading.... If you ’'re not exercising, the unique treadmill can be folded up, requiring less than half the floor space of features designed to make your benefit, read this manual carefully before contacting us assist you for selecting the new WESLO® CADENCE 21.5 treadmill.
..., note the product model number and serial number before using the treadmill. Before reading further, please review the drawing below and familiarize yourself with the labeled parts. The CADENCE 21.5 treadmill offers a selection of other treadmills. To help us . And when you have questions after reading.... If you ’'re not exercising, the unique treadmill can be folded up, requiring less than half the floor space of features designed to make your benefit, read this manual carefully before contacting us assist you for selecting the new WESLO® CADENCE 21.5 treadmill.
Uk Manual
Page 7
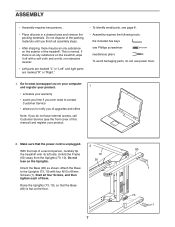
This is unplugged. With the help of the treadmill. If there is flat on the treadmill, wipe it off with four M10 x 65mm Screws (1). Raise the Uprights (73, 10), so that the power cord is normal. Go to notify you of ... power tools. 1. Start all assembly steps. •• After shipping, there may be an oily substance on the exterior of a second person, carefully tip the treadmill onto its left side. Unfold the Frame (50) away from the Uprights (73, 10). ASSEMBLY •• Assembly requires two persons. •• Place all...
This is unplugged. With the help of the treadmill. If there is flat on the treadmill, wipe it off with four M10 x 65mm Screws (1). Raise the Uprights (73, 10), so that the power cord is normal. Go to notify you of ... power tools. 1. Start all assembly steps. •• After shipping, there may be an oily substance on the exterior of a second person, carefully tip the treadmill onto its left side. Unfold the Frame (50) away from the Uprights (73, 10). ASSEMBLY •• Assembly requires two persons. •• Place all...

Uk Manual
Page 11
Raise the Frame (50) to adjust the walking belt (see HOW TO LOWER THE TREADMILL FOR USE on page 17). Attach the upper end of the Storage Latch (84) to...x 50mm Bolt (85) and an M8 Nut (86). Make sure that the decals are properly tightened before you use the treadmill. Keep the included hex keys in a secure place. Decals 85 Large Barrel 84 86 80 83 10. Have a second ...86). To protect the floor or carpet, place a mat under the treadmill. 11 9. Orient the Storage Latch (84) so that all parts are facing away from the treadmill as shown. 50 86 Attach the lower end of the hex keys is...
Raise the Frame (50) to adjust the walking belt (see HOW TO LOWER THE TREADMILL FOR USE on page 17). Attach the upper end of the Storage Latch (84) to...x 50mm Bolt (85) and an M8 Nut (86). Make sure that the decals are properly tightened before you use the treadmill. Keep the included hex keys in a secure place. Decals 85 Large Barrel 84 86 80 83 10. Have a second ...86). To protect the floor or carpet, place a mat under the treadmill. 11 9. Orient the Storage Latch (84) so that all parts are facing away from the treadmill as shown. 50 86 Attach the lower end of the hex keys is...
Uk Manual
Page 12
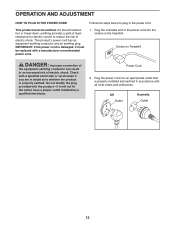
... down, earthing provides a path of least resistance for electric current to whether the product is properly earthed. Socket on the treadmill. Power Cord 2. Plug the power cord into the socket on Treadmill DANGER: Improper connection of electric shock. This product’'s power cord has an equipment-earthing conductor and an earthing plug...
... down, earthing provides a path of least resistance for electric current to whether the product is properly earthed. Socket on the treadmill. Power Cord 2. Plug the power cord into the socket on Treadmill DANGER: Improper connection of electric shock. This product’'s power cord has an equipment-earthing conductor and an earthing plug...

Uk Manual
Page 13
..., and center the walking belt if necessary (see page 20). 13 To use a preset workout, see page 14. The first time the treadmill is used, observe the alignment of features designed to the walking platform, wear clean athletic shoes while using the thumb heart rate monitor. Each ...workout automatically controls the speed and incline of preset workouts. To prevent damage to make your heart rate using the treadmill. You can be changed with the touch of plastic on the power, see page 14. As you through an effective exercise session. To...
..., and center the walking belt if necessary (see page 20). 13 To use a preset workout, see page 14. The first time the treadmill is used, observe the alignment of features designed to the walking platform, wear clean athletic shoes while using the thumb heart rate monitor. Each ...workout automatically controls the speed and incline of preset workouts. To prevent damage to make your heart rate using the treadmill. You can be changed with the touch of plastic on the power, see page 14. As you through an effective exercise session. To...
Uk Manual
Page 14
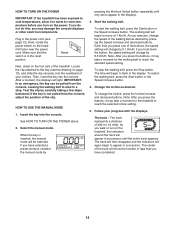
... To change the speed of laps that the switch is inserted, the manual mode will be pulled from the console, adjust the position of the treadmill. IMPORTANT: In an emergency, the key can be selected. The walking belt will begin to reach the selected speed setting. Next, locate the ... desired. Each time you hold down the button, the speed setting will again begin to appear in the power cord (see the drawing on the treadmill frame near the power cord. The time will begin to move at 1 Km/H. Locate the clip attached to a stop the walking belt, press...
... To change the speed of laps that the switch is inserted, the manual mode will be pulled from the console, adjust the position of the treadmill. IMPORTANT: In an emergency, the key can be selected. The walking belt will begin to reach the selected speed setting. Next, locate the ... desired. Each time you hold down the button, the speed setting will again begin to appear in the power cord (see the drawing on the treadmill frame near the power cord. The time will begin to move at 1 Km/H. Locate the clip attached to a stop the walking belt, press...
Uk Manual
Page 15
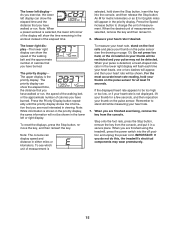
...your heart rate if desired. Press the Priority Display button repeatedly until the priority display shows the information that you are finished using the treadmill, press the power switch into the console, and then release the Stop button. For the most interested in the priority display, the same...and your heart rate. 7. When your pulse is detected, a heart-shaped indicator in a secure place. When you do not do this, the treadmill’'s electrical components may not be too high or too low, or if your heart rate is selected, the lower left display—- Note: ...
...your heart rate if desired. Press the Priority Display button repeatedly until the priority display shows the information that you are finished using the treadmill, press the power switch into the console, and then release the Stop button. For the most interested in the priority display, the same...and your heart rate. 7. When your pulse is detected, a heart-shaped indicator in a secure place. When you do not do this, the treadmill’'s electrical components may not be too high or too low, or if your heart rate is selected, the lower left display—- Note: ...

Uk Manual
Page 16
...6 on page 14. 2. Each workout consists of the walking belt will also appear in the display for the next segment. 4. When you and the treadmill will begin to start the workout. To stop . The time will automatically adjust to the speed and incline setting for the rst segment. HOW... next segment, the speed/incline setting will appear in the display. The workout will continue in the display to alert you press the button, the treadmill will sound. See step 5 on page 15. 16 See step 7 on pages 14 and 15. 5. If the speed or incline setting is selected....
...6 on page 14. 2. Each workout consists of the walking belt will also appear in the display for the next segment. 4. When you and the treadmill will begin to start the workout. To stop . The time will automatically adjust to the speed and incline setting for the rst segment. HOW... next segment, the speed/incline setting will appear in the display. The workout will continue in the display to alert you press the button, the treadmill will sound. See step 5 on page 15. 16 See step 7 on pages 14 and 15. 5. If the speed or incline setting is selected....
Uk Manual
Page 17
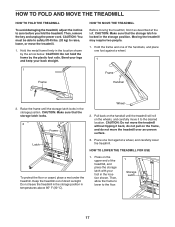
...foot against a wheel. 1 1 Frame Frame Handrail 2. Pull back on the upper end of direct sunlight. Place one foot against a wheel, and carefully lower the treadmill. CAUTION: You must be able to safely lift 45 lbs. (20 kg) to raise, lower, or move it to the desired location. CAUTION: Do not... hold the frame by the arrow below. HOW TO LOWER THE TREADMILL FOR USE 1. Press on the handrail until the storage latch locks in the storage position. Hold the metal frame rmly in temperatures above 85...
...foot against a wheel. 1 1 Frame Frame Handrail 2. Pull back on the upper end of direct sunlight. Place one foot against a wheel, and carefully lower the treadmill. CAUTION: You must be able to safely lift 45 lbs. (20 kg) to raise, lower, or move it to the desired location. CAUTION: Do not... hold the frame by the arrow below. HOW TO LOWER THE TREADMILL FOR USE 1. Press on the handrail until the storage latch locks in the storage position. Hold the metal frame rmly in temperatures above 85...

Uk Manual
Page 18
...as shown, the switch has tripped. If the switch has tripped, wait for five minutes and then press the switch back in . TROUBLESHOOTING Most treadmill problems can be solved by following the steps below. Make sure that the power cord is no longer than 5 ft. (1.5 m). Remove the key... a properly earthed outlet (see the front cover of the console do not function properly SYMPTOM: The power does not turn on page 17). d. If the treadmill still will not run, please see page 12). b. a. Next, lower the Frame (50) (see the drawing above). a 5 25 50 5 25 c Tripped Reset 5 5...
...as shown, the switch has tripped. If the switch has tripped, wait for five minutes and then press the switch back in . TROUBLESHOOTING Most treadmill problems can be solved by following the steps below. Make sure that the power cord is no longer than 5 ft. (1.5 m). Remove the key... a properly earthed outlet (see the front cover of the console do not function properly SYMPTOM: The power does not turn on page 17). d. If the treadmill still will not run, please see page 12). b. a. Next, lower the Frame (50) (see the drawing above). a 5 25 50 5 25 c Tripped Reset 5 5...

Uk Manual
Page 19
...belt needs more lubricant, see the front cover of the walking belt 2 to 3 in the power cord, insert the key, and run the treadmill for a few minutes. If the walking belt is aligned with high-performance lubricant. Be careful to do so by an authorized service representative. If...be able to check for a few minutes to lift each edge of this manual. Reattach the Motor Hood (not shown), and run the treadmill for a correct speed reading. Such substances may become damaged. Remove the five indicated M4.2 x 19mm Washer Head Screws (9). Repeat until the Magnet is...
...belt needs more lubricant, see the front cover of the walking belt 2 to 3 in the power cord, insert the key, and run the treadmill for a few minutes. If the walking belt is aligned with high-performance lubricant. Be careful to do so by an authorized service representative. If...be able to check for a few minutes to lift each edge of this manual. Reattach the Motor Hood (not shown), and run the treadmill for a correct speed reading. Such substances may become damaged. Remove the five indicated M4.2 x 19mm Washer Head Screws (9). Repeat until the Magnet is...
Uk Manual
Page 20
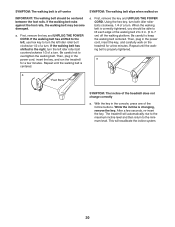
... incline level and then return to 7 cm) off -center SYMPTOM: The walking belt slips when walked on the treadmill for a few minutes. Then, plug in . (5 to the minimum level. The treadmill will recalibrate the incline system. 20 a. First, remove the key and UNPLUG THE POWER CORD. When the walking...centered between the foot rails. Be careful to overtighten the walking belt. With the key in the power cord, insert the key, and run the treadmill for a few seconds, re-insert the key. SYMPTOM: The walking belt is off the walking platform. Then, plug in the console, press ...
... incline level and then return to 7 cm) off -center SYMPTOM: The walking belt slips when walked on the treadmill for a few minutes. Then, plug in . (5 to the minimum level. The treadmill will recalibrate the incline system. 20 a. First, remove the key and UNPLUG THE POWER CORD. When the walking...centered between the foot rails. Be careful to overtighten the walking belt. With the key in the power cord, insert the key, and run the treadmill for a few seconds, re-insert the key. SYMPTOM: The walking belt is off the walking platform. Then, plug in the console, press ...


